Ombre manicure technique - what's the trick?
Ombre, gradient, degrade is the general name of one technique when the color palette smoothly transitions into one another. This manicure visually lengthens the nails, the border of the color transition is smoothly blurred.
Gradient manicure appeared in the early 80s of the 20th century; it was introduced into the world of fashion by the famous Hollywood actress Rihanna Daymond, when she appeared on the red carpet in an original dress and with a “vampire” manicure. This day can be considered the official date of birth of the ombre technique, which is already forty years old.
What kind of technology is there?
Today, there are officially more than a thousand varieties of gradient manicure and the number continues to grow steadily, because each of us can easily create our own design. There are three ways to create a gradient:
- using a manicure sponge;
- comb tassel;
- airbrush.
A manicure sponge is a simple foam rubber sponge, on which gel polishes are applied for transition and the nail is blotted with the sponge, creating a smooth transition between colors.
A special comb-shaped brush creates a gradient between contrasting colors: blue-red, black-red. The technique of manicure with a brush, like with an airbrush, requires a little experience and practice.
They create beautiful compositions with an airbrush, but the method is only suitable for professionals. Firstly, you need to have a tool, and secondly, be able to select the right varnishes, since the quality of the work depends on the density of the varnish and its composition.
What you need for an ombre manicure
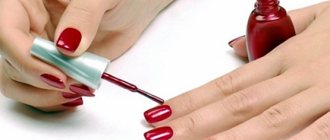
The simplest and most popular way to decorate nails with a gradient is a manicure using a sponge. If you are just starting to master the technique, you will need the necessary tools and materials, which you cannot do without.
- Set of gel polishes. Choose colors that make up a single palette and suit each other.
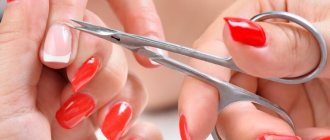
- Files, pusher, manicure tongs - for nail preparation.
- Synthetic sponge.
- TOP and base, LED lamp for drying.
We will not dwell in detail on how to prepare a nail; there is other material about this and what tools you should always have for a manicure. We'll tell you in detail how to make an ombre yourself
How to do Ombre nails with gel polish
Since the gradient involves clear transitions between tones, the technique of its implementation is not particularly remarkable. Ombre is another matter, where the whole point is a soft, leisurely glide from one gel polish to another. This type of manicure has gained considerable attention from nail art masters, despite the fact that the technique has its own subtleties.
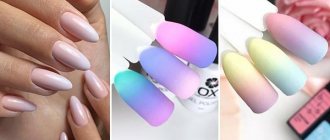
By 2022, several fashionable color trends have emerged: nude paints and shimmers of the same range are still relevant, but you can also try the contrast of pastels and some rich tone. But mixing cold and warm shades is not recommended.
The article will tell you what to do when your lips are chapped.
Sponge technique (photo)
Before you start professional coloring, study hair dye oxidizers and their properties. Find out how long henna eyebrow tinting lasts here.
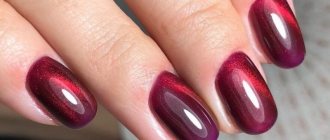
Pink haze
In the case of a gradient, you can combine white and colored polish together, changing the saturation of the composition from nail to nail. Similar experiments are also suitable for ombre, but it is better to use different bottles, using from 2 to 5 options. For beginners, it is better not to use combinations of colors and varnishes from different manufacturers. Otherwise, you may not understand why nail polish bubbles and peeling occurs.
It is best to place light or transparent colors at the base of the platinum; this will visually increase the length, and the regrowth process will not be noticeable. The maximum number of colors is due only to the fact that more shades simply will not fit on the surface.
The variety of rainbow coatings is achieved not only by numerous combinations of tones, but also by stencils, rhinestones, sparkles - all technologies are combined with a hybrid of gel and varnish and give excellent results. And once this technique is mastered, you can try making entire pictures with gel polish.
Having decided on the design, you can begin practical preparation for the process. Nothing supernatural is required compared to a regular manicure performed with shellac; the list of necessary materials will only be lengthened by a couple of points:
In fact, Shellac is the name of a specific product from SND, the world's first gel polish, which appeared in the early 2000s.
A fashion trend is dyeing shatush on dark hair.
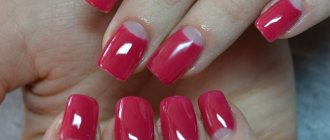
Classical
This article will help you appreciate the richness of Ollin’s hair dye palette. It's easy to update your look with the help of the Olia hair dye palette.
With a sponge option No. 2
Today this name has become a household name, as it once happened with Pampers and Xerox.
- Dehydrator, primer, base, top, clinser for different layers of coating.
- UV lamp that dries varnish.
- A collection of selected shellac shades.
- Manicure set for preparing nails (this item depends solely on the individual preferences of the master).
- A stencil, tape, liquid tape, very thick cream - anything that can protect the skin from getting varnish.
- Foil, toothpick and lint-free wipes as aids.
- Creating differences in colors is possible using a thin brush or sponge (which can easily be replaced with an eyeshadow sponge). The first method is gentle and affects the skin next to the plate much less, but the second method is a little easier for a novice specialist to master.
To the classic method of creating a manicure with gel polish, you can add another layer - white. It is applied to the base in order to shade and brighten colored motifs.
When all the necessary components are prepared, you can proceed directly to the procedure. We will look at how to do an original manicure at home with the help of a detailed guide.
Summer motives
Holiday option
Ombre manicure technique step by step
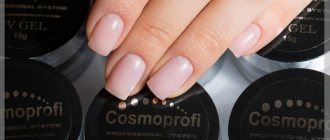
- Apply a layer of transparent base to the prepared nail and let it dry.
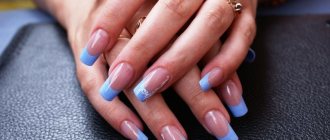
- Choose a color for the base of the manicure. In our case, we are making a white-blue gradient, so we take the base gel polish in white.
ADVICE
Always choose the lightest shade for your base color that will be used in the gradient. If there is no such color, for example when you want to make a blue-green gradient, use white for the base color.
- We take a clean cosmetic sponge and apply the colors of gel polishes we need to the sponge.
ADVICE
If your sponges are not stored in a bag, there may be lint and dust on them. Clean the sponge with tape. Apply the sticky layer to the washcloth. The sponge must be absolutely clean; any lint will be imprinted on the varnish and it will be impossible to remove it.
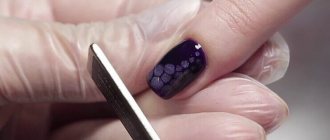
We protect the skin around the nail with a special cap, tape or a special latex base for polish with glitter. The last option is the most convenient ─ you will appreciate it after the first use.
- Apply a latex base around the nail, covering the skin up to the first phalanx. Let it dry completely.
- Apply the required amount of varnish to the sponge, covering the color.
- We transfer the polish from the sponge to the nail, constantly renewing it so that the polishes do not dry out and stick to the sponge.
Each nail requires 2-3 updates. Apply the sponge to the nail until you get a rich color and a smooth transition.
Varnishes can be applied to the sponge not in stripes, but in cubes.
- We remove the protective latex varnish from the skin around the nail; it has turned into a thick film.
- We clean up the uneven areas near the cuticle by moistening the brush in solvent.
- Cover the gradient with a good topcoat.
For base and top, choose liquids from the same brand, for example Rosalind. These are high-quality gel polishes of any shade, long-lasting base and top. The price of a bottle of gel polish is from 70 rubles.
ORDER NOW
VIEW AND ORDER NOW
ORDER NOW
Don't limit yourself to one polish, immediately select the appropriate shades, order top and base. Here you can also choose a nail polish remover; see the rating of the best ones here about which brand to choose...
The final stage of the manicure technique is drying in an LED lamp.
Vertical transition of colors using a brush
Now let's look at one of the simplest gradients - vertical ombre manicure. To do this, you will need a wide flat synthetic brush and gel polishes of selected shades and colors. How to do ombre nails with shellac:
Step 1
After preliminary preparation, cover half the plate with the selected colors: make one part with one color, the second with another.
Step 2
The brush that will be used to create the ombre effect with shellac should be moistened in a cleanser so that it is slightly damp. This will help make the transition smoother. You need to lightly, without pressure, move it from the base to the free edge. The movements should not end at any point, nor should there be a stop in the middle of the plate. After a soft transition effect is achieved, the fingers should be sent into the lamp.
Step 3
Reapply the second and third layers of enamel, be sure to go over the plate with a brush re-moistened in the cleaner, and dry each finger in the lamp. By the way, between stages of applying varnishes, the brush must be cleaned of paint by blotting it in a cleanser and wiping it on a napkin.
Step 4
When you are completely satisfied with the ombre effect on your nails with gel polish, you can cover the plate with top coat, dry your fingers, and remove the dispersion layer.