Do you like to experiment with nail color and style? Then you will be interested to know how you can create original nail art using a sponge. Available materials, simple technique, speed of execution – that’s what you need. Manicure with a sponge is especially suitable for those who have not yet mastered the skills and dexterity to create a design at home.
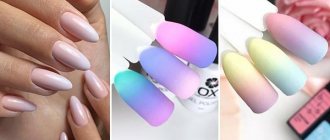
Gradient design, or ombre as it is called, allows for a smooth transition from one color to another. These nails look neat and beautiful. If you carry out the procedure carefully, no one will guess that you did it yourself and not in a salon.
How to make a gradient on nails with gel polish. Types of gradient manicure
A gradient is a nail design that uses several shades of polish that smoothly flow from one to another. It looks impressive on paper, but even more impressive on nails.
Types of coating using gradient technique
There are several types of gradient manicure.
Their choice largely depends on the shape of the nails and their length:
- Vertical is a traditional gradient option. It can be called universal, as it suits all nails. With a vertical manicure, the transition of shades occurs from the root part of the nail to the tip.
- Horizontal. The color changes from the left side of the nail to the right. More suitable for medium-length nails. This manicure can visually lengthen your nails.
- French. White is applied to the edges of the nails and made more transparent closer to the roots. This type of manicure is suitable exclusively for girls with graceful fingers and long and thin nails.
- Gradient with transition. Fingernails are painted with different gel polishes, close to each other in tone. This creates an overall picture of the transition from dark colors to lighter ones. This option is the simplest and is suitable for short nails.
- Linear. Thin lines, straight or curved, are drawn on the nails. Each new line is made a tone darker than the previous one.
Vertical gradient
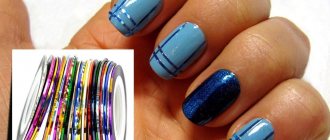
For a gradient, both tones of the same color and completely different colors are used. Usually they take from 2 to 4 colors.
A manicure with a color transition can be done with regular varnishes, but everything will have to be done very quickly, before the varnish has time to dry. It is much more convenient to create a gradient on your nails with gel polish. This material does not dry in the air, and besides, such a manicure will last much longer than a traditional one.
Aeropuffing photo
Below are designs using aeropuffing.
Manicure options
Nail design
Gradient design
Gradient air puffing
Gradient
Baby boomer
As you can see, to create a gradient it is not necessary to purchase expensive equipment or tinker with brushes. All you need to do is purchase an airpuffing kit.
How to make a gradient on nails with gel polish with a sponge. Making a beautiful gradient with gel polish using a sponge
Gradient manicure or ombre is a smooth transition from one polish tone to another. The simultaneous use of several shades attracts with spectacular results. In addition, you can apply designs, rhinestones and other nail art techniques to the gradient coating. You can make a gradient with a gel polish sponge yourself, suggested
Original gradient manicure
Ombre sponge with gel polish yourself
Gradient manicure, ombre, Dip Dye, degrade, nail polish stretching are the names of one technique that is easy for anyone to do at home.
The easiest way to apply a gradient gel polish coating is with a sponge. It is recommended to use varnish with a dense texture and rich pigmentation. In this case, only one coat of coating will be required.
Ombre
The popularity of the gradient on nails with gel polish with a sponge led to the appearance of a special sponge with small pores, with which you can create the perfect ombre without bubbles.
Types of gradient manicure
In nail art, three methods of applying a gradient are used: horizontal, vertical, and with a transition. These methods are considered classic, although new variations of transitions are appearing, for example, geometric.
Fashionable manicure with OMBRE effect
Gradient with transition
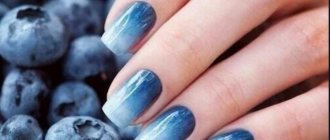
The transition of shades from dark to light is carried out from one finger to another, i.e. If the thumbnail is painted in a dark shade, then gradually towards the little finger the shades of the same color become lighter. The photo shows a gradual transition from light to dark shade.
Pink Ombre manicure
For these purposes, either five shades of the same color are used, or one color for each nail is whitened or another color is added.
Horizontal Gradient
The transition from shade to shade begins from the cuticle area and gradually changes towards the tip of the nail. As for the color scheme, it can be a transition of shades of the same color or a combination of several contrasting colors.
Horizontal Gradient
The gradient consists of at least two shades of gel polish. Stylists advise limiting the number of shades to four on one nail.
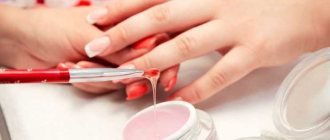
Applying gel polish to nails
Vertical gradient
This coloring technique is carried out by changing shades from one nail fold to another. This approach allows for interesting variations. So, you can alternate gradient coloring with monochromatic coloring. For example, cover the nail of the little finger with one shade, the ring finger using a gradient technique, apply the shade that ends the transition on the ring finger to the nail of the middle finger, etc.
Vertical gradient
Another option: the nails of the little and ring fingers are painted in one shade, the index and thumb in another, and on the middle nail a smooth transition is made from one shade to another.
Smooth transitions visually lengthen the nails, so a gradient manicure looks advantageous on short nails.
Methods for applying a gradient
There are two simple ways to make a gradient gel polish with a sponge, which are given in the video tutorial. Before using them, it would be useful to protect the skin around the nails from staining. For these purposes, use a special product - Skin Defender or liquid tape. Applying a thick cream around the nails or using tape also works well.
Protective coating for nails Barlet Skin Defender
First way
- Several shades of varnish are applied to a sponge or sponge.
- Then the sponge is placed against the nail plate.
- Gently tap it on the nail several times. In this way, the varnish is not only transferred to the nail, but also the clear boundaries are erased, becoming smooth and invisible.
A sufficient layer of varnish should be applied to the sponge so that the gel does not dry out quickly. Experts advise making the first layer thin, drying it, and then duplicating it. As a result, the layer will be bright and will not roll off on the sponge. To prevent bubbles from appearing, blot the paper once or twice with a sponge.
Applying pink gel polish to nails
Second way
- The nail is covered with the lightest shade of the gradient and allowed to dry.
- Dark and light shades are applied to a glass or silicone surface, placing them close to each other.
- Using an orange stick or toothpick, connect the borders of the shades, creating a transition between shades.
- The sponge is placed against the gradient obtained on the glass and transferred with slapping movements to the nail.
Applying red gel polish to nails
The entire process of creating a gradient with a sponge and gel polish is done quickly. Each time the gel polish on the palette is updated. With proper experience, you can paint several nails in one go, as the master does in the video.
Creating a gradient manicure requires a little patience and a little skill. However, the result will please even beginners in nail art. In addition, ombre will be an excellent background for creating unique compositions.
How to make a gradient on nails. Horizontal Gradient Nail Art
Horizontal gradient manicure is done using a sponge, sponge or brush. For a horizontal gradient, you can use three or more shades, which makes the design even more impressive and attractive. You should not combine more than two colors if your nails are short, as this will visually shorten the length.
Horizontal ombre is suitable for individuals who like to attract attention and have an original style. This design has no age; it is suitable for both girls and older women.
Gradient on nails with gel polish. Photos of popular horizontal options.
The trend is a variety of shades for this design, from pastel to rich dark colors. The most current nude tones that look interesting in contrast with bright colors. It is also worth paying attention to berry shades.
To make horizontal gradient nail art, you need:
- Prepare nails for manicure (removing cuticles, polishing plates, etc.).
- Degrease your nails.
- Cover with base gel polish and dry it under a lamp.
- Divide the nail into as many parts as there are shades used, and apply a different shade to each part.
- Using a brush, carefully blend the boundaries of the shades, moving from the base to the end of the nail (or use the option with foil and a sponge).
- Dry the colored coating.
- Secure with top.
Gradient on nails with shellac, how to do it. What is a “gradient” in the nail industry?
A nail design with a smooth transition of colors is called a gradient. Most often, gel polish of darker tones is applied to the base of the plate, while closer to the end it is covered with light shades. This technique involves the design of each nail. The coating can be done both horizontally and vertically.
Another option for gradient nail design is painting the plates in different tones. The color scheme must be carefully selected. With this method, you do not need to work on the transition of shades on each nail, but you will have to make sure that the tones do not contrast too much with each other on neighboring fingers.
When applying a gradient with shellac, you don’t have to limit your imagination. For stretching within one nail, both absolutely contrasting colors and similar ones are suitable: for example, beige and brown. Nowadays it is very fashionable to create a rainbow on your fingers by coating each finger in a different shade.
Required Tools
To make a gradient shellac manicure neat and with a beautiful design, you need to choose the right tools. We will provide the main list that experts use:
- Shellac in different shades.
- Gel polish base and top coat.
- Ultraviolet lamp.
- A piece of foam rubber or sponge.
- Manicure set.
- Plastic plate.
- Brush.
- Cuticle oil.
- Liquid for removing the sticky layer.
Without these items, a gradient using shellac will not be possible. Which brands you use depends on personal preference. However, it should be borne in mind that expensive drugs are not always of better quality than their budget counterparts. But excessive savings will not lead to anything good. Therefore, try to stick to the golden mean when choosing the necessary products for an ombre manicure.
Selection of materials: why is it so important to use original sponges (poufs)?
As the practice of testing the use of non-original (Chinese) poufs (sponges) to create the effect of airbrushing without using an airbrush has shown, they have a lot of significant shortcomings compared to the original. Namely:
- cheap sponges have uneven edges and a rough surface, as they are spongy and porous in texture;
- analogues are characterized by low wear resistance (their large pores are quickly clogged with gel pastes), and such poufs are destroyed more quickly when cleaned;
- during the work process, particles of the sponge often stick to the design, breaking away from the sponge itself;
- Chinese gel pastes (paints) and sponges do not create the effect of airbrushing, as they do not provide the necessary clarity;
- the non-original sponge is unevenly attached to the holder (holder). This obvious distortion of the sponge causes a high probability that the sponge will come off the holder right during the creation of the design.
That is why manufacturers and nail technicians who have already tried this technique advise not to chase unnecessary savings and use only original tools and consumables. Only in this case will one set serve you for a long time, more than recouping its cost, and will bring only positive emotions during the work process.
How to make a color transition on nails with gel polish. Gel polish manicure design with color transition
One of the latest trends in nail fashion has been gradient manicure. Smooth transitions from one color to another using gel polishes allow you to create fascinating combinations of different colors.
Gradient manicure with gel polish in pink and blue tones
Gradient manicure can serve as the basis for more complex compositions and patterns on the nails. How to make a color transition with gel polish? You can understand the intricacies of this technology yourself. Photos will help you choose colors.
Nail preparation
How firmly the varnish coating will adhere depends on the quality of nail preparation. Therefore, it is necessary to strictly follow all pre-treatment steps before applying the main coating.
Gradient manicure with gel polish
After basic manicure care, we move on to preparing nails for applying gel polish:
- Using a buff (a special file), we polish the nails to form a layer that will reliably hold the polish.
- Wipe the surface of the nail with a napkin.
- Degrease the nail plate with alcohol or a special degreaser.
- We cover the nails with a primer (base, base), thus preparing the surface for reliable adhesion to the gel polish. The applied layer must be fixed under the lamp for 30 seconds.
Gradient in light colors
We create fashionable design
After the preparatory procedure, you can begin to create a color transition effect on your nails with gel polish. You can achieve beautiful stretching in different ways using a brush or sponge. On
Sponge
The most convenient way to blend colors with gel polish is with a triangular sponge. The method is considered simple and acceptable for beginners.
- Apply the first layer of light varnish from those chosen for manicure. Secure it in a lamp.
- Using a brush, apply stripes of the desired colors to the sponge that will be used for the manicure.
- Press the sponge tightly onto the nail, while color stripes are transferred to it, mixing at the same time.
- Remove nail polish that gets on the skin of your fingers with nail polish remover.
- The coating must be fixed in the lamp and, if necessary, remove stickiness.
- Apply the finishing coat (top).
Gradient manicure (ombre) with gel polish
Important: the smaller the pores of the sponge, the smoother the transitions will be.
Smooth color transitions with gel polish can be achieved using a sponge in another way. To do this, you need to partially mix varnishes of different colors or shades of the same color on a palette, then apply sequential stripes on a sponge in the desired order. A sponge applied to the nail plate leaves a trace of a smooth, more blurred transition. Examples are shown in the photo.
Gradient manicure different shades
Ombre with sponge
If working with a brush is too difficult for you or you simply don’t have such a tool at hand, you can create a beautiful manicure using a porous sponge. There are two options for ombre with a sponge:
- With a palette. Apply short strips of the selected varnishes to the palette so that their borders merge. Using a toothpick, mix the contact area. Dip a sponge into the polish and press the sponge onto your nail. If necessary, repeat the manipulation.
- No palette. Apply the selected colors directly to the sponge. Make an imprint on your nails by alternately pressing the sponge higher and higher.