You can get an original manicure using nail design tape. In this article we will tell you what design tape is, how to make a simple and stylish manicure using this wonderful decoration tool, how to use it, what tools and materials are needed for this, as well as where you can buy tape and how to choose it correctly.
Application options for nail tape
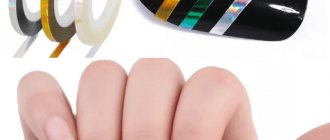
Nail tape is a self-adhesive strip of different colors, always shiny . Available in different widths, but in nail design they usually prefer thin ones.
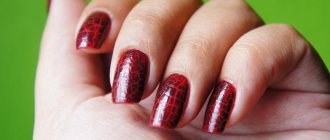
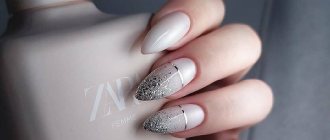
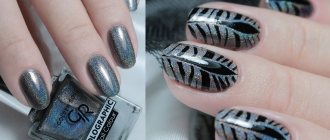
First option: the ribbon acts as a design element
Ribbon as a design element
In such cases, it is not removed after the work is completed. You can use adhesive strips of different widths and several colors, and combine them with other decorations, such as rhinestones.
Create a simple design step by step:
- We remove the cuticle and do a regular manicure, giving the desired shape to the nail.
- If you use one color of varnish, cover your nails in 2 layers. If several colors are used, tape can be used to cover the transition of one color to another at the junction. The strip is also glued to gel polish.
- After complete drying, we take strips of the required length and glue them according to the intended pattern. If the strip protrudes beyond the edges, it can be carefully cut off with nail scissors.
- When the strip is finally and perfectly fixed, one or two layers of varnish are applied on top.
Silver or gold stripes look perfect on almost any surface.
When applying the tape, move away from the cuticle and edges of the nail plate. If you stick it too close, it can easily get caught and come off.
Check out how to quickly make a simple ribbon design:
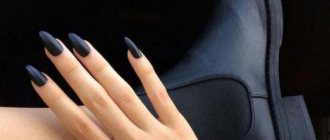
Second option: tape - auxiliary material for applying the pattern
Ribbon - an auxiliary material in design
In this type of nail design, there is no need to select strips to match the color of the coating: any tape will do, even the most unnecessary one, because after the work it will be removed.
At home, for such decoration, adhesive tape can easily be replaced with tape, technical tape, or even medical tape.
Design creation procedure:
- We apply varnish.
- Next, you need to stick the strips on top to achieve the desired pattern.
- We cover the top with another layer of varnish, after it dries, carefully remove the strips and get the desired result.
- We secure the entire pattern with a finish to level the surface.
The tape should only be applied to completely dry varnish, so that after removing it there will be no traces left.
Try making a nautical design using duct tape:
Design ideas
The design with tape on gel polish can be very diverse. Some of the most interesting ways to apply gel polish to a varnished nail include:
- Horizontal or vertical arrangement of several stripes. To obtain a laconic and strict manicure, plain or contrasting pieces of tape are placed along or across the nail plate in several rows.
- Checkered pattern. For a fashionable manicure with a geometric checkered pattern, strips of tape are placed horizontally and perpendicularly, placing a separate emphasis on the top or bottom of the nail plate.
Checkered manicure
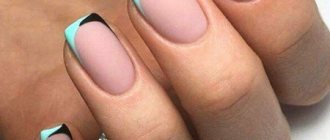
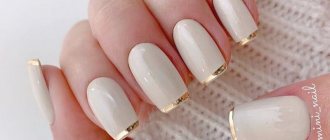
- French. You can highlight the usual strip of French manicure using a line of adhesive tape for nails. The color and the presence of any effects will depend on the mood of the girl who came for a manicure.
Pink manicure with stripes
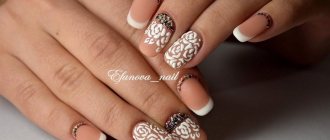
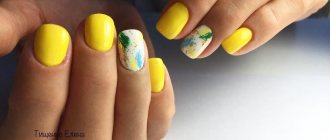
- Design with patterns. You can use ribbons to highlight figures drawn with gel polishes or acrylic paints, or you can construct them using the stripes themselves.
Yellow manicure design with patterns
- Marine motif. The popular “vest” pattern is very easy to make using blue glue strips. It is enough to cover all the nails or individual fingers with white varnish and stick blue or light blue stripes on top of it (photo).
Manicure vest
- Lunar manicure. Highlighting the holes on the nails has lost a little of its popularity, but for girls who do not have the opportunity to repaint their nails every two weeks, this idea is still very relevant. To create an interesting design, an unpainted hole can be highlighted using colored tape and it will look much more interesting and fashionable.
Stylish manicure ideas step by step
Triangular Moon
- Cover the nails with base and dry.
- We cut two pieces from a thin ribbon and attach them at the base in the form of a triangle.
- We cover the nails with gel polish of a contrasting color (white, red, pink), skipping the triangle.
- Carefully remove the strips from the nail that is not yet completely dry and apply a fixative on top of everything.
This beautiful manicure looks great on short nails.
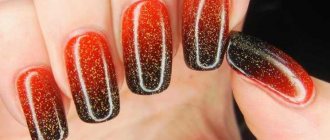
Bright manicure with colored stripes
- You will need neon Shellac, for example yellow. We paint our nails.
- We cut three thin strips of adhesive foil and glue them lengthwise directly from the cuticles.
- After everything is dry, paint the top with a different color.
- Without waiting for complete drying, remove the strips by grasping the bottom edge.
- Instead of a ribbon, you can place a picture on one of the nails.
- We apply the fixative.
Geometric manicure
- Paint your nails with one color in two layers and let them dry completely.
- We glue the strips crosswise. It is necessary that they look a little beyond the nail.
- We paint the selected areas with other colors and dry them completely. Remove the stripes.
Examples of using tape in French manicure
What you need
You should definitely purchase manicure tapes. To be able to make a variety of designs, it is recommended not to settle on one type of ribbon. Let it be a set of matte, glossy and holographic ribbons.
You will definitely need gel polish. For the simplest option, one color can be used. If you want to create a complex design, you need to purchase two or three, and maybe more colors and shades of shellac.
An indispensable attribute of a high-quality manicure with gel polish is the base and top. Without these compositions it is impossible to obtain a high-quality and durable manicure.
Don’t forget to stock up on nail files, buff, orange sticks, tweezers, and manicure scissors for mechanical processing of nail plates.
To prevent the tape from coming off
We glue the tape correctly
- You can glue the strips only on dry and grease-free nails ; you can use a UV lamp for drying.
- Do not glue the strips too close to the edge of the nail and cuticle , in which case the tape will touch foreign objects and come off.
- The tape should not gather wrinkles or form folds.
To remove a decorative strip from a nail, you do not need to make any additional effort. It peels off easily or can be removed with nail polish remover.
Stencil tape in nail design
If you want to add some zest to your ordinary manicure, make, for example, a perfectly even stripe, geometry, but with a poor eye and a trembling hand you cannot draw the lines perfectly, then tapes can come to the rescue. After all, it is not at all necessary to glue them on the nail; they can be used as a stencil.
It’s not difficult to make such a design, for this you need:
- Apply polish to prepared nails and wait for it to dry.
- Place a tape with a pre-designed design on top, sealing it well to the nail.
- Cover the nail with varnish of a different color, being careful not to touch the decor. Then all that remains is to remove the adhesive tape and dry your nails.
This manicure is suitable for those girls who do not like excessive shine, but at the same time want to see the clarity and evenness of lines, diamonds, squares, etc.
Liquid tape
Liquid tape for manicure
Used as the most effective means of protecting against varnish getting on the skin when creating nail designs. It is a quick-drying product that, when dried, forms a protective film on the skin .
You no longer have to worry about staining the side rollers with nail polish and having to scrub them off with cotton swabs and nail polish remover. Using liquid tape, you are guaranteed to ensure clean skin while working. As a rule, craftsmen use this method of protection when performing a complex design, which is guaranteed to stain the cuticles or side ridges.
Learn to use liquid tape with a manicurist:
How to use liquid tape
- Get your nails done. Give your nails the desired shape, then degrease them.
- Apply the product to the areas of skin that need to be protected, wait until it dries completely and a protective film forms.
- Apply a base coat and wait until completely dry.
- Take a cotton pad, moisten it with remover, then take a different color of nail polish and apply several strips on the pad, close to each other. Stamp onto your nails to achieve the desired pattern and depth of color.
- Use tweezers to remove the film with any varnish on it.
See how you can use liquid tape when performing water, gradient and stamping manicures:
How to do a manicure with tape step by step, 35 ideas + photos. Geometry, lunar, chevron, minimalism and... stripes!
You won't believe what manicure tape, also known as design tape, or adhesive tape, can do. In short - complex graphic design with one movement of the hand, minimalism, the simplicity of which is expensive.
For cute feminine, mischievous girly nude art and representative, evening, formal.
In general, this clever thing can work wonders - and you don’t need to be a craftswoman, you don’t need to have nimble fingers to bring these miracles to life.
Even a non-skilled beginner can handle it. Look at the photos, get ideas - it's interesting!
Minimalism and nude
Let's start with the simple - but not with the primitive. Do you want a manicure that is almost invisible, but maintains the effect of well-groomed hands, original – and in 5 minutes?
Take a manicure tape - a spool is enough for a million of the most incredible ideas. Let's start small.
You will need:
- Manicure tape;
- Base;
- Main color, top (optional).
There is nothing to describe: look at the photo.
- We just apply the base and attach the tape.
- To begin with, we attach it in the center, distributing it to the edges: this makes it easier to align.
- We level it with an orange stick and pinch off the ends with pliers - this is better than using scissors.
Important! Leave a space of 1-2 mm from the edge of the nail hole.
And we dry it – that’s it. If the back side is sticky, place it on a dry surface. If not, vice versa.
Spectacular and incredibly simple nail art does not look simple, it is in tune with any image, and is appropriate in any setting. And, if you look closely, it doesn’t look simple.
Minimalism
Minimalism is not only about black dots: we’re tired of them. These are also stripes. stripes - their intricacies are very impressive.
As a basic idea, you can take a simple design as a basis - to understand how it is done. And it’s done simply, with one movement of the hand – almost.
Do you like classics? The one that looks like intersections of stripes?
Just wrap the tape around your finger after applying and drying the base and polish in a criss-cross manner - randomly. Apply the second color - that’s it, you can remove it, cut it with tweezers: the print is ready.
But this has happened a thousand times, and will not happen a thousand more times. But you can create a more interesting design. Graphic, geometric, for example.
Geometry
But with geometry it will be more difficult. But having honed your dexterity on simple figures, you can create the most complex geometric solutions. Does this design seem complicated? Not at all: in fact, everything is simple - you won’t believe it.
The same ones will come in handy - manicure tape and two colors: black and white, for example.
Essentially, the tape serves as a limiter when applying a layer of varnish. And it is important to remove it with a quick, deft movement.
And there are a lot of such ideas - it is important to understand the principle of operation, which, again, is incredibly simple.
You can experiment with width - it gives effective combinations. You can expand the color palette.
You can experiment with geometric shapes and colors.
Negative space
Negative space that creates impact - once you master the technique, you can create miracles. And it's simple.
Negative space makes any simple design look like a masterpiece, and geometry is no exception: these two techniques are literally made for each other.
By the way, both the chevron and the lunar are very good, more about them below.
In the meantime, the simplest example of creating a beautiful and light design.
Lunar manicure
No, he's not quite ordinary. And yes - a regular one can be made using disks - they cleverly help create a crescent of the correct shape and size. But to create a custom hole, you need manicure tape.
Again, it will act as a limiter when applying varnish in layers. The principle is the same: apply the base, color, and stripes.
There are many ideas: this is almost negative space, and the laconicism of almost minimalism.
Dots, rhinestones, sequins, kamifubiki - anything that can decorate and add variety will help to add some zest.
Chevron
Yes, those same triangles of lunar manicure and not only: multi-color stripes at the “corners” are trendy and in fashion. Contrasting, multicolor and black and white, with negative space, glitter, rhinestones - there are many options.
Let's start simple: let's see how easy it is to do, and then we can move on to more intricate ideas.
And most importantly: stripes!
It’s just that a strip is the best thing you can come up with in a hurry if it’s not very clever. And this is the best idea for creating any design: festive, spectacular, simple and surprising in complexity.
In a striped manicure, all techniques are good - even those combined together. This could be the same negative space.
Sometimes it can be attributed to geometry.
And this design is a combination of everything: a stripe that becomes a cage, and open areas of negative space.
Look - it's easy!
Here are some ideas with manicure tape. And these are just the simplest, most basic ones - the basis for creating new ones. Experiment and be beautiful.
Similar manicure:
Share!
From: Nail design photos Search for manicure: nail design, Nail design ideas, manicure photo, fashion manicure, Nails photo
- « Manicure in 5 minutes step by step: 35 ideas + photos. How to make chevron, moon and negative space. And peas!
- Manicure with gel polish: 5 reasons not to do it. Inconvenient questions - and this is not about being unhelpful"
How to choose tape for manicure?
The most common mistake a novice craftsman makes is choosing the wrong tape. This reason explains the unsuccessful design of the nail plate, blurry varnishes and other problems.
The tape that glues objects together is not very good. Wide adhesive tapes are inconvenient to quickly create the desired ornament. Narrow options will suit you. Double-sided tape sticks to your hands and leads to discomfort when performing a manicure.
So, what should you pay attention to when choosing tape for manicure?
- Stickiness . The type of tape that does not glue objects together very well is suitable.
- Size . Wide adhesive tapes are inconvenient to quickly create the desired ornament. Narrow options will suit you.
- One-sidedness . Double-sided tape sticks to your hands and leads to discomfort when performing a manicure.
- Trace _ If the tape leaves a sticky mark on the nail, this is a bad sign. He can easily ruin your manicure with his carelessness.
If the tape leaves a sticky mark on the nail, this is a bad sign. He can easily ruin your manicure with his carelessness.
Advice! Carefully secure the tape to the nail plate, otherwise the polish will spread and ruin the manicure.