Instructions for applying varnish
There is a whole technology for painting nails. Keep in mind that you won’t be able to save time and get a perfectly even coating.
Remember that varnish applied to nails with overgrown cuticles makes the manicure ugly and sloppy.
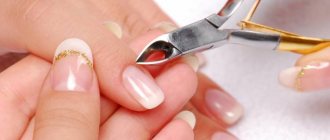
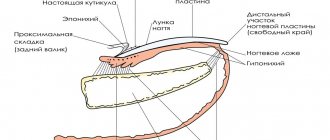
Therefore, in any case, before painting your nails, it is necessary to cut off the cuticles and remove the pterygium. This is done by soaking your fingers in warm water with salt and liquid soap. After the cuticles become soft, they are cut off with tweezers or scissors. Try to cut the skin not in pieces, but in a single strip. Using a stick, scrape off the thin film at the side ridges and near the lunula.
File your nails and go over them with a buff or polisher. If there are cracks or delaminations on the nail, before painting it, you need to sand them, otherwise the varnish will give the plate relief.
Instructions for applying an even coating:
- Apply a base coat to the plate. This can be a regular varnish base;
- After the base has dried, apply varnish;
- Cover your nails with top coat or sealer.
Of course, you don’t have to apply the base and top coat to the plate, but these products extend the life of the manicure and prevent the formation of chips and peeling. In addition, this coating is less scratched and does not fade. It is necessary to apply the base varnish not in one motion, but in several steps.
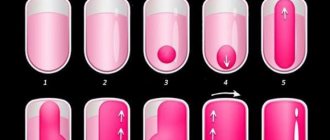
At the very beginning, 1-2 mm from the cuticle at the bottom, place a small and bold point. Using a brush, move the drop down towards the cuticle. Now stretch the drop up to the free edge. You should get a straight stripe. Now return to the place where the drop was originally and apply the varnish in an arcing motion at the side rollers.
Without a good polish there won't be a perfect manicure.
You can’t skimp on your beauty. Therefore, when you go for your next bottle of varnish, take its purchase seriously. We do not urge you to overpay for a well-known brand, because many good products are also in the budget category. However, you should definitely avoid buying cosmetics in passages, dubious stores and on trays in the middle of the street. The likelihood that you will be given a very low quality varnish is huge.
To paint your nails accurately, the polish must be uniform, fresh, and sufficiently liquid.
- The thick coating lays down unevenly, forming stripes
- The presence of small lumps in the varnish can ruin any manicure.
- If the varnish is expired or has lost its original appearance, feel free to throw it in the trash.
Remember that bad polish will not only leave uneven marks on your nails, but will also significantly deteriorate their condition.
Preparatory stage
Before painting your nails, you must carefully prepare their surface. Only a few people can boast of an ideal nail plate. In most cases, there are small cracks that will be clearly visible under the glossy finish. Simple manipulations will help you carefully paint your nails:
- Give your nails the desired shape using scissors and a nail file. Make sure all nails are the same length.
- Now it’s time to take care of the cuticle. We recommend steaming your hands in a warm bath with oil, and then pushing back the cuticles with an orange stick. It is better to do a trim manicure in a salon. If you don't get rid of the cuticle, the varnish will cover it and it will look terrible.
- Using a polishing block, thoroughly polish the surface of the nails.
- Degrease the surface of the nails with a soap solution or nail polish remover.
- Be sure to apply a base coat, because this is the key to an amazing manicure. The base heals nails, protects them from the effects of decorative varnishes and evens out the surface.
Don't forget to make masks for your nails to improve their health and bring them into proper shape.
How to paint your nails near the cuticle?
Use a quality finish with a flexible brush. Before purchasing varnish, carefully inspect the brush; it should be hard and elastic. In this case, the product itself in the jar should flow in a thick stream. If the varnish drips in very large drops, refuse to purchase it; you will not be able to paint the areas near the side rollers and lunula with it.
Place a dot at a distance of 2 mm from the cuticle. Press down on the brush and smoothly, in one movement, move the drop down. When pressed, the brush expands and becomes like a fan. In this state, she exactly repeats the roundness of the lunula. Do not put a lot of varnish on the brush, otherwise it will flow down to the side rollers and stain the skin.
Try to apply black, red and other bright shades of coatings without touching the skin. It is better to leave a small space near the cuticle unpainted. Don't try to paint your nails with one thick layer of paint right away. Always add a little varnish so that it does not run or drip from the brush. After the first layer has completely dried, apply the second. You can dry your nails with a hair dryer or a special dryer.
Try to paint your nails in daylight. Sit by the window. If you have a special lamp, turn it on. Try not to rush. If you need to create a design, use stamping or stickers.
How to paint your nails correctly. Tricks and secrets
“Teach me how to paint my nails beautifully!” Well, for the life of me, I can’t paint my nails evenly. Even light varnish comes out crooked, let alone red! In general, give advice on how to paint your nails correctly . Best regards, Olga"
Well, Olga, you are not the only one tormented by this problem. And if you can still paint long nails neatly, then you have to tinker with short ones. As someone who has short nails (for a number of reasons), I know first-hand how difficult it is to paint your nails evenly without hurting the cuticles and the area around the nail.
So, the women's site Sympaty.net tells you how to paint your nails correctly so that your manicure looks beautiful and your hands look well-groomed.
How to paint your nails evenly: general rules
Before you start painting your nails, treat the surface of the nail with nail polish remover, or wash your nails with soap and dry well. On clean, grease-free and dry nails, the polish will last a long time without peeling or bubbling.
Next, apply the first layer of varnish - a transparent shade or a special base for varnish. This will make the surface of the nail smooth, which will allow the polish to last longer, and will also provide the nail plate with additional nutrition - vitamins and other useful substances.
ALWAYS apply 2 coats of colored varnish , be it translucent or a bright, rich shade. Only two layers will allow you to enjoy the true color of your nail polish, this is the only way the polish will lie smoothly without streaks, and your manicure will look complete and perfect. As a rule, one layer of colored varnish does not turn out saturated, making the nails look faded.
You can also apply a special fixative on top of the colored varnish (second layer). This is done to keep your nails from peeling for as long as possible, and sometimes it gives extra shine to your nails. Although, if you have already applied 2 layers of colored varnish, and underneath there is a transparent shade, this may be enough. So decide for yourself whether to apply a fixative. Personally, I get along just fine without it.
Dry your nails as long as possible! You can dip them in cold water and wave them around with your hands, but wait at least 20-30 minutes after applying the last coat. Otherwise, fingerprints of everything you touched will remain on your nails. Remember - the more layers of varnish, the longer the nails take to dry.
After your nails are dry, use a toothpick (a match and a cotton swab are too thick) and wrap a small piece of cotton wool around the tip. Dip a toothpick into nail polish remover and wipe off any polish smeared around the edges of your nails. Please keep in mind:
- It is advisable to wash off any polish that gets on your skin after your nails are completely dry. This way you won't ruin your manicure if you accidentally touch your nails.
- Try to paint your nails evenly, without getting them on your skin. Because even after erasing the flaws, the manicure will no longer look 100% neat.
That's all. Now let's move on to the technique of applying varnish.
Apply polish to long nails
There is nothing complicated here. Indeed, it is easier to paint long nails beautifully than short ones. The women's site Sympaty.net tells how to do it right:
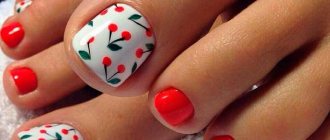
- For long nails, any color of varnish is suitable - from bright to discreet, which cannot be said about short nails. As you can see in the photo, all shades look amazingly chic. The main condition: for the polish to look good on the nails, there must be a manicure!
- If the colored varnish has thickened , then one layer is enough. If you see that it has thickened so much that you can’t paint your nails accurately, dilute it with a special product.
- Before applying nail polish, warm the bottle in your palms and shake well. The varnish will become a homogeneous consistency, mix and thus lie more evenly.
- Start painting your nails from your little finger. Place your fingers on the edge of the table so that your palm hangs down and your fingers are stable and comfortable for you on the edge of the table. The light on your nails should fall from the top left (if you are right-handed).
- Dip the brush into the varnish so that it is completely immersed in it. Then wipe the brush against the edge of the bottle, leaving most of the polish on the outside of the brush. And start painting your nail with this side.
- Mentally divide the nail crosswise into 3 parts. And stepping back one part from the cuticle, lower the brush with varnish onto the nail (so as not to stain the cuticle). Next, with quick, confident movements, sweep the brush to the tip of the nail in the middle, and then another 2-4 brush strokes along the edges. If there is not enough varnish , dip the brush into the bottle again. If, on the contrary, you see excess polish on the nail , carefully brush it there, removing the excess.
- After painting one nail, dip the brush into the polish again , renewing it on the brush each time.
- Paint all nails and leave to dry.
Only after the first layer of colored varnish has dried, apply the next one, otherwise your nails will take a very long time to dry.
How to check if the varnish is dry? Use the nail of one hand to touch the other, as if lightly patting. If the nails do not stick together, the polish is dry.
When you're done with the colored polish, apply nail dryer or sealer .
IT IS BEAUTIFUL!!!
How to paint short nails
Don't confuse short nails with medium length nails! The latter are just as easy to paint as long ones, but when the nails are short, it is difficult to paint them neatly and beautifully.
For short nails, always use a thin enough polish . On long nails, thickened varnish is easy to apply evenly, and a second coat is not required, but on short nails, thick varnish will definitely stain the skin around the nail.
Also refrain from bright colors - red, black, yellow, fuchsia. As you can see from the photo, it looks quite untidy . Pastel shades and translucent nail polishes are best for short nails
IT'S NOT BEAUTIFUL!!!
The principles of applying varnish are the same as for long nails, but with some nuances:
- Apply a little varnish to the brush to avoid excess and smearing of the varnish along the edges.
- If you leave unpainted edges on the sides of the nail , short nails will visually appear longer and more graceful.
- If, while trying to paint short nails, you still get caught in the area around the nail, and at the same time you understand that you won’t be able to wipe it off carefully - only remove large stains of varnish. In the gaps between the skin and the nail itself, the varnish will come off on its own when you wash your hands or dishes . The main thing is not to get the varnish on the cuticle; it’s better not to paint 1 mm before it than to touch it))
That's all the subtleties that will help you paint your nails correctly. Have a beautiful manicure!
—— Author – Khoronzhevskaya Evgeniya, website
To copy this article, you do not need to obtain special permission, however an active link to our site that is not hidden from search engines is MANDATORY! Please respect our copyright .
Decorative coating technique
In fact, painting your nails carefully at home is not at all difficult. All you need is a little patience and skill. Since the good condition of the nail plates is very important for an ideal manicure, you may be interested in thematic articles about vitamins and nourishing baths for nails. All materials on our website are supported by useful video lessons and colorful photo galleries. Let's return to our topic. How to paint your nails beautifully so that people admire you?
Step 1: Applying Foundation
The first step towards a perfectly executed manicure is a base coat. It is very important to pre-paint your nails with a clear base. Firstly, the base protects the nail plate from aggressive pigments of colored varnish. Secondly, the base evens out the surface, making it much easier for you to do a neat manicure at home. You can use a varnish from the strengthening series or apply a regular transparent base.
Step 2. Applying color coating
Before painting your nails with color, prepare cotton swabs, discs, toothpicks and nail polish remover to correct possible errors. Apply the first coat. To successfully paint your nails at home, use high-quality varnishes that spread more easily over the surface. Dip the brush into the bottle and remove excess by running it along the edge of the neck. Start painting from the central part of the nail plate, stepping back a little from the cuticle, as shown in the photo, and then distribute the polish to the sides.
What is the second layer for? Since it is almost impossible to paint your nails accurately the first time, re-coating will mask all the imperfections. In addition, only two layers of varnish will allow you to reveal the full depth and richness of the shade. You can re-paint your nails only after the first color layer has completely dried. Otherwise, the varnish will take a very long time to dry. Sometimes you can get by with one layer of decorative coating: the exception is working with varnish of a very thick consistency.
Step 3: Top coat
The stage of painting nails with a top coat would correctly be called optional, especially at home. Of course, protective coating has many advantages, but not everyone likes it. Make sure the colored polish is dry before applying topcoat to your nails. Considering the fact that the protective coating is already 3-4 in a row, not all girls are ready to wait 30 or more minutes for complete drying. The exception is “drying”, which can be applied even at home using a pipette, spray or brush.
The advantages of the top coat include a glossy shine to the nails and a longer lifespan of the manicure. When applying a protective layer at home, do not forget to properly paint the ends of the ends. After the nail polish is dry, remove excess polish from the skin. To consolidate your knowledge, we invite you to watch an interesting video lesson. From it you will learn how to properly paint your nails at home, without the help of specialists. To ensure that the procedure gives you only positive emotions, we have prepared useful recommendations for you, which you will find immediately after the video.
Subtleties and secrets of applying varnish
- Before painting your nails, be sure to degrease them or simply wash your hands with soap . This will extend the life of the manicure.
- To better remove the polish from the skin, first apply cream to it without touching your nails.
- The workplace for manicure should be well lit. It is very important to position your hands correctly on the table. Please note - elbows should not hang !
- Before you learn how to paint your nails, make sure that the varnish is of high quality and not old. Before use, warm the bottle in your palms and shake it.
- Start painting your nails from your little fingers. If you move in the opposite direction, you may accidentally touch the fresh coating on other fingers.
- To paint your nails at home not only correctly, but also beautifully, use our recommendation. When applying the coating, leave the edges of the nails unpainted on the sides. This little trick will help you visually make your ends longer.
- For short nails, it is better to use a polish with a liquid consistency. It will be easier for you to apply it. You can dilute thickened varnish with a special agent, but remember that after this it will quickly become unusable.
- Before painting each nail, re-dip the brush into the bottle. If suddenly the varnish is not enough, immerse it in the bottle again. However, you should not allow excess, since in this case you will not be able to paint your nails beautifully.
We told you only about one technology for applying varnish with your own hands. Many girls, wanting to paint their nails like in the photo from the cover of a magazine, use completely non-standard methods that they came to in the process of practice. Why not, if the result and quality are pleasing to the eye? After all, you can experiment at home without limiting yourself to any boundaries. Therefore, the question of how to properly paint your nails is individual, and each girl decides it for herself, like, for example, the author of the following video. Anna will share with you her way of painting your nails neatly and without blemishes.
Take a break from household chores and enjoy the process of creating the perfect manicure. We hope that the photo and video materials we offer will help you absorb the information easily and quickly in order to quickly apply it in practice! Be beautiful, dear girls!