Manicure gel polish 2022 is a combination of beauty, durability and technology. Therefore it is considered prestigious and respectable. Compliance with all the rules for applying gel polish on nails and further wearing it plays a huge role. Our selection includes fashionable design ideas with gel polish that will allow you to beautifully decorate your nails in 2022.
Features of shellac manicure
- Gel nail polish includes a system of three products: base, color and top coat. Therefore, gel polish manicure is the most durable, with an extended wear period of up to 2-3 weeks.
- When choosing a brand, they first of all pay attention to gel polishes: OPI, Essie, Gelish Harmony, Kodi Professional, Luxio, Bluesky, CND and Masura (Russia). They are the densest, most popular and safest for nails.
- In order for the gel polish to dry on your nails, you only need 30 seconds in an LED lamp or 2 minutes in a UV lamp.
- If shellac manicure is performed at home, then most often they use a single-phase 3 in 1 system + primer. However, it can also be used with a base (medicinal, rubber) and a top, for example, universal Kodi. This will increase durability and also suit weak nails.
- To cover with gel polish with designs, for example, rhinestones, sparkles, stickers, base coats and thick top coats with or without a sticky layer are used, which are also dried in a UV lamp for 2 minutes. Because they “hold” decorations on the nails better.
Stage 2. Preparing the nail plate for coating
Next, you need to prepare your nails for a manicure with gel polish. This stage is very important, since it determines how well the adhesion of the natural nail and the artificial coating will occur. To carry out proper preparation, we will need the following materials:
- buff;
- brush or brush for removing dust;
- lint-free wipes;
- 2 in 1 liquid: degreaser and sticky layer remover - this product removes natural deposits (grease and dust) from the surface of the nail plate, thereby preparing the plate for better adhesion to the artificial material;
- dehydrator (nail-prep) - deeply dries the nail plate and removes excess moisture from it. A dehydrator is a must for people with oily skin and prone to excessive sweating, since usually the structure of their nails is damp and oily, which impairs adhesion to artificial turf;
- primer - translated as “primer”. There are acid-free and acidic primers.
The acid-free primer acts as double-sided tape and ensures strong adhesion of the natural nail to the artificial nail.
The acid primer lifts the keratin scales of the nail plate for better adhesion to the artificial material. Since the acid primer contains aggressive components, you must be careful not to get it on the skin and cause a burn. It is recommended to use it before extensions for girls with wet or oily nail texture.
What do we do at this stage?
- We treat the surface of the nail plate with a buff to lift the scales of the nail plate and improve adhesion.
- Remove dust with a special brush.
- Apply degreaser to a lint-free cloth and wipe your nails. If you want to make the process as comfortable as possible, we recommend using liquids without chemical fragrances, such as ParisNail liquids. They have pleasant aromas and 100% rid the nail plates of germs, grease and dirt, thus guaranteeing long-lasting wear of the coating.
- If you have oily skin, then to improve adhesion, apply a dehydrator to the entire surface of the nail and air dry for a minute.
- Then you need to apply primer to the free edge of the nail. The free edge is one of the most vulnerable places, and thanks to the primer, the adhesion between the nail plate and the artificial material improves, which contributes to longer wear of the coating. We also air dry the primer for one minute.
French manicure with gel polish
This original style has long found support among all women and girls. And now French is considered a classic. In the design of nails, both basic materials are used - colored gel polish, as well as decorative materials, for example, rhinestones, sparkles, foil elements, and a matte finish. In 2022, “smile” colors can be white, glitter, neutral and colorful. The presence of rich, bright accents is possible.
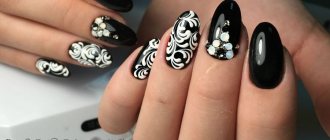
Black manicure
Once upon a time, black design was associated only with informal movements. Modern nail aesthetics has long since revised these outdated views. Black designs made with gel polish have become the latest trend. Relevant for everyday wear. Can become a bright accent in a festive look.
A black manicure can be plain and not include any additional decorations. Or become the basis for a more complex and voluminous design. The most commonly used decorative elements in combination with gel polish are:
- Glitter. The best choice is gold and silver. They look incredibly impressive due to the contrast with the main color of the plate.
- Stones. Massive, small and their combinations. It is considered more successful to use on one, maximum two nails. The presence of each finger can oversaturate the picture. The accent will disappear, the overall impression will be blurred.
- Glitters. They are placed both along the edge and over the entire surface (more abundantly at the root, gradually decreasing towards the edge of the nail). Available in different sizes and shapes. All kinds of color solutions.
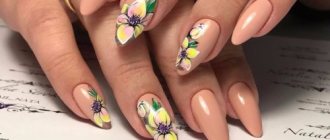
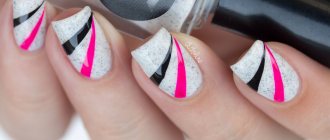
- Various drawings. Geometric shapes, multidirectional lines, flowers, vintage patterns - all this can be applied to the base in any color variations. Depending on the chosen design, its saturation, brightness, the number of nails for applying the design is also selected.
The latest gel polishes make it possible to perform a manicure in a matte or glossy version. Matte, as a calmer, more discreet color, is considered suitable for work and everyday life. At the same time, it also successfully combines with all types of decor that were presented earlier.
Glossy by itself, without additional decoration, attracts attention with its shine. It will be suitable for special occasions, as an addition to an evening look.
Black gel polish can be applied to the nail plate not only as a continuous layer. Actively used, looks impressive in all directions:
- French manicure.
- Art French.
- Lunar.
Beautiful manicure gel polish
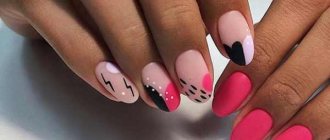
This type of design means it suits your style, taste and mood. But the color and decoration of the nails always attract attention. For example, to design nails in a nude style, light neutral shades of gel polish are suitable - milky, gray, beige, cream and a variety of nail techniques and decor. The main thing in minimalist manicure is monochrome. If your choice is a classic, then in addition to the discreet color of the gel polish coating, individual nails are decorated with imitation stone, ombre, laconic designs and decor. Or cute patterns - many people think it’s beautiful!
The process of creating a design with shellac and gel polish. TOP 10 common mistakes and ways to eliminate them.
If you managed to carry out the process of preparing your nails for applying shellac, avoiding all the pitfalls, do not let your guard down! Creating an image and decorating it with design also has its own subtleties and interesting life hacks.
- Mistake #1
: you carefully painted your nails with a thin layer, but after drying in the lamp you discovered polymerized streaks.
Reason:
when you or the client placed your hand in the lamp, you could keep your fingers tilted throughout the drying process. In this case, capricious or very liquid gel polishes could flow into the side rollers and onto the cuticle. You can solve this problem with the help of gel polish remover, a lint-free cloth and a metal pusher with a beveled edge. When you paint a nail, paint over the surface, avoiding the side ridges and cuticles, but also avoid gaps.
- Mistake #2
: the new gel polish chips and becomes cracked, although the design is covered with a thick topcoat.
Reason:
this phenomenon may be due to the use of an expired topcoat, a conflict of coatings (color and topcoat), or the use of a finish of poor quality.
- Error No. 3
: colored shellac was deformed after drying, bubbles and voids are visible in the coating. The gel polish has a good shelf life and was purchased from a reliable seller with a quality guarantee.
Reason:
the coating was applied in too dense layers or was not dried long enough in an LED lamp. Remember: the main rule of manicure with durable polymer coatings is to apply thin layers, squeeze the excess from the brush onto the neck of the bottle, and follow the manufacturers' recommendations on the polymerization time of materials. Another common reason is that you vigorously shook the bottle of gel polish before applying, which led to the formation of air bubbles in the thickness of the material. The correct way to lift the color pigment from the bottom is to roll the gel polish bubble between your palms.
- Mistake #4:
your manicure chips and becomes cracked, although you know for sure that the gel polish is of high quality and is stored in compliance with all rules and sanitary requirements.
Reason:
If the culprit is not shellac, turn your attention to your UV or LED lamp. If you have a completely new device, there may be a manufacturing defect. For a device that has been in use for a long time, it makes sense to check the light bulbs and replace them if the maximum service life has been exceeded.
- Mistake #5:
When applying layers, you do not brush the free edge of the nail with a brush.
Reason:
the secret to the longevity of shellac manicure is the tightness of all layers. If you neglect to seal, any of the layers of base, color, or top coat may peel off due to exposure to water, housework, or careless handling of the manicure.
- Mistake #6:
You love to create manicures by mixing colors and creating unique shades. However, despite all the tricks, the coverage lasts less than 14 days.
Reason:
Poor wear may be due to mixtures of colors from different brands, or the use of base, top, color, primer and dehydrator from different manufacturers. It’s not for nothing that brands recommend a “family” approach to purchasing materials for gel polish manicure. The fact is that the formulas of all shellac manicure products are created in such a way that their components complement each other and provide maximum durability to the design.
- Mistake #7:
Your manicure shows record wear time, but decorative elements quickly chip, become cloudy or peel off.
Reason:
the secret to high-quality fixation of decor is fixation with a second layer of topcoat, which beginners often do not do. For rhinestones, especially large ones, it will be good to coat the gaps between the crystals with topcoat. And for painting or liquid stones, it is extremely important to comply with the drying time in the lamp. A thick multi-layer design should not be dried for less than 3 minutes on the final layer of topcoat. An excellent solution for the master would be such well-proven top coatings as CND Duraforce and Tnl Viscous. Their thick, rich texture is specially designed for extra-strong fixation of decor and reliable protection of manicure.
- Mistake #8:
You use both completely new coatings and materials that have expired and are about to expire in the same design.
Reason:
It is not advisable to use old gel polishes for manicures. From the time the bottle is opened, the texture of the product changes; shellac can be applied in thick layers. When they dry, air pockets are formed, leading to inevitable detachments.
- Mistake #9:
You apply gel polish and shellac to nails that are too long, and clients soon complain about chips and cracks.
Reason:
practitioners advise not to apply gel polish on nails that are too short. Either increase the minimum length with gel on forms, or advise the client to come for a manicure as soon as at least a small free edge has grown. The fact is that contact of the edge of the nail with the pads of the fingers is fraught with the transfer of subcutaneous fat, traces of household chemicals and sweat from them. If the nails themselves do not wear shellac well, such contact with sweat and fat secretions will inevitably lead to detachments.
- Mistake #10:
Your client has little time for design, and you are in a hurry to create a finished image without observing the required number of layers, their drying time and the density of the materials applied.
Reason:
a hastily created image will not please you with longevity. The nails should be painted slowly and carefully, lightly coating the ends on each layer. If you are working with a UV lamp, dry the layers for at least two minutes each. For greater durability (especially with problem nails), the base and color should be applied in two layers each, and for voluminous and textured decor, re-coat the manicure and top coat.
Bride's manicure with gel polish
For wedding nail art, stylists recommend not only bright white, but also pale pink, caramel, beige and clear varnishes - ideally combined with a white dress. On top of the color you can apply a rub or a foil ornament, a little sparkle or rhinestone. This decoration looks very presentable.
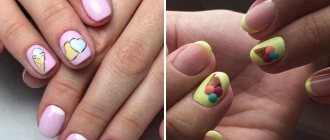
Manicure for short nails with gel polish
The design and color of nails with gel polish can be of any complexity. And on short nails this is considered relevant. So, dark, beige, neon colors and even shiny shades can serve as a base. The main thing is to limit yourself to miniature types of rhinestones and original designs. For example, simple geometry or abstraction.
Preparing nails for a manicure with gel polish: what you need to pay attention to. TOP 10 mistakes made by beginners.
Careful and high-quality nail preparation will help the master quickly and correctly apply the color coating, as well as ensure good adhesion of the nail to subsequent layers of applied materials. Unfortunately, mistakes happen at this stage in the work of both experienced craftsmen and those who have purchased kits for home application of shellac for the first time. What are the consequences of the shortcomings made when processing marigolds and applying materials for degreasing, cleansing, dehydration and improving adhesion?
- Mistake No. 1:
The gel polish base came out with sagging.
Reason:
You did not completely remove the old coating. You need to carefully file down all the layers of the previous design with a nail file or a nail file, so that the layer of the new gel polish base lays perfectly flat on the nail and evens out all the grooves and depressions.
- Error No. 2:
microbubbles and mini-voids are visible in the layer of the polymerized base.
Reason:
during the untrimmed manicure process, you did not completely remove the cuticle, pterygium and eponychium. During the baking process in the lamp, microgaps formed between the nail layer and the particles of skin remaining on the nail. When wearing such a design, detachments at the cuticle and cracks may form due to water getting under the base layer.
- Mistake #3:
The color coating peeled off the nail, starting with the base layer.
Reason:
this is due to the fact that the master could skip the stage of removing the top keratin layer with a buff. Damn the nail, it’s important not to damage it. Do not apply significant force when pressing the tool on your nails and follow the correct direction of movement. Correctly buff from the cuticle to the free edge, with light movements. The same picture is observed if a nail polisher is used instead of a buff. It will make the nail smooth instead of rough, and the coating on the nail will simply not stay on.
- Mistake No. 4:
under the layer of gel polish, cracks formed in the nail plate, which led to the nail breaking.
Reason:
cracks and chips in the nail resulted from thinning of the natural nail due to excessive sanding. The other extreme - not treating the nail well enough with a buff - can result in peeling of the coating due to the peeling keratin scales not being completely removed by the master.
- Mistake #5:
The gel polish peels off as a whole sheet.
Reason:
particles of pterygium remained unnoticed on the nail, and delaminations on the free edge were not removed. With subsequent regrowth and peeling of the pterygium from the keratin of the natural nail, the gel coating also comes off. The continued delamination of the natural nail in depth (under the gel polish) leads to detachments of the manicure already from the end.
- Mistake #6:
Shellac nails and gel polish chip a lot a few days after application.
Reason:
this phenomenon can have three reasons at once - the periungual ridges and the surface of the nail are poorly degreased with a special preparation; the primer application step was skipped; you touched the nail after degreasing and before removing the stickiness from the top coat. How to solve this problem?
- Degrease the nail step by step: disinfect your nails and hands with spray or foam. Next, remove the fat from the nails with a lint-free cloth, and finally treat the nails and side ridges with a dehydrator;
- Don't skip applying acid-free primer. It is advisable to use a product from the same manufacturer as the gel polish base. This way you guarantee maximum adhesion between the base and the natural nail;
- Try not to let your fingers touch the treated nails. If such an incident occurs, re-treat the surface with a stick remover and a lint-free puff.
- Mistake #7:
The coating cracks and breaks off in small pieces.
Reason:
you may not have sufficiently cleaned the nail from dust (sawdust), dirt and sebum (you did not properly treat the surface with a degreaser or used a substitute containing oil instead).
- Mistake #8:
Natural nails, even without blows, develop cracks right down to the flesh.
Reason:
nails suffered from overdrying. You or the technician may have used inappropriate preparations (alcohol, acetone, solvent) for cleaning and degreasing. Their regular use without subsequent treatment of nails with oil or cream leads to weakening, deep dehydration and thinning of natural nails.
- Mistake #9:
when using the base directly on a dried primer (the quality of both products is good and the expiration date has not expired), after a few days your coating still chips and peels off.
Reason:
if you have gone through and eliminated all other options, remember: do not remove the remaining degreaser from the nail with ordinary cotton pads. You can't do this. The discs leave lint that is invisible to the eye, impairing the application of coatings and leading to a loss of aesthetics of the manicure. Residual traces of oil or cream that have not been removed are also contraindicated for gel polish (they also need to be thoroughly “washed off” from the nails with a gentle degreaser). Also monitor the quality of degreasing. If you have applied the base, dried it and see bald spots, repeat the application of the base and be sure to seal the end of the nail.
- Mistake #10:
Your client has long but thin nails, the length of which you mutually decided not to remove.
Reason:
gel polish certainly shields nails from external negative influences, but cannot 100% eliminate the risk of cracks and chips. The coating maintains elasticity on the nail. And if the nail plate bends and breaks, the same will happen to the nail. Hence the deep cracks in the nail and the shellac itself. The way to eliminate the problem is to first strengthen the nails with biogel or correct the length.
Manicure for long nails with gel polish
Medium and long nails are a platform for beautiful designs. For example, a manicure can be done in the traditional way. In this case, a shiny monochromatic finish in white, red, gray and black shades is an excellent backdrop for modern nail art. Another option is an extravagant design that will make the manicure very noticeable.
Fashionable seasonal manicure with gel polish
Of course, spring-summer gel polish design differs from autumn-winter manicure, therefore, you need to design your nails differently.
Winter manicure
Winter nail ideas are laconic, strict, with moderate decor, in beige and dark shades. But, as a rule, they are accompanied by brilliant decor. Which resonates as much as possible with the concept of winter holidays, coziness and is often closely related to “hygge”. This style is typical for Norway, Denmark and Sweden, and its elements are used not only in interior design, fashion, but also in manicure.
Autumn manicure
In autumn, when the weather is no longer warm, manicures are designed in such a way as to emphasize the mood. It is better not to use this approach in 2022. On the contrary, try to add delicate and bright colors to your nail design. Make a colored French manicure, highlight the nail hole brightly, combine several shades at once in a manicure, draw golden leaves, graphic landscapes and your favorite characters on your nails.
Spring manicure
At this time of year, they mostly use pastel colors, delicate watercolor art, graphic flowers, shellac design with sliders + stamping, and beautiful color transitions. In a word, ideas that remind you of the imminent arrival of warmth and summer.
Summer manicure
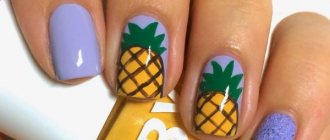
In the summer, creative artists will create nail designs in a bright palette of gel polishes. In fact, the summer style of manicure design will be distinguished by fruity and floral nail art, neon and other colorful coatings.
Hand skin care
In order for the skin of your hands to maintain beauty and youth for many years, it is necessary to do skincare procedures. We will need:
- cuticle oil;
- hand cream.
At the end of the manicure, you need to apply cuticle oil. Place a drop of oil on the cuticle of each nail and rub well. Please note that there are mineral and natural oils. Mineral oil forms an invisible film on the surface of the cuticle. If you use this oil every day, you will get the opposite effect: the cuticle will begin to dry out. This oil is more suitable for masters: the client comes for a manicure once every 3-4 weeks, and mineral oil is ideal for single use. At home, on a daily basis, it is better to use natural oil, for example “Dadi Oil”, “ruNail”.
Organic oil for nails and cuticles Dadi Oil Famous Names 3.75 ml
After the oil, you need to apply a moisturizing or nourishing cream to the skin of your hands and cuticles.
NOTE! It is necessary to take care of your hand skin not only after a manicure! Before going to bed, smear your hands with a moisturizing or nourishing cream, and in the cold season, before going outside, with a protective cream. Once every 1-2 weeks you can scrub and perform paraffin therapy. To save time and money, you can purchase cream paraffin from “Aravia”.
Cream paraffin Flower nectar with flower and beeswax ARAVIA 300 ml
Let's look at the technology for using such a cream.
- Thoroughly scrub your hands to remove dead skin cells.
- Apply a moisturizing or nourishing cream and rub it in well.
- Apply a thick layer of paraffin cream.
- We put on plastic gloves and do not take them off for 15-20 minutes.
- After the specified time has passed, remove the gloves and wipe off the remaining paraffin cream with a paper towel.
After the procedure, it is advisable not to wet your hands for two hours.
Be sure that after such care your hands will tell you: “Thank you!”
Matte nail design with gel polish
The issue of finishing coat is always particularly acute since girls are constantly trying different types of nail designs to diversify the design. And if a few seasons ago literally everyone had a manicure with a beautiful glossy shine, then in 2022 the combination of matte restraint and shining decor will continue to be in trend.
Stamping on gel polish
Do you like monochromatic coverage? But it can also be decorated with an interesting stamping pattern/geometry or plot, using all or several nails. Popular types of stamping designs:
- layering of color,
- stamping + stickers,
- gradient,
- painting with gel polish,
- stamping with rubbing decor, foil,
- matte design.
Features of edged manicure
The difference between classic edged manicure and other techniques lies in its name. In the European technique, the cuticle is softened with a remover and then pushed back with an orange stick. Classic manicure uses metal tools (scissors, nippers, spatulas, etc.). The cuticle is first softened and then carefully trimmed. The main disadvantage of this type of cuticle treatment is the possibility of damaging the delicate skin around the nail. There is also a small chance of infection. However, experienced craftsmen masterfully master this technique, and it does not cause any complaints from clients. In addition, as mentioned above, the European technique is not suitable for all girls due to the cuticle being too rough. Masters recommend starting with a classic manicure, and then gradually moving on to a European unedged manicure when the cuticle becomes softer.
Also a distinctive feature of classic manicure is the use of water. Before starting to manipulate the client’s hands, the master prepares a hand bath to soften the cuticle.
The main advantages of classical technology:
- Available for home use;
- Suitable for working with rough cuticles;
- Does not require large expenses;
Disadvantages of trimming technique:
- If you handle the tool carelessly, injury to the cuticle or nail plate may occur;
- After the procedure, hangnails often form.
In general, the technique is simple to perform manicure at home and quite popular.
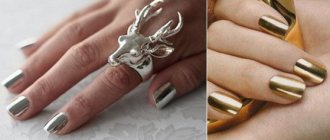
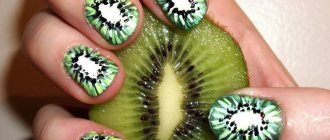
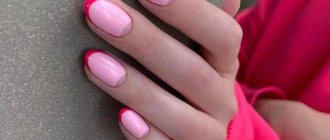
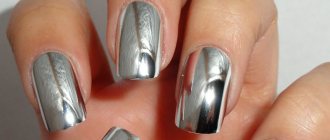
Photo of fashionable manicure with gel polish, ideas 2022
Magnetic gel polish
- We recommend on the topic: French manicure with design - photos, the best new items.
- Brilliant French: a large selection of new photo manicure ideas.