Peculiarities
Due to the fact that a teddy bear symbolizes carefree childhood and the joy of first love, this design is suitable for young romantic people. High school students, students and girls whose work is not limited by the strict dress code will be able to decorate their fingers with drawings of Teddy bears.
This design will look beautiful on nails of medium length or longer than average. In this case, it will look neat, emphasizing the beauty of the form. It is often recommended to choose square and soft square shapes, because... a round and almond-shaped shape will not allow you to complete the drawing completely, perhaps only partially.
If you have short nails and you want to do such a manicure, you can draw Teddy not completely, but only his funny-looking face, complementing the design on the other fingers with thematic patches.
Options for execution
The decoration on your nails will not look good unless you do a manicure first. Any version of it will do: classic edged, European or hardware. All nails must be the same length and neatly filed. The design will look more impressive if you choose the right shape of the nail plate, ideal for your hands. The cuticle also needs to be processed and removed. You can lightly sand the plate before applying the base coat.
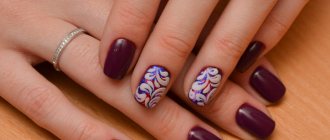
A manicure with the image of a toy from the “Me to you” series will help express the tenderness and softness of nature. There are several methods for applying it; you can try them all and choose the most suitable one. It is allowed to decorate all the nails of the hand with a design or emphasize only one. Most often, girls prefer to place bear cubs on their ring fingers or thumbs.
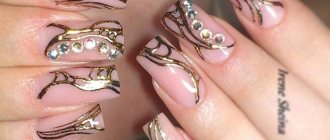
To do everything quickly, you can purchase special stickers with the appropriate design and transfer them to the nail. To add a little variety, it is worth adding some kind of pattern to the Teddy image. It is allowed to use rhinestones, beads and snowflakes. And when you have free time and creative drawing abilities, you should try to create a pattern using paints and a brush. This will help in creating an attractive and unique image. As a background for Teddy, it is not necessary to use a single-color varnish, but to depict a pattern on top of a classic French manicure.
Drawing a Teddy Bear with a brush: detailed instructions
It will take at least half an hour to apply the picture on your nails yourself. To make a Teddy bear look decent, you need skill. Therefore, the chosen nail art may not work out the first time. Before starting work, you should prepare the following:
- nail file;
- scissors;
- cuticle remover;
- old varnish remover;
- thin and flat brushes for nail design;
- acrylic paints, preference should be given to shades of pink, blue and gray, and for the outline, nose and eyes of the bear you will need black;
- base coat;
- colored varnish;
- fixative
Color selection
To draw bears, you will need the following colors:
- white (for backing);
- gray (if you don’t have it, you can mix black and white);
- black (for drawing eyes and detailing the pattern);
- red or blue.
The main tone of the coating in this manicure can be your favorite color, but it will look most advantageous on white and pastel shades. You can limit yourself to a camouflage base - this way you will also reduce the time it takes to complete the coating.
Creation methods
When deciding how to decorate your manicure with a pattern, evaluate your artistic abilities and the availability of the necessary materials. Perhaps a more suitable option for you would be to buy stickers or sliders than to select gel polishes of the desired colors, brushes and additional decorative elements.
Regardless of the method of applying the pattern, gel polish coating requires the following materials:
- buff;
- primer;
- base;
- top;
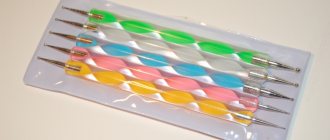
- brush;
- dots;
- napkins;
- de-sticking liquid.
We perform a coated manicure following the instructions:
- we shape the nail and remove the gloss using a buff;
- We perform manicure using the technique available to you (edged, hardware, combined or European);
- remove the sawn-off particles , apply degreaser and primer (the primer dries in air for 1 minute);
- We apply the base and, if necessary, perform alignment in compliance with the correct architecture of the nail. If you do not plan to cover it with color, then choose camouflage shades of the base. Dry in a lamp;
- Apply two layers of color coating , the first thinner, the second denser. Dry each layer in a lamp;
- we carry out design;
- fix the result with topcoat and dry it in a lamp.
Teddy gel polish
You have completed the necessary steps in the instructions for applying gel polish. Let's start using it to draw Teddy step by step:
- Using white gel polish we paint a base in the shape of our future hero and dry it;
- then we depict the head and torso in gray and hold it in the lamp;
- Draw the muzzle in white. If this is a winter manicure, you can add additional elements: a scarf, a heart, a ball - add them in the desired color and send the nails to dry;
- Using a thin brush and black gel polish, draw the bear along the contours and add eyes. Using the same brush or toothpick, we make Teddy more fluffy: we stretch the black color along the contours. Now we put the hand in the lamp for final drying.
Using stickers
Stickers are the easiest way to apply a design; it does not require any additional special or improvised means. Before creating a top coat, remove the sticky layer from the base or color and place the sticker on the nail, pressing it firmly. Then immediately cover with topcoat and dry in a lamp.
For greater durability, you can apply two layers of topcoat.
Using sliders
Many people are afraid to use sliders without prior practice, but rest assured, you will succeed, the main thing is to work carefully.
To transfer a design from a cardboard backing to a nail, first cut out the required element. Dip it in water for a few seconds (it’s better to use tweezers for this).
After pulling the slider out of the water, place it on a napkin, gently blot it and separate the film with the pattern from the cardboard backing. Then place it on the nail and gently straighten it. Fix with topcoat and dry in a lamp.
Please note: there is a special topcoat for slider designs and stickers; it will fix the design more reliably and prolong the durability of the manicure.
How to draw a Teddy bear with a flower: a step-by-step drawing guide with a simple pencil
- Let's discover a few tricks that will make it much easier to transfer your favorite Teddy bear image onto paper. Difficulties may arise at the stage of drawing the face. However, you shouldn't stop working.
- We will tell you in detail how to proceed to the next step. Even without any special knowledge or skills, you will master drawing skills that are accessible even to children. And under your strict guidance, your child will easily make his first drawing of a well-known and beloved image - a Teddy bear.
Teddy bear and sweets
What techniques will we use when drawing?
- Add the necessary lines along the pre-drawn contours of geometric shapes.
- We will use notebook sheets (checked).
- Let's use ready-made diagrams
- All this will help us achieve the desired result - get an aesthetic drawing, respecting the proportions and not using a lot of unnecessary auxiliary lines.
The classic Teddy is a gray bear with pronounced seams and patches. The bear can have all sorts of objects in its paws: a toy, a daisy or a big heart. Thanks to the patches, this image of a toy bear has become recognizable.
Teddy bears
Draw a bear with a flower
- Using straight lines without pressing on a simple pencil, we indicate the boundaries of the future drawing. After this, we draw two circles for the head and torso. Divide the circle for the head with a straight line into two halves - upper and lower.
Draw two circles
- We draw another dividing line - vertical. We should get a figure in the form of a cross. Thanks to these auxiliary lines, we will be able to symmetrically arrange the remaining elements of the bear's face.
Drawing auxiliary lines
- Stepping back a little from the horizontal line, we draw a short segment. This will be the upper outline of the bear's face. We outline the bear's ears with short curved lines. Adding paws. Please note: the lower part of the legs is slightly rounded, which gives the bear's limbs a clubfoot.
- Let's move on to drawing the muzzle. We complete the oval under the horizontal auxiliary line, continuing the earlier segment. Inside this oval we draw another smaller one. This will be the bear's nose.
Draw the face and paws
- Above the nose, directly on the horizontal line, draw two small circles. These will be the bear's eyes. To make the bear drawing cute and touching, lower the edges of these circles a little down.
Adding important details
- On the left we finish drawing the patch. We erase the auxiliary lines. We complete the missing details: a patch on the stomach with rare stitches in the form of dashes, seams on the head, cheeks and head of the bear.
Finishing the petals
- Draw a chamomile stem in the bear's paw. Add an oval - the core. We finish drawing the petals. We arrange them in a circle. Let's decorate.
Design ideas
Depending on the time of year and upcoming events, you can use various options for manicure with a Teddy bear.
New Year's manicure
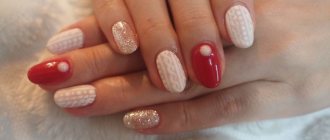
New Year's bears can be beautifully combined with snowflakes, fir branches and gift boxes. All nails can be red, white or green. So, your manicure will not just be winter, but will correspond to the Christmas theme.
Teddy bear with heart
If Valentine's Day is coming soon or some romantic event is planned, a Teddy with a heart in his hands or on an envelope will not only complement your image, but will also help you demonstrate your reverent attitude towards the event.
Teddy bear with inscriptions
When emotions are raging inside that you want to tell everyone about, then simply draw a plush miracle with the appropriate mood and make an inscription that will say everything for you.
The following romantic options are often used: I love you, Miss you.
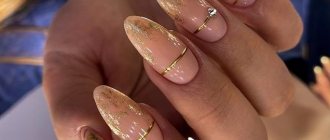
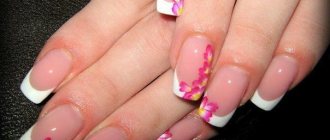
French with a bear
If you are a fan of the classics and only French manicure is your priority, then the teddy bear can be placed sitting on the smile line, looking out from behind it, or in any other form. The beauty of this design option is that it is universal and does not require effort in choosing colors.
Other ideas
If you want to move away from standard drawings from the Internet, make your characters three-dimensional. To do this, you will need a modeling gel or a thick rubber base. With their help you can make a voluminous belly and nose.
By mixing them with glitter and pigments, you can add volume to additional decorative elements (a hat, scarf or balloons in paws).
Use your imagination and you will get an interesting and bright design.
How to draw a Teddy bear with a heart?
Drawings where cute little animals or angels are hugging a big heart are an excellent gift option for Valentine’s Day, Angel’s Day, or just for any reason to please a loved one. After all, it is impossible to remain indifferent while looking at a touching drawing of a little bear.
Adviсe:
- To draw an object in the paws of a bear, you need to depict the limbs slightly extended forward. The outline of the heart is drawn as standard. Despite the schematic representation of the heart, it looks very original in the fluffy paws of the bear.
- If you consider a drawing with a heart to be banal, then draw a gift in the bear’s paws, tied with a shiny ribbon. You can also draw a bouquet of flowers or one large flower, several balloons. The last option is the simplest to implement: a thread is drawn, and an oval or circle is added on top - a ball.
How to draw a Teddy bear with a heart step by step with a simple pencil
Step 1:
- We start with simple sketches, thanks to which we can correctly build the composition of the future drawing of Teddy with a huge heart. We draw the contour lines of the heart. It occupies most of the foreground in the picture. In the background we draw a sketch of the body and head of the bear using light lines. Remember that you don’t need to put pressure on the pencil.
- We clarify the outline of the heart, trying to draw with smooth, even lines. The main thing is not to go beyond the previously outlined contour.
Using light contours we outline the initial lines
Clarifying the outline of the heart
Step 2:
- Let's move on to drawing the outline of the bear's head. We finish drawing the small ears.
- Now it’s time to draw the bear’s face. Here, the classic Teddy usually has patches with uneven seams. This is a characteristic feature of such bears. Therefore, we make sure to draw all the small details. We clarify the outline of the bear's nose and small eyes.
We clarify the contour of the bear's body
Draw the nose, eyes and patch
Step 3:
- We draw the outline of the torso, the pear's legs, in which the bear holds the heart. Again, we add an aged effect to the bear by drawing seams on the patch patch.
- We draw the slightly clubbed paws of the bear. Don’t forget that our bear is old, which means it is very worn in some places. Therefore, for better preservation, it was darned a little. Let's show these seams with a few strokes.
- The final touches are rare strokes along the entire body and head of the bear, which will give the toy a fluffy look. To convey all the plushness of Teddy, we draw strokes, focusing on the original picture.
Draw the paw and the seams on it
Draw the hind legs
Draw the hind legs
Using short strokes we denote the fur of the bear
- Now all that remains is to decorate the bear with gray, the bear’s nose with blue, and the heart with red.
Coloring the drawing
Some subtleties of drawing a Teddy bear with a simple pencil:
- The advantage of drawing with a simple pencil is that any mistake can be corrected just by using an eraser.
- To give volume to the objects shown in the picture, shadows are added - dashed lines. A novice artist, using chiaroscuro, can make a drawing three-dimensional or significantly spoil the image. After all, it is not always possible to apply the tint correctly.
- You can also draw a Teddy bear with chalk on an easel. In this case, attention is paid to drawing the play of light and shadow. In any case, the task remains the same - to form a full-fledged image of the bear. Even when using simple lines, the picture will turn out to be very interesting and unusual. You just need to be careful and transfer the lines in accordance with the original.
- Drawing with ink is much more difficult. Indeed, in this case, maximum line accuracy is required. A drawing made with ink certainly looks very colorful, however, during the drawing process, one wrong stroke can ruin the entire picture.
- Therefore, before you start drawing a Teddy bear with paints or ink, practice drawing the necessary lines with a simple pencil and fill your hand.
Important: another difficulty when drawing toys may be the need to demonstrate the texture of soft fur. To make it clear to everyone that the picture shows a teddy bear, draw with simplified lines.
Teddy with a heart
Interesting fact: toys made using the Teddy technique become collectibles. The topic of creating Teddies fascinates both amateurs and professionals. In various museums scattered around the world (there are about 20 of them), teddy bears are exhibits and are played at special auctions. One of the most expensive Teddy bears was sold at a similar auction for 90 thousand dollars.