Applying gel polish butt to the cuticle is important and necessary in creating a high-quality and beautiful manicure. Since shellac, unlike acrylic nails, does not have the possibility of correction, the gel polish “under the cuticle” technique has successfully taken root. This look has a lot of significant advantages, but it also requires the master to have experience working with gel polishes and a strong hand in hardware manicure. Let's get acquainted with all the nuances and learn how to paint under the cuticle quickly, efficiently and safely.
Advantages and disadvantages of subcuticular technique.
- The ability to enjoy the perfect manicure where it is impossible to change the design.
This method of decorating nails is chosen by girls preparing for business trips, seaside holidays, long absences (including to the maternity hospital);
- Beautiful, durable, sleek design with perfect highlights that last over 3 weeks.
Depending on the growth rate of the natural nail plate, you can see a flawless manicure without gaps in the overgrown nail even more than the standard 14 days (for those whose nails grow slowly);
- Pleasant financial savings.
In this design, the fact of its long-term wear is visible much later, when the nails grow, which means you can make an appointment for a visit to the master a week later;
- Expressiveness and aesthetics.
Deep application of gel polish into the subcuticle pocket will create the visual effect of impeccably well-groomed nails, without the unesthetic gaps typical of growing nails. In addition, this design creates an incredibly positive mood. It will seem to others that your nails, already painted with shellac, are growing. Only you and your master will know the secret of a perfect finger outfit.
You can enjoy all these pleasant moments only if your nail artist is familiar with all the subtleties and secrets of cuticle design. Otherwise, you will have to face such annoying moments as:
- sagging and unevenness of the coating line.
If the gel polish under the cuticle is painted unattractively, without the correct bend, a torn and bumpy line at the nail hole can lead to premature detachment of the coating after regrowth. Or you will simply have to change the design in favor of a more aesthetic one;
- low design durability.
If the master has poorly removed the pterygium and eponychium in the subcuticular part of the nail, the water that gets there, coupled with household chemicals, will help reduce the durability of the coating. And instead of saving, you will have to spend twice as much;
- design with aesthetic flaws.
Inexperienced craftsmen, when performing this design, often inadvertently leave droplets of gel polish on the cuticle itself or on the side rollers. This is unacceptable when painting the nail plate deeply. Pigmented skin, at a minimum, looks unsightly, and at maximum, can lead to an allergic reaction to gel polish;
- damage to natural nails.
The “under the cuticle” technique requires very careful preparation of the matrix zone (the root zone of the nail). Excessive cleansing and pressure on the nail can lead to the risk of a fungal infection or even separation of the nail plate.
How can you reduce the risk of negative aspects so that a new type of design brings you only joy? Let's find out...
Gel polish runs dry
When gel polish leaks, two scenarios can be distinguished:
The root causes of problems lie in application.
Having discovered and solved them, you won’t be afraid of gel polish streaking onto the cuticle in the future:
Summing up the reasons for gel polish flowing onto the skin and cuticles, there is clear advice - practice correct application. Your family members can become wonderful “nail models.”
How to protect nails and skin and remove imperfections when designing “under the cuticle”?
Safety precautions when applying gel polish to nails require a minimum distance of 1 mm from the cuticle area. Thus, we protect the nails from harmful bacteria and provide at least minimal access of oxygen to the nail plate. How to combine this requirement and the popular subcuticular coloring? Practitioners give the following recommendations:
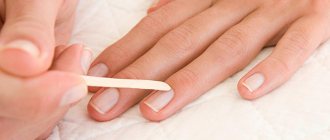
- For fragile, thin, weak nails, use plastic pushers or an orange stick. It is even preferable to remove the latter from the nail and from under the overhanging periungual skin. Less pressure on the nail and lower risk of injury;
- protect the cuticle and adjacent skin with special preparations - “skindefenders”. This pink little thing from the popular brands Masura, Konad, Mo You London, El Corazon will allow you to quickly and efficiently remove tiny droplets and smears of gel polish, without the need for correction using a gel polish remover;
- If you don’t have a rubber-based preparation to protect the cuticle on hand, as well as wooden sticks for correction, use a clean nail polish brush and shellac remover. Try to choose a product from a professional brand, with softening and moisturizing components;
- If you still missed the moment of correction, after drying the manicure in a lamp, apply a preparation to soften the cuticle on the dried gel polish, wait a while and scrape off the blemishes from the skin with the sharp part of a metal pusher. Failed? Dont be upset. Let the shellac finally set on the nail and, when you can hold your hands longer in warm water, try again to remove unwanted particles of the coating.
Why gel polish runs and how to remove smudges
What troubles can happen when working with gel polish, especially for beginners. A frequent request for advice is the question of gel polish running - how to fix it, what’s wrong and how to prevent it in the future.
In this article we will tell you how to avoid smudges of gel polish during application and what to do with existing ones.
The perfect cuticle design: three simple ways to create the look.
So we moved on to the most important thing - creating a finished look in gel polish using the tricks of subcuticle design. The general technique for creating a manicure in this style is as follows:
- Having prepared your nails, apply base to them as close to the cuticle as possible, but without going beyond it. And don’t forget to seal the free edge;
- Gel polish must be applied in very, very thin layers, without making any indentations, using a natural brush or a painting brush. Try to additionally slightly pull back the back of the nail with the thumb and forefinger of your free hand;
- dry the first layer for 2 minutes in a UV lamp and 30 seconds in an LED device;
- Apply a second (if necessary, then a third layer), polymerizing in a lamp for the same amount of time. Do not forget to seal each applied layer of color coating;
- Without removing the sticky layer, apply top coat. The area where the finish is applied must match the area of the colored gel polish. Drying in a UV lamp should take 3 minutes;
- Decorate the manicure with any desired decoration or painting, repeat the application of the top and, after baking in the lamp, remove the stickiness. The movements should be wiping, and the napkin with liquid to remove stickiness should move from the cuticle to the free edge.
The very effect of the coating, as if by magic growing from under the nail fold, can be created in three ways.
Using a separate brush.
It is more convenient to work in this case by applying a few drops of shellac to the palette (to draw the subcuticle pocket).
And as a tool, choose a thin brush with a beveled angle from a set for Chinese nail painting. Stages of design execution:
- place the brush sideways to the nail plate as close as possible to the cuticle and paint the semicircle and the area of the side ridges with several strokes of equal thickness, pulling the skin with your finger;
- dry the contour in the lamp and re-apply the gel polish to the previously dried strokes;
- Having drawn a kind of frame (translucent hole), use a brush from the gel polish itself to paint the central area of the nail with thin, smooth strokes;
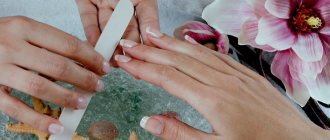
- try not to create overlapping layers. If they accidentally formed, and you noticed it after drying in the lamp, lightly buff the edges of the color coating, smoothing out the transitions. The top will help you completely eliminate visual flaws.
Using the original gel polish brush.
Just like the first method, this option also requires concentration and accuracy.
As a rule, beginners begin to master the rather complex subcuticular technique from here. Image creation steps:
- Having collected a little gel polish on the nail, place the brush at an angle of 45 degrees to the nail (lift the back roller and pull it with your finger);
- Using the pointed corner of the brush, make a stroke in a semicircle, spreading the brush like a fan. Repeat the same application on the other side of the nail;
- usually the central zone of the nail is already relatively evenly painted. However, to be sure, apply a few strokes to even out the color. If you need to remove over-applied coating, increase the angle of movement of the brush on the nail. For a more dense application of color, try to hold the brush almost lying on the nail.
Mechanical (tactile) method.
Creating an image in this way is convenient only if you (or the client) have sufficiently flexible periungual skin (elastic, mobile, moisturized and well-groomed). Otherwise, your hands will quickly get tired of constantly controlling the cuticle and back roller. Due to the labor-intensive and elaborate nature of the work, this method is most often used by experienced craftsmen. And they paint the nail with the original brush, from the gel polish. Involuntary flaws are corrected with a dry hair brush. Essentially, with this subcuticle technique, you are using a second coating method. The only difference is that you push back the cuticle more than once, at the very beginning (before applying strokes), but accompany each brush stroke by constantly pushing back the overhanging skin. Thanks to this, although the manicure takes longer, it is performed more carefully and efficiently. The manicure turns out to be the most expressive and looks fresh and tidy for longer.
How to remove dried gel polish
Remove the stickiness from the dried gel polish. We separate the coating that has dried to the skin using a scalpel or hatchet-shaped scraper/pusher.
Afterwards, we remove the dust and perform the remaining layers with a slight overlap of the processing area with a milling cutter.
This guide is intended solely to help beginners and occasional problems with pros. It is normal to constantly progress and not allow the coating to bleed.
Source
Important nuances: how to paint correctly and how to correct mistakes in the cuticle design.
The beauty and effectiveness of this design depends not only on mastering the brush, but also on observing the following subtleties and life hacks:
- apply thin layers, which will allow you to reduce the formation of a dispersion layer (contact with which is undesirable for the skin);
- To ensure uniform distribution of color, do not forget to lift the pigment from the bottom of the bottle (by rolling the bottle briefly between your hands, or stirring with your own brush or toothpick);
- If you have been painting with one shellac or another for a long time and suddenly see microparticles of plastic from the cap on your nail along with the coating, do not apply this gel polish straight from the bottle. It will take a lot of time to remove grains from under the cuticle. Drip shellac onto the palette, remove unnecessary inclusions and paint directly from it;
- When sealing the end, work with an almost dry brush. Otherwise, during polymerization in a lamp, an unsightly bead may form on the free tip;
- If you have dried both layers of color coating and found that the pigment of the gel polish has crawled to the center of the nail, then the dispersion layer of the base is to blame. Try removing excess with a dry brush or lightly blot the nail with a lint-free cloth (not all the stickiness, but only partially dry the nail);
- After creating a design, massage the cuticle more often with creams, oils and waxes. This way you will quickly relieve the stress of the back roller control procedure and influence the rate of cuticle growth (in the direction of slowing it down). At the same time, practice carefully moving away the proximal cushion after the massage. Over time, in this way you will not only be able to increase the length of the nail bed, but also improve the elasticity of the skin for subsequent subcuticular manicures.
We hope that we were able to cover all possible questions that you might have about the cuticle manicure technique. In conclusion, we can only wish you to train more and not lose heart from the first mistakes. Experienced nail professionals advise looking for the one that suits you best in terms of ease of use from the available application options. Fantasies in the field of decorating marigolds created in this style are truly limitless.
Gel polish runs on the cuticle: what are the reasons and what to do
Manicure salons have not yet opened in all cities, so some girls have to, for example, make their own gel polish. Long, tedious and not without problems.
We've already talked about cuts, now let's move on to streaks - also a common problem when the base, coating or top can flow onto the cuticle and/or periungual fold.
As it grows, the cuticle outline will be unclear and blurred. Many girls begin to pick at the swelling, which will lead to detachments in the future. To prevent this from happening and you don’t have to redo everything all over again, let’s look at the reasons for the formation of streaks.
Poor quality manicure
The presence of pterygium ( these are thin films layered on top of each other, between the cuticle and the socket
) and poorly processed cuticle.
By the way, when a master is told about “removing the cuticle,” they do not mean cutting it off completely (this is dangerous to health), but removing the pterygium.
Due to an insufficiently cleaned pterygium, any base will have streaks.
I don’t recommend cutting manicure; it’s better to buy a remover - a product that softens the cuticle. Apply it to the cuticle. You wait until the pterygium gets wet (just don’t let the remover dry out) and simply clean it with an orange stick.
Dust
After you have done your manicure before applying the coating, the dust remains under the cuticle. She also provokes swelling
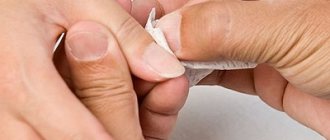
Don’t just brush over your nails, but carefully remove the dust under the cuticle. This can be done with an orange stick, which is tightly wrapped in a napkin.
Holding your hand in the lamp incorrectly
You put your hand under the lamp and accidentally touch the coating. We get something like the one in the photo below.
You can't put your hand down. Drying all your fingers at once is wrong: either 4 at once and the thumb separately, or each nail separately.
If you suddenly touch the coating of the lamp, then remove with a napkin everything that has not dried, then dry the nail completely. Then, in the lateral sinuses, carefully clean the nail with a cutter, sand the surface, degrease and reapply the coating.
Problem with materials
The consistency of the varnish or base is too thin. The problem may also be with a specific shade that constantly flows.
Here are the options:
Gel polish removal methods
There are two ways to remove artificial turf: using sawdust and by soaking it with a special liquid or napkins.
To remove the coating using sawdust, a special apparatus and removal cutters are required. Therefore, this option is suitable only for those girls who are familiar with hardware manicure.
Perhaps someone will have the thought: “Why not try to remove it with a rough file?” But we’ll immediately answer that this method is quite problematic, takes too much time and can damage the natural nail. It is necessary to try very hard to treat the area near the cuticle, and there is a risk of rubbing the skin. Therefore, at home, the easiest way to remove it is by soaking.
If you want to master sawdust removal, then sign up for basic courses at our licensed school “ParisNail”! After training, you will not only do a flawless manicure for yourself, but will become a real professional in the nail industry and will be able to work as a manicurist!
Maceration
This method involves soaking the gel polish with a special acetone-containing liquid. You will find a list of materials required for this procedure and detailed technology for removing gel polish in the article “How to remove gel polish (shellac) at home?”
NOTE! Not all base coats can be soaked, so ask the seller to select the base that is suitable for this type of removal.
Manicure stages and possible mistakes
Today there are 3 main types of manicure:
Combined and hardware manicure must be done using a special manicure apparatus, but before using it, it is better to undergo training, since improper operation of the apparatus can lead to damage to the nail plate, for example, cuts. For beginners, it is better to do a classic manicure at home.
Stage 1. Shape filing, cuticle processing
Before applying gel polish, you need to put your nails in order: treat the cuticle, file the shape.
What do we do at this stage?
Stage 2. Preparing the nail plate for coating
What do we do at this stage?
Mistakes at the nail plate preparation stage
Mistake #1:
Typically, people with oily skin or those prone to excessive sweating have a moist and oily nail structure. When preparing such nails for coating, it is necessary to use a dehydrator (nail prep) to deeply dry the nail plate, remove excess moisture from it and improve the adhesion of the natural nail to the artificial coating.
Mistake #2:
The free edge of the nail is one of the most vulnerable places: if you do not pay proper attention to it, chips and detachments may appear. To improve the adhesion between the nail plate and the artificial material, it is necessary to use a primer. Primer is translated as “primer”. There are acid-free and acidic primers.
The acid-free primer acts as double-sided tape and ensures strong adhesion of the natural nail to the artificial nail.
The acid primer lifts the keratin scales of the nail plate for better adhesion to the artificial material. Since the acid primer contains aggressive components, you must be careful not to get it on the skin and cause a burn. It is recommended to use it before extensions for girls with wet or oily nail texture.
Stage 3. Covering the nail plate
What do we do at this stage?
Errors at the stage of covering the nail plate
Mistake #1:
You used the wrong base for your nails.
The condition of the nail plate is different for everyone: for some it is strong, while for others it is thin, soft and plastic. You cannot use the same base for all nails. It is necessary to analyze the condition of the nail plate and pay special attention to the choice of base coat.
Today there are 3 main types of base coatings: hard, elastic and camouflage. What are their fundamental differences? Which one to choose? Let's figure it out.
Hard bases
Elastic bases
Elastic bases are great for beginners: they are easy to work with, as they do not spread, and the alignment is perfect. Using elastic bases you can extend your nails. Elastic bases are great for soft, highly flexible nails. But on long nails they sag over time, that is, after a while a “dip” appears across the nail.
Why is this happening?
Bases are soft gels, and they, in turn, as we said above, can be elastic or not.
Elastic bases perfectly strengthen the nail plate when leveling, because they are flexible, tenacious, and when the free edge moves, they, like an elastic band, move with it. But this is precisely why shrinkage occurs.
There are bases that contain solid plasticizers. Solid materials do not move with the nail and, accordingly, do not shrink. But keep in mind, UNDER HEAVY LOAD, almost any base will give minimal shrinkage.
What to do?
Strengthening with acrylic or hard gel, but this is a completely different procedure. In addition, the harder the material, the worse it soaks and the more difficult it is to cut.
ADVICE! Sometimes it is not very clear from the name of the base whether it is hard or elastic. To determine the type of base, you can do the following: apply a small drop or strip of base to the surface of a transparent plastic bag and put it in a lamp to polymerize. If after polymerization the drop (strip) bends, it means you have an elastic base in your hands. If you can’t bend the drop and it cracks, then the base is solid.
Mistake #2:
You held your hand in the lamp incorrectly and the coating did not dry well.
How to hold your hand in the lamp correctly?
Mistake #3:
You stored and transported the gel polish incorrectly, it has thickened or air bubbles have formed in it, which is why the coating does not adhere well and is difficult to work with.