You can make an interesting and original nail design yourself, at home, using special manicure brushes.
With their help, you can not only create beautiful patterns and designs, but also decorate your nails with acrylic sculpting.
Although manicure brushes are very similar to regular paint brushes, you need professional tools to create truly stunning designs. It is the correct use of nail design tools for their intended purpose that provides half the success when creating designs on nails.
Types of manicure brushes
So, let’s look at the description in more detail: why which brush is used. Which ones are right for your work?
By purpose:
- Gel modeling is carried out using rectangular or square .
- Modeling with acrylic is done with an oval brush with long and hard bristles.
- To draw small details, use very thin brushes with long bristles.
- Sculpting small details from acrylic is ideally achieved using a special sculpting brush with a sharp tip.
- The area of application of flat or oval tools is Chinese painting. They make it convenient to apply a double stroke
- French is painted using large tools.
- A fan brush is ideal for working with glitter and other bulk design materials .
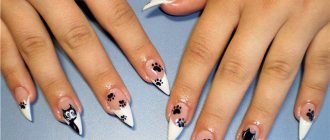
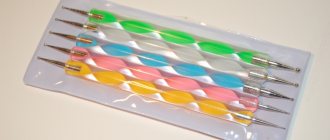
- brush (dotter) has balls of different diameters at the ends; rhinestones or paint are applied pointwise to the nail plate.
- A special pen for nail art is filled with special paint, which allows you to draw patterns of any complexity.
Rectangular brush
Dots brush
| Brush type | What is it used for? |
| Dots | Dots, straight lines, curls, application of rhinestones |
| Flat brush | Chinese painting, complex and voluminous drawings, smooth transitions |
| Round (spot) | Small details and patterns, lace ornament |
| Oval | Chinese painting, acrylic sculpting of small decorations |
| Fan | Shading, background, creating halftones, working with glitter |
| Thin | Fine lines, drawing contours |
According to the material:
- Natural. They are made from natural wool. The most commonly used wool is sable or kolinsky. If used correctly, these brushes will last a very long time. They have an excellent pile, which makes them versatile in using any type of paint.
- Artificial. They are made from special polymers, such as nylon. The service life of such brushes is significantly less than natural ones. But they have an affordable price, which makes them an ideal option for beginning craftsmen.
By thickness:
The tassels are numbered from zero to eight. The thinnest ones are numbered 0. They are used for drawing patterns with small details. The largest one is number 8. It is used to model the tips of artificial nails.
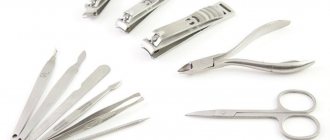
Accessories for design
The choice of materials and tools for nail design - creating patterns and decorations - is huge. Conventionally, all these funds are divided into 2 categories:
- To create a flat manicure. This group includes foil, stickers, ribbons and other materials for nail extensions that do not rise above the main coating.
- Tools for 3D design. These are voluminous beads, rhinestones, bouillons, intertwined threads. They may protrude above the surface of the nail.
Stickers, ribbons and foil
The most popular design accessories:
- Stickers are drawings on a durable adhesive base. They are applied to dry varnish and covered with a quick-drying transparent layer.
- Ribbons. There are different textures (from fabric to metal) and colors (plain, patterned, fabric design). They also have a sticky base and are applied to a dry coating.
- Foil. This is a special film with amalgam coating. The master applies it to the painted nail and presses lightly. The foil print is secured on top with transparent varnish.
- Blood during bowel movement
- What happens if you swallow a needle
- How to take activated charcoal to cleanse the body. Proper intake of activated carbon
Glitter powder
It is not necessary to have a shiny polish in your arsenal - you can always add a little brightness to your nails with the help of a special powder. Small glitter comes in small plastic packages and can have different shapes: round, square, triangular, diamond. Glitter is applied to the top coat of varnish using a brush.
You can also add shine to your nails using special rubs. This is a fine powder with different shades. It is applied to a painted and dried nail and rubbed in using a sponge. Remaining powder can be easily removed with a brush.
The most popular rubbing effects are metallic, holography, chameleon.
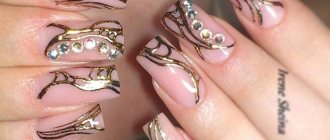
Beads and rhinestones
Colored glitters and films can be used alone or mixed with other design components. The most popular accessory for decorating nails is rhinestones. They are attached to a small drop of varnish, acrylic or embedded in gel. Rhinestones give a manicure design a special charm.
The beads are slightly larger than rhinestones and will rise noticeably above the surface of the nail plate. Professional masters use them only for decorating manicures that will be worn for no longer than 7 days. Beads are attached to acrylic or topcoat. There is also a smaller version of beads on sale - broths. They are used in the “Caviar manicure” design.
Stamping
If you don’t have the skills of an artist, you can always use ready-made drawings.
Stamping is a method of applying patterns to nails that does not require additional painting.
This is a nail art tool kit equipped with a stamp, stencil and scraper. Before applying the design, coat your nails with polish of the desired color.
Apply some paint to the stencil. Holding the scraper at a 45° angle, remove excess varnish. Press the stamp firmly onto the stencil with paint and roll it back and forth and on the sides a little. Use the stamp to create decorations on your nails by pressing it onto the desired area. Remove any remaining polish from the skin with a lint-free cloth.
Base and top coat
To ensure that the gel polish sticks well, a base coat is used. This is the first transparent layer that evens out the nail plate, hides minor imperfections and bonds the polish to the surface.
It is better to apply the base coat with a flat brush and dry it in an LED lamp for about a minute.
The top transparent coating is called topcoat. Its purpose is to fix the entire manicure and protect the varnish from external damage. The top can be matte (creates a coating without shine), with a sticky layer (this must be removed with a lint-free cloth) and without stickiness. It is recommended to apply the topcoat after creating the design. It is advisable to purchase the top and base from the same company.
Nail restoration products
With frequent use of gel polish, nails can peel off, become brittle and dull. The following tools will help fix the problem:
- Keratin masks. They contain liquid keratin, medicinal oils and vitamins. The base should be applied to clean nails and left for 5-7 minutes. Rub in the remaining mask with light movements.
- Strengthening varnishes. They contain calcium, wheat proteins and other beneficial substances. The varnish is applied once every 2-3 days to clean nails. The treatment course is 10–15 days.
- Restorative oils . They additionally contain vitamins and minerals. Such products not only strengthen the nail plate, but also make the cuticle softer and more pliable. The oil should be rubbed into the surface of the nail every day. The treatment course is 7–14 days.
How to choose brushes
Set of brushes
It is advisable to give preference to brushes made from natural materials. They are more expensive, but they are of good quality and will last a long time. These brushes can be used to create patterns of any complexity.
Also pay attention to convenience. The brush should be the right size for you and fit well in your hand.
If you have no preferences in nail design, it is better to purchase brushes in a set. Typically, manufacturers offer an optimal selection of 3, 5 or 12 brushes.
Online stores offer a huge selection of nail design brushes. To ensure that you are buying a quality instrument, always check the quality certificates.
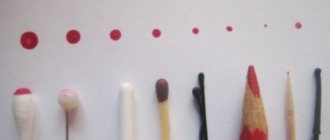
Needle
Both ends of the needle can be used to create dotted designs on your nails with ease. But remember that you cannot press too hard on the sharp end of the needle, so as not to injure the nail plate.
As you can see, simple objects can not only replace some professional tools, but also inspire new ideas. Whatever you work with, start your manicure with a series of required hygiene procedures and end it with a thorough cleaning of all used tools.
Found a violation? Report content
Tips for using manicure brushes
- Use brushes strictly for their intended purpose. If the brush is used incorrectly, hairs may fall out of it and it may become deformed.
- Never leave tools in water or chemicals. This may cause the work area to become deformed.
- Do not leave paint on tools; wash them after each use.
- To prevent the lint from rubbing off, use only smooth materials for the palette.
After each use, lubricate the hair of the tool with cuticle oil. This will protect the brush from drying out and deformation.
Following these simple rules will lead to long-term service for your brushes.
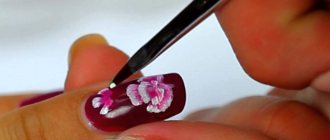
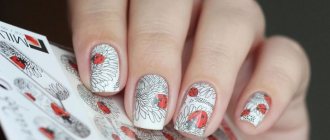
Patterns on nails with acrylic paints
The advantage of this material is the following:
- Large range of colors. Also, if you mix paints, you can get many different shades
- The paints are easy to apply to the nail plates and it is not difficult to create beautiful patterns with acrylic
- Acrylic can be used to paint on any varnish, including gel
- There is no need to use lamps for drying, acrylic will dry in a few minutes just in the air
Acrylic for manicure
IMPORTANT : After designing nails with acrylic paints, the surface must be coated with a transparent fixative. Otherwise the paints will not last long.
Acrylic patterns on nails
Caring for manicure brushes
After finishing work with brushes, they must be cleaned. You also need to clean it every time you change colors. It's very easy to do. If you used varnish to create the design, you must first wash it off the instrument using a solvent. And if you used special paints, it will be enough to wash the tools in warm water and soapy water.
Gel brushes can be easily cleaned with alcohol. You can clean acrylic using monomer. Keep the tool in the solution until completely clean, and then place it on a paper towel to dry. If the brush is very dirty, you can clean it with acetone.
Use acetone only in the most extreme cases, as it can damage the structure of the instrument.
After the instruments are dry, place them in a special case. It is advisable to store them horizontally.
Toothpick
Toothpicks are simply irreplaceable assistants in the list of home tools for creating a manicure. By the way, even some professionals use this simple tool for a variety of tasks.
In addition to dots and small peas, a toothpick allows you to work in an interesting technique with wet varnish. Without waiting for the base color to dry, place a blot on the nail with a contrasting varnish. Insert a toothpick into the center and draw a line towards the edge. The neat little heart is ready! Once you try it, you will quickly learn how to draw flowers with leaves, abstract patterns and much more.
Continuation of the New Year: Russians’ spending on food has increased sharply
It will be hot: the Hydrometeorological Center gave a forecast for spring and summer
Study: Nut Diet for a Healthy Heart