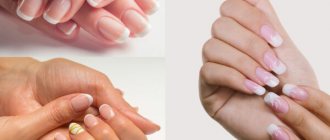
Properly selected manicure brushes will help you create a unique, inimitable design - they can be used to apply the finest patterns and fantasy designs, decorate your nails with sparkles and rhinestones, create gradient transitions, and imitate various textures. Using this or that tool, you can bring your wildest ideas and ideas to life. But before you buy a set of professional manicure brushes, you should familiarize yourself with their main types, specific methods of use, and rules for caring for the purchased tools.
Types of manicure brushes
Depending on the material from which they are made, nail design brushes can be:
- natural - from squirrel, kolinsky or sable pile;
- synthetic (nylon);
- mixed - their composition combines synthetics with natural pile.
The most expensive and high-quality brushes are natural ones, but they are quickly spoiled by products containing acetone. In addition, they are difficult to wash off from varnish and gel.
Brushes are also divided according to their purpose:
- for varnish – thinner and longer compared to the “original” brush from the bottle, so they are much more convenient to use;
- for gel – flat square and rectangular, with a fairly hard pile, which makes it easy to model the shape of the nail during extensions;
- for acrylic - round, with long, hard bristles and a pointed tip, onto which it is convenient to sprinkle acrylic powder;
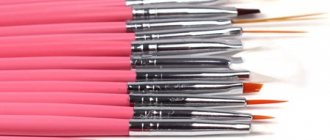
- for design - this includes brushes for drawing, for modeling, fan brushes, for Chinese painting and many others.
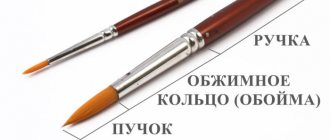
Each brush has a number indicating its thickness or width (for flat brushes). The thinnest are marked 00 and 0, the thickest are marked with the number 8, respectively, the larger the number on the handle, the thicker (wider) the instrument.
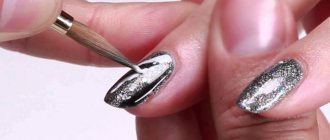
Nail Spot Brush
To create various designs, special brushes are used for painting on nails, differing in shape, length and bristle stiffness. Thus, the dotting brush has a round shape and short, thin bristles. Its size is the smallest - from 000 to 2. With such brushes it is easy to draw the smallest details of a complex lace pattern or emphasize individual elements.
Fan brush for manicure
A fan brush has bristles directed in all directions, like an open fan. It is convenient for shading floral designs, applying glitter and sparkles: first, the desired area is covered with colorless varnish, and sparkles are carefully scattered on top with a fan brush.
Petal brush for nail design
Thin petal brushes designed for painting nails have a beveled edge and a flat shape. They are convenient for making light strokes, applying glitter, and creating original patterns and ethnic ornaments.
This brush is often used for Chinese painting with characteristic plant motifs - flowers, stems and trees. With a petal brush it is easy to draw specific techniques characteristic of this technique - waves, openwork, smooth surface. The result is a very delicate and romantic design.
brush hair
Hair - a thin brush for nail design, round in shape, often with long bristles. It is very convenient to draw long, straight lines. Depending on the task at hand, you can choose a nail liner brush with bristles of different lengths. Such products are practical and often used by manicurists.
Flat manicure brush
A flat, wide brush allows you to quickly and evenly coat the nail plate with varnish. You can also use it to create a gradient and implement other interesting and non-standard nail art techniques.
Rounded nail brush
A rounded brush with sharp edges is best suited for applying gel polish and sculpting. It is similar in size to a thick brush, but its bristles are oval-shaped. She creates stylish designs of different sizes, for example, flowers, because just one imprint of a rounded brush leaves a perfect petal.
Dagger-shaped manicure brush
Dagger-shaped brushes for nail design are flat, with a smoothly rounded end. They are suitable for simultaneously applying different colors of varnish and drawing elegant, three-dimensional patterns.
Thick manicure brush
A thick brush is suitable for uniformly applying varnish over the entire nail plate, as well as drawing large strokes and wide stripes, processing the contours of large elements and creating three-dimensional patterns. The bristles of thick brushes are straight and flat - this allows you to simultaneously pick up several shades of varnish and draw patterns with multi-colored paint.
Dots
Although dots are actually a stick, they are usually also classified as thin brushes for painting on nails. By applying varnish to the rounded tip of a dot, you can create designs of any complexity - from simple dots to skillful Gzhel painting.
Other brushes
What else are there for and what kind of manicure brushes are there? They are divided into 4 groups:
- For varnish. They are used when it is necessary to make drawings with your favorite varnish. The brush in the bottle does not always correspond to the desired thickness. Therefore, you have to use the devices from the set mentioned above.
- For modeling with acrylic. These brushes are required for nail extensions. They perform the required bending and modeling of the shape. The products are hard and have long pile. The brush bundle is elastic and perfectly restores its original shape after pressing. The tip of this tool spreads the powder while making the cuticle line.
- For working with gel. If you are interested in what brushes are needed for gel polish manicure, we will explain that such tools must have hard bristles. They are similar in shape to a square or rectangle. Thanks to these properties, the tool can work with fluid and viscous gel.
- For nail design. What kind of manicure brushes are needed to create an original nail design? For this, there are special tools that art painting masters have in their kits.
Usually the description indicates which manicure brushes are intended for what. Any device must be worked carefully, then you will get a high-quality result.
What brushes are needed for painting on nails?
For beginners taking their first steps in creating nail designs, a basic set of tools consisting of a beveled, rounded and thin brush will help you create simple patterns.
You shouldn’t give in to the temptation and buy everything you can find - first, it’s enough to master the basic techniques of working with two or three tools. There is no need to spend money on expensive brushes made of natural bristles - at first you can safely train with synthetic ones, because they are relatively inexpensive, and besides, the materials with nylon bristles do not flow and are not absorbed. After acquiring the necessary skills, you can move on to professional natural brushes.
Beginners in nail design should take into account the following important nuances:
- a brush made of natural bristles is preferable to use for drawing, while synthetics are ideal for nail extensions when you have to work with dense, viscous substances;
- the shorter the handle, the more comfortable it is to hold the tool;
- It’s more profitable to buy sets, since each brush in it has its own “understudy”.
Unused brushes have a special protective coating, which should be removed after purchase. The stuck together fibers are separated if they are kneaded with circular squeezing movements, after which the bristles should be wiped with a smooth cloth.
Another important procedure is degreasing, which is also recommended to be performed immediately after purchase. A cotton pad is moistened with a special degreaser and used to wipe the villi, carefully separating them. After this, wipe the brush dry with a clean napkin.
What to do if you don’t have brushes at hand?
Of course, you can only cover the nail plate with a brush, even the thinnest one. But when creating decorative nail art, you can use several life hacks if you don’t have the necessary brushes on hand. Dots can be replaced with almost anything. This could be a toothpick, a ballpoint pen, a safety pin, the tip of a cotton swab or hair clips and other available items.
Cut or break the eraser on your pencil. You will receive a homemade stamp. Now just dip your eraser in any pigment and make a leopard print.
Patterns and lines on your nails can be made using stencils and manicure tapes.
A fan brush for creating ombre can be replaced with special sponges for gradient, makeup, or a regular dish sponge.
Write in the comments if you liked the article?
Was it useful to you? What patterns do you like to make for your manicure? Comment
Which brush to apply gel polish with?
A properly selected brush for applying gel polish is the key to a quality job. The result of the work depends on this. You should buy a brush for gel polish, like any other brush for manicure, only in a specialized store - it is advisable to first hold it in your hands, and not just trust the picture on the Internet. It would also be a good idea to read reviews left by other customers. What should you pay attention to when choosing a tool?
How to choose a gel polish brush
When buying a brush for gel polish, first of all, you should evaluate the condition of the bristles - it should be elastic and stiff enough, because it is thanks to rigidity that you can apply the gel perfectly smoothly and correctly model the shape and bend of the nail. The pile must be firmly held in a metal cage, ideally made without a single joint. You should also make sure that the mount fits snugly on both the bristles and the handle.
Brushes for applying gel polish are a universal tool for creating extended manicure. They have different shapes and lengths - here each master is guided by his own taste and sensations.
Attention! When doing nail extensions, you shouldn’t use just one brush; it’s better to get several tools. So, an oval one will help to carefully apply the material along the edges of the nail plate, a beveled one will be convenient for drawing a smile line, and a size 00 nail brush will allow you to carefully draw out small details.
Nail care tools
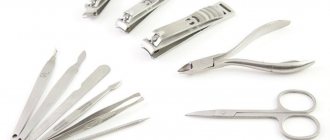
To perform a manicure at home, you need to buy high-quality basic equipment and consumables. You will need:
- Scissors and tweezers. It is important that they are made of stainless steel and sharpened by hand. It is better to buy a tool in a specialized store. The scissors are expensive, but they will last a long time. Sharp scissors make it easier to remove prepared cuticles and shape nails. The forceps remove rough skin and are used to treat areas that are difficult for scissors to reach.
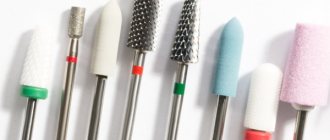
- Files. A tool made of abrasive material is suitable for home use. It would be better to buy a double-sided tool with an abrasive coating of different densities on each side. This file is convenient for shaping and polishing your nails.
- Bafa. This device is optional.
- Orange stick. You can buy a set of sticks of various lengths and diameters. The wide side is designed to push back the cuticle, and the sharp side is designed to remove dirt and dust from under the nails. The files are made from antiseptic wood and are therefore considered safe and hypoallergenic. Since wood absorbs moisture well, orange sticks should be disposable.
- Brushes for removing dust.
- Antiseptic. Even when using the instrument individually, it must be treated with cleaning liquid. This procedure helps prevent bacteria from growing in a humid environment. For scrap, it is not necessary to purchase an ultrasonic cleaner - this accessory is used only by professionals.
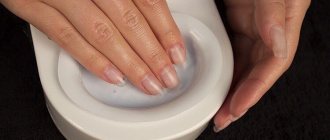
- Hand baths.
- Consumables – gloves, cotton pads, sponges, towels.
- Materials for coating and decorating nails - varnishes, stencils and brushes.
- Cuticle oils. The product perfectly nourishes and transforms the skin.
How to use manicure brushes
During manicure, the tool must be washed with cold water after each stroke applied, since the acrylic dye dries out very quickly and the design will turn out untidy. But it is not recommended to keep used brushes in water for a long time in the hope that this will clean them better - on the contrary, it will only deform the bristles.
A thin liner brush will last much longer if you use it exclusively for painting with acrylic paints, since nail polish dries out the bristles, making them brittle. After completing the procedure, each brush should be treated with a cleaning liquid. When removing varnish residues from a flat brush, you need to carefully drip the cleaner onto the tool and wipe it several times on a dry cloth with light movements in the direction of the bristles.
Beveled
Using an angled brush and drawing patterns is quite easy. Choose a tool with a natural dome, which retains the paint on the tool longer, gently applies pigment to the nails and does not leave areas without painting. Be patient, practice a little and you will be able to draw no worse than in the salons. The main thing is to adhere to a certain technique:
- The resulting pattern depends on the method of applying paint. We dip the cut of the dome in thick acrylic paint, the rest of it remains clean. If you type too much, you'll end up with a bold, incomprehensible drawing, but we want graceful lines. Place the brush perpendicular to the surface and easily lower it onto the cut
- Let's put paint on the brush in a different way. Let's put one of the sides of the dome directly into the paint. We apply this flat side to the surface and get the following element
- If you use the principle of applying paint from the first point, and place the brush on the cut with a little pressure and drag it a little, you can get an element for creating flowers
- Apply paint to one of the flat surfaces. We place the brush on the corner, while moving we lower it onto the entire surface with paint, and then lift it and finish painting with the corner of the brush
By varying the pressure on the brush we create the elements of the pattern. First, it is better to practice the technique on a stencil to learn how to feel the pressure and stroke of the brush.
How to care for manicure brushes
Manicure brushes should be used exclusively for their intended purpose - they cannot be used to paint on paper, so as not to damage the bristles. If the brush is deformed, you can return it to its proper appearance by holding the tool in hot water for several minutes.
Of course, immediately after completing all the procedures, the brush should be thoroughly washed, removing any remaining varnish - otherwise it will have to be cleaned with acetone, which damages the bristle structure. Also, the bristles wear off very quickly when working with uneven surfaces, so there is no need to be overly zealous when wiping the tool on a napkin. This also applies to the palette for mixing paints - it must be perfectly smooth and even.
Advice! After finishing the procedure, the brush can be softened with cuticle oil.
How to clean a gel polish brush
Proper care of your manicure brushes will extend the life of your favorite tools. Immediately after use, the remaining gel can be removed with a regular napkin; later, the brushes should be cleaned with a special product that removes the dense sticky layer.
If you will be applying gel of different colors, you need to dip the brush into the top coat and also remove any remaining material with a napkin.
Important! Washing gel polish brushes with plain water is strictly prohibited! Also, you should not keep the tools near an ultraviolet lamp, as the remaining paint will immediately dry out and they will be hopelessly damaged.
How to store it correctly
Only cleaned, well-dried tools should be placed in the case - manicure brushes are stored vertically, with the bristles facing up. Also, special caps that are placed, again, on completely dry manicure accessories will help keep the pile in working condition for as long as possible. It is better to store them in a dark, closed place - this way they will not fade, and the microparticles remaining on the surface will not damage the delicate bristles.
For the gradient
Typically, to create a gradient manicure, masters use foam sponges or brushes. Considering that the gradient is a color stretch, to create it you need to use flat, thin brushes in the photo. It is very important that the bristles of the brush are soft. This will allow you to carefully shade the colors of the gel polish applied to the surface of the nails. If the brush is stiff, you won’t be able to make a beautiful stretch.
To ensure a beautiful gradient, experts recommend that you wash the tool thoroughly after each shade. This can be done easily by dipping the brush into a container of degreasing liquid and dipping it on a clean napkin. Repeating this action after each time of use will keep the manicure brush clean.
How to properly apply a gradient with gel polish with a brush is shown in detail in the video.
How to make a thin manicure brush
Sometimes you simply don’t have the right tool in your arsenal, but this problem is easy to solve. A thin brush for manicure can be made at home - for this you will need a brush for painting with ordinary paints and sharp tweezers. The bristles should be gradually removed in small tufts from the edges to the center of the fastening. The number of cut fibers depends on the required size of the future instrument.
If you cut a flat watercolor brush diagonally, you get a convenient petal brush. To prevent the remaining bristles from becoming fluffy after trimming, you need to drip top coat onto them and smooth the bristles with your fingers.
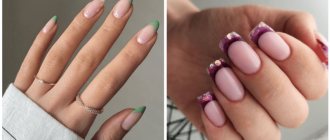
For French
To get a beautiful French nail polish, it is recommended to use a thin, round brush, which is numbered 4 or 3. The bristles of the product should be soft but elastic. This tool will allow you to create a perfect smile line. Manicurists prefer to apply gel polishes with a thin brush, which is shaped like a school corrector. To create a smile line, you need to press on the top of the device until a white drop of shellac appears at the tip. This drop is quite enough for drawing a French coat. To create a French manicure, it is important that the brush is selected correctly. After all, the beauty and accuracy of the design depends on the shape and softness of the instrument.