Often used on women's handbags, the quilted pattern remains incredibly popular. Despite its simplicity, it captivates with its impeccable style and interesting appearance. Therefore, today we invite you to learn how to make a beautiful quilted manicure. Detailed step-by-step instructions will help you quickly master a new nail design with gel polish, and colorful photos will give you a dose of inspiration and good mood.
An easy way to do a quilted manicure
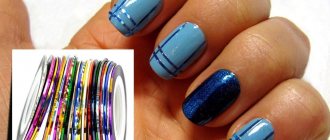
You can perform a manicure using special nail design tapes. This is the most optimal and convenient option. Now we will tell you in detail how to make a simple nail design with diamonds.
- Prepare your nails by giving them a beautiful shape. Apply the first layer of French gel polish, dry it in a lamp and remove the sticky layer.
- Apply the tape so that you get diamonds. Apply gel polish again and cure in a lamp for 30 seconds.
- Carefully remove the ribbons. Using a thin brush and the same gel polish, add volume to each diamond. Periodically fix the pattern in the lamp so that the gel polish does not spread.
- Cover your nails with top gel polish, fix small rhinestones in the corners of the diamond and hold the nails in the lamp for final drying.
- To make the rhinestones stick better, outline them with topcoat using a thin brush and dry again.
After performing these simple procedures, you will receive a very beautiful and neat quilted manicure. It looks very elegant, so it will successfully complement any look. Nail art is suitable for both everyday life and festive events. Be sure to watch the video, which will allow you to get a clear idea of the technique for performing a quilted manicure with gel polish.
https://youtu.be/T2CerP0QWuI
What is a quilted manicure?
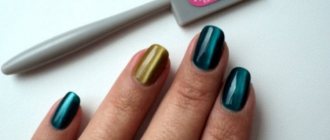
A manicure in a similar style is called quilted, since with the help of volume it imitates stitched fabric. Convex diamond shapes with clear outlines are made on the nails. The classic version of quilted manicure is monochromatic, but craftswomen have figured out how to decorate and diversify it. Diamonds and lines can be of different colors - contrasting or in the same color scheme, and rhinestones and bouillons are added to the corners. The combination of matte canvas and glossy stitching looks interesting. Another effective technique is a gradient from dark to light.
A popular and sophisticated solution is white in combination with pastel colors. The combination of a quilted manicure with a French one looks no less gentle and airy. Both options look festive and elegant, which is why they are often chosen for weddings.
A request for a quilted manicure will not cause any difficulties for an experienced master, because this design has been in trend for several seasons now. But will a beginner be able to replicate the spectacular pattern at home? The technique requires great care because it does not forgive mistakes. The slightest flaw will disrupt the geometry of the pattern and the impression of quilted fabric will disappear.
However, don't worry. The work of creating a quilted manicure is painstaking, but if you strictly follow the instructions, even an amateur can handle the task. A detailed guide will help beginners choose the right materials and tools for creating a quilted manicure with gel polish and, with their help, perform a salon-quality finish at home.
Method without using tapes
It may turn out that you do not have special tapes on hand that are used to create quilted nail designs. Good news - now we will tell you how to make an equally beautiful design with diamonds on your nails without using a special manicure tape.
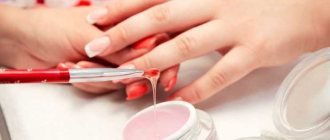
- Before covering your nails with gel polish, be sure to treat their surface with a buff so that the manicure lasts longer. The next step is to thoroughly degrease your nails.
- Apply a base coat to your nails and dry it well in a lamp for 2 minutes.
- To create a design on your nails, you first need to cover them with a base layer of French gel polish. Dry it in a lamp and highlight the free edge of the nail with white gel polish, performing a French manicure. We do not touch one nail on the ring finger - that is what we will decorate with diamonds.
- Using a very thick white gel paint, with a thin brush, begin to carefully apply the design. Draw diamonds from the middle of the nail. After one row is ready, dry the nail in a lamp so that the paint does not spread. When the entire surface is covered with diamonds, dry your nails in the lamp again.
- Next you need to add volume to the drawing. To do this, apply a second layer of paint.
- Apply top coat to the remaining nails, dry the manicure in a lamp and remove the sticky layer.
- The finishing touch is to decorate the quilted nails with rhinestones, fixing them with special glue or gel polish in the corners of the diamonds, and hold them in the lamp for a little longer.
You will get a very beautiful and interesting design that every woman will definitely like. To make it easier for you to master the technique of performing it, we suggest you watch a useful step-by-step video.
LiveInternetLiveInternet
Thursday, April 30, 2015 21:17 + in quote book The movie playing in the speakers The mood now is squirrel
Quilted manicure
is another newfangled nail design option.
It got its name because of its similarity to quilted fabric: cotton wool, sewn with large stitches, like a blanket. Stitches are imitated by creating diamond-shaped patterns, and cotton wool is imitated by creating volume. True, volume in a quilted nail design can only be created with gel or gel polish, so for the usual design, a simplified type of quilted design with varnish, which has a flat appearance, is used. And here is shown one of the options for this nail design with a step-by-step photo tutorial. There are two options for making a quilted nail design without using gels: - draw by hand with a thin design brush, - use adhesive tape. 1 – quilted manicure with a thin brush
The first option, although simple, will be difficult to draw thin, even lines neatly.
Here, the nails are first coated with varnish, which must dry completely. In drawing, a brush with long bristles is used: first, parallel diagonal lines are drawn in one direction, then in the other so that identical rhombuses are formed between them. I have depicted an approximate diagram in the picture: - quilted nail design with ribbons
The easiest option to make a quilted manicure smoothly and quickly is to use adhesive tapes for nail design.
I will show this using the example of one design option, where two colors of nail polish will be used and elements of a quilted manicure will be on two nails. This is done like this: -All nails are covered in one or two layers of nail polish. It must dry completely. I covered the nail on my ring finger with varnish, which will be the lattice on the other nail, to make a kind of reverse. -Next, stick adhesive tapes on the nails: first diagonal in one direction, then in the second. Be sure to remember which strip was the last (more precisely, its direction), it is from this that you will need to start peeling off the tapes. Make sure that the tapes fit snugly along the edges of the nail so that the polish does not flow under them. Now paint your nails over the tapes. It is advisable to choose a thick varnish that will cover the bottom color in one layer. I have a design on two nails and I used opposite colors for the background and top coat. - Without waiting for the varnish to dry, peel off all the tapes in sequence - this is how you get even diamonds. -To compare the surface of the nail, simply apply a transparent top coat over the design. Types of quilted manicure
Of course, you can use a variety of combinations of varnishes and “lattices”, but there are interesting classic options.
Same color
A very interesting effect is obtained when you use the same nail polish on both the bottom and top layers.
In this case, the manicure really lives up to its name. Gradient
You can use the gradient manicure technique with a top layer: that is, reprint the varnish with a sponge over the tapes onto half of the nail.
But here it is advisable to choose a similar varnish in color, otherwise the manicure will look strange. Rhinestones
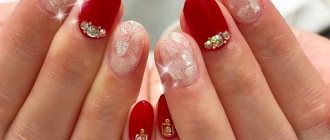
Often, small rhinestones or bouillons are added to a quilted manicure on the lines or at their intersection - the result is an analogue of the strokes of quilted fabric, which is also very beautiful and shiny! Create and get creative! Good luck!
| Categories: | Personal care/Manicure, pedicure |
Tags:
manicure manicure ideas quilted manicure manicure technique master class
Cited 3 times Liked by: 2 users
Like share
0
Like
- 2
I liked the post - Quoted
- 0
Saved
- Add to quote book
- 0
Save to links
Liked2
0
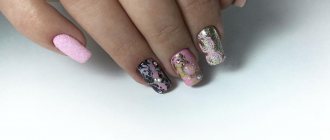
Photo gallery of stylish nail art
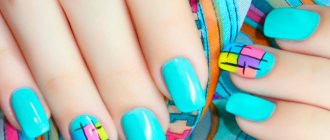
Quilted manicure, depending on the chosen color and technique, can look completely different. You can do it in one color, play with contrasts, make it matte or glossy, complement the design with rhinestones, sparkles and other decorative elements. Every time, even by making minor changes, you will receive a completely unique, beautiful and stylish manicure. We invite you to look at a few photos that will show you all the beauty and charm of quilted nail art.
As you can see, there are a lot of options. Use different colors, get creative, and combine it with other design styles to add a touch of personality to your look . You can decorate all your nails in this style or just one, and apply a monotonous coating to the rest. Limitless scope for imagination opens up before you.
Not all women use gel polish. Many people still make do with regular varnishes, despite the fact that they last much less. They are easier to work with; they do not require the use of additional devices, for example, a UV lamp or liquid to remove the sticky layer. Therefore, many people consider gel polishes to be a product for professionals.
If you don’t have a special lamp and gel polishes, don’t be upset. A manicure with a quilted pattern can also be done with regular polishes. For this you will also need thin self-adhesive tape, varnish and rhinestones. This manicure looks no worse. In conclusion, we bring to your attention another video in which you will find step-by-step instructions on how to perform a quilted manicure with regular polishes.
Quilted manicure with gel polish
This type of manicure is liked by many girls, and has become a favorite option among clients among salon procedures. They value it for its durability and strength. You can safely count on a couple of weeks of stable wear.
Varnish coatings offer enormous opportunities for creativity. Gel polish should be used as a coating. The security of the gel, according to reviews, can accelerate the growth of nails and strengthen them.
To model your own manicure, use multi-colored gel polishes, base and top coats, and a UV lamp. Thin tape will serve as a reliable assistant for manicure.
The main advantage of a quilted manicure is that it should be applied in several layers. Each layer is painted and dried under a UV lamp. Ideally, such a lengthy process is similar to extensions, although the end result is noticeably different.
Preparing nails for manicure
The unspoken rule of any manicure, not just quilted ones, is the rule of caring for your nails before applying varnish to them. So, the nails need to be cleaned of old varnish, then shaped and cuticles removed, treated with a buff on the side ridges and nail plate. Next, you need to apply a primer (for manicure with gel polish), after which the base and the main color of the coating, then you can use the technique of applying diamonds to the nails and cover the manicure with a top coat. It is also useful to do nail baths or spa treatments before applying the coating, as well as apply oil or special gels to the cuticles.
For convenience, you immediately need to prepare all the tools for manicure that may be useful in the process. Nearby should be all the varnishes of the selected colors and thin brushes with which the diamonds will be applied.