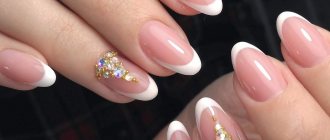
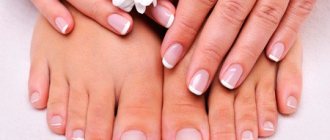
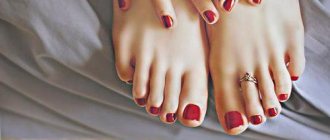
A French manicure with gel polish is done using a camouflage base or a nude flower bed and a white topcoat for the free edge of the nails. Classic French gives them a natural and healthy look, enhancing their brightness. There are many types of it: twist, triangular, beveled, ombre, reverse, millennium, custom.
French is more convenient to paint hair with a brush, but you can use stencils and also decorate with stamping, sliders, fimo, and glitter. For the base, varnishes in natural shades (KODI 20 CN, PNB 004, MY Nail 003, 005, 007) or bases (KOTO 840, OXXI Professional 1 and 3, POLE, Monami) are suitable.
The “smile” is painted with double-layer gels Monami Luxury Light gold, Bluesky 80501, Neonail 2696, Lunail 61, Klio 52 or single-layer Tartiso TCL -32, Tartiso FR-01, Tartiso TRV-01, Arnelle 001, Haruyama 001, Ju. bilej B1. They can be mixed with gel paint for greater color density and texture.
What you need to do a French manicure with gel polish
French manicure with gel polish is made from the main shade of flesh or pink, beige and white, which is used for the free edge of the nails. This is the classic French style. There are manicure modifications in which other colors are acceptable. That is, you need nail covering products of at least two shades. In addition to the pigmented and snow-white composition for the French gel polish, you need to prepare:
- a thin brush to draw a “smile”;
- stencils (optional, but better for beginners);
- buff for preparing the plate, that is, a soft polishing file or block;
- degreaser;
- sometimes a leveling base;
- lint-free wipes;
- lamp for drying the base, varnish and topcoat (UV or LED);
- glossy top;
- dots for attaching rhinestones and glue or gel for extensions;
- orange stick to remove polish from skin.
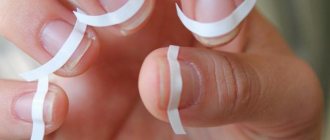
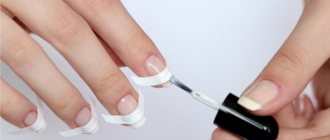
Stencil, stripes
French stencils are used to more evenly define the white tip of the nail, the “smile” line, or to draw a hole at the base. One side of the device is sticky. It is glued onto the nail so that the top edge outlines the “smile” line. Part of the plate is protected, the varnish will not get on it, and the open part is covered with a white flower bed.
There are several types of strips:
- Disposable. Made from paper or vinyl. They are glued on, manicured, removed and thrown away.
- Reusable. Their material is soft plastic or silicone. The principle of operation is the same as in the previous case, but can be used repeatedly.
Stencils also differ in shape. The most common are actually arched wide stripes. There are also circles with holes inside, intended for drawing holes. And also triangles, checkmarks, hearts, with which the “smile” line will turn out to be unusual.
These devices allow you to quickly create a neat manicure without errors, but the sticky side can remove some of the base product. To avoid this, you need to touch it with your finger several times. The sticky layer will become less durable. The device glued to the nail will stick, but not so tightly. And the camouflage base will remain in place.
Brush, what to paint with
There is more than one brush for a French brush; the following types are used:
- Hair. Very thin, as if sharp. With this tool it is convenient to draw a smile line by hand even on short nails; you can also draw patterns. The optimal length of the hair pile is 7-9 mm.
- Cat's tongue. It is also a narrow brush, with a thin tip, but wider at the base than the previous one. More suitable for long nails.
- Liner. This is a tool with a medium width of the fleecy part and a slightly narrowed tip. With some dexterity, you can also outline the line of a smile with a liner, but it is more convenient to paint over the free edge of the nail. Especially if they are long. You can apply a base, but then there should be two liners.
- With beveled edge. Also used to draw a “smile” line. But you can also correct coating defects and paint over the tip of the nail.
Liner With a Beveled Edge
It is more convenient to paint French with a natural bristle brush, especially if you use a liner and a tool with a beveled edge. This type of material is softer, varnish picks up well on it and does not run off, and the coating is easier to level. The hair can also be made from artificial bristles. But it should still be quite soft. In a word, you can paint French on gel polish with different types of tools, they are all miniature.
The best option for a beginner is a hair or a cat's tongue. Their quality is more important - the fibers should not fall out or curl when moving.
The basis
The base for a classic French jacket is chosen in pale pink, peach, flesh, milky, light beige colors. These are camouflage bases, which are also translucent or dense. Every manufacturer has them. The product gives the nail a healthy and natural shade. It is applied first after preparing the plate with a degreaser on the entire nail or on the primer, from base to tip.
Gel polishes in nude shades can also be used as base polishes. As a rule, they are brighter than camouflage agents.
Using a stencil
If you don’t know how to correctly draw a smile line so that it turns out perfectly straight, use stencils for a French manicure. Stencils are strips of paper on a sticky base, 5-6 mm wide. They have different shapes, allowing you to create a smile line not only in the form of a classic semicircle, but also in the form of a wave, zigzag, triangle, heart or straight beveled line. Using stencils is very easy. They are glued onto a beige layer only after it has completely dried. Draw a smile line when the stencil fits tightly to the nail.
After applying the gel polish to the smile line, the stencil is carefully removed. An awkward movement can lead to smearing of the varnish and disruption of a perfectly straight line. After removing the strips, the white layer is dried in a UV lamp for 2 minutes.
You can make a stencil yourself from regular tape. You need to cut a piece 3 cm long. It is cut into strips 0.5 cm wide. The side line of the strips is given the desired shape (semicircle, wave or triangle). Before gluing the adhesive tape to the surface of the nail, you need to glue it to any other surface 1-2 times. This will help reduce its stickiness, and then maintain the integrity of the gel coating.
Which gel polish is better
It’s hard to say which gel polish is best for French polish, there are many of them, for every taste, but the following are popular:
- KODI 20 CN. This is a translucent tea rose shade. The product is usually applied in 2 layers, then it looks denser. The enamel texture makes work easier and avoids smearing on the skin.
- PNB 004. It is light beige, in two layers it has a milky undertone. The varnish retains its shine and tint for a long time.
- MY Nail 003. Lovers of peach color will like it. The shade is unobtrusive, but noticeable.
- MY Nail 005. Similar to the previous color, but lighter and cooler.
- MY Nail 007. This is a coffee with milk shade, also delicate and at the same time juicy.
KODI 20 CN MY Nail 007 PNB 004
The last three varnishes are characterized by ease of use, low consumption and durability.
As a base you can use KOTO 840 (camouflage), OXXI Professional 1 and 3, POLE, Monami bases. They not only add gloss and tint, but also smooth out the surface of the nails.
KOTO 840 OXXI Professional 1 OXXI Professional 3
For a French coat, white varnish is of great importance, which should be applied in a dense layer, without bald spots. This requirement is met by two-layer ones, sold for 250-350 rubles. per bottle of 10-12 ml:
- Monami Luxury Light gold,
- Bluesky 80501,
- Neonail 2696,
- Lunail 61,
- Klio 52,
- TNL #28.
TNL No. 28 Monami Luxury Light gold Lunail 61
It’s easier to work with thick consistency single-layers that cost 500-600 rubles. per bottle 7-10 ml:
- Tartiso TCL-32,
- Tartiso FR-01,
- Tartiso TRV-01,
- Arnelle 001,
- Haruyama 001,
- Ju. bilej B1,
- Bagheera Nails BN-04,
- Kodi 33,
- Lianail Snow Maiden,
- Neonail 5059,
- Alena Caprice 104 and 300.
Neonail 5059 Tartiso TRV-01 Lianail Snow Maiden Kodi 33 Haruyama 001, Arnelle 001
Features of the French jacket
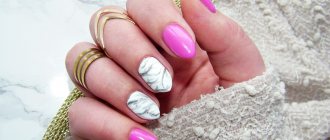
A classic jacket in the form of a nude base and a white “smile” is relevant in case of strict requirements for the dress code. In other situations, no one limits your imagination. The trend is to decorate nails, use different flower varnishes, and vary the shape of the “smile.”
The choice of shape depends on the characteristics of the plate and the cut of the nail. The width of the contrast strip varies from the thinnest, and does not always run parallel to the stock; there are also options with a diagonal line. Fantasy “smiles” deserve special attention, the execution of which depends on the season, occasion, and mood. There are many successful examples in photos in fashion magazines.
One of the popular options is an inverted French manicure, when a “smile” is drawn at the base of the nail bed. Celebrities and beauty bloggers prefer this extraordinary design, playing with shapes. They draw holes, an imitation of a regrown nail, a semicircular, triangular, diagonal contrast line.
One of the features of French manicure is the opportunity to learn how to combine the design with other manicure techniques as a base or accent.
Types of French gel polish
The classic French gel polish is an improved look for natural nails, but more expressive - with a pink main part of the plate and a snow-white free edge. And yet, French manicure is much more diverse; among its types there are:
- Twist . This is a classic, but also the use of colors other than white and nude. The free edge is painted with any bright varnish, sometimes several, and the main part of the plate is painted with pink, peach, or another nude shade. And between them there is a clear boundary, which is a smooth arc.
- Triangular . The smile line is an acute angle. Shades are used as in a classic French jacket or a twist.
- Beveled . Only one corner of the free part of the nail is painted over. This design looks especially good with a square shape.
- Ombre . The transition from the base of the nail to the edge is smooth, without a sharp border. The colors used are the same as for the classics.
1 of 2
- Reverse . The free edge of the plate is painted over with a flesh tone, and the holes are highlighted with white. Markings are drawn in semicircular or triangular shapes.
- Millennium . The free edge is separated from the main shade with shiny decor or shimmering gold, silver varnishes, rubs.
- Non-standard . To highlight the free zone of nails, ornaments, drawings, dots, and asymmetrical figures are used. They are made white or colored.
- Fan . In addition to varnish of a different color, the base of the plate is separated from the edge by decor. It can be in the form of strips of foil, rhinestones, fimo, sliders.
Types of stripes
Strips for French manicure always look like paper stickers located on a paper base. Rarely, they can be made not from paper, but from film. Based on the manufacturing principle, all such stencils can be divided into two large groups:
- Factory-made strips;
- Homemade stencils.
Of course, homemade stencils are usually less convenient to use. But the result obtained with their help does not differ from that guaranteed by purchased strips.
Factory-made stencils can be of different widths. This is purely a matter of convenience. Some people cannot use wide strips because they do not adhere well to the nail, which makes it impossible to obtain a clear line. Others, working with narrow strips, can cut beyond their aisles and thereby spoil the manicure. Typically, the width of the strip ranges from two to five millimeters.
[yandex2] [google2]
In addition, their shape may be different. They can have an acute angle or be straight. Recently, stripes for French jackets with wavy outlines have begun to appear. In addition, these stencils can be asymmetrical and have varying degrees of curvature. This is done taking into account different lengths of nails, because, usually, the longer the free edge, the more the smile line should be curved towards it. Whereas for short nails it can be almost straight.
In terms of how to use strips for a French manicure, everything is limited only by your imagination. They can be moved and rotated, creating an asymmetrical smile line, re-glued several times, making a striped manicure and much more. For example, this type of manicure using the discussed stencils is popular, such as reverse French. In this case, the strip is turned over and glued closer to the cuticle, forming a thin strip next to it, covered with a contrasting color. Another popular option is a lunar manicure, the meaning of which is also to form a zone of contrasting color near the cuticle, but it will not have the shape of a strip, but an elliptical one.
How to make a classic French gel polish
Classic French gel polish can be done as follows:
- First, perform a hygienic manicure, that is, give the nails a shape, the same length, clean the pterygium, cut off the keratinized part of the cuticle, and degrease the plate.
- Next, apply the dehydrator until the nail becomes whiter.
- After the previous product has evaporated, the nails must be coated with a primer; it must dry within 1 minute.
- Next, apply a self-leveling camouflage base in a fairly thick layer, but distributing it with a brush evenly over the entire plate.
- After using it, you need to turn your hand over to better spread the product over the surface, and then dry it in the lamp for 1 minute.
- The dried base should be deprived of gloss by treating the nails with a buff.
- The dust formed as a result of the previous action is removed with a degreaser.
- Using a brush from a bottle of white gel polish, apply the coating to the free edge of the nail with vertical strokes, creating a “smile.”
- Then, using a hair brush, distribute the product closer to the sides of the nail, making “antennae”; when finished, place the nail under a lamp to dry.
- The final stage is the application of a glossy topcoat without a sticky layer, which also needs to be dried in a lamp.
Watch this video for a master class on creating a classic manicure with gel polish:
French gel polish for beginners
French gel polish for beginners should be done in this order:
- File your nails to give them shape.
- Using a buff, remove all the unevenness formed after using a nail file and remove the glossy layer from the surface of the nail plates.
- Lift the cuticle using a metal pusher.
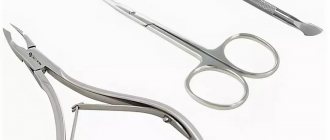
- Clean the sinuses of the nail with a flame cutter, remove the eponychium with it, and walk along the side ridges.
- Cut the cuticle with special scissors, being careful not to break it into pieces.
- Wipe nails with degreaser.
- Apply ultrabond to each of them, which will make the coating more durable.
- Paint your nails with the base, not forgetting to “seal” the ends with it, and then place them under a lamp to dry.
- After removing the sticky layer (if necessary), use a hair brush to paint the free edge of the nail with gel paint (you can paint French gel polish smoothly by starting from the middle and moving towards the sides).
- If the line is not quite perfect, you can clean it up with a flat brush dipped in degreaser and wrung out.
- After drying the white paint on the nails, they are covered with a topcoat for shine, and the last time the hand is placed in the lamp.
Watch this video for a master class on French manicure with gel polish for beginners:
Preparatory stage
To make the manicure and design truly lasting and beautiful, like from the pen of a master, you need to work a little and follow all the steps of clear instructions. Let's start with preparation:
- Before applying French gel polish, remove the old manicure, clean it, and give your nails the desired shape. The cuticle must be removed very carefully so that subsequently no voids form between the base and the nail tissue. Do not apply oily skin care products yet
- Degrease the nail plates with nail polish remover
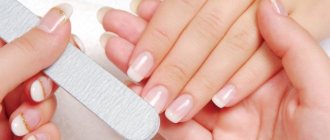
- Sand the entire surface, including the end, with a buff (the softest part if the nails are thin and use a harder one if the nails are healthy). This should be done in the direction of growth, and not in the opposite direction.
- Place the lamp so that it is convenient for you to put your hand into it. Arrange all the necessary supplies.
After degreasing, you should not touch anything with your nails so that particles of fat do not remain on them. The appearance of your future manicure and its reliability depend on this.
With stencil
It’s even easier to do French gel polish with a stencil:
- On nails prepared with a file, buffer and degreaser, you need to apply a base coat, including the end parts.
- After drying, use a translucent flesh-colored gel and polymerize it again in a lamp.
- The stencils are taken with tweezers and pasted onto the nails so that the free edge remains open and the plate below is protected.
- Each one is carefully straightened and pressed using an orange stick, especially at the side rollers.
- White varnish is applied to the ends with vertical strokes, which should also be dried in a lamp.
- After drying, the strips are removed and a top coat is applied, and finally the next layer must be polymerized.
Watch this video for a master class on French manicure with a stencil:
Making at home
You can also make strips for French manicure yourself. Most often, tape is used for this. Both clear stationery and paper masking tape are suitable. A much worse result can be obtained when using double-sided tape, as it is excessively sticky and leaves traces of glue on the nail plate.
The most preferred use is paper masking tape. This is primarily because it is easy to cut. It does not fall apart when stretched and often sticks much better. In addition, only on it can you first draw the outlines of the future stencil. This allows you to achieve the most accurate manicure, because the smile lines on all nails will be the same and flawless.
It is more difficult to work with simple stationery tape, mainly because you have to cut strips from it immediately and “by eye”. As a result, they may not turn out the same, and the manicure may not be ideal. In addition, it is quite difficult to cut a high-quality stencil from such tape because it needs to be cut quickly and without pulling. Otherwise, even a minimal cut can cause the stencil to tear in half. Another feature of stationery tape may be excess glue that will remain on the plate. If the tape is too thick, it will bulge and adhere poorly to the nail, as a result of which the line will not be smooth and neat.
Another good option for how to do a French manicure with stripes if you don’t have any on hand is children’s stickers. You can also cut out the required stencil from them and it will be an almost exact copy of the purchased strips. They will adhere well to the nails and attach easily without leaving any sticky residue. In addition, it is very easy to create a stencil of a good and neat shape with their help. If you want to create an interesting and unusual smile line, it is recommended to cut out the template in this way. In addition, you can easily create any interesting stencil from stickers.
If you still have a lot of difficulties in how to use stickers for a French manicure and it’s inconvenient to use them, then you can do without them. Thus, some nail technicians and even amateurs can paint a perfectly smooth and neat French manicure by hand, without using stencils. Another option is to use wet thread instead of a stencil, but in order for the result to be good, a lot of practice is required. As a last resort, you can try to draw a neat smile line by hand and correct it with a cotton swab dipped in acetone.
[yandex3] [google3]
Easy option
It’s easy to paint French gel polish if you use one of the following methods:
- Start the lines from the sides of the nail to the middle, bringing them together. The liner brush or the one that comes in the bottle with the product is held at a slight angle. The “whiskers” should be at the same level. If the side rollers are dirty, remove the varnish with an orange stick. This method can also be used with a hair brush.
- Start applying the gel from the middle of the plate using vertical strokes. As you paint, you need to move the tool to the growth point in one direction, then in the other. For this method, they also use a “native” gel polish brush or liner. Inaccuracies are corrected with a hair.
- On almond-shaped nails, the free edge of the nail is divided into 3 zones. You should start drawing from the growth point, that is, from the “antennae,” making a straight line to the first third. The same technique is used on the other side of the plate. When the “antennae” is ready, mark the width of the “smile” in the middle, then paint over the free space, rounding the previously drawn straight lines.
Which brush to choose for a French manicure
So, we have already found out that working with this design will not be difficult at all. However, this requires accuracy and perseverance. Of course, you can use a stencil, but experts highlight their lack of practicality and the fact that it is not always possible to get the desired shape of a smile. This is where a design brush comes to your aid.
French
The right brush should be as thin and long as possible, with its help you draw a fine line between the main color and the pattern. In order to paint the tip of the nail a uniform color, it is not suitable and you will need to buy the most ordinary gel brush, you can also use a brush from a bottle of varnish. Before you get the perfect line, you will have to practice to get better at it, so to speak. This can be done on special tips or simply on a piece of paper; this is necessary so that you can calculate the pressure and get used to working with a thin brush.
This tool will also be useful to you for subsequent work with gel polishes; it is with its help that masters in salons make drawings of any complexity.
When choosing a brush, pay attention to the fact that it should be soft and perfectly smooth. If uneven fibers stick out on it, they will interfere with drawing and making blots.
How to paint French gel polish with decor
You can paint French gel polish using decor like this:
- After a hygienic manicure, wipe the nails with a degreaser, cover with a base and dry under a lamp for 2 minutes.
- Then each is painted with a primary color.
- After drying, make a “smile” on the free edges of the nails of the middle, index and little fingers, and when finished, place the hand back into the lamp.
- On the ring finger, dots draw 7 diamonds in 3 rows from the base of the nail to the end, using white gel polish or gel paint.
- Unevenness is corrected with a thin brush soaked in degreaser.
- For volume, you can apply another layer of white varnish to the diamonds.
- After drying, all nails are coated with the finish, and the hand is again placed in the lamp.
- Then you need to remove the sticky layer using a cloth moistened with degreaser.
- Dots are placed between the white diamonds on the ring finger with extension gel; they will act as glue.
- Using the sharp tip of an orange stick, small rhinestones are attached to them, and this nail is dried for the last time in a lamp.
A hand-drawn design consisting of several small elements should be dried after completing each one. If you take the entire image first, it may become blurry if you move awkwardly.
Watch this video for a master class on French manicure with decor:
Step-by-step instruction
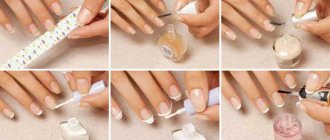
First of all, apply a base layer to the prepared nail plate. The base is applied to the central part of the nail, then gradually distributed over the entire surface, after which it is polymerized under a UV lamp for 30 seconds. Excess product is removed with a toothpick or orange stick. There is no need to remove the sticky layer. Apply 2 thin layers of gel polish of the desired shade to it, painting the end of the nail. Each of them is polymerized for 2 minutes.
Smile line design:
- Before doing a French manicure, you need to find the longitudinal center line of the nail. If the nail has a square shape, its extreme point will be located strictly in the middle of the nail cut. If the cut shape is round or oval, the extreme point of the axis will be at the apex.
- From the extreme point of the center line, they retreat downward to a distance that will be the width of the smile (white tips). Here they make a point with a brush for painting. In order not to spoil the manicure, you can make a mark with transparent gel polish.
- From the mark to the right and left, draw lines parallel to the cut. In this case, their end points should be on the same straight line, perpendicular to the center line of the nail. It is advisable that the end points be located near the place where the nail grows into the skin of the finger.
- If the free edge of the nail is large, there is no need to paint it completely white. The white stripe is made thin (2-3 mm). It is carried out strictly along the cut.
- It is important to make the lines perfectly straight and maintain the proportions of a French manicure. The width of the white stripe should always be several times smaller than the beige part.
- Before applying gel polish, you need to check that the selected smile width is suitable for all nails. Sometimes girls start applying polish from large nail plates. When it comes to the little finger, it turns out that the white stripe is very large for it. Its width on all fingers should be the same.
- When the smile line is marked, it is painted over with white gel polish. You must act extremely carefully so as not to cross the marked boundaries during step-by-step staining. It is advisable to apply a thin layer of varnish so that it does not flow beyond the area to be painted. Experienced manicurists recommend correcting the design using a clean brush. The applied layer is dried under a UV lamp for 2 minutes.
- Then the final top coat of clear gel polish is applied. The top coat is polymerized in a UV lamp for 1-2 minutes. If a topcoat with a sticky layer is used, it is removed using a dispersion layer remover.
How to design a nail
Design on a French jacket is done not only by hand, with a brush, but also with the help of:
- Stamping. These are dies with a soft silicone base and accompanying plates with extruded patterns. Gel polish or paint is applied to the latter. The silicone stamp pad is then pressed onto this plate to transfer the design onto it. The next step is to imprint it on the nail, which has already been processed, covered with a camouflage base and dried. When the stamping is on the nail plate, this finger is placed in the lamp.
- Sliders. These are decals that are applied to nails that are already covered with a base, flower bed and top coat with a sticky layer. The slider is cut along the width of the nail plate and placed on a cotton pad moistened with water. This removes the dense substrate. And the transparent picture itself is fixed on the nail and straightened out. The section of the slider sticking out at the free edge must be cut off. Finally, a glossy top coat is applied over it and dried in a lamp.
- Fimo. These are polymer particles that look like fruit and berry slices. They are also glued to a sticky layer of the finishing coat, another top coat is placed on top and dried in a lamp.
French manicure with gel polish at home with glitter
French manicure with gel polish at home will turn out very bright if you use glitter:
- The first stages do not differ from those described earlier: hygienic manicure, treatment with a buff, degreaser, then covering with a basic flower bed or camouflage, drying in a lamp.
- Then a transparent gel or base is applied to the edge of the plate; there is no need to polymerize it.
- Using a wide flat brush, take larger confetti and place them on the free edge of the nails in different places.
- Finer glitter is applied with a fan tool, and your hand must be placed in the lamp to dry the liquid and fix the shiny decor.
- Next, you need to apply the top gloss coating and dry it again.
- They go over the ends of the nails with a file to remove any protruding particles of glitter.
- All that remains is to apply a second layer of topcoat and dry again.
Watch this video for a master class on French manicure with glitter:
Methods of applying French
French manicure with gel polish can be performed using several additional tools:
- paint with a brush;
- use special strips for the jacket;
- improvised means: tape, cling film, adhesive tape, ordinary stickers;
- stencil;
- tips.
Method 1: draw a French brush
French gel polish can be painted with a brush. It can be made from kolinsky or sable fur, also suitable with nylon bristles. Before drawing, it is recommended to flatten the brush on both sides, in this case the line will be clearer. The varnish is applied with a brush, starting from the periungual ridges to the middle of the nail, after which they are connected by a line parallel to the base.
This is one of the most difficult ways to apply French on yourself, so if you don’t have artistic skills, choose another option.
Method 2: French stripes
The easiest way to do a French manicure at home is to use special French manicure strips. They are also called a stencil. They are easy to glue, the shape is immediately visible, so there is no need to trim anything.
Such strips are sold in cosmetic stores and are thin strips of self-adhesive paper. As a rule, they have an arched shape.
The French stencil is very easy to use:
- Separate from the base and press the adhesive side onto the nail so that the tip remains free;
- Fill the tip of the nail with polish and place it in the lamp;
- After this, remove the strip.
If you did everything correctly, the line will turn out neat. Thus, treat all the nails.
Method 3: use tape, film, patch
If you didn’t have time to purchase ready-made strips for a French manicure, but you need a beautiful manicure today, you can use the means at hand. Suitable:
- tape or tape,
- masking tape,
- adhesive plaster,
- cling film and other adhesive items.
The principle of applying French tape using tape, tape or patch is the same as when using special strips. We glue it onto the nail, stepping back from the edge, apply shellac and dry it in a lamp. Then remove the tape and cover with finish.
Method 4: tips
French manicure can also be done with tips. These are special devices made from a plastic holder with a jacket already drawn on it. The technology of use is simple:
- Prepare your hands as usual;
- Choose tips that match the shape and size of your nails;
- Apply glue to the white strip and press it to the nail;
- Then break the transparent holder and use a glass file to file the edge of the false smile;
- Then treat the nail with a degreaser.
This is the simplest, but slightly outdated option, since natural nails of natural length with gel polish coating are now in trend. And tips are an option for one evening, and not for daily wear.
Ideal French manicure with gel polish for short nails
French manicure with gel polish is also done on short nails, but the “smile” should be very narrow. What the process looks like:
- First, they tidy up the skin around the nail plate, clean out the sinuses, cut off the cuticle, and polish it. For this purpose, it is more convenient to use the device, but a classic manicure is also possible.
- Then the auxiliary products are applied in the following order: degreaser, acid-free primer, 2 layers of leveling base coat. The last product needs to be dried.
- The next step is to apply the flower bed. For the entire plate, use a brush from a bottle or liner. But closer to the edge, where there will later be a border with white varnish, the camouflage color is applied with a thin hair-type instrument. Thus, there should be a step there. That is, there is less colored polish on the very edge of the nail than on the rest of the nail.
- A little white varnish is placed on a flat lid. And with a thin brush they take the product from it to apply to the edges of the nails. You should start moving from the center of the plate to the growth points. To correct coating defects, you can change the direction of the brush, but it should be held at an angle.
- Once the white gel has dried, the finishing coat is applied. After treating each finger, the hand is turned over with the palm facing up to level the product. At the end, the fingers are once again placed in the lamp to dry the top.
Watch this video for a master class on creating a French manicure for short nails:
How to prepare your nails
The first step is to treat the nail plates with an antiseptic. After treatment, give the edge of the nail the desired shape using a nail file. Apply remover to cuticles and ridges on the sides to soften the skin. The next step is to soak the brush in a bath of warm water for 4 minutes, remove and dry.
Use a pusher spatula to push back the ridges and cuticle, trying not to press too hard to avoid wounds. Use tweezers to remove excess skin around the nail, and remove the pterygium with an orange stick soaked in water or with a pusher. All that remains is to apply the oil.
French gel polish step by step for yourself
French gel polish is done step by step by yourself in the following sequence:
- The length is shortened with a milling cutter.
- You need to use a file to give it a more accurate shape.
- Use a pusher to push back the cuticle, clean out the sinuses and treat the side ridges.
- Cut off excess with scissors.
- Wipe the plates and the skin around them with a degreasing cloth.
- French gel polish on natural nails requires the application of a leveling rubber base, which is then dried.
- The next stage is the use of a nude flower bed; it is distributed with a brush from the bottle itself.
- To apply the base product more evenly, you will need to work with a hair, after which your hand is also placed in the lamp.
- French gel paint on gel polish is done faster and lasts longer, so they are mixed on the palette.
- Using a hair brush, draw white lines on the free edge, starting from the middle and moving horizontally to the side parts.
- After drying again, you need to cover your nails with topcoat and put your hand in the lamp one last time.
- Next, remove the sticky layer, if any, and lightly file the ends to get rid of streaks.
Watch this video on how to do a French manicure for yourself:
Preparing for a manicure
Before you decide to apply French gel polish, you need to buy products and tools, as well as prepare a place to work. For a French manicure you will need 2 types of polish. The classic combination involves the use of white and flesh (beige) shades. However, French can be done in any other color scheme. For a business lady, moderate color compositions are more suitable: white and pink, beige and black, transparent and lilac, beige and gold. In everyday life, on vacation and at a holiday party, any combination of colors will be appropriate.
In addition to colored gel polish, you will need a base and top coat, 1-2 brushes, a UV lamp and a special degreasing liquid. It is advisable to additionally buy 1 thin brush for painting nails. To process nail plates, you need to prepare 2 files: with an abrasiveness of 180-240 grit (for filing) and 240-500 grit (for grinding).
To do a French manicure, you need to choose a workplace with good lighting. All items are placed within reach. You need to stock up on cotton pads or lint-free napkins for manicure, a pusher or orange sticks.
Secrets of a beautiful French manicure
In order for the French to look good, to look like the work of a highly skilled craftsman, it is important to follow several rules:
- Having collected white varnish on the brush, you need to shake off the excess amount. It’s more convenient to dip it not into a bottle, but to use a palette.
- When drawing the details of a French jacket, you need to make movements not only with a brush, but also turn your finger in the desired direction. The hand being manicured should be relaxed.
- The “smile” line should be deep. That is, it should be an arc, not a straight line across the nail. This rule applies to any length. The “antennae” should be thin and end at the growing points, not at the cuticle. It is more convenient to do them with a hair brush.
- The “smile” should not be too wide, it looks unnatural. If you need to hide the overgrown part of the nail so that the manicure looks presentable longer, it is better to use a dense camouflage base.
- The “smile” on all nails should be the same thickness. They must be compared during the process in order to achieve the desired effect and correct the error before drying.
- The “smile” should be symmetrical. It’s not difficult to see the nuance if you turn your hand away from you. This rule is also useful when creating the shape of your nails.
- The “smile” line should follow the outline of the cuticle and become its mirror image. But you shouldn’t make it U-shaped.
We recommend reading about what you need to know when choosing a gel polish lamp. From the article you will learn why you need a lamp for gel polish, how it works, and how to choose a lamp for drying gel polish. And here is more information about how to remove shellac at home.
The French jacket has been popular for many years, because it is appropriate with any clothing, everyday and on holidays. It is important that all design details are done carefully and symmetry is maintained. And for this you need a high-quality hygienic manicure, suitable brushes, base, varnish and a little effort.
How to make an express French look with ready-made Dashing Diva tips
Do you urgently need a French manicure at home, but you don’t have a UV lamp and your drawing skills are failing? Keep on hand the new product from Dashing Diva - the new generation of Virtual Nails French false nails. In our video tutorial, we talk about this miracle product and show how you can “conjure up” a long-lasting manicure in a matter of minutes.
Another new product from this brand is French Wrap Plus tips. With their help, you will make an equally neat French jacket with your own hands, if you carefully look at our photo tutorial.