- September 24, 2018
- Nail care
- Tatiana Pekha
A new trend that has captured the attention of all manicurists is marble nail design. Naturalness is always in trend, so natural themes continue to adorn the nails of fashionistas. Nail industry professionals are developing proprietary techniques for obtaining the effect of natural stone on nails and actively sharing their ideas. Thanks to this, it became possible to perform such a manicure even at home. How to create a marble effect on nails and what materials are needed for this? You will get the answer to this question after reading this article.
Definition
Marble manicure is unusual stains on the nail plate that are formed by combining several colors of varnish. How to do a marble manicure at home without special preparation? First you need to study the techniques for creating this nail art and only then decide which one to use.
The marble effect is created using:
- water;
- cling film;
- special varnish with marble effect;
- gel polish;
- acrylic paints.
Next we will describe all these techniques in more detail. Each of them requires different aids, and the final manicure results may vary slightly.
What is necessary?
Very little.
This is your irrepressible imagination, the desire to always look fashionable, drive and knowledge of basic techniques. Perhaps during the creative process you will come up with completely new ideas that no one has used before. It is not at all necessary to visit an expensive beauty salon and receive the services of a professional.
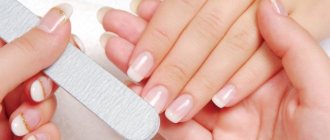
A necessary condition is mandatory preliminary preparation of hands and nails, which in no case should be neglected, the use of only high-quality materials, including special drying lamps (UV) and compliance with all stages of the operation.
Shiny marble
How to make a marble manicure with a special shine? Just add rhinestones, bouillons, ribbon or kamifibuki. Marble nails themselves look like a masterpiece of nail art, so it’s easy to “overload” it, remember this when adding glitter to the design. For a successful color combination, you need to mix varnishes that are similar in shade. Contrasting colors when mixed can give off unnecessary shades, so it is better to dilute them with a neutral color: beige, white or gray.
Advantages: style, originality and beauty
First of all, it is a stylish and sophisticated appearance of nails. The second is the opportunity to show your imagination and create an endless variety of design options.
Well, another important plus is durability, since this type of manicure pleases you with its impeccable appearance for quite a long time. Of course, this is only possible if the techniques are followed and high-quality materials are used.
Marble design is appropriate in any setting. Lighter shades of marble can be a good choice in an office setting. Bright colors and fancy patterns are suitable for celebrations.
Professional recommendation. To get an excellent effect, you must use gel polish from a reputable manufacturer.
You should not skimp on this and buy materials of dubious quality in an underground passage or on the market.
Recommendations for choosing colors for marble manicure
The very name of this design speaks of the image of a natural stone on the nails, but it does not have to be marble (blue, white, black or red stone with veins). You can also imitate other semi-precious or precious gems: lapis lazuli, opal, ruby, turquoise, jade, malachite, etc. When mixing colors, you get eye-catching pebble nails, each finger is decorated individually and uniquely, because it is impossible to draw identical stones.
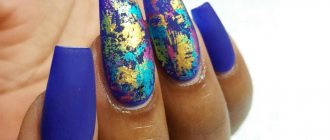
To obtain such stains and patterns, use the trend colors of 2022: blue and light blue, gold and green, beige and white, white and lilac, as well as combinations of three colors (black, white and blue). How to make a “malachite” marble manicure? It is enough to mix different shades of emerald color on the nail.
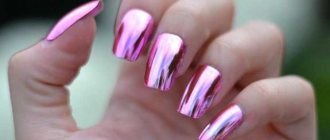
An extravagant solution for manicure would be a mixture of rich and bright shades. In order to get a marble manicure, like in a salon, you can try using varnishes with different textures: metallic, pearl, matte, holographic, rainbow.
Professional recommendations
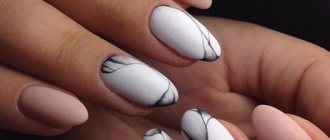
According to experts in the fashion industry, the most popular combination for marble design is black and white. In second place are pink and gray. Naturally, personal preferences must be taken into account. If you decide to do nail art before a special event, you need to take into account the color of the outfit and makeup. Crimson nails are unlikely to look good with a bright blue dress. Naturally, if this is not the idea of a mega-creative designer.
Stone design is not on all nails
With gold splashes
Black and white variation
To make it stylish, work as carefully as possible. Before applying the pattern, degrease your nails, otherwise the coating will spread and adhere poorly.
In 2022, experts do not recommend forgetting about the fashionable shades of the previous year: blue, light blue, gold, emerald, white, purple, black. “Malachite” can be made by mixing light green and emerald shades. The result is a bright 3D stone effect. Nail art experts recommend combining a stone pattern with powder - the stones will shimmer even brighter!
What’s remarkable is that “stone marigolds” look appropriate at any event, at any time of the year. They are universal, and this is their advantage!
Long nails have room to roam
In gentle colors
Moonlight night
Let's sum it up
You must be prepared for the fact that it may not work out the first time. Don't stop halfway and try again - the result will probably be the same as you intended. Having done nail art once, you can experiment, creating original patterns! Don’t be afraid to mix colors and get creative; in the new season, courage and creative thinking are in fashion. Don't forget to share your work in the comments. You can draw inspiration from finished works, as well as take ideas that nature itself presents. Each pebble is original, interesting, and different from the other. You can convey this in your manicure!
More ideas:
Pebble nails using water
Using water you can get an interesting stone structure, which is very simple and easy to make. Let's look at how to make a marble manicure in the turquoise style using this technique. We will need: a container with water, a toothpick, three colors of varnish (black, gold and turquoise shades) and finish. The polish dries quickly, so open the bottles in advance and act quickly. So let's get started:
- cover the nails with the main color;
- drop a drop of turquoise varnish into the center of the container with water;
- wait until the drop spreads evenly over the surface of the water and a circle forms;
- add a drop of black varnish to the center of the turquoise;
- again we wait for the colors to spread completely;
- drop gold varnish into the center of the resulting circles and wait;
- carefully mix all three colors with a toothpick;
- the color mixing technique can be changed each time and you can get different patterns;
- one by one, lower each nail into a container of water;
- hold the nail parallel to the water surface and try to ensure that the varnish completely envelops the nail plate;
- take your fingers out of the water and remove the varnish from the skin, but you need to act quickly before it dries;
- repeat the procedure with the remaining nails;
- Finally, the nails need to be coated with a finishing agent.
How to make a marble manicure with varnish so that it does not dry out prematurely? In this technique, you need to use only warm water, otherwise the varnish film on the surface of the water will harden too quickly.
A very simple technology for nail art beginners
For those who want to get a rather interesting result simply and without wasting extra time and money, there is another simple way - drawing patterns with a toothpick while the varnish is not dry.
You can try experimenting and drawing patterns using a nail polish brush, alternating it with a toothpick.
For those who find it difficult to orient themselves right away, we offer a simple diagram of the movement of a toothpick or needle.
An example of actions with a needle, which is previously tightly wrapped in a small piece of cotton wool. In such cases, using a sharp end is very problematic - you will damage the top layer and the design will be sloppy.
What is needed to create it at home?
You will need:
- Basic varnish of the selected shade.
- Two or one - complementary colors.
- Transparent color base.
- Drying.
- Toothpick (needle).
- The fixative is translucent.
Technique
- Apply a very thin layer of transparent base to prepared nails.
- Dry.
- Apply the main shade (color).
- Dry the first layer if the color depth is insufficient.
- Apply the layer again.
- Don’t wait for it to dry and add a drop or two of additional varnish to your nail.
- Do not dry.
- Take a toothpick and draw patterns.
- Proceed carefully.
- Dry.
- Apply clear fixing liquid.
Conclusions. The coming fashion season promises to be interesting. Designers offer a huge variety of styles for both casual wear and special occasions. We recommend taking a closer look at fashion in the field of nail art, since nail design also plays an important role when choosing a stylish look.
Using cling film to create marble on your nails
Regular cling film will help you create marble nails. As with the previous technique, you will need few tools and materials, just enough cling film, contrasting varnish colors and a finishing agent. Let's consider the steps in order:
- first, cut a piece of film and remember it well in your hands;
- Apply the base color of nail polish to your nails and let it dry completely;
- Paint the entire nail plate with a contrasting color and, without waiting for it to dry, quickly blot the top layer of varnish with a soft piece of film.
The film will remove a small amount of nail polish, leaving small streaks of color. The procedure should be quick, until the varnish seizes in lumps and dries. For beautiful streaks and veins, you need to choose thick varnishes so that the color does not show through. If the result meets your expectations, then dry it and, as usual, secure the design with a finishing coat.
Water manicure without water
Instead of water, we use a silicone pad on which the base is spread - the background color of the varnish, then a drawing is made in it with a different shade. The resulting sticker, after drying for a short time (as soon as the design has set), is applied to the nail with tweezers and smoothed out. Afterwards the excess is cut off.
| Take a free manicure course. Start taking the course! |
| Photo and video lessons of drawings on nails (from our partners). Start watching lessons! |
| Nail designs by color (from our partners). View! |
Special varnish for marble effect
Regular polishes and gel polishes have a similar effect. No special skills are required in this case. How to do a marble manicure without unnecessary materials? It is enough to buy a special polish of the desired shade (white interspersed with black shimmer or turquoise with the addition of colored chips) and paint your nails with it. To make the marble effect more intense, you need to cover your nails in two layers. To secure the design well, do not forget to use a topcoat. If you use a finishing agent with a metallic sheen, you will get an original design that combines shine and stone structure. Use rubs with different shades to make the shimmer of the stones look more unusual.
New designs
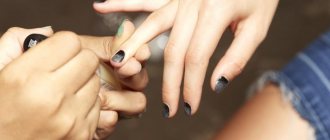
This season, an original, but at the same time discreet and not vulgar manicure is relevant. The trend we are talking about today has won the hearts of beauties of different ages. Women are increasingly turning to nail technicians to apply a pattern that imitates the texture of stone. This trend has successfully migrated since 2022, now gaining more and more popularity.
A big mistake is mixing more than 4-5 colors. It turns out dirty and not neat. The exception is shades of almost identical tones.
Do you think you can't afford a salon manicure? You are wrong, thanks to detailed instructions everything will work out. Have more self-confidence and go ahead!
This season, an original, but at the same time discreet and not vulgar manicure is relevant.
This technique has won the hearts of beauties of different ages.
Women are increasingly turning to nail technicians to apply a pattern that imitates the texture of stone
Marble design using gel polish
Transforming nails with a gel-based composition is a little more complicated. First you need to prepare everything you need: an ultraviolet or LED lamp (preferably with high power so that the gel polish dries faster), a thin brush, files and buffs, a high-quality set of gel polishes (2-3 colors, base and finish). Let's get started with marble manicure:
- Use a soft buff to file down the glossy layer of the nail, achieving a matte and smooth surface.
- We degrease and coat the nails with a base product that protects the nail plate from the influence of chemicals.
- We seal the ends of the nails with the base.
- Dry your hands one by one in a UV lamp (or Led) for about 1-2 minutes.
- Apply the base color of the varnish and also seal the ends.
- Dry your nails for 1-2 minutes.
- All that remains is to paint your nails with marble. To do this, use a brush and a contrasting color of gel polish.
- The stains can be made in several shades, for example, on a white background of gel polish, draw gray veins of marble, then use a thin brush to paint in black. This way the design will look like it has a 3-D effect.
You can paint your nails with acrylic paints; we’ll look at the technique below.
Aristocratic beauty
A simple marble manicure, but not without a special charm. Graphic shapes and clear lines play up a simple blurry pattern. The highlight lies in the contrast of shapes and color variations.
What you need
- base;
- basic color gel polish;
- white gel polish;
- palette (foil or plastic);
- thin brush;
- top;
- lamp.
Step-by-step instruction
- Prepare your nails for work. They need to be degreased and a layer of base coat applied.
- Dry everything in a lamp.
- Cover nails with the main color in 2 layers.
- On the palette put 1 drop of the main color and 3 drops of white varnish.
- Using a thin brush, mix 3 different saturation gradients. Stretch the colors into several tones, starting from the lightest. The last tone should be as close as possible to the main dark tone.
- Apply a white base coat to undesigned nails.
- Along the central axis in different directions, fan out droplets of gel polish with a thin brush, imitating marble.
- You need to pick up colors from the palette and transfer them to your nails. At the cuticle they should be dark blue and change color as they spread across the nail. Towards the tip the contrast should fade away.
- Send the layer to polymerize in a lamp.
- Hide the excess side parts of the design under white gel paint or gel polish.
- Using a thin brush, draw two borders, emphasizing the rolls of color in the design. All thin lines should follow the gradient.
- Dry the design in a lamp.
- Cover the white shade with a matte top, and the gradient with a glossy one.
- Send to polymerize in a lamp.
This marble design balances between cold and clear geometry and soft, blurred shapes drowning in a rolling of colors. The contrast of textures further facilitates the perception of the balance of this coating.
Marble painting with acrylic paints
The technique for performing this design is not particularly different from the “water” method, it’s just that acrylic paints are a little thicker than regular varnish, so it’s easier to work with them. Paints can be mixed with each other; use a palette made from a small piece of foil for this, and a toothpick will do instead of a brush. Next, use a container of water and drop the desired color of paint into the center of the liquid. Dip your nails into the smeared circles of colored paint and then wipe off the excess. Cover the result with two layers of topcoat. The chic design is ready, don’t be afraid to experiment and be inspired by the surrounding nature.
Water and waterless method. What is this?
When ordinary water is used to create various patterns, then professionals mean water manicure (another commonly used name is aqua manicure). Technology has also been developed without the use of water; in this case, a regular plastic bag or cling film is used. Some people suggest using pieces of foil, but it is a little more difficult to work with, since its texture is more rigid.
Main condition:
Successfully decide on the choice of shades.