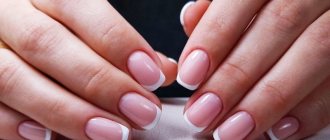
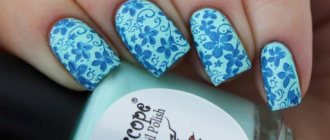
French manicure is a classic that is always in fashion. The French jacket is a favorite of many women; it goes well with clothes in any style, from evening dresses to formal office attire. A distinctive feature of the French coat is the smile line, which not everyone can draw by hand. This is why there are stencils for French manicure - with them anyone can draw the perfect smile line in a matter of seconds.
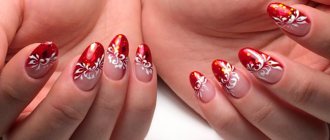
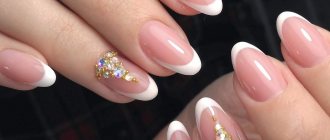
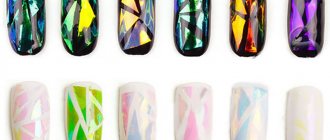
Nowadays, the classic version is no longer surprising, so non-standard French is becoming more and more common, when the edges of the nail are painted in bright colors. Women decorate their nails with designs, decorating the border of the smile line with rhinestones or “golden sand”. In general, there is room for your imagination to run wild.
What is called the “smile line”?
The classic version of the French manicure is when the main part of the plate is painted in a tone close to the natural nail (light without or pale pink), and the tip is covered with white varnish.
The line separating the protruding tip of the nail from the main part of the plate is called the smile line. It is carefully outlined with a brush, and then the protruding part of the nail is painted white along the contour.
Note that the smile line is different for all people: symmetrical and not very symmetrical, beveled to one edge, round, oval, elongated, etc. But this does not matter, since by doing a French manicure you can adjust it in your favor.
Stencils for French - what are they and what are they for?
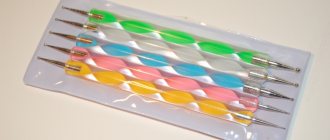
What do stencils for a French jacket look like? These are small sticky strips of paper in the shape of a crescent, usually small in width - 5-6 mm. They are glued one at a time onto the nail in the place where the smile line is located. All that remains for the woman to do next is to apply white varnish to the tip, being careful not to go behind the stencil, and voila! The perfect French jacket is ready!
It’s interesting that stencils for French hair are used not only at home, but also by many craftsmen in salons. They allow you to save a lot of time and effort, because to draw a smile line with a brush by hand, you need good skill. One wrong move and everything will have to be redrawn. With stencils everything is much simpler: glue them, paint them with varnish, remove them and you're done.
Modern French manicure is replete with a variety of shapes. For example, the smile line does not have to be semicircular. Nowadays, non-standard solutions are at the peak of fashion, such as:
- triangle;
- zigzag;
- wave;
- heart;
- straight beveled line.
Stencils of all listed shapes are available for sale.
The price for them is low, for example, on the well-known Aliexpress they are sold at a price of 10-11 rubles per package. The package contains 60 strips, that is, enough for 6 times.
You can purchase stencils for a French jacket as a set. El Corazon has these. The set includes 120 strips in every shape and variation imaginable. The price is affordable - only 70-80 rubles for such a variety!
What can replace stencils for French manicure?
Do you want to do a manicure right now, but don’t have stencils on hand? There is no need to limit your creative flight. Scotch tape, adhesive tape or landscape paper - these improvised items will successfully replace stencils for a French jacket.
We make a stencil from adhesive tape or electrical tape:
- Cut a sticky strip 3 cm long.
- Cut lengthwise so that the width of the strip becomes 0.5 cm. The result is a sticky piece of 3 by 0.5 cm.
- Give it a classic semicircular shape or leave it as is. If your soul requires sophistication, you can cut a zigzag or wave.
- To ensure that the tape reduces stickiness and does not tear off the nail polish, a stencil from it must be glued to some surface before use and peeled off - do this a couple of times.
Don't have any sticky tape at home? Then the paper will come off. It is better to take a landscape paper or, in extreme cases, a notebook sheet. A newspaper excerpt is not suitable - it is too thin and stained by printing ink. Cut out a stencil of the desired shape from thick paper. It’s easy to attach the homemade product to your nail – just wet it with water.
What are stencils for?
To draw a beautiful, neat line with a brush and white varnish at home without stencils, you will have to practice quite a lot. Therefore, to make the task easier, stencils were invented. And they come in two types: for applying patterns and “smile” shapes to nails and for obtaining beautiful designs on them. In addition, using ready-made strips at home significantly reduces the time and money spent on trips to the salon.
How can you replace stencils?
You can try to do without special stencils: cut a strip of adhesive tape or electrical tape into strips 2-3 cm long to wrap around your finger. Stick to the nail plate at the desired level and apply the polish with bold strokes! To avoid troubles such as peeled off varnish, the tape must be glued to some flat surface a couple of times so that a minimum of glue remains on it. You can also cut out homemade templates from paper and attach them to your nails using water.
We make French in 15 minutes!
You will need:
- stencils (10 pieces);
- varnishes of two colors (for the main part of the nail and the edge), transparent fixative varnish.
Let's get to work!
- Do a regular hygienic manicure: treat the cuticle with tweezers or a special remover (we wrote about what a cuticle remover is here).
- File your nails to give them the desired shape. French looks impressive on rectangular and classic oval shapes.
- Apply a base coat to your nails (special base coat or regular clear polish).
- Cover your nails with 2 layers of varnish of the main color (pink or light beige). You can leave them transparent. Dry each layer in air for 7-8 minutes, or 2 minutes in a UV lamp (if using shellac).
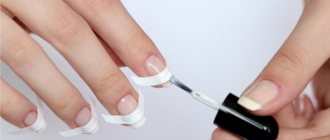
- Glue the stencil to the first nail. Apply it directly to your own smile line and wrap it around the pad of your finger.
- Apply white polish to the edge of the nail, staying within the stencil. Remove the stencil. Dry the varnish. Repeat the same with the remaining nails.
- Cover all nails with a clear coat of top coat varnish. This will give the manicure extra shine and even out the border from the base color to white at the edges.
- Decorate your manicure as desired with glitter, rhinestones, stickers, designs, or leave it as is.
Using stencils, you can make a French haircut very quickly and at home, rather than wasting time recording and going to a beauty salon.
French manicure is a favorite design option for the nail plate for many fashionistas. This design is very feminine and natural, and in addition, it allows you to look well-groomed and appropriate in almost any situation. French manicure never goes out of style, it suits any style and color of clothing and looks suitable in any situation. An absolutely indispensable accessory for creating such a manicure are special strips - stencils for French manicure, which help make it neat.
Step-by-step manicure at home
Can be done in just half an hour. We will need 2 varnishes, as well as stencils for a French manicure.
Stages:
- Softening and removing cuticles, hangnails, giving nails the desired shape.
- Stick on the stencils, and the length of the free tip of the nail should not exceed 5 mm.
- Apply varnish to it, after a few minutes paint the next layer.
- Remove the stencil.
- Cover your nails with a pastel-colored polish.
- To add shine and extend the life of your manicure, apply a sealer at the end.
Your own classic manicure using stencils is ready.
Application of strips
Strips for French manicure are necessary in order to use them to draw a clear and even smile line on extended or natural nails. They have an adhesive base, thanks to which they are firmly attached to the nail, hence another name for them - stickers for French manicure. Correct use of these stencils guarantees a high-quality and neat manicure with a minimum amount of time. These stencils must be used as follows:
Thus, from the description of the process it is clear that there is nothing complicated in how to use stickers for a French manicure. The technology described above is suitable for creating a classic French jacket or a colored one when only the color of the free edge of the nail is replaced. If you plan to replace both shades in your manicure (both pink and white), then you will need to first apply a lighter or less dense tone to the entire nail, and only then stick on strips, separating the darker area.
What you need to do a French manicure with gel polish
French manicure with gel polish is made from the main shade of flesh or pink, beige and white, which is used for the free edge of the nails. This is the classic French style. There are manicure modifications in which other colors are acceptable. That is, you need nail covering products of at least two shades. In addition to the pigmented and snow-white composition for the French gel polish, you need to prepare:
- a thin brush to draw a “smile”;
- stencils (optional, but better for beginners);
- buff for preparing the plate, that is, a soft polishing file or block;
- degreaser;
- sometimes a leveling base;
- lint-free wipes;
- lamp for drying the base, varnish and topcoat (UV or LED);
- glossy top;
- dots for attaching rhinestones and glue or gel for extensions;
- orange stick to remove polish from skin.
Stencil, stripes
French stencils are used to more evenly define the white tip of the nail, the “smile” line, or to draw a hole at the base. One side of the device is sticky. It is glued onto the nail so that the top edge outlines the “smile” line. Part of the plate is protected, the varnish will not get on it, and the open part is covered with a white flower bed.
There are several types of strips:
- Disposable. Made from paper or vinyl. They are glued on, manicured, removed and thrown away.
- Reusable. Their material is soft plastic or silicone. The principle of operation is the same as in the previous case, but can be used repeatedly.
Stencils also differ in shape. The most common are actually arched wide stripes. There are also circles with holes inside, intended for drawing holes. And also triangles, checkmarks, hearts, with which the “smile” line will turn out to be unusual.
These devices allow you to quickly create a neat manicure without errors, but the sticky side can remove some of the base product. To avoid this, you need to touch it with your finger several times. The sticky layer will become less durable. The device glued to the nail will stick, but not so tightly. And the camouflage base will remain in place.
Brush, what to paint with
There is more than one brush for a French brush; the following types are used:
- Hair. Very thin, as if sharp. With this tool it is convenient to draw a smile line by hand even on short nails; you can also draw patterns. The optimal length of the hair pile is 7-9 mm.
- Cat's tongue. It is also a narrow brush, with a thin tip, but wider at the base than the previous one. More suitable for long nails.
- Liner. This is a tool with a medium width of the fleecy part and a slightly narrowed tip. With some dexterity, you can also outline the line of a smile with a liner, but it is more convenient to paint over the free edge of the nail. Especially if they are long. You can apply a base, but then there should be two liners.
- With beveled edge. Also used to draw a “smile” line. But you can also correct coating defects and paint over the tip of the nail.
It is more convenient to paint French with a natural bristle brush, especially if you use a liner and a tool with a beveled edge. This type of material is softer, varnish picks up well on it and does not run off, and the coating is easier to level. The hair can also be made from artificial bristles. But it should still be quite soft. In a word, you can paint French on gel polish with different types of tools, they are all miniature.
The best option for a beginner is a hair or a cat's tongue. Their quality is more important - the fibers should not fall out or curl when moving.
The basis
The base for a classic French jacket is chosen in pale pink, peach, flesh, milky, light beige colors. These are camouflage bases, which are also translucent or dense. Every manufacturer has them. The product gives the nail a healthy and natural shade. It is applied first after preparing the plate with a degreaser on the entire nail or on the primer, from base to tip.
Gel polishes in nude shades can also be used as base polishes. As a rule, they are brighter than camouflage agents.
Types of stripes
Strips for French manicure always look like paper stickers located on a paper base. Rarely, they can be made not from paper, but from film. Based on the manufacturing principle, all such stencils can be divided into two large groups:
- Factory-made strips;
- Homemade stencils.
Of course, homemade stencils are usually less convenient to use. But the result obtained with their help does not differ from that guaranteed by purchased strips.
Factory-made stencils can be of different widths. This is purely a matter of convenience. Some people cannot use wide strips because they do not adhere well to the nail, which makes it impossible to obtain a clear line. Others, working with narrow strips, can cut beyond their aisles and thereby spoil the manicure. Typically, the width of the strip ranges from two to five millimeters.
In addition, their shape may be different. They can have an acute angle or be straight. Recently, stripes for French jackets with wavy outlines have begun to appear. In addition, these stencils can be asymmetrical and have varying degrees of curvature. This is done taking into account different lengths of nails, because, usually, the longer the free edge, the more the smile line should be curved towards it. Whereas for short nails it can be almost straight.
In terms of how to use strips for a French manicure, everything is limited only by your imagination. They can be moved and rotated, creating an asymmetrical smile line, re-glued several times, making a striped manicure and much more. For example, this type of manicure using the discussed stencils is popular, such as reverse French. In this case, the strip is turned over and glued closer to the cuticle, forming a thin strip next to it, covered with a contrasting color. Another popular option is a lunar manicure, the meaning of which is also to form a zone of contrasting color near the cuticle, but it will not have the shape of a strip, but an elliptical one.
Making at home
You can also make strips for French manicure yourself. Most often, tape is used for this. Both clear stationery and paper masking tape are suitable. A much worse result can be obtained when using double-sided tape, as it is excessively sticky and leaves traces of glue on the nail plate.
The most preferred use is paper masking tape. This is primarily because it is easy to cut. It does not fall apart when stretched and often sticks much better. In addition, only on it can you first draw the outlines of the future stencil. This allows you to achieve the most accurate manicure, because they will be identical and flawless.
It is more difficult to work with simple stationery tape, mainly because you have to cut strips from it immediately and “by eye”. As a result, they may not turn out the same, and the manicure may not be ideal. In addition, it is quite difficult to cut a high-quality stencil from such tape because it needs to be cut quickly and without pulling. Otherwise, even a minimal cut can cause the stencil to tear in half. Another feature of stationery tape may be excess glue that will remain on the plate. If the tape is too thick, it will bulge and adhere poorly to the nail, as a result of which the line will not be smooth and neat.
Another good option for how to do a French manicure with stripes if you don’t have any on hand is children’s stickers. You can also cut out the required stencil from them and it will be an almost exact copy of the purchased strips. They will adhere well to the nails and attach easily without leaving any sticky residue. In addition, it is very easy to create a stencil of a good and neat shape with their help. If you want to create an interesting and unusual smile line, it is recommended to cut out the template in this way. In addition, you can easily create any interesting stencil from stickers.
If you still have a lot of difficulties in how to use stickers for a French manicure and it’s inconvenient to use them, then you can do without them. Thus, some nail technicians and even amateurs can paint a perfectly smooth and neat French manicure by hand, without using stencils. Another option is to use wet thread instead of a stencil, but in order for the result to be good, a lot of practice is required. As a last resort, you can try to draw a neat smile line by hand and correct it with a cotton swab dipped in acetone.
What it is
French stripes –
These are special stencils that allow you to create a neat French manicure. They come in different shapes, but the most popular are the classic ones - semicircular, they provide an even smile line, both on natural and artificial nails.
Stencils for French manicure can be glue-based or water-based.
The classic version of the French coat is a pastel-colored base, and the free edge of the nail plate is painted white. Today, this design is made using any color instead of white. Special stickers for French manicure, which are glued to the free edge of the nail, instead of a white coating, will help to diversify your French manicure. French nail stickers are:
- Lace stripes. The required amount of lace is cut off and dipped into water. After this, they are easily peeled off from the base and transferred to the nail using tweezers.
- Metal and acrylic elements. They are used as additional decoration and are attached with special glue for manicure.
- Sliders - applied to an artificial or natural nail, sealed with gel on top and dried in a UV lamp.
Also called French manicure stickers are ready-made adhesive-based strips that are used to evenly apply the smile line of a French manicure.
Lunar French
In order to decorate your nails with the currently popular manicure, you don’t need to go to a specialist. Just like the classic one, it can be made at home, following a few rules. What you will need to do a lunar manicure with stencils: gel polish of two compatible shades, a UV lamp, a base.
Step-by-step instruction:
- Get your nails in order.
- Degrease their surface, cover with a special base and dry in a lamp.
- Apply varnish intended for the hole and send the nails back to the UV lamp.
- Since manicure is done with stencils, cover the hole with a sticker and apply a second gel polish.
- Apply top coat and cure your nails one last time in a UV lamp.
How to use French stripes
When representatives of the fairer sex decide to make a design on their own, they do not always understand how to use stripes for a French jacket. In modern nail service stores you can purchase French manicure kits. The standard set is:
- Base varnish in pastel colors.
- White nail polish.
- Transparent sealant.
- Adhesive strips.
French manicure strips are glued onto a well-dried base polish.
They are applied in such a way that the regrown edge of the nail remains free for the upcoming painting in white. After the white coating has dried well, the strips must be removed. After completion, the nail is covered with a transparent fixative.
French with stripes is very convenient to do, but there are still certain disadvantages. The strips have a standard size, which does not suit everyone.
Some representatives of the fairer sex prefer to use stencils made at home.
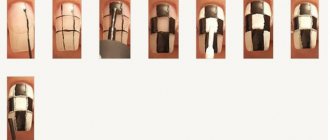
Another interesting picture demonstrates the use of round stickers. Not everyone immediately understands how to use them correctly:
Making French stripes yourself
It’s not difficult to make strips for a French manicure with your own hands; for this you need the following materials:
- Wide tape.
- Scissors.
- A thin permanent marker that can be used to write on tape and will not smear.
- The glass is wide.
In order to make drawing convenient and the adhesive side of the tape not to lose its properties, the tape is glued on top of a wide glass. After this, you need to draw strips of the required shape on it using a permanent marker and cut them out.
For those who have a printer at home, you need to purchase A4 self-adhesive paper. There are many templates for French stencils on the Internet; you can download and print them (we list the most interesting one below). Such homemade strips cannot be distinguished from store-bought ones.
French stencils for printing. Click to enlarge.
Here is another non-trivial photo describing how to use stencils-stickers for French jackets of various shapes:
How to make a stencil for manicure
Is it possible to make them yourself? Certainly! In order to make stencils for manicure with your own hands, you will need adhesive tape and varnish (it is advisable that its lid is round and flat). Place tape on the lid and cut out a circle. Then cut it into several more pieces (2-3). Ready!
The main rule: when you do a manicure with stencils of your own making, stick the tape well to the nail plate, otherwise you will encounter the fact that the polish will bleed through. You need to remove homemade stickers after they have completely dried.
By the way, stencils for lunar manicure are made according to the same scheme, only the circumference should be slightly smaller, since the sticker is glued at the base of the nail plate and the narrower it is, the more beautiful and neat the result.