In acrylic extensions on tips or forms, the French is laid out with two balls: first, a camouflage is formed from pink powder, then a smile is formed from white powder. The higher the professionalism of the master, the less sawdust the finished nail requires.
For those who work with acrylic, we have prepared a selection of three training videos. From them you will learn the secrets of quickly laying out acrylic on tips and forms with minimal cutting, and also see how professionals lay out a smile the first time.
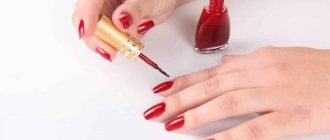
French nail polish
If you are in doubt about the best way to do a French manicure at home at minimal cost, then start with a regular one.
nail polish. Both ready-made kits and all components separately are available for sale. The kits usually include:
- base coat;
- pink camouflage;
- white nail polish for a smile;
- top coat for durability and shine.
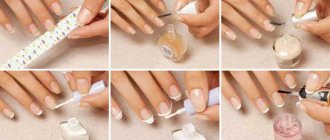
To get an even smile line the first time, use stencils for a French manicure.
How to draw a straight smile line?
It’s great if you know how to draw the coveted thin French line exactly, but what if not? Don't worry - there are ways to make this task easier!
Stencils for French
The simplest and most ready-made option is self-adhesive stencils for creating a smile line. You need to carefully place the stencil strip on the polymerized camouflage base, leaving a few millimeters of free edge. Paint it with the desired color and polymerize it. Then remove the stencil and proceed with further technology.
Special brushes for French manicure
There are also special brushes for French manicure with a cut out core - you need to apply a coating to them and simply apply it to the nails, imprinting it.
Stationery eraser
You will be surprised, but an ordinary rubber band is a very popular way to create an even smile line. Pull it over the nail, leaving a free edge, which you can paint with the chosen color.
How to make an express French look with ready-made Dashing Diva tips
Do you urgently need a French manicure at home, but you don’t have a UV lamp and your drawing skills are failing? Keep on hand the new product from Dashing Diva - the new generation of Virtual Nails French false nails. In our video tutorial, we talk about this miracle product and show how you can “conjure up” a long-lasting manicure in a matter of minutes.
Another new product from this brand is French Wrap Plus tips. With their help, you will make an equally neat French jacket with your own hands, if you carefully look at our photo tutorial.
The history of the appearance of French
Many women associate French manicure with its French origin. Not at all, this is a misleading opinion. French style appeared back in the seventies in the USA. Hollywood stars became the first fashionistas who had to wear manicures due to professional necessity.
The large amount of time spent on decorating actresses' nails prompted producers to find a solution to this problem. Cosmetics founder Jeff Pink helped with this. His ingenious idea of designing nails made it possible to forget about the red tape with manicures and at the same time took root in everyday circles.
The French style has gained particular popularity since the development of the nail extension industry. Today it can be seen on both short and long women’s nails. He looks amazingly gentle.
French gel polish
Perhaps the optimal combination of speed, durability and affordable price is French gel polish . This procedure is also most convenient from the client’s point of view:
- Fast (up to 1 hour).
- There is no unpleasant odor, as, for example, with acrylic extensions.
- The natural nail is not filed down when applying and removing the coating
- The coating polymerizes in a matter of seconds, no need to wait for it to dry.
Why does shellac from some artists last for weeks, while for others the coating begins to crack and chip off already on the third day? It's all about the subtleties and secrets of technology. For those who want to overcome peelings and delight clients (or yourself, if you do your nails at home), we have prepared lessons on French manicure with photos.
Prepare the client's hands
Remove the old covering and treat the client's hands with a disinfectant.
Prepare your natural nail
To prevent peeling at the base of the nail, carefully push back the cuticle with an orange stick. To make your work easier, apply Color Couture Entity One Cuticle Oil to the border between the nail and the skin. If the cuticle is very grown and dry, give the client a trimmed or European manicure.
Shape the free edge of the nail
Using a CND Kanga Board natural nail file, shape the free edge into an oval or square according to the client’s wishes.
Clean and degrease the nail plate
Wipe nail plate with Entity One Natural Nail Prep using Graham HandsDown Nail Wipes. This stage is needed to remove dust from the surface after sawing the free edge, fat, cuticle particles and other contaminants. Only on perfectly clean nails does French gel polish last without peeling. Be careful not to accidentally touch the client's nails with your fingers after treatment. If this happens, wipe the nail with the product again.
If the client has so-called “wet nails,” then additionally apply Entity One Nail Dehydrator. How to identify such a detail? Ask her how regular polish holds up. If even professional brands of varnish “live” on the client’s hands for 1-2 days, then the reason may be the moisture of the nail plate. Treatment with a dehydrator in this case will help make the coating more durable.
Apply primer
The primer will increase the adhesion of the gel polish to the nail plate and extend the life of the manicure. To perform French with Entity One gel polishes, you can choose between the acidic Entity One Nail Primer - for healthy nails, and the acid-free Entity One Nu Bond - for weak and damaged nails.
Apply base coat
Entity Base Coat protects nails from staining with gel polish pigments, evens out the surface and has a positive effect on durability. Apply the base in a thin layer, making sure to seal the end of the nail. Cure the coating in a UV lamp for 2 minutes or 30 seconds in an LED lamp.
Cover your nail with camouflage
Apply 1 or 2 coats of Nude Fishnets Translucent Beige/Peach Camouflage Gel Polish from Entity One Color Couture. Cure each layer in a lamp - 120 seconds for a UV lamp and 30 seconds for an LED lamp.
Use Entity One Spotlight Gel Polish to create a smile line, making sure to seal the end of the nail. It is better to make a smile in two thin layers, polymerizing each: this way the coating will lie smoothly and without bubbles. The lamp exposure time is the same: 2 minutes for a UV lamp and half a minute for LED equipment.
Masters disagree on how to paint a smile during a French manicure with gel polishes: with a brush from a bottle or with a separate thin brush? In fact, both methods have a right to exist. We have recorded for you a master class on French manicure with shellac, which shows both technologies for removing a smile. Take a look to make it easier to decide.
Treat your nails with a top coat
Entity One Color Couture, Top Coat provides additional protection against fading, damage and chipping, seals previous layers and extends wear life. Apply the top very thinly, not forgetting to cover the end. Curing time is the same as previous products.
Remove the sticky layer
Entity One Nail Prep is suitable not only for preparing the nail plate, but also for removing the dispersion layer. Place liquid onto Graham HandsDown Nail Wipes and buff your nails.
Please note that the stickiness is removed only from the top, and it remains on the previous layers, which improves the adhesion of the layers to each other.
Finish your manicure with cuticle oil.
Cuticle oil Color Couture Entity One Cuticle Oil 15 ml will provide the skin with softening, nutrition and protection. The product is suitable for sensitive skin.
French manicure with gel polish is ready.
You can order all the products used in this master class in our store with delivery to all cities of Russia.
You will also need a base tone and a white Entity One color coat.
You can select them here:
Are you using Shellac products from CND? We have made for you a review of shellac shades suitable for camouflage and a white smile, and photographed a manicure using them step by step. You can view the photo tutorial and ask any questions about CND products here.
If you or your client needs a French manicure on short nails , then be sure to watch our video tutorial on how to create the perfect French manicure on short nails.
Preparing nails before gel French
Before applying special bases, preparation of the nail plates is required. Its stages are as follows:
- cosmetic treatment and cuticle removal;
- filing the edges of the nail plates to give a certain shape;
- gentle cutting of the top layer;
- treating nails with a degreasing agent.
When the nails are ready, gel polish is applied to them, after which the nails are dried in the light of an ultraviolet lamp (2-3 minutes).
After drying, the gel coating requires the application of a protective layer, which serves as a fixative.
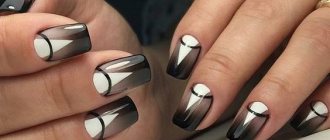
New 2015 nail designs in the style of French manicure with photos
What to do if you want something new, but you’re not ready to give up your favorite French jacket? In 2014 and 2015, many new designs appeared in French nail designs for short and long nails.
How to diversify the usual design, but at the same time maintain the delicacy and color scheme of French manicure? Try combining it with the lunar one . Our master class with photos will tell you how to do this: Lunar manicure with COLOR CLUB gel polish
The fashionable “ reverse French ” design is a must-have for any craftsman. If you are interested in this drawing and doubt your skills as an artist, then you should watch our training video Reverse French on short nails. In it you will get a lot of ideas for creating designs on your nails.
Colored French manicure is catching up with the white classic in popularity, especially in the summer season and early autumn. How to combine colors and draw an even smile by performing a multi-colored French manicure - we share these and other secrets in our video Colored French manicure with Cuccio Veneer gel polishes.
Another unusual approach is drawing a double smile. In our master class with photos you will see all the stages of creating this hit manicure in 2015 fashion trends.
The white color at the edge of the nail can be shaded, creating a gradient effect. With this technology, you are insured against mistakes in creating a smile. Gradient French manicure can be done with both white and colored gels, acrylics and gel polishes.
In our store you can purchase everything you need for a French manicure with acrylic, gel or gel polishes. We stock materials, tools, equipment and accessories from brands tested by our regular customers. Select the equipment you are interested in and start shopping!
French stencil: “Pros” and “Cons”
An alternative way to create a smile line is the stencil technique: before applying white color, a frame is glued to the nail, which is removed before polymerization. Those considering this technique should know:
- Fastening the stencils evenly, symmetrically and at the same distance from the free edge is not as easy as it seems. With the time spent trying, you can learn how to draw a line manually.
- After removing the stencil, the line rarely remains flawless; adjustments will definitely be required.
- The sticky layer of the stencil often remains on the coating; if it is not removed, the top gel will lie unevenly and sloppily. Additional surface cleaning also takes time.
- The curve of all stencils in the set is the same, and the thumb and pinky nail require a unique line that takes into account the width of the plate.
Experienced professionals make the perfect smile line in a matter of seconds: it’s worth making the effort to master this skill and no longer think about auxiliary devices. Moreover, the latter rarely live up to expectations.
Recommendations from experts
An ideal French gel polish, as shown in the photo, can only be achieved if the following recommendations of nail service professionals are followed:
- You can get a rich shade only by applying several layers of gel polish to the nail plates;
- each applied layer is dried in an ultraviolet lamp;
- after each coating, the sticky layer must be removed using a special product;
- the finishing layer is applied more densely compared to the previous two;
- white French should be dried in a lamp for no more than one and a half minutes, this will prevent the appearance of yellowness and preserve the purity of the white and milky shades of the French;
- Despite the properties of gel polish to spread independently over the nail plate, it is still better to use guide brushes to apply it, this will ensure uniformity of the applied layers;
- To achieve smooth lines and their clarity at the beginning of the experimental path, special stencils will help, with which you can draw not only a French jacket, but also openwork lace ornaments.
Now you know what a French coat is, with the help of what available materials and devices it can be made and in what variations. Only practice will allow you to achieve the best results. There are many examples of French. Each master creates his own individual samples. You can always be original in French manicure style.
We hope the article was useful. Share with readers your experience of using gel polishes for French hair.
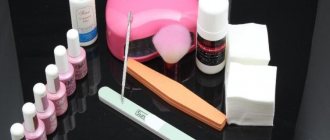
Tools for doing French work yourself
To perform a French coat, in addition to gel polish, you will need the following set of tools:
- nail polish remover - necessary to remove previous coating
- metal pusher – used for removing gel polish and working with cuticles
- file – choose files with abrasiveness from 110 to 180 grit
- orange stick – used for unedged manicure to soften the epidermis
- scissors
- base and top - will be needed if you use three-phase gel polish
- color gel polish
- white shade of gel polish – necessary for drawing the “smile” line. Instead of white gel polish, you can use absolutely any shade.
- manicure brushes or stencils
This is the basic list that professional nail artists use. As you master nail design, you can either reduce or increase the list of tools you need.