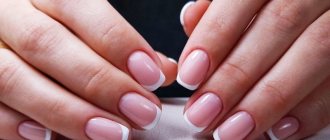
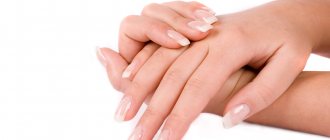
Well-groomed hands and beautiful nails with a carefully thought-out design are the calling card of a modern fashionable woman. Tidy nails significantly improve self-esteem and mood, and give confidence in one’s own abilities. Moreover, a beautiful manicure increases a woman’s status and determines a friendly attitude. However, it is not always possible and time to regularly visit nail salons. It is not surprising that fashionistas are often concerned with the pressing question: “How to do a manicure at home?”
Experienced nail experts say: nothing is impossible. If you have good tools, special tools and minimal experience, the process of processing and decorating marigolds is always successful. You just need to not be afraid to try your hand, to “train your hand.” And recommendations from experts will help you master the beautiful and necessary art of nail design at a decent level.
View this post on Instagram
Posted by Unreel (@extremeofficial)
How to do a manicure at home: tools and products needed to perform it
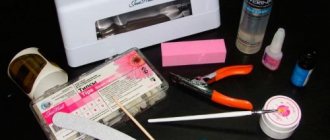
It's no secret that the success of any job depends on correctly selected, high-quality tools. Nail care is no exception. The impeccable appearance of the fingers, the speed and correctness of the manicure depend on the tools. The traditional trimming technique requires:
- accessories for cutting cuticles and dead skin from the side rollers - manicure scissors, cuticle cutters with a flat blade. Also, the cuticle can be removed with clippers and a pusher with a sharp lance blade. The most famous and sought-after professional brand is Solinger brand products made of hard tool steel;
- pusher-pusher designed to move and lift the cuticle. It can be one-sided or two-sided. At one end there is always a paddle-shaped blade, and at the other there are tips with different purposes. For the cutting technique you will need a hatchet;
- It is convenient to use a clipper to trim the excess length of the plates. Depending on the length of the blades, it is used for manicures and pedicures. Thanks to its thoughtful design, it is one of the safest cutting tools;
- files 180 grit. These units measure abrasiveness; the exact value must be indicated on the product itself. This file is used to contour the nails, sawing off the top layer of plates to make the surface rougher for better adhesion to the base;
- polisher (buff) with abrasiveness 2000 grit. Most often it has the shape of a bar or a rounded, volumetric rhombus. There are models with 2-3 working surfaces for different purposes. In this case, the degree of abrasiveness is indicated for each side separately;
- disinfectants – 70% alcohol solution; chlorhexidine; pharmaceutical antiseptic for disinfection of hands, surfaces and instruments;
- wooden sticks for moving cuticles. Made from orange wood;
- nail polish remover;
- soft, clean towel or napkins, cotton pads; voluminous ceramic container for caring procedures.
How to do an unedged manicure at home?
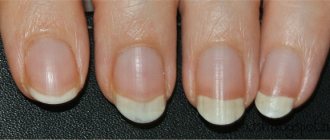
Unedged manicure is one of the main modern trends. A significant advantage of this technology is its safety. The main principle: do not cut the cuticle, but simply “push” it to the base. Thus, its structure remains soft and pliable.
The cuticle protects the nail from infections; if it is preserved, this function remains. The more often you cut off the skin, the rougher it becomes and spoils the manicure, because the cuticle grows back very quickly. This also causes damage to the nail plate.
to do an unedged manicure at home ; to do this, you need to follow these tips:
- If before this you have always done a classic manicure, but decided to switch to the European version, then after each shower, move the skin to the base of the nail. When the cuticle grows back, remove it with scrubbing movements.
- To improve blood flow and soften rough skin, rub your fingers with cuticle oil several times a day.
- Buy a hard file. It helps get rid of hangnails and prevent new ones from appearing.
The main thing in unedged manicure is to maintain daily cuticle care. Follow the basic three rules and your painted fingernails will look neat and beautiful.
Selecting the right tools for manicure
Ladies taking their first steps in mastering nail care and nail design often make mistakes when choosing tools. Manufacturers offer a lot of devices, not all of which are useful or safe. What do experienced specialists recommend?
- Orange sticks are an excellent solution for working with cuticles and cleaning eponychium. They cause less injury to the skin and plate than their metal counterparts.
- It is best to trim raised cuticles with nippers - they are more convenient and do not leave hangnails.
- In theory, nail forks are supposed to remove cuticles. In practice, the sharp ends leave deep, bleeding scratches and catch living skin, wounding it. It is better to refuse them.
When choosing cutting tools, you need to pay attention to the quality of the steel and sharpening. Since no pressure is allowed on the nail plate area, the blades must be very sharp.
Files: types, purpose
- 80 grit – coarse, intended for filing artificial plates;
- 100-150 – medium, give shape to artificial nails;
- 180-240 – soft, for natural plates;
- 400-2000 – polishing buffs.
The file movements are carried out in one direction so that the edges do not become frayed, and always on a dry surface.
Forming a free edge
Shaping your nails is a great way to correct their imperfections and give them a more elegant, aristocratic appearance. The edges are filed symmetrically, the plates must have the same length.
Oval and square are suitable for any size, but almonds and other pointed shapes are best done on elongated nails.
Cutting manicure technique
Step-by-step instructions:
- wash your hands, treat with an antiseptic;
- remove old varnish, degrease the records;
- in a bowl, steam the cuticle on the fingers of one hand, move it with a pusher;
- clean the pterygium, cut off the dead white skin on the ridges and cuticle;
- moisten the skin with oil.
If you don’t want to paint your nails, apply a layer of colorless base.
Or start nail design.
Fact about manicure
As a varnish for nail plates, the ancient Chinese used a mixture of beeswax, gelatin, egg whites and gum arabic resin. Natural dyes from rose petals and orchids were responsible for the color.
Advice from manicurists
It is important for every beginner to know what to buy for nail care, and what to avoid. Thus, saving not only money, but also the health of the skin will not suffer.
A DIY manicure will be no worse than a salon one if every novice master takes into account the following tips for creating well-groomed nails.
- Beginners are recommended to purchase orange sticks, which do an excellent job with cuticles and serve as a tool for cleaning the base of the plate.
- It is also advised to purchase not scissors, but tongs for manicure manipulations. Nippers are an ideal option for a novice craftsman.
- They help cut off the cuticle as best and deeply as possible. Therefore, frequent manicures will not be needed.
Important! Do not under any circumstances purchase the so-called “fork”. Which will only damage the skin of the nail. And besides, this tool has nothing to do with manicure items. Photos of “forks” for do-it-yourself manicure are proof of this.
Untrimmed treatment of nails and skin during manicure
Performed without steaming, dry. Its peculiarity is that dead skin and cuticle are not cut off. To soften dead skin, special alkaline or acidic solutions are used. Before using the product, you must read the instructions. Some of the products need to be washed off, but soft fruit compositions can be left on, as they have a beneficial effect on the condition of the fingers. The softened cuticle is moved with sticks, and the rollers are polished with a buff.
European unedged technology:
- wash hands, disinfect;
- apply a creatolytic to the cuticle and rollers;
- Use a stick to move the rollers, sand with a 180 grit file;
- remove the softened cuticle with a stick;
- degrease nails with alcohol;
- Apply varnish in accordance with the chosen design.
View this post on Instagram
Posted by Unreel (@extremeofficial)
Precautionary measures
A low-quality manicure set may become deformed or dull from such treatment. Therefore, you should choose high-quality medical steel instruments. Some instruments do not need to be disinfected. This applies to disposable kits. Orange sticks, for example, are used only once and do not need to be treated with an antiseptic. Tools with plastic tips or individual parts cannot be boiled or ignited. For disinfection, you need to use a special lamp that does not harm plastic parts or treat them with an antiseptic.
How to properly apply a layer of varnish during a manicure
Fresh gel polish is no hassle. It fits perfectly and dries quickly. If the composition has become thicker, it should be diluted by adding 3-5 drops of varnish solvent to the bottle. Do not use acetone or nail polish remover!
Bright and dark tones of varnishes: how to apply manicure correctly
- First, a base is applied to the plate.
- Apply varnish to the brush and rub it along the neck to remove excess.
- The brush is placed in the center, at an angle of 450. Lead from the center to the base. Then they pass along the same strip, to the free tip, without stopping, in a smooth movement, without lifting the instrument.
- The brush is placed at the beginning of the painted strip, perpendicular to the finger. Lead to the side, round and continue moving along the roller to the tip, coloring the edge. The same steps are repeated with the opposite edge of the nail.
- The bristles are squeezed out and passed along the end of the plate, “sealing” it.
Method of painting nails with pastel and nude thick varnishes:
- dip the brush and squeeze it onto the neck;
- place the plate vertically in the center, practically without touching it with the bristles, only with the applied varnish;
- lead to the cuticle, then along the same strip - up to the tip;
- place the brush in the cuticle area, paint the space near the side roller from the base upwards, without touching the skin;
- repeat the procedure on the other side of the nail, sealing the free edge.
Shellac and gel polish
One of the popular fashion trends today is creating a manicure for short nails at home using shellac.
Shellac has enviable durability. It is almost impossible to accidentally damage an already hardened coating. Thanks to this, when applied correctly, the coating lasts for at least 2 weeks. If you take good care of your nails, you will need to do a manicure no earlier than in a month.
Shellac does not involve the application of drawings. This feature is also typical for gel polish. Therefore, the color of such coatings is rich and expressive. Bright colors are very popular, such as pink, turquoise, yellow, etc. You can also choose a universal option. It will match with any clothes. These shades include beige, cream, white, gray, etc.
The coatings presented must be applied correctly. After hygienic treatment, the nail is polished. Next, a base is applied to it. This material hardens under a UV lamp. The selected color of gel polish or shellac is applied on top. It also needs to be dried under ultraviolet rays. When this coating has dried, the varnish is applied to the edge of the edge of the nail. This is how it is “sealed”. After hardening, the cuticle is treated with special restorative oils.
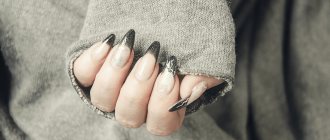
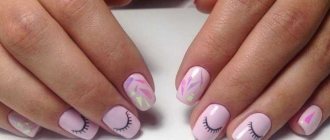
Which manicure design to choose in 2022
A number of beautiful techniques can be easily performed at home.
- Magnetic cat eye polishes are mesmerizingly beautiful. A magnet is held near a fresh layer of varnish for 1 second. The closer it is, the clearer the stripe.
- Hard varnish “Crackelure”, which cracks, forming a bizarre relief pattern.
- Matte satin that masks all the imperfections of the plates. You can apply a glossy top coat on top or leave a velvety surface.
- Imitation leopard skin. Uneven spots of a darker shade are applied to the dried neutral background, which are framed with black “commas”.
- The zebra is made with contrasting varnish on a white or light pastel background.
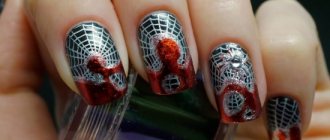
- A wide selection of stickers, stamps and stencils allow you to create stunning home designs.
- To decorate your nails with stones, they are placed on fresh, undried varnish. Crystals are taken using a damp toothpick or stick.
Another universal option for all occasions is glitter or acrylic powder.
Summer design ideas
When considering ideas and step-by-step instructions for doing your own manicure at home, it’s worth considering several popular motifs for the summer season. You can use a lot of bright colors. Designs are created on the nails that resemble fruits (kiwi, watermelon, strawberries), as well as flowers.
A popular technique is to create a transition on the nail from one shade to another. A sponge is used for this. To do this, two or more colors of varnish are applied to a flat surface. The boundary between them is erased with a stick. Dip a sponge into the mixture. The varnish is applied to the nail. It results in a smooth transition from one color to another.
Using stencils, different shapes are drawn. You can make stripes, circles, abstractions. A popular technique is to add several different drops of varnish to a container of water. They are mixed a little with a stick. Next, the nail is dipped into a layer of varnish, which floats on the surface.
How and how to disinfect manicure instruments at home
In salons, all instruments are processed under lamps or in a dry-heat apparatus. At home you can use:
- oven. At a temperature of 2500, treatment lasts a quarter of an hour;
- If blood gets on the blade, before heat treatment it is washed, soaked in chlorhexidine or alcohol.
It is better to use disposable files and sticks or soak them in antiseptic.
What medical supplies may be needed
- To disinfect hands and instruments, you can use a 70% tincture with hawthorn.
- Mountain celandine balm helps against warts.
- If a wound is accidentally caused, use special glue BF-6.
How to make nail polish last long?
Every girl and woman tormented herself with the question: how to make the varnish last a long time? And it doesn’t matter whether the manicure was done in a salon or at home. Varnish tends to crack. This process can be delayed by following some tips:
- Sand the nail plate with a polishing file. Nails should be smooth, so the polish will not only last a long time, but will also lie more beautifully. But do this carefully so as not to damage the plate.
- If you have thin nails, take care of their health. On hard nails, the polish lasts longer. Always use a foundation.
- Degrease your nails. Residues of varnish, particles of fat and dust particles invisible to the eye affect the success of the future nail art.
- Many in childhood saw how adult women, before applying varnish, beat it on their palm. However, this action is fundamentally wrong. You need to twirl the bottle of varnish in your hands, this way the varnish will not mix with air and there will be no bubbles. Also, the bottle should be kept in a dark place.
- Paint your nails in three stages. The first stroke is in the center, then on the sides.
- Varnish should not be applied more than two layers.
- After applying each coat, let your nails dry for at least 10 minutes.
- Apply vitamin oil to the plate and skin around the nail. It will protect the nail art and strengthen the nail structure.
- Do your manicure when all your household chores are done. Ideally, in order to completely dry and not deteriorate from contact with objects, the varnish needs more than 12 hours. But it only takes an hour to harden and not collect fine dust.
- Whether it's plain polish, shellac or gel polish, always apply a base coat at the beginning of your manicure and finish with a topcoat.
Never dry your polish with a hairdryer, use a UV lamp for this, or wait until the coating dries on its own.
By following these simple rules, you will maintain the beauty and health of your nails. Paint your nails as often as possible, and then, with experience, your manicure will not be distinguishable from the work of a master.
Bonus: a manicure that will last a long time
After the hygiene procedure, you can do a manicure (with varnish) for beginners. It is very easy to implement such designs step by step. Many women prefer nail art that will “last longer.” What can you do to make growing nails invisible?
Lunar manicure is an interesting trend that has not gone out of fashion for many years. The nail holes are simply not covered with colored varnish, so the growing nails are not visible. Geometry is always popular and allows you to disguise overgrown nails. Stripes around the perimeter, triangles or squares will not let you know when the manicure was done. The same situation applies to bitmaps. Another interesting design involves covering only half of the nail with varnish.
In general, creating a beautiful manicure and nail polish is not at all difficult if you practice a little. An individual manicure set and several nail polishes will allow you to create unique designs every week. And also, now you know how to make a design with which it will be very difficult to determine even an approximate period of manicure. This is a good solution if you are always short on time.
Classic edged manicure
Next, the cuticle is gently pushed away from the nail plate using an orange stick or the same steel tool with a plastic tip. Disposable wooden sticks are used by both experienced masters and are used in manicure for beginners. Step-by-step photos will help you understand what needs to be done at each stage.
Then the rough skin is carefully trimmed with tweezers, scissors or a trimmer. The action must be repeated with each nail. Afterwards, the cuticle should be lubricated with any cosmetic oil or special oil that slows down its active growth. The next stage is polishing. For rough processing, tools with diamond or mineral coating are used, for soft processing - wooden or silicone.
The next stage of manicure for beginners (step-by-step instructions allow you to perform the procedure correctly and quickly) is degreasing the hole and nail surface. After this, you can apply nail polish. All tools that have been used must be disinfected. It is enough to rinse your personal manicure set in Chlorhexidine.