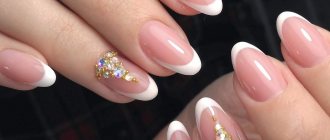
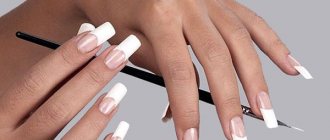
Today, French manicure with gel polish at home is a reality for every nail art lover. It is not difficult to purchase everything you need. The main difficulty lies in applying gel polish. French manicure is a classic nail art. It emphasizes the elegance and sophistication of the image, so it must be executed flawlessly. Making the lines perfectly straight takes skill. Few people manage to perform French gel polish flawlessly the first time. To make your task as easy as possible, you need to adhere to certain rules.
Preparing for a manicure
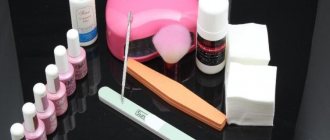
Before you decide to apply French gel polish, you need to buy products and tools, as well as prepare a place to work. For a French manicure you will need 2 types of polish. The classic combination involves the use of white and flesh (beige) shades. However, French can be done in any other color scheme. For a business lady, moderate color compositions are more suitable: white and pink, beige and black, transparent and lilac, beige and gold. In everyday life, on vacation and at a holiday party, any combination of colors will be appropriate.
In addition to colored gel polish, you will need a base and top coat, 1-2 brushes, a UV lamp and a special degreasing liquid. It is advisable to additionally buy 1 thin brush for painting nails. To process nail plates, you need to prepare 2 files: with an abrasiveness of 180-240 grit (for filing) and 240-500 grit (for grinding).
To do a French manicure, you need to choose a workplace with good lighting. All items are placed within reach. You need to stock up on cotton pads or lint-free napkins for manicure, a pusher or orange sticks.
Treatment of the nail plate
Before you paint your French manicure with gel polish, you need to prepare the nail plate. The final result directly depends on the quality of its processing. The free edge of the nail must be trimmed and filed, giving it the desired shape. Then the surface of the nail plate is processed. In order for the manicure to lie perfectly flat and look flawless, you need to remove the top keratin layer. The surface of the nail should become slightly rough and matte, this will provide better adhesion to the coating.
Then the cuticle is pushed back so that no voids form under the base layer. Remains of cuticle that have grown to the nail must be removed with a cuticle remover. The treated nail is wiped with a liquid to degrease the surface. Before creating nail art, you need to familiarize yourself with the rules for decorating a French manicure with gel polish step by step, which we will tell you about below.
Technology for creating a classic French manicure with shellac: photos and videos
We will not stop at performing the most hygienic manicure, here the technology is standard
The only thing that is worth repeating once again is that you need to pay attention to the cuticle: it should be cut off as much as possible. The shape of the free edge of the nail is any, but almond-shaped, oval or softened square will look preferable.
The length also varies depending on your choice, but remember that the classics still look preferable on medium-long or short nails, which, by the way, are especially relevant this season.
Now let’s proceed to a direct examination of the procedure for performing a French manicure with shellac, with a photo description.
First, you should thoroughly degrease the nail plates.
Pay special attention to the area near the cuticle and around the side ridges. If you neglect this procedure, the varnish will quickly come away from the nail plate, and along with it, the service life of your manicure will be reduced.
There is no need to file the nail surface - shellac has excellent adhesive properties and does not require additional fastening. It is enough to use a primer that will ensure maximum adhesion of the nail to the shellac.
We also carefully apply the primer to areas near the cuticle and side ridges, as well as near the tip of the nail. Nails are ready to be coated.
Important
All layers must be applied as thinly as possible, especially this rule applies to the smile line, otherwise your manicure will look bulky. The topcoat may be slightly thicker in order to hide the border of the smile line transition.
The coating itself occurs in several stages:
At the first stage, a transparent shellac base is applied in one layer. Then the nails are sent to a UF lamp. In the second stage, color is applied. Many people neglect these stages, believing that the base is enough. But this is a big mistake. As the nail grows, the area of the overgrown nail will be exposed, and the manicure will look sloppy. It is enough to apply the color in one layer. If the tone is not dense enough, you should apply it again. Each layer is dried in turn in a lamp. The third stage is the most important and most difficult - drawing a smile. Forget about stencils. In the case of shellac, and indeed with all types of polymerizing varnishes, stencils are contraindicated. The thing is that shellac does not harden without exposure to ultraviolet radiation. As a result, shellac or gel polish may penetrate into the formed cavities of the stickers, or it will drain when tearing off the stencil. Drying with stencils will also not work; they will simply remain under the frozen layer of shellac. We draw a smile in two stages. First, apply thin strokes along the free edge of the nail. If necessary, we correct errors. The resulting result is fixed in the lamp. At the second stage, we draw the brush again along the previously outlined contour, trying to completely saturate the smile with color. Dry it again in the lamp. Over time, as you gain skills, you will learn to perform this procedure in one stroke. For beginners, we recommend using special sliders that imitate a smile. A few more words should be given to the boundary of the smile
It is important that the drawn smile follows the natural contours of the free edge. At the same time, of course, we adjust its shape
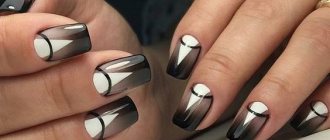
Interesting: There are many options to make it easier to perform a French manicure with shellac at home. The most accessible and simplest is the use of sliders. They can be either applicative, imitating a smile, or with full filling of the nail plate.
The fourth stage is applying the finishing coat. Apply the top alternately in two layers. This will even out the edge of the smile. Dry each layer in a lamp. Don’t forget to seal the ends with topcoat. If you do not apply the finishing coat to the end parts of the free edge of the nail, then over time the shellac will come away from the nail.
To consolidate the material, we suggest you watch a video on how to make French shellac.
Step-by-step instruction
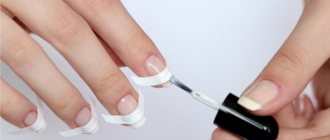
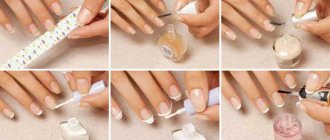
First of all, apply a base layer to the prepared nail plate. The base is applied to the central part of the nail, then gradually distributed over the entire surface, after which it is polymerized under a UV lamp for 30 seconds. Excess product is removed with a toothpick or orange stick. There is no need to remove the sticky layer. Apply 2 thin layers of gel polish of the desired shade to it, painting the end of the nail. Each of them is polymerized for 2 minutes.
Smile line design:
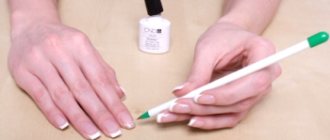
- Before doing a French manicure, you need to find the longitudinal center line of the nail. If the nail has a square shape, its extreme point will be located strictly in the middle of the nail cut. If the cut shape is round or oval, the extreme point of the axis will be at the apex.
- From the extreme point of the center line, they retreat downward to a distance that will be the width of the smile (white tips). Here they make a point with a brush for painting. In order not to spoil the manicure, you can make a mark with transparent gel polish.
- From the mark to the right and left, draw lines parallel to the cut. In this case, their end points should be on the same straight line, perpendicular to the center line of the nail. It is advisable that the end points be located near the place where the nail grows into the skin of the finger.
- If the free edge of the nail is large, there is no need to paint it completely white. The white stripe is made thin (2-3 mm). It is carried out strictly along the cut.
- It is important to make the lines perfectly straight and maintain the proportions of a French manicure. The width of the white stripe should always be several times smaller than the beige part.
- Before applying gel polish, you need to check that the selected smile width is suitable for all nails. Sometimes girls start applying polish from large nail plates. When it comes to the little finger, it turns out that the white stripe is very large for it. Its width on all fingers should be the same.
- When the smile line is marked, it is painted over with white gel polish. You must act extremely carefully so as not to cross the marked boundaries during step-by-step staining. It is advisable to apply a thin layer of varnish so that it does not flow beyond the area to be painted. Experienced manicurists recommend correcting the design using a clean brush. The applied layer is dried under a UV lamp for 2 minutes.
- Then the final top coat of clear gel polish is applied. The top coat is polymerized in a UV lamp for 1-2 minutes. If a topcoat with a sticky layer is used, it is removed using a dispersion layer remover.
Using a stencil
If you don’t know how to correctly draw a smile line so that it turns out perfectly straight, use stencils for a French manicure. Stencils are strips of paper on a sticky base, 5-6 mm wide. They have different shapes, allowing you to create a smile line not only in the form of a classic semicircle, but also in the form of a wave, zigzag, triangle, heart or straight beveled line. Using stencils is very easy. They are glued onto a beige layer only after it has completely dried. Draw a smile line when the stencil fits tightly to the nail.
After applying the gel polish to the smile line, the stencil is carefully removed. An awkward movement can lead to smearing of the varnish and disruption of a perfectly straight line. After removing the strips, the white layer is dried in a UV lamp for 2 minutes.
You can make a stencil yourself from regular tape. You need to cut a piece 3 cm long. It is cut into strips 0.5 cm wide. The side line of the strips is given the desired shape (semicircle, wave or triangle). Before gluing the adhesive tape to the surface of the nail, you need to glue it to any other surface 1-2 times. This will help reduce its stickiness, and then maintain the integrity of the gel coating.
Types of brushes
All manicure brushes can be divided into several large categories according to their scope of application. Due to certain features, using the same brush in different areas is impossible and inconvenient. So, according to this parameter, brushes can be divided into:
- Brushes for Chinese acrylic painting;
- Brushes for painting nail polish;
- French brushes;
- Gel extension brushes;
- Brushes for acrylic extensions.
Based on the material, all brushes are divided into natural and synthetic. Natural ones are very similar to those used by painters and are made of the same material - mink or sable. They are wear-resistant, durable and quite expensive. Synthetic brushes are much cheaper, less durable and are most often used by beginners. A set of natural manicure brushes can cost several thousand, while a synthetic one doesn’t even reach a thousand.
Additional characteristics that influence the choice of brush are their width, flexibility, elasticity, and cut shape. In addition, the comfort of the handle plays a significant role. If the master is determined to further improve his skill, then it is more profitable to immediately purchase expensive and high-quality brushes. When choosing brushes for home use, you can get by with a more budget-friendly option. Manicure brushes are generally characterized by a rather variable price; it is influenced not only by the material, but also by the brand and design.
How to apply French gel polish on your legs?
In the summer, when open shoes are used, a beautifully designed French pedicure is especially appreciated. Gel polish is ideal for coloring toenails. It does not wear off and does not lose its shine from friction against the surface of the shoe, does not turn yellow or peel off from sea water and hot sand. Gel polish allows you to maintain a flawless pedicure for a long time.
Before you draw a French jacket on your legs, you need to think through the design and choose colors. You should not make an elongated oval smile shape on your toes. It is suitable for very large and elongated nail beds, which are extremely rare. The width of the white stripe should not be more than 1-3 mm, otherwise the French coat will look rough and unaesthetic.
It is not recommended to use clear gel polish for pedicures, as it does not correct the natural shade of the nail. The combination of natural color with white can aggravate the blue and yellow of the natural color.
- Before applying gel polish, perform a trim pedicure. The cuticle can be removed with a special product and an orange stick. The nails are given the desired shape and filed. Use a file to remove the glossy shine from their surface. After removing dust, the plates are degreased with a preparatory agent.
- Treated nails are covered with a base, evenly distributing it over the entire surface. The base layer is dried in a UV lamp for 30 seconds. After this, a colored coating is applied, painting the cut of the nail. It is polymerized for 2 minutes. Then apply another 1-2 layers of colored gel polish. The gel layers are dried for 2 minutes.
- When the surface is dry, draw a white stripe. It can be applied according to the same pattern that is used for manicure. But it’s easier to paint the strip with the same type of strokes, moving from one edge of the nail to the other. To paint the nails of small fingers, it is more convenient to use a very thin brush. The white layer is dried in a UV lamp for 2 minutes. After applying the top layer, the gel polish is polymerized for 2 minutes. Then the nails are treated with a sticky layer remover and cuticle oil is applied.
Shape of brushes
The shape of the brushes refers to the cross-sectional outline of the tuft of bristles. Round brushes can be very diverse - pointed, beveled, rounded, straight and others. They are used to create one or two color backgrounds, ribbon backgrounds or designs for large elements.
Rectangular brushes are used in Chinese painting and other acrylic works. In addition, they are convenient for shading the background and large elements that require a broad stroke. They are not as versatile as round ones, but with an angled flat rectangular brush you can draw commas and simple curls that are very difficult to create with a round brush.