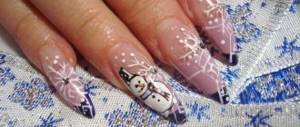
There are a lot of winter manicure options. Traditionally, it uses images of snowflakes, frosty patterns, and imitation of large knitted wool. If you want something unusual and interesting, then try doing a manicure with bullfinches. These birds are immediately associated with the onset of winter, so in the cold season this design will be more than relevant.
How to draw a bullfinch on nails
Nail art has long won the hearts of many girls - with the help of unusual solutions you can express your individual style and emphasize your image. In winter, especially before the New Year, you want something festive, bright and beautiful - there is nothing more symbolic than snowflakes, bullfinches and rowan berries. The bullfinch on nails looks impressive, complex and expensive.
Design Features
To create a nail design with a bullfinch, you don’t need to have an artistic education, just be patient. And detailed instructions will help you draw a beautiful bird.
For manicure, it is better to use gel polishes: they dry only in UV or LED lamps, so you can paint with them for a very long time, you can also mix colors and apply multi-layered patterns. In addition, when finished, the nails look neat, and the manicure will last at least 3 weeks.
Ordinary varnishes are also suitable, but working with them requires some skill, and after making a mistake you will have to start all over again.
Nail preparation
Before you start your manicure, you need to prepare everything you need. You will need:
- Base, top and colored varnishes (white, red, black - for bullfinch and any background color).
- Nail degreasing agent.
- Cotton pads or regular cotton wool.
- Thin brush.
- UV or LED lamp.
Before applying varnish, you need to degrease the nail plate so that your manicure will last much longer and the coating will not peel off.
Manicure technology
Nail designs with bullfinches can be different. It all depends on the girl's preferences. But the principle of implementation is the same. Let's consider the principle step by step.
- Apply the base and dry it in a lamp. It is important to seal the ends of the nail well so that the coating does not chip off.
- Cover the nails with the base color and dry. To achieve a dense and even coating, it is better to apply several layers.
- We draw a branch on which the bullfinch will sit.
- We paint the body of the bird with white varnish.
- Draw the head and wing in black.
- Paint the breast with red varnish.
- With white – add a highlight to the wing and draw an eye.
- Draw the beak and pupil in black.
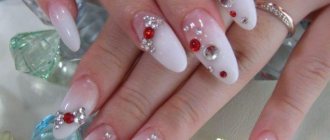
- Complete the composition as your imagination allows, for example, you can draw another twig, snowflakes, add sparkles or rhinestones.
- The finished drawing is covered with topcoat and dried. If the coating has a sticky layer, then wipe the nails with a degreaser.
Interesting design ideas
New Year's manicure
It’s very easy to turn a winter manicure with a bullfinch into a New Year’s manicure: to do this you need to combine white, blue, green and red colors.
If you add snowflakes, a Santa Claus hat or a Christmas tree (already on other fingers) to the drawn bird, then you will be able to bring the festive composition to life.
There is another option: in order not to overload your nails with a large number of elements and different colors, add a little shine to it in the form of rhinestones. In this case, the manicure will take on a discreet and, at the same time, original look.
Manicure with bullfinch and rowan
Bullfinch and rowan are two complementary elements that are very often found together. For this reason, they are harmoniously combined in manicure.
It is not necessary to draw a bullfinch on a branch, as is the case in most cases. You can divide the composition into several nails.
And for greater effect, rowan is made voluminous, for example, using rhinestones or half-beads.
This manicure will definitely attract the attention of others.
Gentle manicure
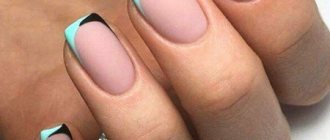
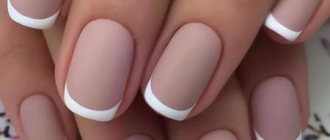
To achieve the effect of lightness and softness in your manicure, you should choose the right color scheme. This design is created by using pastel colors such as: light gray, beige, light pink, light blue.
These shades look especially advantageous in combination with a classic French jacket.
For a more subtle effect, muted tones are used when drawing the bullfinch (the matte finish looks elegant). In this case, the design will not be so catchy, and the manicure as a whole will look harmonious.
Additional elements and decorations
Traditionally popular winter and New Year's designs from year to year remain snowflakes, monograms imitating a frosty pattern on the window, Christmas trees, snowmen and stylized Christmas tree balls.
Recently, totem animals for the coming year have begun to gain popularity.
Usually only a few nails are distinguished with such patterns, but on the eve of the holiday it is permissible to give free rein to your imagination, and it will not look tasteless.
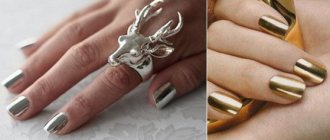
For the more daring, drawings of other winter attributes and characters (like mittens, deer, penguins) are selected.
Even the simplest pattern with snowflakes can be played up with different colors and made it both bright and delicate.
10 photos of manicure ideas
Manicure video
Design Features
To create a nail design with a bullfinch, you don’t need to have an artistic education, just be patient. And detailed instructions will help you draw a beautiful bird.
For manicure, it is better to use gel polishes: they dry only in UV or LED lamps, so you can paint with them for a very long time, you can also mix colors and apply multi-layered patterns. In addition, when finished, the nails look neat, and the manicure will last at least 3 weeks.
Ordinary varnishes are also suitable, but working with them requires some skill, and after making a mistake you will have to start all over again.
Top 100 manicure with rowan and bullfinches
Hi. Manicure ideas with designs of bullfinches or rowan berries are quite popular. At the same time, they overlap to a significant extent thematically.
Therefore, I combined in one photo selection 40% of the designs with mountain ash, 30% of the photos only with bullfinches. And approximately 20% include one and the other type of element.
Overall, the collection turned out great, I tried to add diverse designs so that after viewing you will have a lot of ideas and options in your head.
This theme is perfect for autumn-winter, or even New Year's manicure.
During the creation of the page, the song “Bullfinches” by Ivanushek International was played... bgggg))
Rhinestones are the most popular option for decorating an image - rowan berries.
Well, without rowan, for the New Year.
In anticipation of real winter, we paint snow on our nails... and burning bunches of rowan berries and bullfinch.
This is how beautiful it turned out. Let's continue the theme of winter designs)! Bullfinches are selling like hot cakes)! And the rub on white shimmers like a snowball.
Bullfinches and snowflakes on short nails.
The slider was sprinkled with acrylic powder. Result = real winter on your nails!
Close-up photo for those who still doubt, this is completely hand-painted, no sliders, no stencils, just a couple of brushes, paints and labor.
Bullfinches... funny))) Work done:
- hardware manicure
- leveling
- design painting
Winter blue manicure.
The most winter design - a snow-covered rowan branch and bullfinches!
It's snowy today. Snow, frost and a fairy-tale mood. And we have a beautiful manicure and a couple of bullfinches in love.
Hand painted. Background - Watercolor drops #ecoaquarelle, bullfinch - hand painted with gel polishes + velvet sand.
Look, the snow looks like it’s real: light, fluffy and shimmering.
- Removing old coating
- Hardware manicure
- Strengthening NP with a rubber base
- Gel polish coating
- Freehand drawing
Used in coating and design
- Vogue base
- gel polish NAVI 123
- gel polish KODI 24
- top neonail
- gel paint brown
- comifubics
- Vog gel paste (white)
- snow sand
Bullfinches sit on the branches, Shining like lanterns. Their warm, pinkish color is like hello to the sun.
Well, what a beauty. Autumn is at your fingertips. We will make any berries voluminous and realistic.
The dawn paints the chest of the bullfinch with a scarlet brush, So that in frosts and snowstorms it does not freeze in the snow.
Step-by-step makeup instructions for the looming eyelid: daytime, evening and smokey eyes
Often, attentive people make conclusions about a woman’s age from her eyes. And drooping eyelids only add a couple of years to the real number. This eye shape gives the impression of a tired, sad, gloomy person.
For some, the shape of the eyelid changes with age, but young girls can also experience this problem.
Many women try to combat this, in their opinion, disadvantage by resorting to either plastic surgery or professional makeup. The latter method is safer. Even if you don't like the end result, you can always wash off your makeup and try something new. In this article you will learn how to remove drooping eyelids using makeup.
General makeup rules
To find the perfect makeup for your face type and eye shape, you need to try several options. In doing so, follow these general rules:
Curl eyelashes
For any type of makeup, curl your eyelashes, use mascara or special tweezers . This will make your look more expressive and your eyes will look more open.
False eyelashes
In makeup for the looming eyelid, it is not recommended to use false eyelashes. It is better to create volume with a special mascara.
Brows
Pay attention to the eyebrow line. It is necessary that it be clear, attractive and emphasize the beautiful features of the face as much as possible. A smooth arch perfectly matched to the shape of the face can attract attention much more than drooping eyelids.
When drawing arrows, point the tips upward. It is better to do this with a pencil rather than eyeliner.
When applying shadows, do not lose your sense of proportion: do not shade the entire moving eyelid with a dark color, apply shadows sparingly under the eyebrows.
Nail design with bullfinches
Bullfinches on nails are perhaps the most charming winter manicure option. To make it look neat and professional, you need to adhere to several rules: applying varnish, combining colors, placing the design on the nail bed.
The combination of colors and decor in nail designs with bullfinches
The unspoken rule of such manicure painting is no more than three colors plus a base (background in this case). Bullfinches on nails are traditionally performed in red, white and black colors against a background of transparent varnish, light blue or the same white.
The colors should be the same brightness, and, preferably, density - so they will lie equally evenly on the surface. In the case of red, it is better to choose bright scarlet, acidic shades; white can be taken with a slight blue.
Methods for applying images of bullfinches to the nail plate
No one expects an exact image as in the photo (unless, of course, it is a sticker). We are talking rather about a schematic representation of a bird, in image and likeness reminiscent of it.
- Contour application involves drawing thin outlines of the bird and other details onto the nail plate with black paint; after drying, the picture is painted over. Here you cannot do without several layers - in some places one varnish will lie on top of another, so it is very important to let each layer dry before applying the next one. This is a painstaking and time-consuming method, and if one of the details is damaged, the entire nail plate will have to be redrawn, and not just the bird.
- A simpler and faster method is contourless application. With a brush, they simply draw one after another the elements of the bullfinch image on the nail plate, again allowing each of them to dry before applying the next one. This is necessary so that the varnish does not spread.
- If you still need an exact image of the design, you can purchase special nail stickers. They come in two types: those that are steamed in hot water, after which the transparent film is removed and the picture remains on the nail plate, and those that are simply attached like tape. The technology may vary in detail; you need to read the instructions. The latter hold up better, the former look more natural.
- There is also modeling - creating a three-dimensional image of a bullfinch from polymer clay. This design is applied with special sticks, dried and painted. It looks the most realistic, but such a manicure is extremely inconvenient in everyday life.
Nail preparation
Before you start your manicure, you need to prepare everything you need. You will need:
- Base, top and colored varnishes (white, red, black - for bullfinch and any background color).
- Nail degreasing agent.
- Cotton pads or regular cotton wool.
- Thin brush.
- UV or LED lamp.
Before applying varnish, you need to degrease the nail plate so that your manicure will last much longer and the coating will not peel off.
Cute snowflakes on nails in winter manicure 2019-2020: photo of design ideas with snowflakes
When winter is upon us and you want to do an appropriate manicure, the first thing that comes to mind is a design with snowflakes. For many, beautiful openwork snowflakes on nails may seem banal and not so original winter nail art.
Therefore, in the design of a manicure with snowflakes 2019-2020, you need to turn to the latest nail trends, choosing a fashionable and stylish combination for winter nails.
A couple of delicate snowflakes will not spoil even the most fashionable manicure design; it could not be reproduced using any modern technology. It doesn’t matter whether you choose a matte or glossy finish for your winter manicure with snowflakes, you can safely experiment even with fashionable mirror nails.
Patterns and types of snowflakes also have quite a few interesting and beautiful options. Hand painting, stickers, stamping, 3D decorations in the form of snowflakes, as well as stencils and snowflake sparkles will help diversify the 2019-2020 winter manicure design and add tenderness and charm to it.
Beautiful snowflakes on nails are a fairly universal winter manicure option for all occasions. A casual, office, New Year's, or evening look will be ideally completed with a winter manicure with snowflakes in the appropriate design style.
The traditional white shade of snowflakes in winter 2019-2020 manicure can be replaced with another color. Golden and silver snowflakes will look very elegant and festive. It is also fashionable to combine white snowflakes, for example, with black ones in a winter manicure design.
The most popular manicure option in winter remains a single-color design with an accent, which is represented by beautiful snowflakes. You can decorate snowflakes with glitter or small crystals.
Small snowflakes go perfectly with any themed winter nail art. On one of the nails you can depict a fawn or a Christmas tree branch, and on the other you can draw a beautiful snowflake.
An amazing combination in winter manicure 2019-2020 will be beautiful snowflakes and trendy knitted nail designs. A manicure with snowflakes in a design with stripes dividing the design in half, as it was fashionable to do with flowers and leaves, will look new.
We offer no less fashionable, stylish and beautiful photo ideas for winter manicure with snowflakes 2019-2020 in today’s collection. The most amazing and original nail designs with snowflakes are collected in the TOP 10 winter nail trends, which will tell you how feminine and charming snowflakes look on nails in different styles.
New items in winter manicure design with snowflakes 2019-2020 – 10 beautiful fashionable interpretations
Velvet snowflakes
Beautiful snowflakes sprinkled with acrylic powder or granulated sugar create an incredible winter effect on your nails. This winter manicure with velvet snowflakes captivates with its tenderness and laconic design.
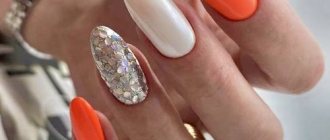
Snowflakes in the form of rhinestone inlay
For those who adore rhinestones on their nails, an inlay in the shape of a snowflake would be an excellent solution. Sparkling pebbles and beads, combining into a luxurious snowflake on one of the nails, create a chic winter 2019-2020 manicure design that looks breathtaking.
Fashionable manicure fall-winter 2017-2018 – photos of trends, new items
The end of autumn, the beginning of winter is a magical time! The first snow falls, the air becomes frosty and fresh. I want miracles, the anticipation of the holidays comes. At the same time, I want changes in appearance. We suggest starting with marigolds. But which design should you choose? Let's look at how trendy fashionable manicure is for fall-winter 2017-2018 and photos of new products.
Fashionable colors
Before choosing a winter manicure, you need to decide on the main color of your nails.
The following shades are relevant:
- Bright red color, perfect for holiday design.
- Dark red, wine shade with purple undertones. Reflects the autumn mood and breathes coolness.
- The glamorous mauve color is a girls' favorite. Relevant at any time of the year. Goes well with rubbing and silver glitter.
- Light brown nude shades remain popular for a long time, including in creating winter nail designs 2022.
- Dark blue is a favorite of the season. Indispensable in the implementation of themed winter compositions on nails.
- Classic gray is a universal color that can be combined with a variety of decor.
- Turquoise green is one of the fashionable manicure trends in winter 2017. Deep and elegant, giving nails a special sophistication.
- Golden-green color, close to khaki or olive. A non-standard combination for bright personalities.
- Bright light blue shade. Pairs well with silver glitter or rub, beige, bright red, gray and white colors.
- Autumn yellow-orange hue. Can also be used in winter designs.
There are no special requirements for the shape of nails. The main thing is that it is comfortable and fits the anatomical shape of your fingers.
Main manicure trends fall-winter 2017
We told and showed what is relevant in the early fall of this year in the last article. Now let's get acquainted with fashionable nail ideas for the 2022 winter and late autumn seasons.
Materials
The most popular materials for decoration: glitter, rubbing, gel, acrylic powder, Yuki silver and gold flakes, rhinestones. You should also stock up on gel paint and brushes of different sizes, because in winter it’s boring without painting your nails with themed designs!
Design themes
Popular themes for nail decoration in winter: mittens and hats, frosty landscapes, cartoon animals, snowflakes, Christmas tree decorations and the trees themselves, snow, frozen flowers, leaves, monograms, sweaters and much more.
Winter fashion ideas
Now let’s take a closer look at the ideas for winter manicure 2017-2018 and photos of new products.
Frozen rowan
Depicted with a bullfinch or as a separate branch. Rowan berries made in the form of drops of stained glass gel polish look impressive.
Mittens and hats
You will need artistic skills and a little imagination to depict drawings with mittens and hats. But it's worth it! It looks very festive and lifts your spirits. You can decorate with velvet, acrylic powder, glitter.
Geometric snowflakes
These snowflakes are special. They are drawn with strictly even lines and dots. Decorate as desired.
Volumetric curls on a matte or rubbed finish
It looks modern and unusual. Ideal for a holiday.
Even more volume!
The theme of volume does not stop with monograms. You can add visual volume to any nail design. This is especially true for imitation snow. For this, acrylic powder and 3D gel are used.
Simple coating with rub and glitter
If you don’t want to bother, there is a win-win option - combine a trendy color with rubbing, glitter or Yuki flakes. By the way, the Haruyama brand has incomparable thick gel polishes with holographic glitter on a transparent base.
Winter French
French manicure has become a boring classic. But even he can be transformed in the hands of an experienced master.
Photo of extended nails
Extended nails are usually longer. This allows you to roam around and paint whole pictures. The ideas discussed above are also great.
Photos of new fall-winter nail designs for short nails
Photo of winter nail design with gel polish
Do you know any other new and unique winter nail design ideas? Write in the comments!
www.masteru-manikura.ru
Winter manicure 2019-2020: new items and photo ideas for winter nail art
The new winter season has prepared many new manicure ideas and ways to decorate nails for fashionistas. New manicure trends for the winter will be unusually diverse and multifaceted, presenting the best techniques and creative approaches to winter manicure for the coming season.
Fashionable winter manicure has its own characteristics in its implementation and execution, which professional masters adhere to when implementing each individual idea of winter manicure design 2019-2020.
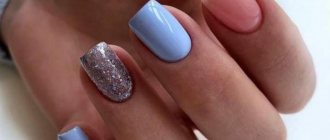
Firstly, this refers to the color palette of gel polishes in winter manicure, which should be “cold”. White, blue, pink, grey, mint and lilac colors will be perfectly represented in the most fashionable winter nail designs.
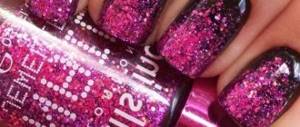
Secondly, winter manicure involves the use of a lot of sparkles and decorative elements that sparkle beautifully on the nails in winter. Nails completely covered with glitter, rhinestones and crystals in different shapes, shiny confetti and foil will look charming.
Thirdly, a delightful winter nail design is unthinkable without drawings and prints. The hits of the winter season will be thematic patterns in winter nail art designs with snowflakes, snowmen, Santas, deer with antlers and many other winter characters.
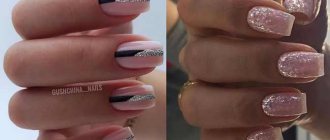
Among the techniques in a fashionable winter manicure will be the favorite French and lunar design, geometric and marble design, “cobweb” and “brush strokes”, painting in different styles, slider and stamping design.
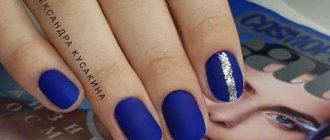
A favorite will be the fashionable matte winter manicure design, offered by new products with decor and patterns. A pleasant matte manicure for the winter attracts admiring glances and looks so “warm” and “cozy”.
Another hit of winter will be a fashionable manicure with a knitted pattern, which adds volume to the patterns in winter nail design. Winter manicure “knitted sweater” is especially original with powder and various “powders”.
If you wish, you can find great ideas for winter nail design 2019-2020 to suit your taste - from delicate nude winter manicure, cute pastel, flawless white and mysterious black nail designs for the winter.
The photo collection of the most fashionable winter manicure is ready to surprise you with new products and striking examples of the best winter nail art design in new styles and solutions.
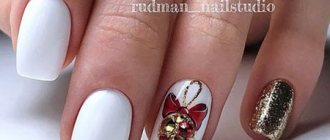
White winter manicure
A snow-white manicure will be the ideal choice for winter, allowing you to achieve a magnificent effect on your nails with the help of glitter, sparkles, and pebbles. A black and white winter manicure with geometry or in combination with cobweb gel will be fashionable.
Knitted winter manicure
Winter sweater manicure is another seasonal nail design trend for the winter that looks exciting and interesting. Knitted motifs can be done on individual fingers or you can create a “sweater” manicure for the winter with different shades on each finger.
Winter manicure with confetti
Shiny round pieces of foil will be a fashionable addition to a light winter manicure design. By carefully placing matte white confetti as an accent on your thumb or trying to create a gradient with kamifubuki, you can get a stylish and unusual winter manicure in a fashionable design.
Winter manicure “spider web”
Trendy decor in the form of spider web gel in black and white colors will be incredibly popular in the fashionable winter manicure of 2019-2020. Strict geometry and abstract patterns are the two most popular types of winter spider web manicure, which look incredibly beautiful with glitter and foil as decoration.
Nail art with deer for the winter
A playful and funny winter manicure is offered by masters in the form of images of deer, whose horns will be an important element of winter nail art, elegantly decorated with rhinestones or glitter. Use bright red and flawless white gel polishes to get an amazing winter deer nail design.
Winter manicure with flowers and twigs
Winter manicure is decorated with beautiful and fashionable flowers in a new design style - black thin and fragile flowers, twigs and buds, with a bright shade of the base in tandem with “negative space”, and certainly with a matte finish. This winter manicure in a floral style will be very fashionable.
Smokey eye makeup step by step - diagram, technique, how to apply
Recently, one of the most popular methods of applying evening makeup has become smokey eye makeup. This is a special technique that requires absolutely no special skills, only accuracy and attentiveness, and it is quite possible at home. Let's look at all the secrets and sequence in our article.
If you know how to do bright smokey eye makeup, then you can say with 100% confidence that all men are yours. If not, then we recommend that you quickly learn this makeup technique. We offer a master class in pictures on how to do evening make-up: smokey eye makeup techniques for brown, blue and green eyes.
Makeup for green eyes
Green eyes are considered the most charming. This is a very rare color in its pure form; much more often you can find girls with hazel-colored eyes or golden splashes. How to properly make up green eyes? Video: smokey eye for green eyes.
First you need to understand that the color type is very important. Those. makeup will be successful only with the right selection of colors . For green eyes it is:
Now about the shape of the eyes . With almond-shaped ones, everything is clear, they are perfect, and no matter how you paint them, it will be good, but good is a four, and we need at least a 5. So, to make cat eyes even more expressive, you need to apply shadow along the crease between the eyebrow and eyelid colors are darker than the main ones.
Small eyes can be visually enlarged using the smoky eyes technique, but more on that a little later. Before applying color to close-set eyes, apply a beige or light natural shade of eyeshadow in the corners; this will visually increase the distance slightly. For far-set eyes, do the same, but with dark shadows.