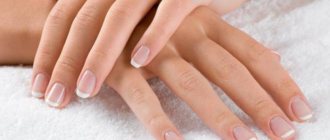
There are quite a lot of factors that can affect the health of natural nails: nutrition, ecology, the girl’s activities, and how she cares for the sensitive area. For many, a thinned nail plate is a natural defect that is almost impossible to eliminate using cosmetic methods.
Because of this, it is now quite common to strengthen nails with gel at home; for beginners, this technique is quite simple to perform step by step if you correctly follow all the subtleties and features of the technique.
General recommendations
The main features of gel polish, thanks to which it is gaining popularity every day, are hidden in its physical properties:
- durability, stays on the nail plate for 2-3 weeks;
- resistance to external damage. Gel polish does not fade, does not fade, does not scratch, does not crack, and is resistant to any chemical influences.
- Safe for health.
When choosing a color, in addition to the client’s tastes, it is necessary to take into account the length of his nails, skin tone, time of year, and situation. In addition, it should be remembered that depending on the consistency and texture of the gel polish, shades of the same color may look different.
Different colors of gel polishes, like hair, can give the skin an unpleasant yellowness, pallor, and redness. To avoid mistakes, you should apply the varnish to the transparent tip in two or three layers, and then apply it to the nail.
Each color has many shades, they are divided into scales. You should be wary of pink and beige tones. For dark-skinned women, shades without yellowness are suitable; for pale skin, cool colors: pink and grayish-beige. For girls with golden skin, it is better to choose a delicate cream palette or red shades.
Dark colors make the nail appear longer. Therefore, dark glossy gels are ideal for short nails. For example, dark blue, purple, cherry, chocolate, black.
On long plates, dark and bright colors will look too provocative and vulgar. Pastel and light colors will elevate long nails.
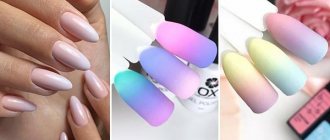
Bright colors, catchy patterns or pictures are ideal for medium-length nails. Matte, holographic, sand, glitter, magnetic, thermovarnishes look impressive at standard lengths. Classic French manicure suits both a formal business style and a gentle romantic look.
The time of year undoubtedly influences the choice of color and pattern of gel polish. For outdoor activities and summer parties, feel free to choose acidic shades, holographic patterns, catchy inscriptions and pictures. In autumn, colors that are in harmony with nature are suitable. Winter is the time for light and classic polishes, and in spring delicate floral tones will look just right.
Application technique
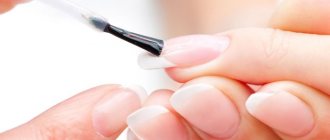
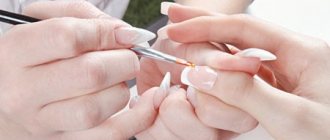
The application of gel polish is carried out step by step in the following way: hygienic cleaning, degreasing, application of base, color layer, final layer. Each layer must be dried.
When applying color, it is important to follow a certain technique, which differs from applying simple varnish. There are two options for applying gel polish to the nail. In the first, the brush is placed just below the base (2-3 mm) of the nail and, under light pressure, goes to the base, then to the tip. Next, the side parts are painted from the root, after which it moves along the form to secure the end of the nail.
In the second option, on the contrary, a drop of varnish is placed 2-3 mm from the base, the brush moves upward, then comes off and distributes the varnish over the right and left parts of the nail. The middle is painted over with the remaining varnish. The undoubted advantage of gel polish over simple polish is that it does not dry out and can be leveled for an unlimited amount of time.
Tools
To make a high-quality manicure and not damage the nail plate, you must use the following tools:
- Lamp for drying layers. There are 3 types of lamps: LED or LED lamps, gas light, ultraviolet. The most popular is the latter device. The ultraviolet lamp appeared on the market earlier than others, has a varied design and a wide price range. However, it works due to UV lamps, which dry out the skin and nail plate. In addition, with frequent use, they quickly burn out. It will last no more than 3 months in the salon. Each UV lamp has a different power, which affects the drying speed. Experts believe that it is safest to buy 36 W lamps. They dry the layer in 2 minutes. and cause minimal harm to hands.
LED lamps are more expensive, but more durable than previous ones.
They dry gel polish in 10-30 seconds, which significantly reduces manicure time. Such lamps are much more convenient for home use; they are compact, do not cause discomfort and do not dry out the skin. You need to choose models with lamps located around the entire perimeter, otherwise the gel polish will dry unevenly.
Gas light lamps combine LEDs and fluorescents and are characterized by low energy consumption and durability. It does not dry out the skin and is suitable for all types of varnishes, but the drying time of the layers depends on the brand and varies from 30 to 180 seconds.
- Files. They are necessary to give your nails the desired shape and length. Instruments made of glass or ceramic with a hardness of 180/240 grit are best suited.
- Soft brush. Necessary after each stage of nail treatment. Removes dust, nail and skin particles.
- Orange stick. With their help, you can safely move the cuticle, remove excess gel polish or apply patterns.
- Pusher. Can be used instead of an orange stick: gently pushes back the cuticle and removes excess skin.
- Wire cutters. Must be made of surgical steel. This will ensure that cuticles and hangnails are removed safely.
- Buff or soft file. The abrasiveness of these tools is 160/180 grit. Needed for polishing or removing the top layer.
- A set of brushes for applying various varnishes and designs.
The application of gel polish is carried out step by step using a variety of auxiliary materials: napkins, antiseptic, gloves, medical mask, oil for moisturizing the cuticle, degreasing composition, and means for removing the sticky layer. After each use, all instruments require thermal or chemical treatment.
How to strengthen: types of gel polish and their features
There are a lot of gel systems, it’s easy to get confused in them. Each type of nail has its own gel. Let's consider the category “phase”, here there are:
- single-phase;
- two-phase;
- three-phase.
- Single-phase systems are a gel that simultaneously serves as a base, shape-modeling and final coating. Such gels are liquid in composition. If the natural nail is flat, then it will not be possible to build the correct architecture. It has no purpose other than adhesion between the nail plate and the material.
- Two-phase gel systems consist of a modeling and finishing coating. It is necessary to use adhesive material (primer, ultrabond) under them. For a good, smooth natural plate, this option is ideal.
- Three-phase gels are a set of a base, modeling gel, and final coating. This system is suitable for strengthening, building the correct architecture and extension of nails. This set is universal for all types.
The next separation category for gels is consistency:
- liquid;
- average;
- hard;
- polygels.
- Liquid gel is tricky to work with. The coating is applied in a conveyor manner, each nail is dried immediately in a lamp. This is necessary so that the gel does not flow onto the side rollers and cuticle of the finger.
- The gel has a medium consistency and is universal in nature. They act as strengthening and modeling of the nail. They lend themselves well to laying out and do not spread quickly.
- Solid gel is intended for nail plate extension. Has a rigid structure. After application and drying, sawdust is required to level the surface.
- Polygel or acrygel is a type of composition that combines the properties of acrylic and gel.
It is durable and elastic. Such properties are excellent for strengthening weakened nails, modeling, and extensions without forms. Attention. You can work with polygel slowly, which is convenient for novice craftsmen. And, most importantly, it does not bake in a lamp, unlike conventional gels.
Which one is suitable for long-lasting manicure?
The health of the nail plates and the beauty of the manicure depend on the choice of brand of materials.
Gel polishes are divided into:
- single-phase, when the base, colored gel polish and top are already mixed. Usually applied in one or two layers;
- two-phase, when the base already has color and is strengthened with a top;
- three-phase, when a base, colored gel polish, and top coat are applied to the nail;
Single-phase coatings are the easiest to use and significantly reduce the time of manicure application. However, the quality of this varnish is worse than others. It is more difficult to level and lasts less time.
Using a base when applying two-phase gel polish increases the service life, evens out the nail plate, and prevents the colored pigment from penetrating the nail or flowing under the cuticle.
Three-phase gel polish is considered professional. It must be applied step by step: degrease the nail, then apply the base, color and top coat (finish coat). Next, all this is treated with a special liquid to remove the sticky layer. Three-phase varnish requires a special application technique, but it looks better and more presentable.
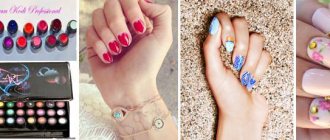
The table shows the most popular brands of gel polish, their features and disadvantages:
| Brand | Peculiarities | Flaws |
| CND | Provides bright and rich color after the first application. |
|
| In'Garden So naturally | The composition contains medicinal natural ingredients. It applies easily to the nail and has a rich color after 1-2 layers. | Difficult to remove. It must either be cut down or kept in a special solution for a long time. |
| Color Couture | Has a wide palette of 140 colors. Perfectly smoothes the nail. | Little-known brand. |
| Jessica Geleration | Convenient for single-color coating, has a positive effect on nail health. | Very liquid consistency. Drawings and patterns will bleed. |
| Axxium OPI | Considered one of the best coatings. Protects the nail well, does not break, scratch, or crack. Apply only to healthy, whole nails. | It takes a very long time to dry – up to 5 minutes. This may cause swelling. Stays on nails for up to 10 days. |
| Bourjois Paris | Created on the basis of regular varnish. Quite thick. | In all quality characteristics it is inferior to classic gel polish. |
| Grattol | It is easy to apply to the nail and does not require additional leveling. Has a large palette of colors. There is practically no smell. | It has contraindications for allergy sufferers; you need to study the composition. |
| Gel Color OPI | Used in salons around the world, it has received several awards from the American Beauty Association. It has a safe composition, rich color, and several color collections. Dries in no more than 30 seconds. | High price. |
| ruNail | Easy to apply and remove, does not spread over the nail. Has a rich palette of colors. | Lasts less than 3 weeks. |
| Masura | Large selection of colors and effects. Bottles of different volumes from 3.5 to 35 ml! Safe composition and low price. | May cause difficulties during application. |
| Bluesky | It has a varied palette of colors and shades, an average degree of viscosity and pigmentation, and is easy to apply. | Has a pungent odor, dull - must be applied in several layers, |
| LUXIO | Easy to apply, odorless, flat brush that regulates the distribution of polish on the nail. There are color collections, more than 160 shades. | High cost, contraindicated for allergy sufferers, you need to study the composition. |
| Kodi Professional | It has a safe composition, is evenly distributed over the nail, and is quite bright. Large selection of shades, bottles of 8 and 12 ml. | High price. |
| TNL Professional | Easy to apply and remove, large selection of colors, which is constantly updated. Low cost. | May cause allergies. |
| Canni | Safe composition, no pungent odors. Large selection of colors and convenient brushes. | |
| Lovely | They are durable, have a bright color, and are economical to use. |
If the manicure is done in good faith, then shellacs will meet all the above characteristics.
general information
Why is the procedure for strengthening natural nails with gel so popular? It is worth mentioning that the strengthening gel comes in two types. It differs in characteristics and effects on nails.
- Biogel;
- Simple gel.
An ordinary gel has almost the same chemical composition as is used for gel nail extensions. It has almost all the same negative effects on the plates as extensions. Unless you have to cut down your own plate so much. Biogel is a different substance. This strengthening gel for nails has a positive effect on them during wear.
Gel strengthening of natural nails has the main advantage. It prevents the nail from breaking and cracking due to mechanical damage. The gel creates a thick and durable layer on the surface of the plate that protects the nail from scratches. Due to this layer, the nail does not bend even under fairly strong pressure.
The coating itself is quite strong and stable. It lasts on the nails for about three weeks, and sometimes more. However, as the nail grows, the border between the gel and your nail becomes visible, and therefore the coating has to be adjusted.
The gel layer is resistant to damage, scratches, and rubbing. It retains its aesthetic functions until the last day of wear. When using a colored coating, there is also no fading.
[yandex2] [google2]
How to make at home
Regardless of the type of gel polish (single-phase, two-phase, three-phase), all rules of hygiene and application must be followed.
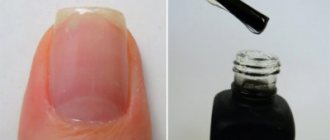
- Hygienic manicure. This is the preparation of the nail plate, namely the removal of the cuticle, the hangnail, and giving the required shape. Next you need to disinfect and degrease your nails. Preliminary preparation is responsible for the quality of the future manicure.
- Applying the base layer. It is called the “first layer” and is applied using a “base”. This is necessary to strengthen and straighten the nail. First apply to four fingers, except the thumb, then dry. The same is done with the thumb. This sequence of application is necessary for even drying of the base.
- Next, colored varnish is applied. It is applied in a thin layer in several layers, constantly drying. This will help avoid uneven application, eliminate bubbles and varnish getting on the skin.
- The design, rhinestones and stickers are applied to the dried color layer. No special techniques are needed here. Of course, if this is not applying patterns or combined painting.
- The final layer is applying the top. It sets the polish and makes it glossy and shiny. During the final layer, it is important to secure the ends well, otherwise the gel polish may come off ahead of time.
Applying gel polish step by step guarantees long-lasting wear and healthy nails.
Strengthening nails with gel: step-by-step instructions
Before starting the procedure, it is necessary to thoroughly disinfect the hands of both the master and the client. Then the nails are filed to remove the glossy surface. You should take time to cuticles and give your nails the desired shape. Then the nails are degreased.
To prepare nails for strengthening, it is better to use a file with an abrasiveness of 240 units.
Nail strengthening technology:
- The first layer of gel should be applied to the dry surface .
- The nail is dried in the lamp for 2-3 minutes (depending on the type of gel).
- Repeat 3 times , increasing the drying time.
- Apply sealer or protective gel.
- Remove any remaining gel from your fingers.
- Apply oil to cuticle .
Strengthening nail plates with gel
The thumb is always treated separately and last.
This video tutorial demonstrates in detail the entire process of strengthening nails with gel:
Master class for monochromatic manicure
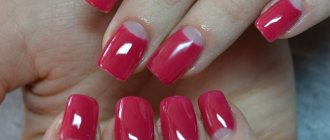
A plain manicure will never lose popularity. You don't need to paint your nails the color of the rainbow to be on trend. One color is enough to look stylish.
The photo shows step by step how to apply gel polish at home.
- First you need to prepare the nail plate, namely give it a shape, trim the cuticle and overgrown skin. Afterwards, using a brush, carefully remove all dust from the nails and degrease. This is done with a special degreaser or dehydrator on all nails at the same time; there is no need to dry them in a lamp. In some cases, nails are polished with a buff.
- Applying a base is necessary to protect the nail plate from the active components of the gel polish. In addition, the base evens out the nail and gives it the correct shape. To prevent it from spreading, first apply it to four fingers (except the thumb) from top to bottom and dry. Then the thumbs are painted. Do not allow the base to get under the cuticle or on the edges. Be sure to seal the end of the nail.
- Plain gel polish is applied and dried according to the same principle as the base. Depending on the brand, the colored gel is applied alternately in several layers.
- Next, the finishing coat is applied and dried in a lamp. This is what strengthens your nails and prolongs the life of your manicure.
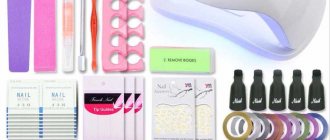
Tools and materials
First of all, you need to decide on the end result and the tools you can afford. To nourish weakened nails, biogel is better suited. To create a chic long manicure, of course, use regular gel. Gel polish has the same strengthening properties as gel powder, but requires drying with a lamp. You should also consider whether correction or re-strengthening can be afforded.
Brushes for applying gel to nails
All of the listed types of strengthening materials are suitable for natural nails, so price plays an important role in this matter. Any of these types of gels can be purchased separately or in a special set to strengthen nails.
Depending on the properties of the gel, it is necessary to acquire a suitable catalyst or lamp with a power level that suits the type of strengthening gel. You should also prepare degreasers, a manicure base (bond and primer), a polishing file (buff) and a simple nail file, and brushes for applying gel.
Master class with simple patterns and drawings
To make an original pattern, you can use any ordinary objects: masking tape, sewing needles, foil, sponge, toothpick. Stickers were invented long ago for drawings. And more complex patterns are made using special brushes, stencils, and tools.
The simplest pattern is geometric. From straight lines, triangles and circles you can depict winter patterns (snowflakes, snowmen, Christmas trees), spring flowers, and autumn thaw. Simple lines in a chaotic order can also look stylish, the main thing is to choose the right colors and not to overdo it.
Patterns and designs are applied to the gel polish before the final coating. Smooth lines are easy to apply using masking tape. It will prevent colors from mixing, does not harm the gel polish and peels off easily. This is how you can make a two-color manicure: stick a piece of tape onto the colored layer, and cover the rest with another varnish.
It is more convenient to apply dots with a toothpick or needle. Ethnic patterns can be made from straight lines and dots. They will perfectly dilute a monochromatic manicure and create a unique image.
You can place pieces of foil on a colored nail and paint over it with white polish. If you remove the foil, you will be left with colored stripes on a white background.
Gradient manicure is done using a sponge or sponge. Dry shadows of various shades are applied to the base and secured with a top coat. It's quite easy to draw flowers. Thick gel polish is dripped onto the base or color layer. This drop is then pulled out with a needle or toothpick, taking the shape of a petal.
Strengthening nails with biogel under gel polish
Nails need rest, which they don’t always get. If extensions are being done, there can be no talk of any rest, but biogel is a completely different remedy. What does it do to nails? Strengthening nails with biogel has advantages. After reading them, you will immediately see the answer to the question:
- The product is applied directly to the surface of the nail plate;
- Low material consumption;
- Contains natural ingredients that have medicinal properties and prevent brittleness and splitting of nails.
- The surface becomes smooth, the manicure shines and takes on a natural look.
Additional Information! Women with allergies, pregnant women, nursing mothers, girls with sensitive skin have found a real boon in biogel. It does not contain dangerous chemical compounds that can cause protein allergies. Therefore, strengthening with biogel under gel polish is the safest way to perform a manicure for pregnant women.
The strengthening technology is carried out step by step:
- The surface is prepared for applying the base. Maximum accuracy and caution is the first rule of the procedure. The plate is processed with a cleaner. Using a special tool, the cuticle is pushed back, the nail is filed with a nail file and takes on the desired shape. Using a soft buffer, the surface is sanded and re-processed with a cleaner.
- It is necessary to strengthen the nails with a gel polish base. Manufacturers of varnishes do not share secrets about the composition of their products. Therefore, carefully studying the instructions will not harm a novice specialist. The composition must contain strengthening substances. Otherwise, a primer is used before applying the base coat. Nails are covered with biogel after thorough drying.
Note! The exfoliated ends of the nails are removed, the damaged edges are shortened so that the gel polish that adheres to the scales does not peel off.
- The main points of the process are carried out. Drying must be of high quality. If the base layer is not sufficiently dried, the base layer will begin to peel off quickly. Different manufacturers indicate their quantity of the base layer, which must be taken into account when applying. Drying is carried out after each application of a layer for up to two minutes, the topcoat dries for up to 5 minutes.
The quality of the manicure improves when coated with gel polish and strengthened with acrylic powder. It is applied before the main layer. The nails become stronger and their rigidity increases. Using colored powder will only enhance your manicure.
The skin around the nail should not come into contact with the cosmetic product. Otherwise, the biogel will peel off ahead of time.
- The final step involves applying a finishing coat, which must be dried under a lamp. Upon completion, nail design is performed according to the client's wishes.
Master class with decor
Simple decor on nails will suit any woman, regardless of age, social status, race. The easiest way to do it is with stencils.
- The selected stencil is carefully placed on the base or colored layer and straightened. It should fit snugly to the nail on all sides.
- A different color is applied.
- The stencil is removed using tweezers slowly from the root to the edge of the nail. The resulting drawing is dried under a lamp.
- The final layer is applied.
There is no need to make patterns on each nail. It may look too colorful and tasteless. Most often, the decor is complemented by a monochromatic manicure. Applying gel polish step by step greatly simplifies the implementation of even complex decor.
You can decorate your nails with rhinestones. For example, depict raindrops or a crown. Rhinestones can complement both a plain manicure and designs. The size of the decor is selected based on the length and color of the nails. The emphasis should be placed on only one finger. Rhinestones or any other decorative elements are applied to wet gel polish without glue, then dried and strengthened with a top coat.
How to strengthen nails with gel under gel polish
Long-term decorative manicure is obtained using gel polish.
It is characterized by advantages:
- The nail plate becomes thicker;
- The procedure is simple and safe;
- The color palette is varied. Wanting to get a new shade, several colors are mixed for the final result.
The strengthening process consists of three stages:
- Includes nail strengthening with a base. It is characterized by a transparent color and is applied in a thin layer. Dries in an ultraviolet lamp. When using gels of a single-phase system, all stages are performed with one gel.
- After the base coat, the base coat is applied. The technology does not provide for building the structure of the nail. The material is applied to the base in a dense layer, but not thick. To avoid detachments and chips, the gel should not get on the cuticle or side ridges. Then dry. If it gets on the skin, the material is removed with a cotton swab, which is moistened with a degreaser.
- At the last stage, the finishing gel is applied. After drying, the sticky layer is removed.
How to strengthen nails with gel under gel polish, the video shows in detail all the steps. By using it you can create a wonderful manicure yourself.
Fashion trends in 2019-2020
One of the fashionable new products in 2019-2020. became nail art, which turned into real art. These are individual patterns and designs on nails.
Simple geometric patterns are out of fashion; modern nail art is all about artistic compositions.
Particularly popular are the designs not on a pair of nails, but on 10 fingers. Each episode on the nail continues the next and builds a single composition.
Convenience and practicality are the companions of modern fashion. Therefore, the trend this year is short and medium length nails.
Bright, acidic colors also came out of the top. In 2019-2020 sky, green, orange, olive, brown, mustard, fuchsia, yellow are welcome. The classic color combination: black, white, red has not gone out of fashion.
The average cost of applying gel polish in a salon is 1,500 rubles. Independent step-by-step procedures will significantly save budget and time.
Author: Anastasia CHEKUNOVA