Modern women use bright, shiny nail designs in their everyday life. There are no restrictions on decoration even within the office style, which dictates its own requirements for clothing and shoes.
To create a brilliant design yourself, just stick bright colored foil on your nails. For the durability of such a manicure, you need to know the rules for applying and fixing the material.
Design Benefits
A shiny manicure can be created using different decorating materials, such as glitter or kamifubuki. But manicurists prefer foil. It is provided in the nail art market with a large number of options (colors, textures).
Foil has a number of advantages: ·
- convenient to use;
- variety of colors;
- retains a bright shine after application;
- durable to wear when fastening rules are followed;
- It's inexpensive.
Foil is sold in the form of multi-colored sets. This allows you to choose the desired shade for any color gel polish coating.
What materials and tools will be needed for the job:
| Name | Description and quantity |
| Top | Polymer material intended for fixing the design (used as one of the options for imprinting foil) – 1 pc. |
| Foil | Any type of material in sheets, containers or rolls - quantity as desired. |
| Glue for foil | Special glue in a plastic bottle, air-dries – 1 pc. |
| Orange stick or silicone brush | A tool for distributing foil over the surface of the nail and removing air bubbles under the material. |
How to apply and secure the foil on the nail will be described below in the article, depending on the complexity of the design and the availability of additional materials.
LiveInternetLiveInternet
Quote from Rudenka's message
Read in full In your quotation book or community!
Foil background. Master Class
Effective work can be done even from ordinary food foil - the same one in which we bake various dishes.
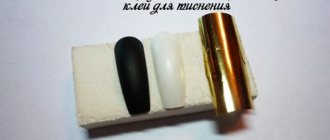
For this we need
foil, acrylic primer, glue and a regular dishwashing sponge.
I’ll make a reservation right away: it’s more convenient for me to use a glue stick; perhaps some of you prefer to glue on acrylic primer. In this case, a palette knife will help you...
First of all, coat the cardboard cover blanks with glue so thoroughly that there are no uncovered areas left. This is especially important if you plan to then use embossing (foil that is poorly glued to the base may cause bubbles to appear when exposed to a hair dryer).
Then we place the crumpled foil (we take a piece larger than the format of our cover) on a cardboard base and...
we begin to crush it. The main thing is not to overdo it, so as not to turn the future cover into a perfectly smooth mirror. Our goal is to make beautiful creases. First, I lightly crush the foil with my hand, then I go over it with a dish sponge - not with smoothing, sliding movements, but as if pressing the foil into the cardboard.
After we have processed the front side of the cover in this way, we turn the foil over to the back side. Don’t forget about the “edge”: so that the contours of the cover look clear and the foil does not “walk” along the edge, “we roll our cover edge-wise across the table on each side.
Turn the cover over and glue the foil to the cardboard base. Since the endpaper will subsequently be glued to this side, there is no need for creases here - we need as smooth a surface as possible, so we glue it with diligence, smoothing movements.
This is what the finished covers look like
However, they are only half ready. Then the fun begins. We put acrylic primer on a sponge and rub it over the cover. Why do I rub it first... Because I prefer not a uniform dense white background, but with transitions from gray to white - this gives the background a more complex and interesting aged look. So, first we rub the soil over the surface with wide movements.
... and then we take the soil again and begin to treat individual areas of the surface with it using the “chpok-chpok” technique to make them lighter. If there is a lot of soil, you can get this interesting texture (see enlarged view)
If we need abrasions for greater effect, we turn the dish sponge over with the hard side and begin to scrape and scratch the surface
Then I use white embossing. From some angles the result looks like this:
This is ATSki - the “Old New Year” series. Here we used dark gold embossing powder to achieve the effect of old Soviet pictures:
And this is part of the decor that was made for New Year's photo projects. The same foil, primer, scuffs with a dish sponge and embossing with gold powder.
source
Rudenka
Scrapbooking Post Series:
Part 1 - Awesome Lantern - Paper Candle Holder!!! MasterClass Part 2 - Again the Original Lantern - Candlestick (from cardboard) + 5 Mk ... Part 12 - Delicate Beautiful Volumetric Postcards - Butterflies. Mk Part 13 - How to quickly and easily make “real wood” (imitation wood). Mk Part 14 - Background from Foils. Master Class Part 15 - New Year's Texture Tags. Interesting Fact. Mk
Material classification
Manufacturers of nail art products offer different types of foil. They differ in several parameters and are packaged in collections of the same texture, but in different colors.
Main types of foil by application method: ·
- Tear-off foil - sold in rolls, where bright elements are printed onto the tape web and separated by perforations.
- Transfer foil is produced in the form of long tapes, which are rolled into rolls and packaged in plastic containers or in the form of a set of small fragments of such tapes. Foil is easy to use (it is preferred by beginner craftsmen for creating designs at home). There are several methods of attaching to the nail plane, but a prerequisite is the presence of a strong sticky (dispersive) layer on the surface of the nail. ·
- Thermofoil - is characterized by increased resistance to abrasion during manicure wear, but has difficulties during application (mandatory heating during application).
- Liquid foil is an innovative product that greatly simplifies the application of bright material on the nail and is convenient to use to completely cover the nail plate.
Foil can be divided by color:
- plain foil in a variety of bright, neon and glitter colors;
- foil of the same color, but with a geometric or floral print of the same color, highlighted by a higher print density; ·
- multi-colored material with a matte effect;
- color drawings on a transparent tape that are transferred to the nail;
- plain ribbons with a holographic effect;
- holographic designs on a transparent background, which are transferred to the colored gel polish coating;
- foil with the effect of rainbow stains - “broken glass”.
The shape of the foil is: ·
- sheet - presented in the form of a flat sheet with a colored coating applied, it is often rolled into rolls with the shiny side inward to avoid damage to the pattern or shiny layer;
- pressed - available in gold and silver colors in the form of separate pressed pieces in small glass or plastic jars, differs in that it is very thin and requires tweezers to apply to the nail;
- adhesive tape - foil in a roll with a ready-made sticky layer, on the other side a pattern is applied;
- stickers - patterns are applied to transparent tape, which are pasted over from the backing using tweezers and transferred to the nail in the desired place according to the design.
Even a beginner can glue foil onto nails when creating a design, but a manicurist’s collection includes all foil options, since the right to choose the color and quality of the material belongs to the client.
Choosing the right foil
In salons that sell manicure materials, you can find two main types of foil. The difference between them is practically invisible visually, while they differ significantly in the methods of application to the nails.
There are two main types:
- translated;
- tear-off.
The foil can be transferred to the entire surface of the nail or decorated with pieces of other decor, for example, drawings and ornaments. As a rule, it can be very difficult to transfer it to the entire nail, since there are natural bends. They cause the fragile material to break and jam. That is why you need to know the basic methods of applying it and apply them in practice.
Glue
You can glue the foil on your nails using a special glue for foil. This material is produced by almost all companies that produce nail art products and foil. It is usually produced in opaque plastic bottles with a brush in the cap.
With its help, simply apply glue to the nail. The material does not require drying in an LED lamp, except for special gel fixatives, which must be dried in UV rays.
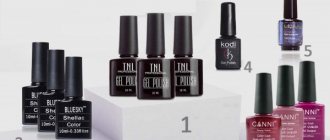
Popular brands of foil glue among manicurists:
- Born Pretty;
- CityNail gel glue (10 ml);
- SVN (10 ml);
- AND (12 ml);
- Global (10 ml);
- Globdilndils 6 ml (China);
- XKJ (16 ml);
- Maxximum Star Glue (8 ml);
- Nail Foil & Glitter Tattoo Glue (12 ml);
- Naomi FOIL GLUE (12 ml).
It must be remembered that regardless of the type of glue with which the foil is attached, the durability of its use in manicure determines the quality of the finishing coating.
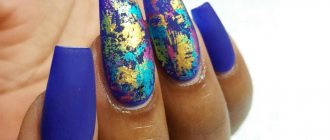
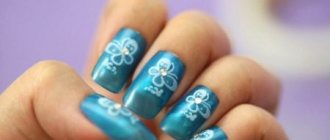
Foil for nail design
We won’t be lying if we say that rhinestones have somewhat lost their former relevance, but girls still have a penchant for luxurious glitter on their nails. What to do - tame your desires or find a healthy alternative to them? For an experienced manicurist, the answer is obvious - use a trendy and unusual nail art design, such as a foil print, reminiscent of a glare of precious metal.
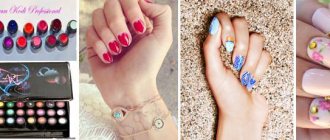
The best photos that reflect the essence of such a popular trend in manicure are collected in our inspiring selection.
Glue analogues
There are alternative options for attaching foil to the nail. Each of them has its pros and cons.
The simplest of them is considered to be printing foil onto a sticky (dispersive) layer of colored gel polish. This technique is often used when creating designs at home in order to save on purchasing a large amount of expensive materials that may not be needed in the future.
However, when printing foil onto gel polish, a high-quality result will be obtained in the presence of 2 factors: ·
- the presence of a strong sticky layer (varnishes from different manufacturers have different degrees of dispersion); ·
- the presence of a soft texture of the base film on which the foil pattern is applied (the layer with the pattern or color should be easily separated from the surface of the substrate).
You can glue any type of foil when creating complex designs on nails using an acid-free primer, which is a mandatory component when preparing a nail for coating or creating an artificial nail plate.
One way to stick foil on your nails
The steps are as follows:
- For this method, it is necessary to completely complete the procedure for creating a colored coating and cover it with a top coat.
- After drying the design in an LED lamp, the primer is applied pointwise to the places where the foil is planned to be printed.
- 3-5 seconds after applying the primer (drying in an LED lamp is not used), you can print the foil.
- You don’t always get a high-quality result, especially when transferring designs onto the nail. This is due to the different quality of foil from different manufacturers. There is foil that can be printed with high quality only using special glue.
If a manicure is created at home without the use of gel polishes and LED lamps, you can also use foil to create bright prints. However, it will most likely not be possible to achieve complete coverage of the nail plate.
To do this, you need to apply several layers of regular varnish and let them dry. Then apply a thin layer of the same varnish and wait 1-2 minutes (the varnish should not dry completely) to print the foil onto the sticky layer of the drying varnish.
Varieties of design
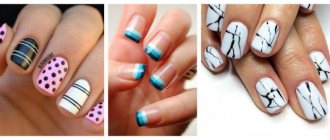
The types of decorative designs are very diverse:
- transfer patterns and chaotically scattered spots;
- straight and curved stripes;
- matte foil or using a velvet top;
- casting;
- mirror manicure;
- "broken glass".
They use different types of material, which can also be combined.
Manicure with transfer foil
The design with transfer foil can be made the same on all fingers or you can highlight 1-2 nails:
- Apply special glue over the dried varnish and polymerize it.
- Cut off a piece of decor, apply it to the entire surface of the plate, straighten and smooth it using a silicone “hoof”.
- Remove the film with a sharp movement.
- Cover the surface with topcoat and dry.
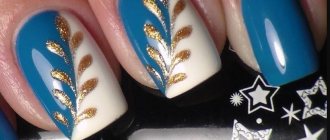
Design with transfer foil
For design you can use:
- only one color of varnish in a deep shade (black, burgundy, emerald, dark blue) in combination with gold and silver foil stripes;
- two colors – dark and lighter, with iridescent splashes of transfer decor;
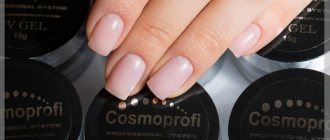
- nude tones of varnish and the same shades of foil, imprinted in the form of multi-colored rain;
- light background and patterns, with the base of the plate outlined with black gel paint.
Manicure with foil stripes
A fashionable design with foil stripes should look modest:
- Nails are painted one bright color. Decor is glued onto the little, ring and middle fingers so that it follows the lines of the cuticle and one of the sinuses.
- You can use several nude shades for manicure. The strips are glued 2 pieces in parallel, along the center of each plate.
- You can make intersecting lines from strips, forming rectangles or just sharp corners. In this case, not all nails should be decorated.
Watch the video on how to do a manicure with foil tape:
The strips are always glued to a grease-free surface because they have a sticky layer. If you fix the decor unsuccessfully, you will have to redo the entire coating. The strips must be secured on top with a top.
Matte nail art
Matte design can be done in this way:
- Cover 3 nails completely with varnish, and 2/3 on the little finger and ring finger.
- At the border of gel polish and natural color, apply transfer foil or display foil.
- Cover everything with a matte top.
Matte nail art
There is also foil without a glossy sheen. It can be used with both a shiny top and a matte one.
Mirror manicure
Designs with the effect of a mirror surface of nails are performed using:
- sheet foil, placing it on the plate in one piece and cutting off the excess;
- special stickers corresponding to the size of the nail;
- liquid foil, which is applied in 2 layers on a base of dark gel polish.
Liquid foil
With the first two methods, it is important to smooth the material well on the plate.
Manicure with foil prints
Designs with foil prints are very diverse:
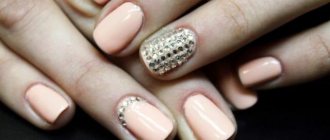
- chaotic sparkles of a darker color than varnish, plus rhinestones;
- gold or silver on colored varnish and almost complete coverage of the nail with foil;
- highlighting individual sections of the plate with prints;
- their drawing of patterns.
Watch the video on how to print foil onto gel polish:
Transfer material is used for these designs. The plate should be dry, the surface should be wiped with a degreaser, before that you can walk over it with a buff.
Manicure “broken glass”
“Broken glass” means that the nail should look like shards, shiny and multifaceted. Typically, sheet foil of several shades is used, which is cut into pieces of different shapes. They are placed on a damp topcoat or glue, polymerized and covered with a glossy finish. The design is suitable for dark and light tones of gel polish.
Casting
Casting or patterns in combination with foil are done like this:
- The dried gel polish is treated with a buffer and degreased.
- Using a thin brush, apply the pattern in 2 layers, each one dried.
- Transfer foil is applied to the ornament so that the spraying is imprinted.
- Cover with finish and polymerize.
Casting in combination with foil
It turns out as if the pattern was drawn with foil.
Methods for gluing foil
There are several types of foil, each of which can be used in a design in several ways. There are ideas for manicure with foil that cannot be realized without glue, for example, covering the entire surface of the nail with the material.
However, decorating with foil prints is quite possible on a sticky layer of gel polish. The design intent often determines the choice of foil attachment method.
Sheet transfer
The quality of gluing of this type of foil depends on the thickness of the film on which the color coating is sprayed. If the foil is thin and soft to the touch, then it can be glued to the dispersion layer of gel polish after drying.
To make it the most aggressive, it is necessary to dry the color coating in an LED lamp for at least 60 seconds. The simplest and most reliable way to attach the foil is to use a special glue. It is applied in a thin layer to a completely dried color coating and allowed to air dry for 1 minute.
Zhataya
Crimped foil is a thin material without a backing, which is transferred in small pieces using tweezers to a sticky layer. It must be leveled using an orange stick or a silicone brush. This type of foil is very thin and adheres well to a weak dispersion layer, but is covered with at least 2 layers of topcoat.
Crumpled foil is often used by manicurists to create aquarium designs.
Liquid
Liquid foil appeared on the nail art market relatively recently. This foil is a gel in which shiny components are mixed.
The rules for applying the material are the same as for gel polish: ·
- gel foil must be applied to a color coating that has completely dried in an LED lamp; ·
- depending on the desired effect, the material is applied in several layers, with each layer drying in an LED lamp for about 30 seconds; ·
- The top needs to be covered with a top coat (masters recommend using a top coat without a sticky layer to securely fix the design).
It is easy to use at home, and the effect of its use is not inferior in quality to classic transfer foil. This type of material is convenient to apply both to the entire plane of the nail, and in fragments.
Broken glass
This type of foil known as “broken glass” is distinguished by a special technique of application. The material is a transparent film on which smoky rainbow stains are applied, which gently shimmer when the sun's rays hit them at different angles. Their appearance resembles gasoline stains on the surface of the water.
This pattern does not translate onto the plane of the nail, so it is necessary to glue the foil fragments directly to the transparent backing. The design will turn out to be of high quality and neat if you have very thin and soft foil available. Because the thinner the foil film, the less finishing gel will need to be placed on top to level the nail plane.
Before work, the “broken glass” foil is cut into fragments with nail scissors, each of which is transferred to a sticky layer on the surface of the nail. It can be attached to the dispersion layer after drying the gel polish or to glue for foil.
If you have a high-quality thin sheet of foil, you can glue small fragments using an acid-free primer. The technique for using this method is described below in the article.
Manicure ideas with foil
The entire palette of shades is used for design - any version of shiny decor is in trend. Bright colors, matte shades, and mirror finishes are popular. How to make a manicure with foil:
- Versatile silver material suitable for everyday design. Combines with pastel gel polishes in pink, powdery, blue, milky shades.
- Gold foil looks interesting in formal looks and evening manicure. Looks impressive on a black background, combined with green, blue, red, white. You can glue the decor with stripes or patterns.
- Colored metallic coating looks beautiful with a contrasting background, combined with nude shades and rich monochromatic varnishes. You should not use acid tones - they are not in fashion.
- Matte manicure in nail design gives the image nobility and sophistication. Compositions of shiny pieces, ornaments of thin stripes, and three-dimensional designs with a casting effect look interesting against a velvety background.
- Lunar manicure is a current classic. You can decorate the hole with shiny material, giving it any shape. It is better to use contrasting combinations of foil and colored varnish.
- A French jacket with a shiny free edge or an emphasis on the “smile line” is suitable for everyday and formal design. Oblique and straight French looks beautiful. You can take sheet and transfer material for work.
- The design with multi-colored dots is made from crumpled foil. It needs to be finely torn and randomly placed on glue or sticky varnish.
- A reflective mirror manicure is easiest to do using thermal film. After heating, the product becomes soft and lies evenly on the entire surface of the nail plate.
A win-win option is to decorate your nails with shiny stripes. They can be hung in different directions, narrow and wide fragments can be used, and geometric patterns can be made.
Application methods without glue
It will not be possible to glue foil onto your nails over the entire surface without glue, but it is quite possible to decorate parts of the nail with separate shiny elements. To do this, you need to perform a manicure and apply a colored gel polish coating. It needs to be dried in an LED lamp for at least 30 seconds and covered with a finishing layer of topcoat.
To print foil, you need to choose only topcoats that form a sticky layer after drying (usually it is removed with a clinser as unnecessary). Foil is printed onto this dispersion layer, applying it with the glossy colored side to the surface of the nail. You need to carefully smooth out the foil and wait about 30 seconds.
Then carefully separate the backing from the film so that the colored foil coating remains on the nail. To fix it, you need to put your hand in the LED lamp for 10 seconds and cover it with topcoat and dry it for about 60 seconds.
For gel polish
There is a method that beginners in manicure often use to decorate their nails with foil at home. If an attempt to print foil onto a sticky layer of gel polish fails (the material has weak dispersion), then you can try to print on a thin layer of undried gel polish.
If the design idea requires foil to be printed on the entire surface of the nail, you need to apply a colored coating and dry it in an LED lamp. Then you need to cut out a fragment from the foil tape that is as close as possible to the contours of the nail plate. Apply a thin layer of gel polish to the nail and place the fragment with the matte side up (so that the bright part of the foil is on the nail).
The hand must be placed in the lamp to dry for 30 seconds. Then carefully pick up the edge of the piece of foil and peel the backing off the nail. If the result is satisfactory, the design is covered with a layer of topcoat. If the appearance does not suit the master, you can try again.
How to use foil to remove gel polish at home
Removing gel polish using foil
Many girls and women like long-lasting nail coatings - after all, their use is the key to a flawless manicure for a long time. If everything is done correctly, constant use of a persistent composition will be no more harmful than covering your nails with regular manicure varnish.
The process of removing the gel-varnish coating, which must be performed step by step, deserves special attention:
- The thin shiny coating is filed with an abrasive file.
- A cotton pad soaked in gel polish remover is placed on the nail and wrapped in foil .
- After 10-15 minutes, the foil is removed , and the dissolved gel polish is removed from the nails using a metal spatula or an orange stick.
Correctly removing gel polish is very important, since the condition of your nails depends on it.
For undried top
The method of attaching foil to an undried top is similar in technique to the method using gel polish, which is described above in the article. In this way, you can print foil both on the entire plane of the nail, and in the form of shiny fragments.
To get a brilliant imprint in the right place according to the design idea, you need to apply stripes, spots, and geometric shapes with a top coat onto the colored gel polish coating. It is recommended to use a thin paint brush to apply the material. Then apply a piece of foil to this place and dry it in a lamp for 30 seconds. Then separate the transparent foil base from the nail plane.
You should not apply a large amount of topcoat, because when it comes into contact with the foil, it will form streaks after drying in the lamp.
On the sticky layer
The easiest way to create a design with foil is to print it onto a sticky layer of colored gel polish. It will not be possible to completely cover the entire nail plate in this way, but creating a stylish design with chaotic prints in the form of brush strokes or an abstract shiny design is quite possible.
Masters in nail salons use this method of foil imprinting to create bright, shiny backgrounds in aquarium design. A layer of transparent construction gel placed on top in the form of a lens will qualitatively secure the design. For this method of printing, it is better to choose plain foil strips without a pattern.
Non-transfer foil
Before applying tear-off type foil to the gel polish, you will need to cut out the required pattern from it. Tear-off foil is sold in gold leaf. It can be torn off in a chaotic manner and create a mosaic-like pattern on the nail. To cover the entire nail plate with this material, you will need to trim off the excess foil or file it off along the entire perimeter at the end of the manicure.
Potal is sold in the form of notebooks in sheets or small pieces in jars.
Acid-free primer double-sided tape
Some types of foil are successfully attached to a wet layer from an acid-free primer. But a high-quality result is not always achieved; it depends on the properties of the foil and the materials from which it is made.
In terms of its properties, an acid-free primer, which is applied to a polymer material (in the case of a design with foil, to a colored gel polish coating) exhibits the characteristics of double-sided tape. It glues the shiny part from the foil tape to the nail, but requires that it be secured on top with a top coat.
To ensure the durability of the manicure, masters recommend fixing this design with 2 thin layers of topcoat, drying each one in an LED lamp for at least 30 seconds.
It is not difficult to glue any type of foil to your nails, but you should follow the rules for applying it for each type of material. When creating different designs, depending on the complexity and stages of its implementation, different fastening methods are used and with experience comes an understanding of which option for fixing the foil is the most convenient.
Foil selection
In order for the manicure to turn out exactly as intended, you should purchase special foil - for nail design. It is easy to work with, and the choice of colors and shapes is very rich.
Regular household foil is denser because it is intended for other purposes, so it is more difficult to work with and design choices will be limited. So, before using foil for nail design, you need to decide on the option for your future manicure. The choice of style and further appearance of the nail determines which material is best to choose for the job.