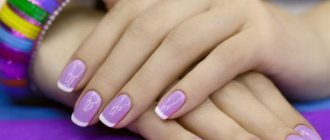
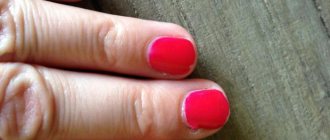
Extended nails are another novelty in the nail industry, which most girls accepted with delight. Almost instantly transform your nails beyond recognition - they become long, with an interesting shape and original design. And which ones are practical - they last a long time, and there is no need to constantly take care of the coating - when to apply and remove. But a person quickly gets bored with everything, and the design that admired a week ago is no longer pleasing.
Extended nails
What to do? There is an answer - it turns out that you can apply gel polish with a completely different fashionable design to your extended nails. But is everything so easy and simple, will gel polish harm the extended nails?
Secrets of great design
Let's talk about some of the features and nuances of this process:
- Don’t forget right away - shake the bottle of gel polish to ensure uniformity of the composition;
- Note that basically the technique of applying gel polish on your own and extended nails is the same;
- Please note that the coating must be applied to artificial nails in a dense, thin layer, otherwise this coating will look unnatural and bulky. The reason is that if you extend your nails with gel polish, they will be thicker than natural ones, and if you apply a thick coating, it will be too much;
- We carefully study the label and annotations. If the gel polish forms a sticky (dispersive) layer after drying (polymerization) in a UV lamp, it must be removed, for example, with a lint-free, smooth cloth. It is harmful and can even cause an allergic reaction;
- If you also get tired of gel polish, removing it from artificial nails is not so easy - you cannot, for example, use acetone (it will eat the extended nails themselves, they are also made of gel). It is also not advisable to remove it with a file; removers or a router with attachments are suitable here.
How to do this without errors
Let's look at the technology of applying gel polish on artificial gel nails step by step:
- You should not wash or steam your nails; they will absorb excess moisture, which will affect the quality of the coating. It is enough to soften and push back the cuticles and side ridges;
- polishing stage. Using a special file for extended nails (buff), you need to ideally polish the surface of the artificial nail; the quality of the coating layers depends on this;
- degreasing of extended nails with a primer, unlike natural ones, is not necessary according to some experts; others insist on this stage;
- applying the base (foundation). It not only protects natural nails from chemical attack, but also improves the adhesion of the layers. That is why it is recommended to apply the base to extended nails. It only takes about two minutes to polymerize;
- main point. Apply gel polish to extended nails using neat, long strokes from the cuticle to the cut, in a thin layer, without touching the skin. We seal the edge for beautiful contours and polymerize in a UV lamp;
- if the color is not very saturated, you can apply a second thin layer of color and dry it in a lamp;
- You need to secure the work by applying the last layer - the finishing layer (top), dry it for 2 minutes in a lamp and admire the extended nails covered with gel polish until the next correction;
- removal of harmful dispersion - a sticky layer, particles of which can lead to allergies;
- The last stage will last a long time - this is regular nail care.
Important. To protect the new coating of extended nails with gel polish, it is recommended to wear gloves for the first two to three days while doing housework.
Nail extension with gel polish step by step. Nail extension technologies
There are two main materials used for extensions:
- Gel nail extensions.
- Acrylic nail extensions.
False nails are nothing more than a plastic plate, which is shaped to imitate a natural nail. The difference between acrylic and gel is the hardening process itself.
Acrylic polymerizes (i.e. turns into a solid polymer) by mixing the monomer and powder, while the gel has these two components in its composition, but is presented in liquid form and hardens only under ultraviolet rays. Each of the materials has both pros and cons.
Technologies do not stand still; these days, gels have become available with a fairly thick consistency that does not spread and at the same time does not harden instantly like acrylic.
Thanks to this, it will be easier for a beginner to work with gel. Also, acrylic is less transparent; they will not be able to decorate the nail with the so-called “aquarium”.
But it’s not without reason that many craftsmen prefer acrylic? Of course not! The clear lines and shapes that acrylic nails can have are very difficult to achieve with gel.
But the latter has undeniable advantages. The monomer used in the acrylic system has a pronounced odor - toxic and volatile, spreading throughout the room and beyond in seconds.
In this regard, in beauty salons, acrylic nail extensions are allowed only if there is a separate room equipped with a powerful hood. At home, especially if there are children in the house, this will also become a hindrance. The gel does not have a strong odor and is easier to work with.
Nail extension methods
Today, the two main methods of extension are most common - with tips and with forms. Moreover, the latter are used less and less and have not gone into oblivion only because of the ease of working with them.
Nail extension tips speed up the work process by half, but as a result, artificial nails lack the grace, variety and strength inherent in nail extensions. The forms also allow you to create an artificial nail on a natural plate by clamping the material with tweezers, but more on that later.
How to properly extend nails with gel
Extending nails using gel is not difficult; you can even do it at home.
- First, you need to give the nail the desired shape, this is done using nail scissors and a nail file, then it is advisable to remove the cuticle and polish the nails.
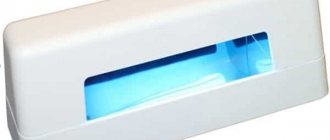
- Next, carefully apply the stencil and cover with gel, starting from half of the natural nail. In order for the gel to harden quickly, you need to use a special ultraviolet lamp.
- After the gel has completely dried, apply a second layer and leave for another 3-4 minutes.
- Now you need to remove the stencil and apply the gel again, preferably in the middle of the nail, from there it is easier to stretch it along its entire length.
- After the gel has dried, you need to give your nails the desired shape, then apply the very last thin layer of gel.
Yellowing on the nails after the lamp must be cleaned with a special product. The extension lasts approximately 2-3 hours, it is not advisable to wet your hands for at least an hour, otherwise the gel may peel off or the appearance of the nails will change.
When you're tired of everything
If the desire to change the design is great, then the process of removing gel polish will not scare you. It’s already been said above that you can’t remove it with acetone, or with a file, just to rip it off is even more barbaric. Is there anything else I can do to remove gel polish from extended nails?
A few recommendations on this issue:
- removal with remover. The solvents are gentle and contain vitamins and minerals. The method is fast, effective, safe;
- removal using a special device (milling cutter) with different attachments (cutters). In the experienced hands of a specialist, this is a quick, effective procedure. You can learn how to use a router at home and remove gel polish easily, without discomfort, saving on salon services;
- the third method is not very useful for nails. But if there is nothing else to remove the gel polish with, you can use alcohol diluted with water (1:1) or 100% vodka as a solvent. The exposure time should be increased to 20-30 minutes.
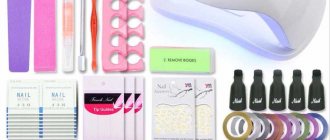
Instructions for strengthening nails
Strengthening with gel under gel polish is best done in nail salons. For those who decide to carry out the procedure themselves, it is important to strictly follow the instructions:
- Nails are pre-cleaned and degreased, and a primer is applied.
- Apply gel in 2 layers, drying each layer in a lamp.
- The material is applied to each finger separately and dried immediately.
- If necessary, adjust the shape with a file and a buff.
- Cover the nails alternately with a base layer, gel with pigment and top coat. After each layer, dry in a lamp.
At the end, treat the cuticle with oil and apply a nourishing cream to your hands.
Care and care
Some tips for caring for your nails after such procedures:
- nails made of fragile gel material cannot be used as a household tool;
- professionals recommend resting the nail plates and cuticles after removing the coating;
- You can strengthen and nourish your nails by applying a special fortified clear varnish;
- After removing gel polish, you cannot do without baths, wraps and masks, which contain vitamins, healthy acids and oils, and minerals.
Removing artificial material
Protective coatings can be removed using liquid solvents or mechanical sawing. To remove artificial materials, special solvents based on isopropyl alcohol have been developed. If you urgently need to remove the gel at home, you can use acetone. Cotton pads are soaked in solvent and applied to the nails. You can cover the top with food foil. After 15-20 minutes, the “caps” are removed from the nails. The loose material is carefully removed with an orange stick. After removal, it is advisable to moisturize and nourish the nails and cuticles with oil or cream.
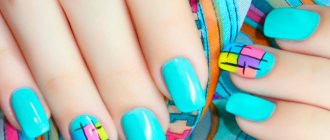
Fashion trends
And at the end - a surprise. Let's reveal the secret - what 2018 will bring to the world of beauty and nail design:
- shape of the year - almond, medium-length oval. The color of the year is beige, black, but not only. Example – painting, roses on a black oval;
- The delightful South Korean novelty stunned me - a manicure with a gold wire border is always in trend;
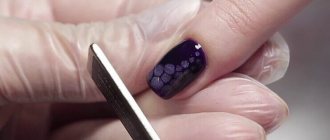
- “glass” manicure, reminiscent of broken glass (that’s what they call it) or the facets of a diamond;
- a fashionable matte manicure decorated with a glossy pattern, for example, a drop, a pea, a leaf, a strip, is at the peak of popularity this year;
- Chameleon polish is still in trend. This is a thermovarnish that constantly changes shades - depending on the temperature of the air, the hand, and the lighting. This opens up some fantastic options for playing with color;
- artistic painting of nails is now applied to the very edges of them, and the subject of painting can be flowers, hieroglyphs, geometric patterns;
- drawing on stone is a fashionable novelty. Agate, malachite, turquoise, onyx, magical drawings - who can resist here.
As they say, we only live once. This means that you want to experience and try everything. And our nails are another artist’s canvas.