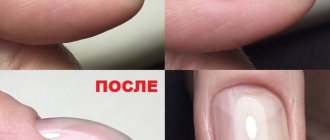
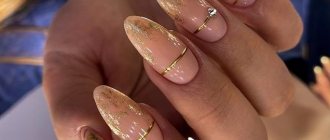
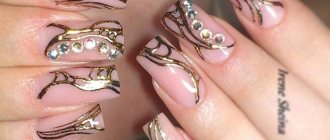
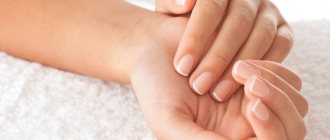
The ideal glare effect on the coating of natural nail plates is one of the main trends in modern nail design. Most nail artists post photos of their best work on social networks, because beautiful highlights are an absolute indicator of skill.
In essence, ideal highlights on gel polish are obtained by reflecting light rays from the smooth surface of the manicure. Also, the shape of the lamp will determine what kind of glare you get in the end. Under the rays of a straight-shaped light source there are straight highlights, and under the rays of a round lamp there are rounded highlights. To create perfect oval highlights with clear symmetry, use a round-shaped lamp and the lens of any photographic device located at the level of the light source.
Important! A perfect glossy surface is the key to how highlights will be made on gel polish. Therefore, after creating a manicure, there is no need to rush to remove the dispersion layer, since first a beautiful photo is taken. After all, after removing the dispersion, the glossy coating may fade a little.
For a good photograph, it is important to ensure that the highlights caught by the camera are evenly rounded. You should not take a photo if you were unable to achieve a perfectly smooth surface of the nail or if there are minor imperfections in the manicure. Because the camera is able to “expose” all existing errors and irregularities in the coating that are invisible under normal lighting.
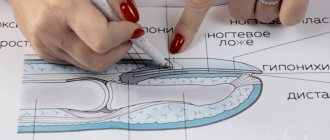
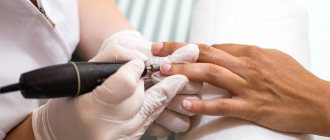
Before applying highlights on your nails with gel polish, it is important to first do a hardware manicure and properly level the surface of the nail.
Nail preparation
If old coating is present, it must be carefully removed with a nail polish remover that does not contain acetone. Since, being more gentle, it minimizes the damage caused to the nails and surrounding skin.
- To treat the cuticle, a special oil is used, which softens rough skin and allows you to gently remove it from the surface of the nails. If necessary, the excess cuticle layer is removed with nail clippers. It is important to ensure that no pterygium remains on the plate, otherwise rapid detachment of the material will occur in this area.
- A manicure file gives the required shape to the free edge of the nails. If the nail plates are subject to delamination, then it is necessary to trim the surface using a shaping file.
- Using a highly abrasive polishing file, the keratin layer is carefully removed from the surface. This is necessary so that the nails have high-quality adhesion to artificial materials. After sawing, the dust is brushed off with a soft brush.
- Using a fine buff, the surface is processed again, moving in the same direction as the file while filing. The dust is brushed off without touching the treated nails with your hands.
- The remaining dust in the cuticle area will be a serious obstacle to good adhesion of the nail to the coating, so it is important to degrease the surface of the plates before applying the primer.
Important! The operating time of the dehydrator is only 20 minutes; if you do not proceed to the next stage within this period, the degreaser is applied again.
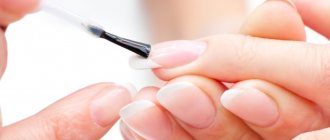
- Next, a low-acid or acid-free primer is applied to the nail. This product has a sticky layer, due to which it can be compared to double-sided tape, the main task of which is deep dehydrogenation of natural nails for better adhesion to the base layer.
How to make perfect highlights: option 1
Each of the methods is very similar to each other and has a common component due to which such strengthening is carried out. In this option, a base will be used, which is used together with gel polish, only its consistency should be liquid.
- A degreaser and primer are applied to prepared nails. Typically, an acid-free primer will leave a slight tacky layer.
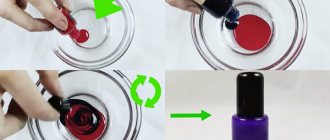
- Place a few drops of liquid base on the palette and add acrylic powder to it. The color of the powder can be used either transparent or camouflage. Both components are mixed, but you should not make the mixture very thick, because it will not be very convenient to work with. It needs to level out on its own and not stand in lumps.
- A thin layer of base gel is applied to the surface of the nail, sealing the ends, and dried in a lamp.
- To apply the resulting mixture, use a tweed brush. Take a small amount of this material and distribute it over the nail. The bulk should remain in the central part. The edges are coated lightly. There shouldn't be any volume there. The cuticle area is smoothed so that there are no steps or sagging there. There is also no need to apply too much material at the end. Everything at the tip should be neat and elegant. The cuticle area can be smoothed using slapping movements. The resulting result is dried in a lamp.
- With subsequent fingers, do everything in the same way.
- After drying, repeat the same thing.
- The next step is to apply a thin layer of clean base to finally smooth everything out.
Nail surface modeling
High-quality alignment of the nail plate before applying highlights of gel polish on the nails is the main task of this design, so that the gel polish lays evenly without spreading around the edges. A thick rubber-based gel base will best cope with this.
- A sufficient amount of gel is collected on the brush. Positioning it parallel to the nail, apply a drop of base slightly above the middle. Then, moving the brush in the opposite direction, the base is pushed towards the cuticle. When painting the end of the nail, the base layer is pulled towards the free edge with the utmost care.
Important! The base gel should not come into contact with the skin of your hands or cuticles. Otherwise, rapid delamination of the material in these places cannot be avoided.
- When creating the architecture of the nail, after applying the gel base layer, the hand is placed under a round lamp with a bright glow, so that the glare is reflected on the coating. If it is not entirely clear whether the required volume and thin perimeter of the layer have been achieved in the right places, the reflection of the light bulb on the coating is viewed through the phone screen. When moving the nails up and down, or left and right, the highlight should not be interrupted. If the surface is uneven, then add a little more base to the brush, which is collected at the highest point of the nail (apex). Having received a beautiful, uninterrupted highlight, the base layer is polymerized.
- The second base layer is applied in the center of the plate, without sealing the end, and then dried.
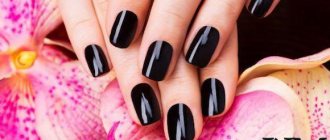
To make highlights on nails with gel polish as in beautiful photos, the material with the main color is applied only after the gel base has completely dried. The number of layers depends on the color and chosen coating. For example, a bright color when dyeing is applied in two layers, and for a dark palette of gel polishes it may be necessary to apply three layers. Polymerization of each color layer occurs sequentially.
A fixing layer of material applied to the correct nail architecture will create ideal highlights on the gel polish, both under a round light source and under a lamp of any other shape.
You can visually lengthen short fingers by photographing highlights along the growth of your fingers. When using a macro camera on your phone, the photos will come out of higher quality than those taken with a regular camera.
Leave in history: how to photograph nails with highlights
The design is ready. The highlights on gel polish are a sight to behold. It's time to capture the beauty for history. It's okay if you don't have a professional camera and studio lighting at home. Buying an expensive DSLR, flashes and reflectors for the sake of photographing hands is, of course, unnecessary. However, you will have to purchase something - a lamp.
The lamp for highlights on nails should be round. The light bulb in it is cool white. This could be, for example, an inexpensive TERTIAL lamp (IKEA) or any other dome lamp.
In addition to the round lamp, you will, of course, need a smartphone with a decent camera and, importantly, a matte surface for photography - this can be a table, paper or a piece of fabric. Here are instructions on how to photograph your nails so that the highlights are perfect.
- Do not wipe off the sticky layer from the topcoat. Dispersion will give more shine to the photo and emphasize the beauty of your highlights. You can wipe off the stickiness later.
- The lamp should be on the side, as close to the nails as possible, in front of the camera. Adjust its position so that the highlights sparkle.
- Line up the shot. Do not photograph your hands with your fingers completely straightened. Do not interlace your fingers like an octopus.
- Take a few shots. Make sure that the highlights in the frame are round and even. After the photo shoot, remove the dispersion.
Photo of nail polish coating
Even more photos at the link: Gel polish photo.
How to make perfect highlights: option 2
In this case, use a base with a denser consistency.
- Apply a thin layer of base of a dense consistency to the prepared nail, covering all parts of the nail. Do not push material under the cuticle. Sent to dry in a lamp.
- With the second layer, take a drop of the dense base and distribute it in the middle of the nail, and paint the sides with the material that remains on the brush. The tip of the brush begins to distribute the main drop. But the main part should remain in the middle of the nail. The drop size and volume must be adjusted independently. It depends on the length, curvature of the nail, and whether there are any unevenness on the nail plate. If the bend of the nail is large and directed downward, then you should not emphasize this with additional volume. If your nails are long, then a drop is needed over a larger area. The main thing is that all the material is smoothly distributed. All this is sent to dry in the lamp.
What are ideal highlights on nails? Alignment of the nail plate or perfect highlights
Did it work? Surely - not always and not for everyone.
Almost all claws have flaws, and the correct, evenly convex shape of the claw, to be honest, is very rare. Meanwhile, the Internet is full of photographs in which the surface of the nail shines elegantly, giving a neat round highlight. Masha Create talked about how to achieve a similar effect without resorting to Photoshop in her video blog. Today she is one of the most famous and talented masters of gel polish nail design, and her lessons are viewed with great pleasure by dozens of users every day.
the site, as usual, presents the lesson in the format of photo instructions with detailed comments, for those who find it easier to work with static pictures.
To work you will need:
- UV or LED lamp;
- Biogel (Masha uses Bio Stretch Gel);
- A comfortable flat soft synthetic brush with long rounded bristles (about the size of a little fingernail) or a clean gel polish brush.
- Colored biogel;
- Glossy top coat for biogel or gel polish;
- Cotton pads or lint-free wipes;
- A degreaser suitable for removing the sticky layer (as gentle as possible).
So, let's try to make the perfect highlight on the nails under the strict guidance of Masha
Step 1
We prepare our nails as if we were going to do regular gel polish. We remove the cuticle, buff the surface of the nail a little to remove shine, and thoroughly degrease everything. If the current design is done directly after the previous one, the nails do not need to be buffed. However, here you need to look at their condition. They shouldn't shine.
After degreasing, we begin to apply modeling material. It is not at all necessary to take biogel. Some masters level the nail directly with a gel polish base, others with a modeling gel. In the first case, you need to take a base that is as thick as possible in texture; nothing will work with a liquid one. In the second, you need to remember that the gel does not dissolve, it will have to be cut off, and this is not particularly useful for nails.
Biogel is ideal for such leveling. It is quite thick in texture, and also soluble, like ordinary gel polish. Very comfortably.
Step 1
We apply the first layer quite thinly, as a regular base. Biogel does not have the habit of flowing somewhere without asking, so you can cover all the nails with it, coming close to the cuticle, and only then send it to dry.
Dry the base layer until completely hardened, do not touch the sticky layer. It is according to this that the next, main level will be leveled.
Step 1-2
Step 2
Now we take a large drop of the same biogel on the brush (you can always remove or add excess) and place it close to the cuticle. We push the drop a little more so that it is as close to the skin as possible, and then stretch it towards the tip.
Step 2
It is very important not to press the brush on the material. It is enough to drag it due to surface tension, otherwise you can damage the sticky dispersion layer that is under it, and there will be no normal self-leveling.
The main part of the material should be concentrated in the middle of the nail. A simple technique will help you achieve an ideal result: you need to turn the almost finished nail over and place it with the pad up parallel to the ground. This time is just enough to carefully seal the tip.
Step 2-2
It is better to start drying in this position, and after half the allotted time has passed, you can turn your finger over and hold it normally.
By the way, it’s very convenient to do the same thing with a clean gel polish brush. It is best to store it in a bottle filled with a Nail Prep-type liquid, which is replaced when it gets dirty.
Step 2-3
When drying nails, a burning sensation may occur, especially if the material polymerizes under an LED lamp. The thing is that the biogel layer is quite thick, and when hardening occurs very quickly, heat is released. Usually you can easily endure it, but if you are completely uncomfortable, take out the claw, let it cool, and then dry it.
The polymerization time of biogel is the same as that of gel polish.
And now, all the fingers are perfectly aligned. Beauty, and that's all!
Step 2-4
Remove the sticky layer.
Step 3
Now you can cover your nails with gel polish or colored biogel. In this case, the base is not needed; the modeling material plays its role.
Just apply the color to the nail. Masha uses colored biogel. It doesn’t flow, lays down well, and you can safely paint all the claws, only then putting them under the lamp.
Step 3
Apply a second layer of material. It has a gorgeous rich color, so two levels is enough.
Step 3-2
Biogel on biogel is a guarantee of quality. When gel polish is applied to the biogel, there are usually no problems either, but this is a combined technology, and theoretically, something somewhere, with an extremely unfortunate arrangement of stars, will begin to peel off. At the same time, it is not at all necessary that the material is bad. Just conflicted. But if you do everything carefully, this happens extremely rarely.
Now here's an interesting point. Biogel may or may not shine. It depends on your luck. To accurately ensure a chic gloss, you can replace the standard biogel topcoat with a gel polish. But if you were repairing a nail (patching a crack, attaching a corner), then it is better to first apply a layer of biogel topcoat (it is strong), dry it, and add gloss on top with gel polish.
The ideal glare effect on the coating of natural nail plates is one of the main trends in modern nail design. Most nail artists post photos of their best work on social networks, because beautiful highlights are an absolute indicator of skill.
In essence, ideal highlights on gel polish are obtained by reflecting light rays from the smooth surface of the manicure. Also, the shape of the lamp will determine what kind of glare you get in the end. Under the rays of a straight-shaped light source there are straight highlights, and under the rays of a round lamp there are rounded highlights. To create perfect oval highlights with clear symmetry, use a round-shaped lamp and the lens of any photographic device located at the level of the light source.
Important! A perfect glossy surface is the key to how highlights will be made on gel polish. Therefore, after creating a manicure, there is no need to rush to remove the dispersion layer, since first a beautiful photo is taken. After all, after removing the dispersion, the glossy coating may fade a little.
For a good photograph, it is important to ensure that the highlights caught by the camera are evenly rounded. You should not take a photo if you were unable to achieve a perfectly smooth surface of the nail or if there are minor imperfections in the manicure. Because the camera is able to “expose” all existing errors and irregularities in the coating that are invisible under normal lighting.
Before applying highlights on your nails with gel polish, it is important to first do a hardware manicure and properly level the surface of the nail.
Nail preparation
If old coating is present, it must be carefully removed with a nail polish remover that does not contain acetone. Since, being more gentle, it minimizes the damage caused to the nails and surrounding skin.
To treat the cuticle, a special oil is used, which softens rough skin and allows you to gently remove it from the surface of the nails. If necessary, the excess cuticle layer is removed with nail clippers. It is important to ensure that no pterygium remains on the plate, otherwise rapid detachment of the material will occur in this area.
A manicure file gives the required shape to the free edge of the nails. If the nail plates are subject to delamination, then it is necessary to trim the surface using a shaping file.
Using a highly abrasive polishing file, the keratin layer is carefully removed from the surface. This is necessary so that the nails have high-quality adhesion to artificial materials. After sawing, the dust is brushed off with a soft brush.
Using a fine buff, the surface is processed again, moving in the same direction as the file while filing. The dust is brushed off without touching the treated nails with your hands.
The remaining dust in the cuticle area will be a serious obstacle to good adhesion of the nail to the coating, so it is important to degrease the surface of the plates before applying the primer.
Important! The operating time of the dehydrator is only 20 minutes; if you do not proceed to the next stage within this period, the degreaser is applied again.
Next, a low-acid or acid-free primer is applied to the nail. This product has a sticky layer, due to which it can be compared to double-sided tape, the main task of which is deep dehydrogenation of natural nails for better adhesion to the base layer.
Nail surface modeling
High-quality alignment of the nail plate before applying highlights of gel polish on the nails is the main task of this design, so that the gel polish lays evenly without spreading around the edges. A thick rubber-based gel base will best cope with this.
A sufficient amount of gel is collected on the brush. Positioning it parallel to the nail, apply a drop of base slightly above the middle. Then, moving the brush in the opposite direction, the base is pushed towards the cuticle. When painting the end of the nail, the base layer is pulled towards the free edge with the utmost care.
Important! The base gel should not come into contact with the skin of your hands or cuticles. Otherwise, rapid delamination of the material in these places cannot be avoided.
When creating the architecture of the nail, after applying the gel base layer, the hand is placed under a round lamp with a bright glow, so that the glare is reflected on the coating. If it is not entirely clear whether the required volume and thin perimeter of the layer have been achieved in the right places, the reflection of the light bulb on the coating is viewed through the phone screen. When moving the nails up and down, or left and right, the highlight should not be interrupted. If the surface is uneven, then add a little more base to the brush, which is collected at the highest point of the nail (apex). Having received a beautiful, uninterrupted highlight, the base layer is polymerized.
The second base layer is applied in the center of the plate, without sealing the end, and then dried.
To make highlights on nails with gel polish as in beautiful photos, the material with the main color is applied only after the gel base has completely dried. The number of layers depends on the color and chosen coating. For example, a bright color when dyeing is applied in two layers, and for a dark palette of gel polishes it may be necessary to apply three layers. Polymerization of each color layer occurs sequentially.
A fixing layer of material applied to the correct nail architecture will create ideal highlights on the gel polish, both under a round light source and under a lamp of any other shape.
You can visually lengthen short fingers by photographing highlights along the growth of your fingers. When using a macro camera on your phone, the photos will come out of higher quality than those taken with a regular camera.
Over the course of life, our nails acquire tubercles, pits, depressions, and stripes, which is why subsequently it is impossible to apply the varnish in a perfectly even layer. Applying many layers of gel polish still fails to achieve the desired result, but other people’s nails look perfect and shine like candy. There is simply one simple way to level the nail plate. So how is the nail plate leveled? I bring to your attention a photo tutorial on leveling the nail plate using a super thick base.
First, prepare your nails as you would before painting.
In the most usual way for you: we file, buff, that is, we do a manicure.
It can be a classic edged manicure, or a machine manicure, or maybe you like European - it doesn’t matter.
Then apply the primer. The primer air dries in about half a minute. There is no need to put your hands into the lamp. As soon as you see that your nails have turned whitish, the primer has dried and you can proceed to the next step.
The next step is to take a thick base. If it is super thick, it will be even better. I have a base from RIO. ATTENTION! The base should be thick!!! If the base is liquid, then nothing will work, since it will flow under the cuticle.
Apply a very thin layer to the entire nail plate.
This is done so that the next layer of base spreads well over the surface of the nail.
Then we put more base on the brush and apply or even put drops and stretch them in the middle of the nail.
Do not smear it over the entire nail plate, but only in a stripe in the middle of the nail!
Turn your hand palm down and hold it for about a minute.
In the photo it seems as if the hand is lying on the table, but this is not so. Hand on the air.
I have been using CND top and base for a long time. But after the jump in the dollar, CND materials became very expensive and I began to look for more budget options so as not to raise prices for clients, but at the same time I wanted the material to be of high quality. Kodi Professional has been on the nail industry market for more than 10 years and has proven itself well. Kodi Professional is produced in Ukraine, so during the period of political conflict it was difficult for us to buy these materials for some time, but supplies quickly improved and this pleased us.
Kodi Rubber Base is called rubber for a reason; after polymerization, it remains elastic and soft on the nail, which allows the coating to adhere better without cracking. On the one hand, it is elastic and soft, but on the other hand, it makes the nails quite dense and strong, and my clients, even with fragile, breaking and peeling nails, grow long nails with it.
The consistency of the base is thick, it is very convenient for leveling the nail plate and creating perfect highlights on the nails. The base has a specific synthetic smell only when you smell it in the jar; during use you don’t notice any smell. The base brush is quite convenient, but it is only available in 12 ml bottles. If you buy a bottle of 14 ml or 30 ml, then it already comes without a brush. In this case, I use a gel nail modeling brush to apply this base, like this one:
I didn’t see any difference between the volumes of 12.14 and 30 ml, except for the absence of a brush. So you can safely buy any, but 30 ml is the most profitable financially.
The jar of this base is black with a screw cap, the base is thick and transparent.
The photo below shows a 30ml bottle
For better wear, I apply a primer under it to the tip and end of the nail, respectively, this is done on a previously degreased nail.
I will tell you in more detail the technology for applying this base in order to get the ideal shape of the nail or, to put it in professional language, “how to level the nail plate with a rubber base” and create “ideal” highlights on the nails:
1. We prepare the nail: we cut out the free edge of the desired length and shape, treat the nail bed with a buff, then I do a dry combined manicure using a machine and scissors
2. Then I apply the degreaser to the nail plate, let it dry - this is literally 10 seconds
5. Next, on each finger separately I apply a thicker layer of base, so that there is more in the middle of the base, less at the edges, and turn the nail down. I make sure that everything is even and when the gel polish is distributed, I turn it over and place it in the lamp for another 30 seconds. I cover all my nails this way.
7.After color and design, I fix everything with a top coat and dry for another 60 seconds
8. Remove the sticky layer
9. Treat with cuticle oil
This technology allows me to both strengthen the nail and even out the nail bed. Thanks to this application, the nails are dense and strong, which means you can walk with them for quite a long time without breaking or cracking.
At the moment this base is my favorite, I sometimes combine it with other tops (not Kodi) and still everything holds up and wears great.
Coating nails with gel polish (shellac) is by far the most popular procedure. The reason for its popularity is that you can wear this manicure and coating for 2-3 weeks.
At the same time, the nails look good and do not bother their owner. Well and correctly applied material does not chip or peel off. The color of the coating remains until the next manicure. But there is no limit to perfection! Therefore, manicurists now not only simply apply shellac to their nails, but also try to align the nail plate so that, with the right lighting, they can see the perfect highlights on the nails
!
In the process of coating nails with gel polish (shellac), the nails can be smoothed using base or finishing gels. As a rule, there is such a need when the client comes for gel polish coating. The master removed the old material, but not completely. And for the coating to look good, the nail must be made even.
During the nail leveling procedure, the gel is applied to each finger separately. So, apply a base layer of gel polish to the prepared nail, as close to the cuticle as possible. They also seal the end of the nail. Then you need to take your finger, turn it away from you to the side, and place it under the lamp so that the highlight is visible on the nail. The highlight looks like an even light stripe. If you twist your finger a little, you can see how it moves along the nail. And if the nail is smooth, then the stripe will also be smooth. If the highlight stripe gives a curvature, then there is an unevenness in this place. This is where you need to put a drop of gel and let it spread a little. After that, look at the nail again, make sure that it is smooth and send it to dry in the lamp. So you will need to look at all the nails.
Next, a colored coating is applied to the nails, also as close to the cuticle as possible, and the edge is painted over. Then the nails are covered with finishing gel. To ensure perfectly smooth nails, the gel finish must be applied in the same way as the base gel. In this case, you get nails with perfect highlights.
.
How to take a photo of nails with perfect highlights?
You always want to take a picture of your finished beautiful nails and thereby demonstrate your skills. To get a great nail photo
, you need to position your hand correctly. To get the perfect highlights, place your hand on the back of the hand, on a plain dark surface, or as shown in the photo. For a plain surface, you can buy a sheet of colored Whatman paper. Then the Tertial table lamp is brought very close to the nails. So that those same highlights are visible. You need to move your fingers so that the glare lies evenly on them and only then remove it. Everything may not work out smoothly right away, but over time everything will work out well!
Precaution
When sanding your nails, be careful not to sand off too much. Otherwise, when drying the biogel under a lamp, you will experience hellish pain from heating the material and increased sensitivity of the exposed nail bed.
In general, in professional stores, a sales consultant will always ask what experience you have in working with similar materials. And if you are a beginner, most likely, he will offer softer products and explain how to use. Therefore, look for such a store and do not refuse a free consultation before purchasing. It’s better to find out once again than to walk around with sore nails for a week and a half. Still, the bed area has many nerve endings. This is a very sensitive place. It’s not for nothing that during torture, needles were driven into these very places, knocking out the necessary information from spies during the Second World War. Don't torture yourself because of some glare. It's not worth it.
In general, if you are not very competent in working with the listed materials, use regular varnishes. Keep simple instructions for use:
So, clean your nails of cuticle growths and everything around it. Take a multi-sided file and sand your nails with the softest side, without large abrasive particles. If you have smooth plates, you don't need to grind anything. They usually treat vertical stripes on the nails, which make the plates uneven. Sometimes heterogeneity is caused by dissection of areas or old injuries.
After sanding your nails, apply any high-quality colored polish that dries quickly. Repeat layer.
Will there be gloss?
Now about the gloss. It should appear on your nails if you did everything correctly, dried it completely, took all the pauses, and did not rush when applying the materials. If there is no glossy effect, but, on the contrary, everything is very matte, perhaps you wiped your nails on your T-shirt, accidentally, without even noticing. Or there is a lot of dust, wool and other microscopic particles flying around the apartment, which have landed in the materials on the nails that have not yet dried. That is why it is worth repeating that you need to be able to work with biogels and gel polishes and gain experience. All the first pancakes may come out lumpy for you.
The same applies to ultraviolet lamps. Professional equipment quickly copes with the task. But all this cheap Chinese junk sometimes only serves as a beautiful blue lamp, but it does not dry out the biogel at all. And the situation is the same with biogels. Very cheap biogels, even under the ultraviolet light of professional lamps, may not harden or, on the contrary, begin to dry out instantly after application, when you do not have time to stretch it over the nail. At least some kind of competence is needed here. It’s one thing to buy one biogel, and another thing when several materials and devices are involved in a manicure.