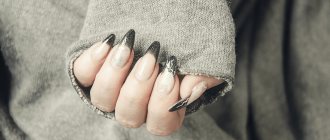
The idea of long, beautiful and well-groomed nails has been of interest to many girls for a long time. Fortunately, the modern beauty industry can provide a huge number of options to choose from for every representative of the fair sex. Some people stick to a regular manicure, while others choose acrylic or gel systems, while others are accustomed to using gel polishes. But it is worth remembering that almost each of the above methods will lead to the fact that the nail plate will change and become thinner. Therefore, many girls today prefer such a concept as biogel. The fact is that the system of its use is quite simple, and the effect is possible for a long time. If you understand the work using this system, then if you have certain materials, you can achieve the desired result yourself at home.
What is Biogel?
Many girls and women are faced with this issue because they do not distinguish it from regular gel polish or the shellac system. The substance will be a soft and plastic form, which in appearance and consistency is very similar to nail polish. Its main element will be the resin of the tix tree, which grows in South Africa. Its difference from its analogues is that it contains calcium, which easily strengthens nails, as well as protein. A separate advantage is that through such a system the nails will continue to “breathe”, so their modification will not be observed.
Many women choose this option because it allows them to strengthen their natural nail from the outside, create a wide variety of designs on it, and restore the nail plate. Its use will be considered relevant after acrylic has been on the nails for a long time. It has absolutely opposite qualities, and in most cases can severely injure and modify the nail. This will not happen with biogel.
The advantage is that this system has a fairly wide palette of colors and shades, thanks to which you can create the most interesting design options that correspond to modern fashion trends.
However, in order to save on its application, you need to know what exactly is needed to cover it with biogel, what tools are needed for this, and how the procedure itself is carried out. But first of all, it is necessary to consider the pros and cons of this option for strengthening nails in order to understand whether it is suitable or not.
Ideas for manicure with biogel coating
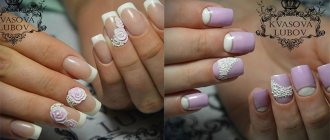
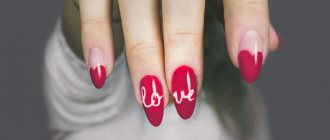
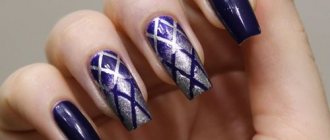
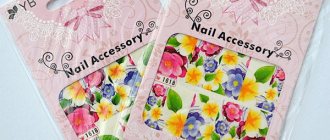
Strengthening nails with gel can be successfully combined with various types of designs. The easiest way to make a manicure is with a single-color coating that is easy to apply. The abundance of colors will make even a simple design very attractive. An alternative option could be a classic French jacket. Ideas for a light and gentle manicure are presented in the photo.
To not just strengthen your nails, but to make them a standard of beauty, try decorating them with glitter and rhinestones. A manicure with biogel can be painted with a variety of patterns and designs. The luxurious design, presented in various variations in the photo, will certainly please you.
Now you know that strengthening your nails can be a pleasant and beautiful procedure. Having chosen the design you like in the photo or come up with something of your own, all you have to do is be patient. After all, working with biogel requires special perseverance, as evidenced by the following video lesson. In the video, manicurist Victoria will talk about the intricacies of the procedure. The video will help you systematize the knowledge you have acquired and put it into practice. Enjoy watching, dear girls!
Benefits of using biogel
Each girl can highlight for herself the individual pros and cons of this system. It all depends on what kind of nails, what their length is, what problems the nail plates may have, and what effect you want to get in the end.
Many of the advantages of using biogels include:
- Duration of use of the system. Typically, the applied substance or the design that was created with it will last up to a month. It all depends on how quickly the natural nail grows and what shade it is. There are cases when this period may increase or decrease, based on the personal characteristics of the body.
- Preservation of the naturalness of the nail plate, its length and shape. The fact is that biogel is applied to your nail, simply making it smoother, more beautiful and original. It will look natural on your nails, so no one will question whether your nails are your own or extensions.
- The procedure will not take too much time, and it can be done almost any day of the week. A separate advantage is that having purchased the necessary products for applying biogel, you can carry out the procedure even at home, while watching your favorite series or TV show.
- The material is hypoallergenic. The fact is that it contains natural substances that will easily strengthen the nail.
- Possibility of changing your nail plate. With this substance you can create long beautiful nails that are quite soft to confirm the naturalness. This can be called a kind of extension option.
- The system is non-toxic and harmless, so quite often it is used even by expectant mothers and those women who breastfeed their children.
- Unlike other systems, in this one there is no need to take a “break” in order for the nails to recover. Ecogel does not affect the nail plate as seriously as acrylic, so it can be used for quite a long time.
Biogel: features and benefits
As mentioned above, biosculpting gel is characterized by a low content of harmful components, as well as the presence of protein in its composition, which provides care and restoration of nails. In addition, the list of substances that have a positive effect on the structure of the nail includes tree resin, calcium and some groups of vitamins.
The gel is a soft and, as a rule, colorless mass, characterized by special plasticity. Using this material, you can model the shape of the nail, as well as cover the deformation.
The main achievements of the technique of coating nails with biogel include:
- Emphasis on natural ingredients (wood resin, which strengthens the nail plate and prevents its damage; protein, which nourishes the nail and restores its natural structure; vitamins A and E, which supply nails with nutrients and have a positive effect on their growth; calcium, which makes nails stronger and elastic);
- “Breathing” of the plate under the gel layer. Despite the fact that the mass flows into natural pits located over the entire surface of the nail, air circulation does not stop and the nail continues to receive oxygen;
- There are no contraindications to this cosmetic service. Biogel nail extensions are allowed even for pregnant and lactating women. It has been proven that the gel does not cause allergic reactions and does not aggravate existing problems. In addition, especially sensitive people can easily undergo the procedure, since the product does not have an unpleasant odor;
- Long lasting results. The wearing time of the coating can be up to a month. And there is no need for a long rest, like after acrylic. But we must not forget that to maintain the effect, timely correction of the biogel must be carried out (approximately once every 3 weeks);
- Possibility of partial coverage during correction. To cover the overgrown part of the nail, it is enough to apply the gel only to it, without cutting off the rest of the material. It will be almost impossible to notice and distinguish these manipulations from complete coverage;
- Application time. Unlike acrylic, which takes hours to cover nails, biogel extensions take no more than an hour. And the process itself is similar to painting with regular varnish, which does not create unnecessary discomfort and does not require special skills.
The positive aspects of decorating nails with biogel are visible to the naked eye. The only drawback of this whole procedure is the instability of the gel in relation to chemical solutions, for example, acetone, cleaning products, and alcohol.
Disadvantages of environmental gel
Of course, like any other system, this one cannot exist without flaws. They may differ for each girl, depending on the physiology of the nails themselves. Most often it is noted that:
- After a week, chips appear at the ends of the nails, which makes the manicure not as beautiful as it was originally.
- It is impossible to achieve the same strength as when using a gel or acrylic system. In this case, the nails can bend and change, which will undoubtedly affect the strength and hold of the gel on the nails. Cracks and dents may appear.
- The cost of applying such a coating will also be an order of magnitude higher. If you compare it with regular varnish, shellac, acrylic or gel systems.
- Strengthening the nail plate will only occur from the outside. If you remove the biogel, the nail will be as thin as it was originally.
- It is worth remembering that like any other system, this one will be removed from the surface of the nail. The strength of the plate, its thickness, as well as the absence of various types of damage will depend on how delicately the procedure is carried out.
From the above, we can conclude that the biogel system will be ideal for those girls who prefer naturalness and naturalness in their image, but are not averse to strengthening their nails with the help of new products in cosmetology. It is perfect for those who like their nails to be not too long, because in this case the natural length will manifest itself in the best possible way. As practice has shown, when using ecogel, most girls prefer a plain coating, without a large number of patterns or spraying.
Photo gallery of biogel nail designs
Nails extended with biogel are practically indistinguishable from natural tips. The maximum naturalness and laconicism of such a manicure will appeal to many girls. Neat nails of moderate length can be decorated with any design, showing your individuality. Giving preference to natural shades and discreet delicate compositions, you will only emphasize the exquisite beauty of women's fingers. Our small photo gallery will be a source of inspiration and encouragement for you.
Traditionally, our article ends with another video lesson on how to use biogel not only to build up, but also to repair a broken nail. In an effort to improve your appearance, do not forget about your health. Remember, the true beauty of a woman is in her naturalness!
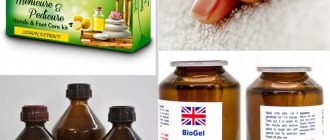
What will you need to create your own design using biogel?
As practice has shown, the materials with which the design will be created cost a lot. But if you constantly use the system, it will pay for itself after 8-9 uses. This means that in the next four months its purchase will fully justify itself and there will be no need to visit expensive beauty salons.
In order to carry out work on applying ecogel, you must purchase:
- Disinfector.
- Dehydrator.
- Acid or acid-free primer.
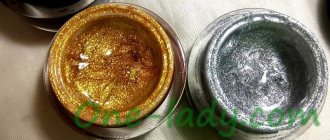
- One or more gel options.
- Finish coating.
- Ultraviolet lamp or LED lamp.
- Special lint-free wipes.
- Files for natural nails and buffers, the abrasiveness of which ranges from 180 to 240 grit.
How is the ecogel application carried out?
- Initially, you need to carry out a standard manicure. File your nails to the desired length, give them the desired shape, push back or remove the cuticle. In this place, the cutting of the free edge of the nail itself will play an important role. Once you have the required length and shape, it is important to use a glass file to run several times along the edge of the nail in one direction. This will make it possible to completely remove scales, which can later raise the biogel system.
- It is necessary to carry out complete disinfection of hands. Here you can use a special drug that was purchased in advance. Less commonly used are tinctures using alcohol that were made at home. But they are best suited if you want to save money and not go to an expensive salon.
- It is necessary to remove the “gloss” from the nail plate. To do this, use a file for natural nails or a buff. There is a cut in the form of a herringbone on both sides of the nail. The main task is not to grind down the thickness of the nail plate, but to remove the fatty layer, which can interfere with the normal adhesion of the material to the nail. Next, you need to use a brush to brush away any remaining dust from the nail plate so that there are no protrusions and pimples after applying the system.
- Degrease the nail. This is achieved using a special lint-free cloth on which a degreaser is applied. Next you will apply the dehydrator to the nail. This will help remove moisture from the plate and prepare it for primer application.
- The primer, which can be acidic or gentle, is aimed at ensuring the highest quality adhesion of the nail to the gel. This will help extend the life of the ecogel several times and not worry about peeling or chipping at the most important moment.
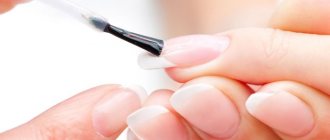
- Direct coating of nails with biogel. It will be worn from the tip of the nail to the cuticle. That is, there will be a constant overlay of one layer on another. If desired, you can make a little rubbing movements, which will allow you to better “adhere” to the nail. After the material has been applied, it is necessary to repaint the free tip of the nail, also called the end. This approach will help keep the gel on your nails for a longer time. After coating, place your hand under a lamp for two minutes to dry.
- Second layer of biogel application. It will help make the color more even and avoid visible recesses or unevenness on the nails. Can make the shade of the varnish more saturated. The marigolds will again be immersed in ultraviolet rays for two minutes.
- Finish coating must be applied. It is also used along the entire length of the nail, sealed at the end. It is very important here not to miss a single millimeter or strip, since it will stand out strongly after drying. The coating will make the nail smooth and beautiful, giving it gloss and shine. Additionally, it prevents the appearance of spots and potholes on the plate itself.
- It is necessary to remove the dispersive or sticky layer using a lint-free cloth, onto which nail polish remover without acetone will be applied.
This procedure may initially seem quite complicated, but the photo and video tutorials that are now available on the Internet will help you understand this process in a few minutes. Therefore, many girls combine the process with regular relaxation at home, and do not incur additional costs for a manicure.
Strengthening nails with shellac gel. Strengthening nails with gel. Instructions
Strengthening nails under gel polish using gel can be done with a single-phase or three-phase agent. If the product is single-phase, then only this gel is applied to the prepared nail plates; if it is three-phase, then three different products are used: base, constructor and finish.
Experts also pay attention to other necessary conditions:
- In order for the gel coating to last longer, it is not recommended to use any moisturizer on the skin of the hands before the procedure;
- if a bath was made before processing the plates, then it is better to carry out the strengthening procedure the next day;
- An additional product – a rubber base – will help achieve a perfectly flat surface;
- To avoid chips and cracks, at each stage of strengthening it is necessary to carefully seal the end of the marigold.
The most important thing is that for the result to be pleasing to the eye, and for the manicure to last at least 3 weeks, you should complete the following three mandatory steps.
Step 1: base
Base is a transparent material from which the strengthening procedure begins. Apply the product with a thick synthetic brush in a thin layer. Dry the base in a lamp, the exposure time is from 30 s to 1 min (this depends on the quality of the lamps used and the manufacturer of the material).
If a single-phase product is used, then the gel is also applied in a thin layer and dried in a lamp.
Step 2: Base Layer
When the base has dried, they begin to work with the main layer, it is also called construction or sculpture. Since strengthening does not involve the process of changing the shape and length of the nail, the product is applied quite densely, but not in a greasy layer.
Instructions for strengthening nails with gel under gel polish in photo
In this case, the gel should not be attached to the cuticle and side ridges, which can subsequently lead to peeling and chipping of the material. If the product does get on areas close to the nail, it should be removed with a cotton swab dipped in a degreaser. Drying the sculpture layer in a lamp.
Step 3: Finish
Top Coat is the last, final layer. Before applying it, you need to make sure that the previous layers lay flat; if this is not the case, then you should make a sawdust of the unevenly distributed material with a soft buffer. The finish is applied with the same dense synthetic brush and polymerized in a lamp. The final touch is to remove the sticky layer (if there is one) with a special napkin.
The procedure is completed by applying gel polish or other coating. When choosing gel polish, do not forget about the top coat, which will allow the product to last much longer.
How to remove Biogel correctly?
If an acrylic system was used, it is usually not removed, but simply adjusted. In biogel, it will be necessary to completely remove the layer before applying a new coating. This is both a plus and a minus of the system. The fact is that removing and covering will take more time than correcting. However, the gel on your nails will be “fresh” and will last perfectly.
To remove from nails, you need a little:
- Make a light cut of the surface of the nail on which ecogel is applied.
- Apply a small amount of remover to the cotton wool, place it on the nail, and make a cap from foil. This will help avoid drying out or leakage of liquid; it will fully affect the applied gel.
- When 10 or 15 minutes have passed, you can use a pusher or an orange stick to remove material that is noticeably soggy. As a result, it is once again advisable to apply a buff over the surface of the nail, which will completely polish it and help remove any remaining gel.
How to cover nails with biogel at home step by step
Before you start applying biogel to your nails, they should be prepared. To do this you need:
- remove old varnish;
- move the cuticle away from the nail plate;
- eliminate all dirt under the nails;
- shape the free edge of the nail;
- smooth the surface of the nail plate with a nail file;
- Polish your nails with polishing paper or cloth.
It should be noted that you cannot do a trimmed manicure immediately before applying the gel. If there is a need for it, then it should be done 24-36 hours before the procedure for strengthening nails with biogel.
- After you have prepared your nails, apply one layer of clear gel to them using a brush. It needs to be given a few minutes to harden. If you want to do a colored manicure, then apply a layer of colored biogel on top, wait a couple more minutes and apply another layer. If you don't want to use colored gel, simply apply another coat of clear gel to your nails after the first one has dried.
- As soon as each finger is processed, you should put foil caps on them. This will help the gel absorb faster and give it the desired shape when drying.
- It should be noted that the second layer of gel takes much longer to dry than the first. Therefore, if you do not have a UV lamp, try not to do anything with your hands for the first 30-40 minutes so that the gel sets well. Well, if you have a UV lamp, then dry your nails in it (this will take 3-4 minutes), after which you can safely begin your household duties.
Fashion trends in manicure and pedicure
Stiletto nails design photo
Manicure by zodiac sign: Aries, Leo, Sagittarius. Photo ideas
5 Instagram nail design masters: interesting works
Pedicure at home video step by step for beginners
Important!
Correct removal of biogel is very important. The fact is that different compositions from different companies can be filmed differently. Some will require additional sanding, while others can be removed immediately with a remover. But it is worth remembering that in any of the options you cannot strongly influence the nail plate during removal. In particular, this will apply to the pusher. Scratching the nail plate and any damage is unacceptable, because in the end this will play a cruel joke on a girl who wants to get a manicure in the future. The nail may become thinner, noticeable damage will remain for a long time, the nail will not look beautiful and impressive, like a healthy one, on which a beautiful pattern has been applied. Therefore, in this case, it is better to sit with the remover on your nails a little longer than to damage the nail with a metal plate that can quickly remove the gel.
- Author: Author: Alena
Rate this article:
- 5
- 4
- 3
- 2
- 1
(0 votes, average: 0 out of 5)
Share with your friends!