Posted date: July 12, 2017
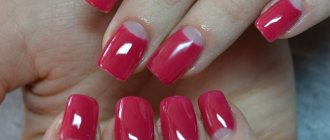
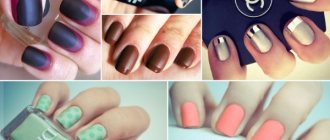
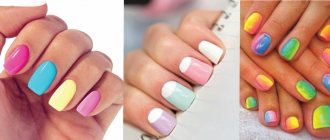
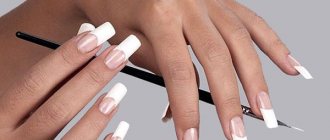
Sugar manicure confidently takes a leading position in nail art and is becoming a favorite of modern fashionistas. Ideal for creating solid colors, gradients or three-dimensional designs. With this material, a sea of ideas and opportunities to express yourself opens up.
From the very beginning, “sugar effect” manicures were done using ordinary sugar particles. But this material turned out to be not universal, because the sugar grains are too large, and besides, the manicure does not last long due to the fact that the sugar melts quickly - it dissolves the first time you wash your hands.
However, manufacturers of materials for nail services were not long in coming; they offered the masters a special powder called melange, which allows them to create the effect of sugar on nails. It is suitable for both gel coating and regular varnish.
The special composition of the powder resembles colored dust. It is applied to wet gel paint or colored polish, creating an incredible marmalade manicure. Small grains of sand lie smoothly and quickly on the nail plate and suit any look.
Velvet sand (melange powder) can be found in any specialty store or ordered online. The grains of sand have a beautiful shimmer, so the sugar manicure turns out amazing and easy to do.
Benefits of sugar manicure
Girls and women around the world increasingly prefer this type of manicure because:
- in this design, nails look stylish and attract the attention of others;
- Using this technique, you can cover all your nails, or you can only cover individual parts of them, which will make the design even more original;
- the procedure does not take long and can be easily performed at home;
- the material used in the work is quite durable: it will stick to the nails when doing household chores and frequent contact with water;
- If you don’t do a sugar manicure yourself, but go to a professional, it can last about three weeks.
Cons of sugar manicure
Fortunately, there are fewer disadvantages of sugar nail art:
- If you turn to a beauty salon for help, the new product is expensive.
- A manicure with sand requires scrupulousness; negligence leads to the material falling off within a few days.
- To maximize the period of wearing decorative elements, you need to wear rubber gloves on your hands when doing household chores.
Sugar candies
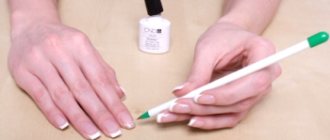
Nowadays, many products have appeared on the nail design market, thanks to which you can achieve the effect of sugar on your nails. You can choose any colors: plain, neon or melange.
You can create a sweet surface using acrylic powder with small glitter.
- Each nail needs to be covered with a base, two layers of colored varnish and polymerized in a lamp.
- Apply a thin layer of top.
- Immediately, gently sprinkle acrylic dust using a pusher over the entire surface of the nail.
- Dry in a lamp and remove all excess with a brush.
To prevent excess powder from spilling, it is recommended to hold the nail over the jar and sprinkle glitter on top.
Performing sand nail art
You can do this manicure in several ways:
- Using powder. In this option, painted nails are dipped into a container with special sand or sprinkled on top. The powder has several types, differing from each other in the size of the grains: very small ones give the nails the appearance of velor, and large ones look like granulated sugar.
- Using sugar varnish, otherwise called liquid sand. This coating is somewhat thicker than regular varnish and is very convenient to apply, since liquid sand does not tend to creep onto the cuticle. The manicure will look especially impressive if the coating contains glitter or shimmer.
Instructions for completing will vary depending on what materials you prefer to use and what result you want to achieve. Below are just a few design variations.
Manicure with regular polishes
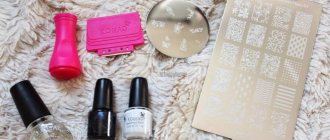
For this nail art you will need:
- base coat;
- colored varnish;
- velvet sand for nails;
- brush to remove excess;
- fixative
The design is carried out as follows:
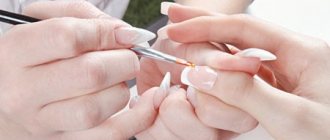
- Prepare the nail plate: remove the remnants of the old coating, push back or remove the cuticle, correct the shape of the nail, sand and degrease it.
- Apply a transparent base - it will even out the structure of the nail plate, protect it from the negative effects of colored varnish and greatly simplify the removal procedure in the future. Wait for the base to dry completely.
- Paint your nails with colored polish. The shade can be absolutely any, but it is better to choose it so that the base is in harmony with the powder.
- Without waiting for the color to dry, generously sprinkle sand on the nails you want to decorate.
- Wait at least 10-15 minutes for the coating to dry thoroughly.
- Use a stiff manicure brush to sweep away excess powder from your nails and, if necessary, give the pattern the desired shape.
- Cover the finished design with a fixative and dry completely.
Manicure using acrylic paints
This technology will be useful for girls who can draw. To do this manicure, you need to stock up on:
- base coat;
- colored base varnish;
- acrylic paint (preferably white);
- thin brush for painting;
- velvet sand;
- manicure brush;
- fixer.
The technique is very similar to that described above:
- Prepare the nail plate properly.
- Cover your nails with base and dry it.
- Apply the colored backing and wait until it dries completely.
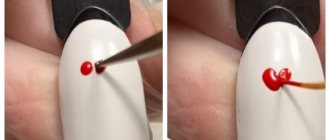
- Using a thin brush, draw a pattern on the nail. It is advisable to use white acrylic paint - professionals say that it is less demanding and absorbs color better than others.
- Apply powder liberally to the design. This must be done promptly, since acrylic dries faster than regular varnish.
- When the pattern is completely dry, carefully brush off excess sand with a manicure brush.
- Cover your nails with a sealer and dry thoroughly.
Sand manicure with gel polish
This design option will last much longer than one made with conventional varnishes, and it is no more difficult to make. You will need the following materials:
- buff;
- base;
- colored gel polish as a base;
- polymerization lamp;
- orange stick;
- nail powder;
- top coating.
- Get a hygienic manicure and correct the shape of your nails. If you prefer to steam your hands in a bath before removing cuticles, do this a day before applying the coating - otherwise your nails will release moisture and the shellac will not last long on them.
- Treat the nail plates with a buff and degrease with a dehydrator.
- Apply a thin layer of base coat and set to dry. The duration of exposure depends on the type and power of the lamp.
- Paint your nails with one or more coats of color. Without drying the last layer of color, carefully spread the sand over its surface, pressing lightly with an orange stick if necessary. After this, dry the nails in a lamp.
- Cover the manicure with top coat and dry it. If your top has a sticky layer, wipe it down with a dehydrator and enjoy the finished design.
Beautiful manicure
If you love and know how to create patterns on your nails, you can mix velvet sand with gel polish and use a thin brush to create designs with this mixture. In this case, after applying the colored base, you will need to dry it in a lamp, and then draw the desired pattern on the nails. The design is also polymerized in a lamp and covered with a layer of topcoat.
There are countless variations of sand manicure - it all depends on your imagination and skill. With a little experience, you will be able to create real masterpieces on your nails .
Sugar manicure with gel polish
This design looks better on extended nails or gel polish. It is in these cases that you can create not just a marmalade coating, but also make various designs and patterns that imitate a sugar coating.
Step-by-step instructions for performing the sugar effect on nails:
- The first thing you need to do is perform a standard manicure procedure, give your nails a shape, use a buff to remove the gloss, degrease your nails and apply bonding agent to them.
- Next, the nail plate needs to be covered with a base and sent to the lamp. After this, you need to apply gel polish of the main color to your nails in two layers, polymerizing each of them in a lamp.
- Melange powder is applied to the residual stickiness of the varnish using a pusher or brush. It is best to do this procedure over a jar of material, this way you will save decorative rubbing.
- After this, you need to pour a little finish onto the foil (this is done so that the powder does not get into the bottle along with the brush) and cover your nails with it using a brush from the old bottle. The nails are put into a lamp and dried longer than usual.
- To make a sugar manicure with gel polish look more natural and believable, after drying the nails are covered with a second layer of top coat. Without drying it, the nail plate is re-sprinkled with melange and sent to dry. Finally, remove the residue using a fan brush and rub in any protruding particles using a stiff brush.
How to remove sand varnish
Removing a coating that contains acrylic powder is much more difficult than regular varnish with abrasive particles. To remove it, you will need a manicure machine with cutters that will remove the top, hardened layer of acrylic powder.
In other cases, a special shellac remover will do the job. You will need foil, cotton pads and a little patience. Soak a small piece of cotton pad in the product, place it on the plate and wrap it in foil. You need to sit with this compress for more than 10 minutes for the material to completely move away from the natural nail. Then proceed to removal - remove the remaining material with an orange stick or pusher.
How to remove gel polish? EASY) Revealing secrets!
Sand effect varnish
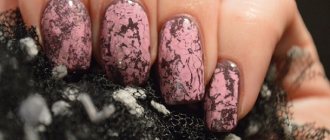
A pleasant novelty in the world of manicure is sand nail polish. Sugar-effect varnishes contain small particles (often silicone grains of different sizes). They are the ones who create the effect of a rough surface on the nail plate. In addition, small sparkles are often included in the composition, thanks to which the manicure is obtained with a gentle shimmer.
Using this varnish is as easy as using varnish for a regular glossy manicure. Additionally, you will need a base for the varnish - the first thing to do is apply it to the nails. After this, shake the bottle of sugar polish so that the grains of sand are evenly distributed throughout the jar, and only then apply the polish to the nail plate.
To make your manicure look richer and more textured, apply sand polish in two layers. And in order to slightly smooth out the rough surface and further secure the manicure, the nails can be coated with a fixative varnish.
Sugar manicure allows you to create a unique structure on your nails, and the design looks bold and attractive. In this case, decorative sand can not be applied to the entire surface of the nail. The patterns covered with sand look stunning.
Sugar manicure at home
There are several techniques for applying manicure, it is better to familiarize yourself with each and then choose the most suitable option. The first way is as follows:
- Do a regular trimmed manicure, be sure to steam your hands in a warm herbal bath, push back and trim the cuticles, use a nail file to give them a better shape, and dry each nail plate well with a towel.
- Apply a protective base to your nails.
- Now scoop up a small amount of colored dye and make a couple of strokes on each nail. Most often, calm pastel colors are chosen - sand, beige, milky, soft plum, soft pink. Sometimes, on the contrary, strongly contrasting shades are selected.
- While the composition has not yet dried, quickly but carefully sprinkle granulated sugar on the nail and wait until it sticks completely. According to nail art masters, 10-15 minutes is enough for this.
- Next, use a hard miniature brush designed for working with nails to sweep away any loose grains of sand; if you need to make a pattern, form it.
- To make a sugar manicure last longer, it is advisable to seal the result with shellac, but this technique will not work if you want a 100% velvet feeling.
How to remove sand varnish?
Removing sand varnish is not an easy task. To avoid damaging the nail plate with prolonged friction, manufacturers suggest generously moistening a cotton pad with nail polish remover and pressing it firmly against the nail for a minute or two.
After this procedure, the sand nail polish should be soaked and removed from the surface without any problems.
Features of velvet sand on nails
Velvet sand on the nails makes their surfaces rough, matte, and a little “fluffy.” The material is a granular substance consisting of small particles and similar to coarse powder or fine sugar, semolina. It comes in three types:
- Translucent. Gives a velvety effect, but retains the visible shade of the gel polish.
- Color. It is used directly on the base coat, as it has a pronounced tint, sometimes melange.
- With sparkles. It also has color, and it is not only pigment, but also shining particles.
Velvet sand manicure can be done on the entire nail or used for part of the plate to highlight the pattern and create a voluminous texture.
Benefits of rough manicure
Rough manicure is in demand because it has many advantages:
Velvet sand can be used on short or long nails of any shape. If you follow the application technique, it will not fall off when washing your hands or doing any work while wearing gloves.
Creating an original sugar nail design
If you are bored with the traditional technology of creating velvet nail art, then use one of the tips from beauty specialists:
- The grains can be attached not to the entire nail plate, but to capture only part of it, for example, highlight the hole of the nail bed with velvet or apply it to the tip. Don’t be afraid to decorate with rhinestones - French and moon manicures require additional elegant framing.
- Saving material can lead to a result that you are clearly not happy with. When working with velvet sand, you need to understand - either sprinkle it generously, or not use it at all. Don't be afraid to get your fingers dirty - the particles can be easily rubbed off and fall off.
- Uneven lines, ornate patterns, monograms drawn using several colorful shades at once look very stylish and expensive.
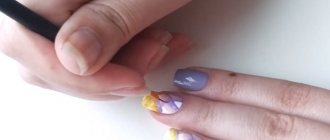
Velvet sand painting
The technique allows you to combine several decoration options in one composition. Painting is done with gel paint, top coat or gel polish. The technology is as follows:
- After applying the main color of the gel polish, seal it with a top coat.
- Remove the dispersion layer.
- Using gel paint, gel polish of the selected shade, or just a transparent top coat, we draw monograms using a thin brush.
- Sprinkle the drawing with velvet sand.
- Dry it in the lamp for double the time.
- Brush off any remaining sprinkles with a brush.
The monograms of the painting must contain a sufficient amount of liquid and be “fat” in order to “take” the sprinkles. Otherwise, the drawing will have bald spots and will be uneven.