Posted date: July 24, 2017
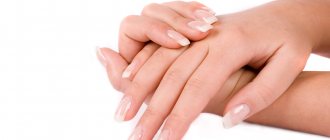
Due to the fact that modern women are trying to succeed in all areas of life, they have a catastrophic lack of time to care for their nails. The main difference between a dry manicure and the classic method of nail care is that it does not require soaking your fingers in water. A classic manicure with aromatic baths and massage is usually preferred by lovers of salon spa treatments. This is really nice, but, firstly, it takes quite a lot of time, and secondly, preparing a bath every time is not always convenient, especially if you put your hands in order yourself at home.
The variety of manicure types is impressive every day. Who would have thought that before fashionistas could limit themselves to only one traditional look. Now dry manicure, which is also called edged or European, has gained popularity. Let's try to figure out what exactly it is and why exactly it is good.
What is dry manicure?
This manicure is a way to care for your nails without using steaming. Japanese and spa manicures can also be dry, but the main and most popular is European.
First of all, masters recommend dry manicure to those who care for their nails and hands not only once, before the holidays, but regularly, at least 2 times a month.
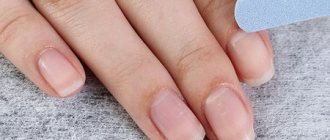
Unedged dry manicure at home
When performing this type of manicure, the cosmetologist practically does not use scissors and tongs, and also does not steam the nails before treatment. After soaking, the marigolds absorb water and change shape, becoming flatter. When dry, they return to their natural roundness. As a result, the fresh varnish suddenly peels off and lags behind. This manicure makes it possible to maintain beautiful, well-groomed nails longer.
Tools and cosmetics necessary for dry manicure
Carrying out the dry manicure procedure does not require constant visits to the beauty salon; it is not at all difficult to do it yourself at home. You don’t even need a special bath and nail scissors, you just need to have the following items on hand:
- cuticle softener;
- a wooden (orange) stick or a metal manicure spatula (pusher) to push back and remove the softened cuticle;
- a large and small file for filing the nail plate in order to give it the required shape;
- cotton pads and liquid (preferably without acetone) for removing previously applied varnish from the nail plate;
- base for varnish to protect and nourish the nail plate;
- varnish of the color you choose to cover the nail plate;
- varnish coating fixer to give the painted nail additional shine and increase the service life of the coating itself;
- vitamin oil for cuticles.
Benefits of dry manicure
Dry manicure has become a revolution among nail artists:
- Instead of stabbing and cutting tools, only wooden sticks are used. They push back the cuticle without harming the nails. By the way, it is precisely because of this fact that the second name for manicure is European unedged.
- The varnish remains on the nails much longer;
- Minimal risk of infection. It is almost impossible to damage the skin with wooden sticks. Therefore, it is almost impossible to get an infection after a manicure.
- Dry manicure is much gentler on both nails and hand skin.
- There is no discomfort, pain or discomfort during a manicure.
- Even if you have very sensitive skin, the procedure can be repeated weekly without causing harm.
- After this manicure, hangnails do not peel off, since the skin and cuticle structure are not cut off.
- This type of manicure is suitable even for children.
- If dry manicure becomes part of your life on a regular basis, the growth of the cuticle slows down.
Trim manicure
Pros and cons of all types of manicure: expert opinion (photo: @paintboxnails) What is the point:
during a trimmed manicure, remover is applied to the nails and placed in a bath of warm water, in which the cuticle and pterygium become soft and then completely trimmed with tweezers.
Pros:
A quick procedure that immediately gives visible results. Suitable for those who have very shabby manicures or very rough skin.
Minuses:
high risk of injury, as well as the rapid appearance of burrs. Plus, this procedure is not suitable for regular manicures.
5 beautiful manicure options for short nails Read
When is this manicure relevant?
Orange sticks for dry manicure
It has already been described above what positive features characterize European dry manicure. But not everyone gives it preference. Some people are used to the classic edging and don’t even think about changing their long-term habits. It is worth highlighting those cases when a dry manicure would be an ideal option:
- delicate and thin skin around the nails;
- allergy;
- if you want to keep your hands in an attractive condition, it’s easier and faster;
- if the blood capillaries are located too close;
- very thin and delicate cuticle;
- if there is a fear of getting a cut during a manicure session and becoming infected with some kind of disease;
- for children.
In what cases is dry manicure relevant?
Dry manicure is otherwise called European due to the fact that it was invented in Europe by the most popular nail artist Christina Fitzgerald. We have already emphasized above that this type of manicure is the safest due to the insignificant chance of infection. However, it will not be superfluous. If we generalize the cases in which a dry manicure may be necessary.
- The presence of thin and vulnerable skin on the hands. For example, if you are allergic to some drug.
- The desire to make it easier to keep your pens in good condition
- Blood capillaries located close to the surface of the skin.
- Delicate and thin cuticle
- Fear of sharp objects and infection through them
- Manicure of children's fingers.
Set of tools
A necessary tool for dry manicure
When preparing for a dry manicure, immediately forget about the baths in which you are used to steaming your nails and using scissors. You don't have to use this tool. In order to do an unedged manicure you need:
- apricot or orange sticks to treat the cuticle;
- two types of files – wide and thin. The wide one is used to create the desired shape of the nail, and the thin one is used to complete the work;
- wooden or metal rounded spatula;
- sharp nippers, needed if there are hangnails around the nails;
- napkins;
- cotton pads;
- nail polish remover, possibly with oils;
- nail oil;
- cuticle remover;
- colored nail polish;
- base for colored varnish;
- fixative
Content
- 1 Differences between dry and wet manicure
- 2 Advantages of the dry method
- 3 Disadvantages of the dry method
- 4 Dry manicure procedure (quick step-by-step guide)
- 5 Dry varnish
Despite the fact that this service became popular in salons in the 2010s
, it is not an absolute innovation.
It is believed that nail care with little or no water was at the dawn of the history of manicure and pedicure. And dry manicure and pedicure itself was offered in some salons even before 2000, but was not popular (although some manicurists in the United States abandoned water back in the 1990s). Interest in the dry method increased in 2010
and later. Most likely, this was influenced by a number of publications about cases of infection with fungus and other bacterial diseases in nail salons.
Oddly enough, the dry method is now practiced even in spas (where the very name “spa” requires water procedures). Moreover, the development of the salon industry is moving in the direction of eliminating water not only in manicures and pedicures. In the future, wraps, peelings, and other salon procedures will be done without water.
Manicure process
Performing an unedged manicure
In general, the unedged manicure procedure lasts no more than 45 minutes. Everything, as usual, begins with disinfection of the hands of the master and client. Next, the master, using nail polish remover without acetone, removes the previous nail coating. Use a nail file to model the desired shape of your nails.
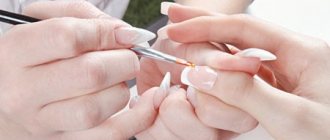
The next step is to apply a special liquid with fruit or lactic acids to the cuticle to soften it and slow down growth. Wait 5-7 minutes. After the cuticle has softened and become pliable, it is removed with a wooden stick. Remains of dead skin are removed with a damp corner of a clean towel. Nourishing oils are applied to the nail plate and rubbed in with massage movements. At the client's request, varnish is applied.
The final stage is a hand massage using a nourishing cream to speed up blood circulation.
Unedged manicure
The need for a manicure is no longer in doubt among either women or men. Neat, well-groomed hands make up a significant part of the image of a successful person. In addition, regular and thorough nail care will prevent many diseases - from ingrown toenails to fungal infections. Finally, well-groomed fingers with neat nails are simply beautiful. For nail care, beauty salons offer a wide range of procedures, among which unedged manicure is becoming increasingly popular.
Unedged manicure at home - it's simple and safe! 10272
Unedged manicure: execution technology
Unedged manicure is also known as “European” and “preparative”. Its peculiarity is that the cuticle is removed from the nail plate not with the help of cutting tools - scissors, tweezers or cutters - but by applying a product to the cuticle that softens and dissolves the thin skin layer by layer due to the content of fruit and alkaline acids. The remaining cuticle after nail treatment is removed with a soft stick.
Advantages and disadvantages of unedged manicure
Unedged manicure has both supporters and opponents. The advantages of unedged manicure are as follows:
- the risk of infection with AIDS, hepatitis or other infectious diseases is eliminated, since there is no violation of the skin
- the growth part of the nail is not injured by cutting instruments
- the need for repeated manicure occurs after a long time
Disadvantages of unedged manicure:
- Possible allergy to the acidic components of the cuticle treatment product
- For overgrown and rough cuticles, softeners are ineffective
Salon version of unedged manicure
Beauty salons offer several options for unedged manicure.
Dry manicure . Suitable for fairly well-groomed nails without rough, neglected cuticles. The nails are treated with a peeling agent, then a cuticle softener is applied, after which the remaining skin is removed with a soft stick or pumice stone. Dry untrimmed manicure is indispensable for layered nails that do not want to be soaked in water.
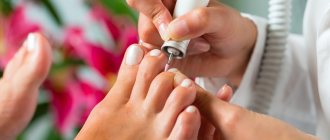
Wet manicure . The technology is reminiscent of a classic manicure: hands are held in a warm bath, then the cuticle is softened with a solvent and vitamin oils, after which it is carefully moved back and scraped with a soft stick. If the cuticle is difficult to remove, especially rough areas along with hangnails are cut off with scissors. Wet manicure is usually done for neglected, poorly maintained nails or for particularly rough skin.
Hot manicure . It is considered a type of wet, since nail care also begins with soaking, but not in water, but in vitamin oil or lotion. Combines with massage and paraffin therapy for hands. Hot manicure is recommended for brittle and dry nails, injured cuticles, and close proximity of capillaries on the fingers. Recommended for children and teenagers as it helps to form strong, healthy nails.
Unedged manicure at home
Many women prefer to do unedged manicures themselves at home. Some believe that such care costs them much less than a salon procedure, others save time in this way, and still others simply enjoy taking care of their own nails. So, what do you need to do an unedged manicure at home?
Tools for unedged manicure at home:
- nail file (glass or plastic to prevent nails from peeling), large and small
- a stick for pushing back cuticles (recommended from orange wood, since this material is soft and has a slight disinfectant property, but such sticks quickly become frayed and become unusable; metal ones are good - they can be disinfected, but they can damage the nail; plastic-rubber ones are very good - and durable, can be processed, and soft enough)
- manicure scissors for trimming hangnails
- a bath of warm water, a soft towel, cotton swabs or swabs
Preparations for unedged manicure:
- cuticle softener
- cuticle oil
- vitaminized nail cream
Algorithm for performing unedged manicure at home:
- disinfect your hands, remove any remaining polish from your nails using an acetone-free product;
- give the nails the desired shape by treating the free edge with a large file, and the side parts from the side of the nail folds with a small file;
- dip your hands in a bath of warm water with a few drops of neutral softening soap dissolved in it and hold for 5 minutes;
- treat the nails one by one, starting with the little finger: wipe the finger with a soft towel, apply a cuticle softener, lightly move the stick around the nail, carefully remove the remaining cuticle and scrape off the skin along the edges of the nail;
- Carefully cut off the rough, torn skin on the sides of the nail with scissors;
- treat the skin around the nail with fortified cream or oil to eliminate swelling, prevent hangnails and slow down further growth of the skin;
- After 15-20 minutes, the nails can be wiped dry and degreased. Apply a base coat, then 1-2 layers of decorative varnish and a fixer that gives the nails shine.
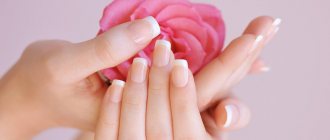
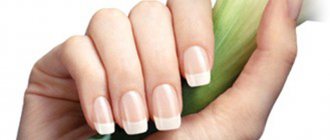
Admire your neat, well-groomed fingers with a flawless manicure, because you deserve it!
To do an unedged manicure at home, you will need:
- Cuticle Remover , Mavala
- Cuticle Oil +, Orly
- Cream oil for nails Nailcare Butter Tube, Catherine Nail Collection
- Basic treatment coating for maintaining natural nails Fundation I, Nail Tek
Dry hardware manicure as a type of European unedged
European unedged manicure, in addition to manual, can be hardware. The device, in appearance and in its operating principle, may resemble a medical drill. The nozzle at the tip rotates quickly and thus affects the nail plate. A dry manicure differs from a regular hardware manicure only in that the hands do not need to be steamed first. Algorithm:
- Old nail polish is removed with nail polish remover, preferably one that does not contain acetone.
- Rub emulsion into the cuticle to soften the cuticle and remove it with a stick.
- The device is held in the same way as a ballpoint pen; you can only work with dry hands.
- Under no circumstances should the device be pressed tightly against the nail bed, as this can injure the skin.
- Medium abrasive attachments are designed to remove dead skin from nail folds.
- A nozzle resembling a small ball removes the cuticle.
- Low abrasive attachments are needed to remove dry calluses.
- After treating the nails with the device, a caring cream is applied to the hands.
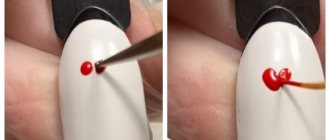
Dry manicure procedure (quick step-by-step guide)
Disinfectant gel
- Step 1.
Disinfect the client's hands using disinfectant gel. - Step 2.
Moisturizing lotion or cream + hand massage from fingertips to elbow. In good salons, aromatic oils and sometimes an exfoliant are added to the massage cream for gentle peeling. - Step 3.
Cuticle softening oil. Then the hand is placed in a plastic bag and a heated mitten is put on top. Heat activates the action of oils. - Step 4.
Cleaning the edges of the nails, filing. - Step 5.
Cuticle care (non-cutting method). - Step 6.
Cleaning the nail plate, applying varnish and top protective coating.
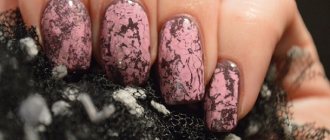
Dry polish is a nail sticker
Manicure with dry glitter at home
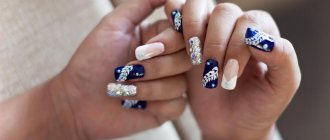
Manicure with glitter
There are different types of glitter for manicure. And so, when it comes to shiny varnish, then there are no questions about how to proceed. There are several methods for doing a manicure with dry glitter. It may not work out perfectly the first time, but a few training sessions and you will be able to give up salon procedures.
Option 1. Initially, the nail is covered with a base layer of varnish. Use a dry brush to pick up glitter and shake off the particles onto the varnish that has not yet dried. The manicure ends with a finishing coat.
Option 2. The brush is dipped into the varnish, and then into a container with glitter. After this, apply glitter varnish evenly to the nail plate.
Option 3. Nails are painted with colored varnish. When it dries, the design is applied with transparent varnish. While the polish is still wet, shake off glitter onto the nail. Those that do not get on the transparent varnish are swept off the nail with a brush.
Option 4. The nail or part of it is covered with transparent varnish. After this, you need to dip your finger into the bowl with sparkles. They will stick to the painted part of the nail. For example, this option is very convenient if you make a shiny jacket.
Option 5 . A separate type of glitter is glitter. The particles in it are much larger than those we are used to. In this case, the following may be useful for manicure: hairpins, sticks or needles. Immediately after applying the varnish, you need to take the glitter one by one with a handy object and carefully apply it to where you want to fix it on the nail plate.
Home manicure ideas
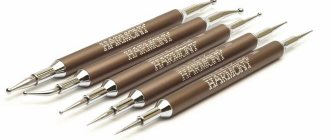
Manicure with dots is performed using a special “dots” tool, similar to a needle with a ball at the end. It is sold at any nail store. To replace the dotsu, take a toothpick or hairpin. Prepare a base varnish and several contrasting color varnishes for dots, dots. Apply base polish to your nails and let it dry. Using a dot or similar, apply dots on the nail next to each other or in a strict order. It all depends on your imagination.
Water manicure
A bright, bold, unusual water manicure draws attention to your nails.
Prepare nail polishes that match in color, a container of water at room temperature, a product to protect the skin around the cuticles or hand cream, cotton pads, nail polish remover, toothpicks.
Apply a special protective agent or hand cream around the cuticles. Add one drop of varnish to a container of water one at a time in the intended order.
Swipe the toothpick several times in different directions over the varnish in the water. No more than 1 minute should pass from the first drop to the finished drawing. Place your nail parallel to the plane of the water in the center of the design.
Allow time to dry, remove excess polish around the cuticle. Repeat the procedure for each nail.
Next: in detail how to do a water manicure.
Lunar manicure at home
He returned from the 30s of the last century. At that time, it was not customary to cover the entire nail with varnish; fashionistas left the hole at the base uncovered. Hence the name - lunar.
Prepare 2 polishes in contrasting colors and stencils (available at a nail store).
Apply polish to the nail color that will be at the base of the nail and allow time to dry. Place the stencils on the nails at the hole and apply the main color of the polish. Give the polish time to dry and carefully remove the stencils from your nails.
Next: how to do a moon manicure yourself.
Matte manicure
The fastest way to get an unusual home manicure.
Prepare a glossy varnish, without glitter or pearl, in a pan of boiling water.
Apply polish to your nails. Without waiting for drying, hold your nails over steam at a height of 15 cm for 10-15 seconds. Manicure is ready.
Magnetic manicure
Another simple and effective manicure at home.
Thanks to the invention of a varnish in 2007, which contains metal particles, magnetic nail polishes appeared on the market. Immediately after applying the varnish, by bringing special magnetic strips to the nail, you can achieve unique patterns - grid, diagonal, stripes, rays, stars. You can buy magnetic stripes together with varnish or in separate sets.
Suggest your ideas in the comments! And we have another excursion into home manicure from a course participant.
Contraindications and side effects
Correctly performing a dry European manicure is not as easy as it seems, especially if it is a hardware one. As a rule, the majority of clients, out of habit, choose an edger, and many craftsmen simply do not have enough hands to do such work.
A master without experience or the necessary skills can cause serious harm to his client. When polishing the nail or pushing back the cuticle, you can seriously damage the nail plate, even leaving large grooves on it. In addition, if the master is incompetent, the procedure can be quite painful, especially when using a device for hardware dry manicure. A person may feel unpleasant vibrations and a strong burning sensation.
An important feature of dry manicure is that it does not leave the cleanliness that a classic edged manicure can provide. Steaming the skin makes it possible to completely remove the entire cuticle; it is almost impossible to do this with an orange stick.
Dry manicure is not recommended if your nails are neglected; to get them in order you need to steam your hands and cut off dead skin.
In order for an unedged manicure to be of high quality and not cause harm, you need to take a responsible approach to choosing a specialist and not skimp on it.
Review
Olga, 45 years old. Ekaterinburg During my life I have tried a lot of different manicures. My blood vessels are located very close to the skin, so every trip to the specialist ended in wounds and unpleasant painful sensations. In one of the programs I learned that such wounds can also cause infection. For some time I tried to do everything at home on my own, because I am confident in my tools. But very quickly the appearance of my nails deteriorated. A friend advised me to go for a dry manicure. I was in a negative mood. But I went. For about 40 minutes the girl-master worked magic on my hands, and I did not take my eyes off her work, expecting cuts and blood. But they were not there. I left the master with beautiful hands without a single cut. Since then, only dry manicure. It became a pleasant discovery for me and I’m not ready to exchange it back for a trim manicure yet.