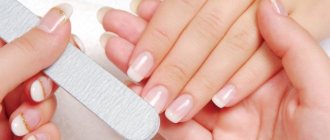
Moon manicure
invented a long time ago, almost 100 years ago.
In recent years, it has gained great popularity along with French. Permanent nail coating is trending. Most of the fair sex prefer a manicure that will stay on their nails for 2-3 weeks. Moon manicure
is an ideal solution for permanent coating.
Even if your nails grow very quickly, the area in the cuticle area will look good, as if you had a manicure recently. Moon manicure
is a variation of French manicure.
In the classical sense, the lunula (the hole at the base of the nail) is left unpainted. Currently, designers offer various options for lunar manicure,
including in combination with French, the lines of the moon should be directed in one direction.
It is recommended to paint the lunula area in a light shade, and the rest of the nail bed in a contrasting darker color. Lunar manicure
can be done using regular nail polish or
gel polish.
In the salon, in the case of a two-color moon manicure, masters draw the outline of the hole with a thin brush, and then fill the rest with a regular brush, or simply paint the nails with an indentation in the case of a single-color coating.
Beginners
can use a nail stencil
to get the perfect
moon manicure at home EL Corazon®
company produces a good selection of stencils for designer manicure, among which you can find one for
a moon manicure.
Video “How to make a Moon manicure with a transparent hole and a gradient” Photo and idea from Yagala
Moon manicure with a transparent hole
can be done not only with one color, but also with several at once.
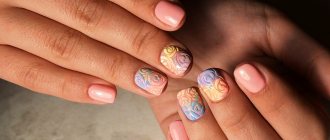
If you have time, you can try a complex and very effective moon manicure “Tenderness” at home.
The multi-color lunar manicure in this photo was made from three pastel shades of EL Corazon® Active Bio-gel Color gel polish from the “Cream” series No. 423/292, No. 423/280, No. 423/294. In addition to nail polishes, you will need: cuticle protection Kaleidoscope by EL Corazon® Cuticle Defender, sponge, dots and rhinestone rivets. While watching the video, please note that instead of a traditional nail stencil, Kaleidoscope by EL Corazon® Cuticle Defender is used, which simultaneously protects the area of the side rollers. This is a more economical way.
Moon manicure - 2017 Photo and idea from Yagala
This photo shows an interesting idea for lunar manicure 2017
, which is made using stamping.
Instead of nail stencils, you can use Cuticle Defender, which simultaneously protects the side rollers from stamping polish. The ornament is applied with silver mirror varnish, which effectively combines with bright blue EL Corazon® Active Bio-gel Color gel polish “Nail Party” No. 423/623. Please note that moon manicure
is not done everywhere.
One nail is accented with rhinestones. EL Corazon®
company offers customers a large assortment of rhinestones for nails, among which, in addition to the classic round shapes, there are also curly ones.
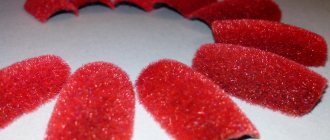
EL Corazon® self-adhesive paper stencils have the most economical cost. They are made of paper made in Germany, durable, fit perfectly to the nail plate and are easily removed without leaving sticky marks. If you are just planning to master the lunar manicure technique at home,
then buy them.
You can buy a nail stencil right now in the official online store at a price of 69 rubles. For lunar manicure
you will need set No. 120/1 or No. 120/2.
Stencils for lunar manicure, how to make a lunar manicure at home
For lunar manicure, mirror varnishes f-08 and f-10
and applied in one layer.
Moon manicure
Moon manicure, moon manicure photo, manicure with holes
Lunar manicure
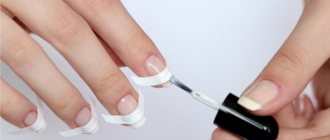
can be done using just one color, and the design will look more original than a one-color design with the same varnish.
You can even do without additional consumables - stencils. Just take a thin brush and make three dots - one in the center (at the top of the hole) and two on the sides, and then connect them with lines. Once you've drawn the outline, continue painting your nail as usual. The classic moon manicure is ready!
The only thing you should take into account is that the varnish
for a lunar manicure
must be thick in order to get an even contrasting outline.
Please introduce yourself (if you haven't already introduced yourself on the site)
| 5 630 2848 3356 2629 |
Moon manicure: spectacular design ideas
There are several types of manicure that invariably hold leading positions. Among these categories is a wonderful moon manicure.
Sweet Bloom
Romantic manicure had a positive influence on fashionable lunar design. Elegant manicures are becoming increasingly popular this year for decorating with beads and creating designs on any theme. Fashion critics note a growing interest in the fascinating sweet flowering technique, which is represented by unusual and mesmerizing three-dimensional designs.
Geometric
As a result of active creative searches, complex versions of lunar manicure with a combination of elements from other manicure styles have become popular. The classic style of painting the hole is still relevant, but updated with a new version. Repeating stripes on a plain nail plate look very interesting and charming. At the request of fashionistas, you can add decorative elements.
Guipure
Themes with support in guipure, lace, and monogram became real hits. As for paints, a variety of ideas are welcome: gradient, matte, metallic or mirror effect.
Minimalism
Minimalism in the decor of lunar manicure this year is expressed in laconic and restrained solutions. For example, on a nail, decorations made of small rhinestones, with the smallest rhinestones, adorn the entire hole or are simply scattered over the surface of the nail plate. Containment through decor allows you to express the inverted French.
Decor with rhinestones
Using rhinestones, you will add feminine and elegant notes to your nail design. In this version, the classic manicure is updated, turning into bright and elegant.
Nude chic
The design comes in a million shades of beige. In this case, the hole can be of different shapes. It is best to highlight the hole with a metal strip. As always, simplicity is the best choice.
Rubbing
The most popular are gold, mirror and silver holes on beautiful long nails. But not only thanks to special powder you can achieve an amazing effect. Glass nail art also copes with this task.
Displaced
There are a lot of ideas for such a manicure. Designers offer an interesting option - offset moon manicure. Its advantage is that you can change the line of the hole, or rather move it.
If we talk about colors, it all depends on your imagination and the imagination of the master:
- red;
- green;
- brown;
- yellow.
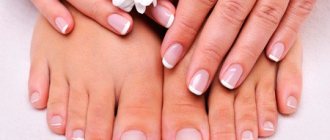
Combined
An updated version that combines two types of manicure. We cover the base of the plate with one color, and the hole and tip with another. Another interesting option is when the hole is covered with a clear varnish or not painted over at all, the base is bright in color, and the smile of the tip of the nail is painted in a pastel shade. This manicure is suitable for any occasion.
Bright
Chips and abrasions are clearly visible on bright colors. So, if you want to walk around with this manicure, then you should do it with gel polish. If the coating is applied using the correct technique, it can last up to 3 weeks without much adjustment.
Ombre
We can safely say that this type of manicure is taken from natural landscapes. Every person has watched the sunset or sunrise more than once. Such views are always delightful, because they combine unusual color transitions. Manicure professionals from different directions embody this phenomenon on their nails.
Popular combinations of red and pink, the transition from yellow to green. If you want to create such a design yourself, then you should first practice on paper, and only then do it on your nails.
With decor
These can be rhinestones, beads, sequins, foil or electrical tape. In any case, if your nail artist is experienced enough, from an ordinary lunar manicure he will be able to create a real masterpiece that will cause the envy of all female representatives.
Brilliant
Glitter can instantly change up a classic hole design. As a result, you will get an original manicure, which you will spend a few minutes on. This manicure is appropriate both in bright New Year's looks and in everyday life.
Spot
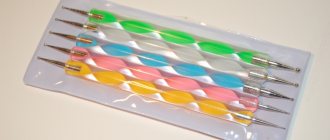
Another trend is the design of the hole with a voluminous dotted pattern. Here a special tool comes to the rescue - a dots, with which stitches are applied to the boundaries of the hole. You will definitely like this original design option; besides, it looks really feminine and unusual.
Gradient
This super trendy nail design is a great alternative to the classic moon manicure. Suitable colors can vary from neon to pastel. You can also use sparkles and highlights.
Ruffian
When designing nails, masters highlight the cuticle. However, the hole should be emphasized very carefully, drawing a thin strip. However, some options seem more advantageous than others.
"Two in one"
Make a hole, as in the “reverse French”, and highlight the free edge of the nail in the same way as in the classic one. Such accents, as a rule, are made in one shade, but you can use your imagination and experiment - there are no restrictions.
Another version of the “moon” manicure is when the pattern follows the contour of the nail plate, sometimes even along the entire length, which allows you to visually lengthen the nail
Transparent hole
“Moonlight” manicure with a transparent hole (if desired, you can paint it with a neutral nude varnish). The option is simple, but one of the most original for such coverage. However, in this case you can experiment. For example, create a spider web pattern on several nails or complement them with a pink pattern made from acrylic powder.
Colored hole
To create a “moon” manicure with an opaque but colored hole, you need to do the following: apply a base, completely paint your nails with varnish of the shade that you have chosen for the hole, then apply a stencil and apply a second layer of varnish on top of the main color (this method is relevant, first of all , to create a coating using gel polish).
The last step is to apply a topcoat to seal the paint. In this case, the hole can be semicircular or, for example, triangular.
Lunar manicure - autumn 2016 Photo and idea from Yagala
Lunar manicure “Foliage Fall”
made in the style of autumn nail design.
The author of the idea chose a spectacular combination of three colors in a yellow-brown tones. To perform the “Falling Leaves” lunar manicure,
in addition to varnishes, you will need a thin brush for nail design.
Let's look at the lunar manicure step by step:
Step 1 - Draw the line of the hole with a brush;
Step 2 - Paint your nails with white polish; Step 3 - alternately apply stains with varnishes of three colors (EL Corazon® Active Bio-gel Color gel polish No. 423/262, No. 423/274 and Kaleidoscope by EL Corazon® No. I-12); Step 4 - Paint the leaves with white varnish using a thin brush. Autumn lunar manicure - ready!
Simple moon manicure at home Photo and idea from Yagala
In this photo
presented is
a very simple lunar manicure,
made using just one white nail polish EL Corazon® Active Bio-gel Color gel polish series “Cream” No. 423/290 and complemented with different sizes of glitter.
Glitter polishes make it easy and quick to turn your everyday manicure into a weekend manicure. The size of the hole may vary, depending on your idea. Watch the video
and learn all the details on how to make
the simplest moon manicure at home.
Moon manicure Photo and idea from Yagala
| Lunar manicure with French manicure | At this point photo presents Nail design - watch video |
What are your nails currently covered with? Let's find out what they choose in 2022.
| 886 817 389 466 |
"Anti-French" - a type of lunar manicure
.
The hole in the cuticle area is a mirror image of the smile line with a classic French manicure, hence the name “anti-French”
.
To make a spectacular lunar anti-french manicure
you will need at least 2 colors, but more is possible, it all depends on your idea.
The colors of the varnishes should be contrasting; keep this in mind when choosing materials. In the pictures
presented below, the author of
the photo
managed to choose a good combination of bright pink varnish No. 144-neon and green No. 145-neon
EL Corazon®
.
For lunar manicure, anti-French
coatings must be very dense in order to cover the previous layer the first time.
EL Corazon® matte varnishes are ideal for moon manicures
and other layered nail designs.
Matte varnishes do not give glare, this allows you to draw all the attention to the design. The collection of matte varnishes EL Corazon®
consists of several dozen colors, it contains both light and dark shades, everyone can choose a varnish to suit their taste.
You can buy matte varnishes in the official online store right now at a price of 190 rubles. It will not be difficult for professionals in a nail salon to carefully make an anti-French moon manicure,
but if you are doing nail design at home, we recommend using the EL Corazon® moon manicure stencil.
Lunar manicure “Watermelon”
will look spectacular not only during the day, but also in the evening in a nightclub, because it is made using neon varnishes!
Lunar anti-french manicure - see photos further...
Anti-French manicure
The EL Corazon® company thanks NAILHATE for your attention to our products and the provided photos of moon manicure
for site. More information about NAILHATE’s work can be found on the website https://nailhate.blogspot.ru/search/label/EL%20Corazon (Attention! Copying materials from her website is possible only with the consent of the author!)
Classic moon manicure colors
Nail artists' favorite colors for lunar manicure are red, white and black. They are standard and quite universal. However, now gel polish manufacturers have such a variety of shades of UV coatings for nails that it would be a pity not to use them.
Nowadays, bright blue colors, beige and green shades are very popular. One of the current nail trends is a combined design that combines different colors, textures and decorative elements.
White
White manicure is often done for a wedding, additionally decorating it with rhinestones, appliqués or pearls. When choosing a white UV coating for nails, give preference to high-quality gel polishes, because inexpensive ones, as a rule, turn out to be liquid in consistency and cover the nails unevenly, leaving gaps and streaks.
This rule applies to the entire base and light palette. You can usually save money without sacrificing quality on color and darker shades. They are thicker from almost all manufacturers.
Black
Black manicure has not gone out of fashion for several years. This is always relevant. Black manicure can be done in a variety of styles - classic, gothic, grunge and others. Black moon manicure is very popular among girls.
It is better to use black gel polish, with which you can create a beautiful and fashionable mirror finish. Black can be combined with any shade of nail polish and decoration, be it rhinestones, foil, mosaic, and so on, so you can find a lot of design ideas based on it.
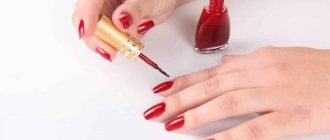
Red
A sort of classic of the genre. Red color in manicure is considered basic and goes with any clothes and makeup. Red manicure is especially popular in autumn; this color is often combined with gold, rhinestones and kamifubuki. The fashionable combination of black and red is very popular in moon designs.
If you don't want to do a very bright manicure, give preference to cherry, darker wine shade or marsala color.
Among the magnetic gel paints, we can highlight a beautiful raspberry-red shade with golden reflections from the MASURA collection, which is called “Crimson Cat,” as well as a light burgundy shade of TNL “Magnit Luxury.”
Blue
Blue, any variations of it: from light shades and bright blue to deep dark color. The trend is smoky blue and a combination of blue and gray in nail design. The blue “cat's eye” remains relevant, and can be made even more expressive with an additional layer of transparent tinted glass varnish.
In general, the combination of magnetic shellac and colored glass is now very popular. This design option can be complemented with rhinestones or mosaics. Well, don’t forget the classic New Year’s moonlit blue manicure with iridescent snowflakes sprinkled with sparkling acrylic sand.
Beige
Beige manicure is a great everyday nail design option. Dusty shades are very popular now.
There are interesting shades of beige in the OPI “Soft Shades” and “Infinite Shine” lines, as well as the IRISK brand in the NUDE collection, etc.
Pink
Pink, like beige, is a universal color for everyday manicure. Indispensable when decorating short nails, because light shades visually lengthen nails. Pink is the color of spring and summer. It is combined with floral patterns and monograms. If desired, you can make a geometric pattern.
Moon manicure 2016 (moon manicure) Photo and idea from Yagala
If you already have a little skill in painting with a brush, then you can try doing a moon manicure at home.
without stencil.
In addition to the varnishes themselves, you will need a thin brush. First draw the hole area with it, and then apply the varnish using a regular brush. The delicate pink-lilac manicure in the photo was made using two EL Corazon® bio-gels. using a gradient application technique. According to the author's idea, the lunar manicure
is complemented with gold glitter.
Patterns are drawn with white paint. To emphasize the style of the moon manicure,
the author additionally emphasized the hole area with white dots.
Manicure using foil
This manicure looks very beautiful! Perhaps you shouldn’t wear it to work in the office, but it’s perfect for a holiday. Foil can be used in any color that suits you. First, apply a clear base coat and special foil adhesive to your nail. Immediately apply the foil, bringing it as close to the cuticle as possible. Gently press the foil, and then remove it from the nail with a sharp movement. Next, apply the base varnish. At the end, secure the manicure with a clear varnish or finish.
Moon manicure with glitter (moon manicure) Photo and idea from Yagala
If you want to diversify the classic moon manicure,
then you can use dots and put down dots that form flower arrangements, as in this
photo.
Flower cores are complemented with nail glitter.
If you do a manicure at home, then to accurately draw the hole area, you can use a nail stencil, for example a vinyl one, as in this master class. With just two contrasting colors of nail polishes and glitter, you can create a stylish and original moon manicure
that will not go unnoticed on your hands if you use this idea.
The site contains interesting sections on nail design at home:
Moon manicure at home Moon manicure >>>
Lunar manicure is no less popular than French manicure. Lunar manicure is done in various ways. The hole can be left unpainted or, conversely, painted. In salons, manicurists who are fluent in painting techniques will not have any difficulty drawing the hole area; at home, lunar manicures are most often done using nail stencils. The “Moon Manicure” section presents various ideas, photos, and videos.
Performing a moon manicure with gel polish (shellac)
Performing a manicure using the “reverse French” technique with gel polish involves the use of a certain list of tools:
· base and top coating; · UV lamp for drying nails; · two gel polishes of different colors; · orange wood manicure sticks; Remover – liquid for removing the sticky layer from the nail plate; · stencils of round or semicircular shape; · beveled gel brush; · file for nail modeling; · degreaser (can be replaced with remover).
Step-by-step instructions for moon manicure with shellac
First, give your nails the desired shape using a nail file and remove the cuticle. If necessary, the cuticle is removed with special means, such as gel or professional scissors. Remover removes the oily layer from the nail. After this step, you can no longer touch your nails, as you can disrupt the further adhesion of the gel polish to the surface of the nail plate. Irregularities in the nail are polished with a buff.
Applying base coat
Once your nails are prepared, you can proceed directly to application. First, apply a thin base coat. It is a thick transparent nail polish. It dries in the same way as gel polish in a UV lamp exactly as long as it should according to the instructions. For example, the company CND, which produces gel polishes and manicure bases, recommends drying its base for 30 seconds. It is most convenient to use Shellac when painting, since careful preparation of the nail is not required before application, which significantly saves time.
First stage
After drying the base, apply a thin layer of the main color, which will be the color of the lunula, to the entire nail plate and dry. To obtain a more saturated and dense shade, the gel is applied again.
Second phase
You need to wait until the gel has completely dried, after which you can attach the stencil. This is done at the bottom of the nail cuticle.
Third stage
Then the free edge of the nail plate is covered with the desired shade. If the lunula turns out darker than the main color, then this situation is corrected with an angled brush dipped in remover. Color gel usually takes longer to dry than base. Drying takes 1-1.5 minutes. If the master has sufficient experience, then it will not be difficult for him to draw the lunula “by hand”.
Fourth stage
When all layers of gel have dried, you can safely remove the stencil. Next, the resulting result is secured with a top coat, which adds shine and durability to the manicure. It dries as quickly as the base, about 30-40 seconds.
If the design requires it, then before applying the top coat, the nail can be decorated with rhinestones, stickers, painting, stamping and other decorative elements.
Water Marble manicure at home Water Marble manicure >>>
By visiting the section “water manicure at home” you can get acquainted with this amazing technique, look at the step-by-step photos
with a detailed description and learn all the subtleties of implementation. After watching a video on water manicure, you will get new ideas that you can then implement on your nails. Water manicure at home - view photos, videos >>>
Moon manicure step by step with photos (other options)
Do-it-yourself lunar manicure can be easily done at home; just become familiar with the technique.
Rhinestones in nail design >>>
If you came to this web page looking for interesting ideas for home manicures, then it will be useful for you to know that EL Corazon®
offers customers a huge selection of rhinestones for nails - glass and acrylic, there are even nail stickers made of rhinestones.
home manicure
enthusiast can handle them You can buy rhinestones for nails wholesale and retail (in the online store) from us right now.
Rhinestones for nails. How to place rhinestones on nails watch video >>>