Modern nail art simply amazes with its versatility and limitlessness! Nowadays there is simply an endless number of non-standard ideas that, if desired, every girl can turn into reality on her own.
Manicure has long been more than just nails covered with two layers of one-color varnish. Now you can show your imagination with all your might, combining it with artistic skills, for example, you can draw a bird on your nails or make a drawing of a peacock feather.
Peacock Nail Art Ideas
Peacock nail designs can look different
To make a beautiful peacock manicure it is important:
- Decide on a technique for its implementation that can best reflect the essence of your personal style - bright feminine or, conversely, strict business using a more muted palette of shades.
- Take into account your own experience in nail art in order to easily implement your plans with your own hands - do not immediately take on a complex sketch before you have mastered your hand.
Here are the most interesting ideas for peacock manicure:
| Photo | Description |
| Idea 1. Water technology (or liquid stone) Allows you to get an unusual three-dimensional design with bright multifaceted iridescent shades. To do it yourself you will need:
| |
| Idea 2. Unusual color scheme A free interpretation of feather nail art allows you to get a unique design with the most suitable palette. He is characterized by:
| |
| Idea 3. Ethnic technique It makes it much easier to draw feathers with your own hands, allowing you to get a lighter, airier and more stylish design. Can be executed:
| |
| Idea 4. Patterns on the free edge or middle of the plate The design is more sophisticated and versatile for feminine looks. This technique allows:
| |
Idea 5. Patterns on transparent nails:
Camouflage polish is best suited as a background. | |
Idea 6. Colorful ombre:
| |
| Idea 7. Design “story” Allows you to create a real living story on your nails by drawing different elements on each nail. You can use ready-made stickers, the price of which does not exceed 300 rubles. |
Peacock design for beginners in 7 steps
Let's try to make a simple peacock manicure with our own hands, suitable for all beginners:
| Photo | Instructions |
| Step 1 Apply a camouflage coating (transparent, flesh-colored or milky). | |
| Step 2 Draw a neat straight line with a brush diagonally, closer to the free edge of the plate. | |
| Step 3 We draw several more thin short strips in a semicircle from the outer edge of the main strip. We use the same shade of varnish. | |
| Step 4 Using another shade of varnish, draw several lines on the opposite side of the main line. | |
| Step 5 Use glitter varnish to highlight the main line, creating volume and texture to the design. | |
| Step 6 We fix the design with a colorless topcoat. |
Peacock stamping design
Detailed instructions will tell you how to reduce design time using a special kit:
| Photo | Instructions |
| Step 1 Apply colored varnish as a background. | |
| Step 2 Paint the area of the plate with the desired pattern with a different shade of varnish. | |
| Step 3 Use a scraper to move along the plate. | |
| Step 4 Using a stamp, we “capture” the design from the plate. | |
| Step 5 Transfer the design from the stamp to the nail. | |
| Step 6 Using dots we apply dots of a bright shade. | |
| Step 7 Apply a lighter shade of varnish over the first dots. | |
| Step 8 Using a thin dot tip, place dots of a bright shade between the first two, creating a kind of pattern corresponding to a peacock feather. | |
| Step 9 Complete the peacock manicure with a transparent fixing gel. |
Step-by-step nail design technique
There are a lot of techniques for drawing and its design. We will consider the classic option of creating a feather that will look neat in any color scheme. Here we will draw it in several shades to achieve the most natural drawing. If this is your first time doing it, try not to skip a single step. In the future, you can adjust them and add your own elements.
It all starts with nail preparation. They should be even and of the same length. I must say that feathers look best on long nails, since the design takes up enough space. Remove cuticles. Choose the most familiar method for this. You can simply soften it with a remover and push it away with an orange stick, or you can do a full-fledged trimmed manicure.
- The pen design we have chosen is best repeated on a light background. Take a thin brush and beige varnish. We put varnish on the brush and mark the outline of the future feather. It looks very much like a tree leaf. Draw the central groove.
- We draw the feather itself with the same beige color. To do this, moving from the center line of the pen to the sides, we make abrupt strokes. It's okay if they go slightly beyond the contour. But it is better to stick to the given perimeter. As a result, the beige borders should be erased, and in their place the ends of individual elements of the pen should appear.
- Now we need 2 darker shades: red (closer to brown) and brown. First we draw strokes with a lighter shade, and then with a darker one. The movements are identical to those performed with beige varnish. You can take a brush a little thicker so that the strokes are more noticeable.
- If you want to add shine, then take glitter and run it over the feather in some places.
- We draw the feather shaft with a thin brush and white varnish. The line should be thicker at the base and become a barely visible thread towards the end.
- After the design has dried, cover it and all other nails with a top coat. This will extend the life of the entire manicure and protect the feather.
Where to draw feathers?
Depending on the idea, feathers can be arranged in several ways.
As an accent. Most often, girls draw it on one nail, for example, the ring finger. This looks interesting. The remaining plates can be varnished in any tone or several matching shades. This design is suitable for women who, due to work or style, can afford a bright manicure.
Small feathers can be located on all nails, while the same ringless one always stands out as a separate accent. It can use a fundamentally different technique, coloring, or a thematic design, for example, a bird.
Delicate manicure option
In the form of a print. If you use stencils or small ready-made stickers, you can create the same print on absolutely all nails. It will look nice.
A feather painted on several nails at once looks impressive and bright.
Here it is very important to think through the design and every decorative element so that the drawing does not turn out tacky, and the idea is a success
Black and white manicure
Since the feather has an oblong shape, it is most often placed along the nail. This visually stretches the fingers, and even a large feather on short nails looks harmonious.
Bright design option
A little less often, girls get a lunar manicure with this design. Most often, fragments of a dream catcher decorated with feathers are suitable for such an image. Sometimes the French is emphasized with a pen.
French jacket with peacock feathers
Drawing a pen with a needle
One of the easiest ways to paint a peacock feather on your nails is to paint with a brush on wet polish. This technology allows you to achieve the desired softness of the lines, as well as make them quite thin. Working with this method on short nails is not very convenient, but you can often still get a good result. Another advantage of this method is the fairly high speed of pattern application.
- In order to paint a peacock feather on a nail in this way, you will need at least three to four shades of varnish. After the base for the varnish has dried on the nails, it is necessary to apply a varnish of the background color to them in the required number of layers, but do not dry the last layer;
- Place a drop of black varnish directly on the wet varnish and begin to stretch it across the plate so as to form the central axis of the future feather in the desired location;
- From this axis, continue to “pull” the varnish in both directions at angles, forming the sides of the feather. In this case, at one end there should be a significant expansion (in the event that a peacock feather is drawn);
- While the black varnish has not dried, drop a varnish of a different color onto the expansion site and slightly stretch it towards the narrowing of the feather so that an element resembling a drop is formed;
- Place a smaller drop of varnish of a different color on it and leave it round;
- After the pattern has dried, coat the nail with clear varnish and dry.
You need to paint a peacock feather on your nails using this technique quickly so that the polish does not have time to dry.
However, if this does happen, you can try to correct the situation by covering the dried area with clear varnish. [yandex3] [google3]
What to consider?
Be sure to take into account your style: girls who visit the office every day need to correctly combine the color scheme for drawing
Of course, if you take into account the ethnicity of the image, it is ideal to apply such a manicure if you have the appropriate look: a hairstyle with braids, “multi-layered” clothes made from natural fabrics. But modern life is in full swing, so such strict rules no longer apply to fashionistas
A manicure with a dream catcher fits harmoniously into an urban look with jeans and a T-shirt.
Make your nails not only original, but also stylish: choose the color palette of the design to match your favorite clothing tone, which is most often seen in your wardrobe. If you have chosen an unusual shade, try to complement it with some element: an accessory, a bag, a print on clothes to match
Showcase your taste, but unobtrusively - let the dream catcher attract attention, but not take it completely. Give preference to delicate nude or pastel colors, and make the silhouette of the dream catcher contrasting
Design ideas
You can choose any background for the pen - in addition to green, white, black, and any other you like will do! Just try to select tones so that the finished picture is harmonious.
This nail art can be done in winter, adding bright colors to your life, and in summer, so that you remain the center of attention on the beach by the sea.
The advantages of such nail art include the fact that you can complement the finished manicure with anything:
- Manicure with rhinestones, for example, highlight the “eye” with a purple stone;
- Sequins - they can be used to create edging and smooth transitions;
- Sliders - you can decorate your nails with the color you like and complement them with sliders with the image of a bird, its tail or other elements that would be appropriate for such a design;
- Broths - these small balls can also contribute to your manicure. You can take them in gold color and then your peacock feather will be even brighter and more attractive!
Of course, the design is already bright, so when choosing additional decorative elements you need to remember a sense of proportion. An abundance of rhinestones on each nail never adds to the attractiveness - it looks tasteless and sometimes even very vulgar.
Gel polish allows you to wear a manicure for more than two weeks, so everyone tries to pay due attention to the design, because... he will please the owner for more than one day
A strict and at the same time delicate jacket can be decorated with a simple feather, which will add romance to the design. Before the New Year holidays, when a party is planned, complement this classic option with a bright peacock feather on your nails.
Gradient
A gradient is a smooth transition from one color to another, otherwise it is called ombre. You can paint your nails using this technique and stamp the feather – this design looks cute. If you have a stencil of this design, you can create a gradient using a regular sponge or makeup sponge.
Nude manicure
This design attracts girls with its naturalness and sophistication at the same time. Add a little charm to this manicure with feathers. The white airy image will show your romantic mood.
With rhinestones
Rhinestones add luxury to any design. They can be used to complement a drawing, a jacket with a feather, bright sliders and stickers. The main thing is to choose rhinestones that are harmonious in color and size, and to make them stick better, place them with small broths.
Other ideas
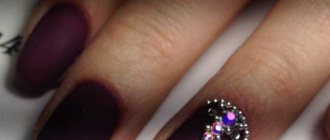
A manicure with a matte feather looks unusual. It is better to choose dark colors for it, because... light colors rub off and get dirty quickly.
Another option is ethnic. Indian amulets and dream catchers look unusual in design and make it seem filled with magic.
How to recreate Peacock Feather on your nails?
We invite you to familiarize yourself with step-by-step instructions for original nail art, with which you will learn how to do a manicure with your own hands, transferring peacock feather designs to the surface of your nails. When creating an exotic design at home, be patient, because this decor takes a certain amount of time and requires precision in execution. The key stages of interesting nail art will be accompanied by photos that will help you in the decorating process.
In order to reproduce an unusual pattern that imitates the motley feather of a peacock, you need to have on hand:
- Base coat.
- Dark green, white, purple, blue and gold polishes.
- Transparent sealant.
- Thin brushes.
Armed with all the necessary items, you can begin the creative process of creating a unique manicure.
- First of all, take care of the beauty of your nails by giving them a neat shape. This can be done both in the salon and at home. Use cosmetics and care products for your hands and don’t forget about your cuticles. Your fingers should be in perfect condition.
- After a hygienic manicure, cover all nails with a thin layer of transparent base. Do not neglect this stage if you do not want the nail plate to acquire the shade of the colored varnish used.
- After letting the base dry, apply two coats of dark green varnish on top.
- Now you can use a thin brush to paint a peacock feather with white varnish. Use a brush in smooth and measured movements so as not to smudge the pattern. There is no difficulty in creating the “skeleton” of a pen; you can make an impressive design with your own hands, spending a few minutes on it.
- Next, you need to decorate the feather with a neat purple dot - this will be the “eye” of the peacock’s tail. Outline it with white varnish and add a few strokes of golden color, as done in the photo.
- Fix the bright designs on your nails with a top coat, and your original manicure is ready. Even a beginner in the field of nail art can easily cope with such a simple design at home.
And now, by tradition, we invite you to look at our collection of photos, which contains the brightest and most interesting options for nail art in the style of a peacock feather. With such gorgeous nails, the whole world will be at your feet.
Finally, watch a video about how you can easily and very quickly create a manicure reminiscent of the bright plumage of a peacock using nail stamping. The exciting process will give you pleasure, because creating something unusual and new with your own hands is very interesting. Give yourself a festive mood by putting a bright accent on your fingers, and enjoy the well-deserved attention from your fans!
Ways to create a manicure with feathers
You can show your refined taste in many ways: from the usual painting with varnish to using special decor.
Drawing
Free drawing is available in almost any situation and provides the most extensive field for the manifestation of your imagination. You will only need a few varnishes of different colors and thin drawing tools (brush, needle, toothpick or a special marker for nail art).
How to draw a feather step by step:
- The thickest line creates the stem.
- From the rod to the sides, several thinner lines are drawn with noticeable intervals or many thin strokes close to each other.
- Once the base is ready, you can embellish it by adding touches of a different color or a thinner line of shimmer polish along the stem.
Transfer stickers
This is a quick way to decorate your manicure with graceful feathers. You will need transfer stickers, a small container of water and tweezers, varnish for the background of the pattern and a topcoat.
Trim off the excess from the sticker close to the outline of the pattern so that you get a piece slightly smaller than your nail. Remove the top transparent film
Place the sticker in a container of water for 30 seconds. Next, you can apply the paper backing directly to the nail or carefully remove the sticker from it with tweezers and work with it. The wet decal can be carefully moved to the desired position. Then blot its surface with a napkin and secure with a topcoat.
Stamping
To do this, you will need any background varnish you like, a highly pigmented stamp varnish, a top coat, a stamping plate and stamp, a special scraper, or an old plastic card. This manicure with feathers is performed like this:
- Coat your nail with base polish and let it dry completely.
- Apply varnish of a different color to the stamping plate. Holding the scraper at an angle to the plate, move it once so that there are no empty parts in the drawing or excess varnish.
- Take the stamp and transfer the design onto it using a rolling motion. After this, you can quickly correct what remains on the stamp: add a few elements with another varnish or remove the smeared one with a toothpick.
- Using the same rolling motion of the stamp, transfer the design to the nail. After it dries, use topcoat.
Depending on the pattern on the plate, you can also make individual feathers, as in the photo above, and create a “peacock tail” texture on the nail:
Also see video:
Gluing feathers
Both real bird feathers and decorative ones, decorated with bright spots and colored tints, look amazing on nails. Let's take a closer look at how to use them correctly:
- Before applying the background, place the feathers on your nails: it may be more convenient to trim them to close to the final size.
- Cover the nail with a single layer of base polish and use tweezers to immediately place the feather on top. Spread it over the nail with the same tweezers, separating the stuck together fluff and make sure that it sticks to the nail completely.
- After the varnish has dried, trim off the parts protruding beyond the surface of the nail and apply topcoat.
Stencils
This simple way to make a manicure with feathers requires only special stencils and available tools: varnishes, sponges and brushes, needles or toothpicks for drawing. The pen in this technique is made like this:
- Apply the base color polish to the nail and dry this layer well so as not to spoil it later.
- Glue the stencil.
- Take two polishes of different colors and apply two thin stripes of them onto a foam sponge.
- Lightly tap the sticker with a sponge to transfer the gradient pattern onto the nail.
- Peel off the stencil and highlight the middle of the feather by drawing a line with a thin brush.
- Cover the design with topcoat.
Creation methods
Feathers on nails look very good in any version and design. How to carefully transfer the design that is sitting in your head onto your nails? Let's look at a few options, they will help you easily create an elegant manicure.
Regular brush
The simplest drawings can be brought to life with a brush. A thin brush allows you to paint, outline the outline itself and highlight the shaft of the pen. A flat and tapered brush helps create a slight volume and relief to the drawing. With a petal brush, the shape and outline of the feather can be easily drawn. It is enough to make small strokes that are close to each other. They will end up being indescribably beautiful. How to draw a feather on nails step by step can be seen in the diagram below.
Natural material
Real and artificial feathers look great on nails. Natural ones sometimes have not very bright colors, unless it is a parrot. It is best to buy accessories at a cosmetic store or order them online. Nail feathers are provided by RuNail, the price for 1 piece starts from 40 rubles and above. A huge range of colors will appeal to every girl. Options with specks or an unusual pattern look most beautiful. The natural feather is placed on a sticky base and then secured with a finishing coat.
Stamping
The stamping kit consists of plates with patterns, a scraper and a stamp. It is recommended to find a suitable feather pattern that best suits your look. All that remains is to coat the plate with varnish, and then transfer it to the glazing bead and onto the nail. You can color the drawing (feather on nails) the way you want.
Video instruction
How to make feathers on your nails using gel paste can be seen in the video.
Modeling
A voluminous manicure is created using acrylic powder or a special extension gel. The viscous consistency of the materials helps to create the desired shape. And after hardening in the lamp, a three-dimensional figure in the form of a feather is obtained. This design can be complemented with sparkles, grains of acrylic powder or rhinestones.
Stickers and stencils
There are several types of stickers and stencils. Each sticker can depict a feather or several small elements at once. They can be black and white and color. It all depends on your taste. Stencils are thick plates with a carved pattern. A stencil with the image of a feather is applied to a colored base, and the space is filled with sparkles, rubbing, yuca flakes, or lined with rhinestones.
Color options
This type of manicure looks great in both calm tones and bright multi-colored designs. It all depends on the specific situation, taking into account the occasion and attire accompanying it.
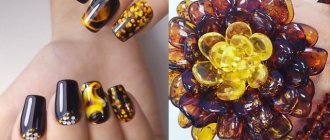
Nails coated with black or chocolate brown varnish with golden feathers painted with a thin brush look stylish and at the same time discreet.
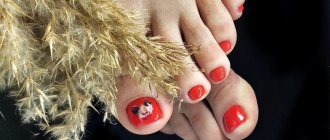
A great option for a romantic summer manicure is pink and blue feathers on a white background. This design is more suitable for young girls.
Editor's choice: Winter manicure: interesting options with photos and videos
The image of a peacock feather looks most advantageous on nails coated with green varnish of a lighter shade than the feather itself. When drawing the “eye”, it is recommended to use blue and gold varnish.
Another good option is to use blue varnish to create the background. A peacock feather and any other feathers, including those painted using stamping, look beautiful on it.
Methods of execution
This manicure can be done in different ways:
- draw yourself with a thin brush or needle;
- transfer to the nail using stamping;
- buy ready-made sliders.
Hand painted
If you paint yourself, it is better to immediately prepare varnishes or acrylic paints in yellow, blue and green colors - they must be present in your manicure, intertwined into wondrous patterns on the feathers of the majestic bird.
Using stamping
In the case of stamping, you will have to prepare a special board with the desired image, a silicone or rubber stamp and a scraper. In addition, you will need special stamping varnishes - they have higher pigmentation. But you need to act quickly - in about ten seconds you need to have time to transfer the design from the board to the stamp, and then to the nail, otherwise the varnish will dry out and will not print. This matter requires some skill.
Let's stick the sliders
Sliders are called design for beginners. They are also convenient when you don’t want to spend a lot of time creating a manicure. Nowadays you can buy a variety of nail stickers . But first, practice carefully transferring them to the nail and smoothing the surface correctly.
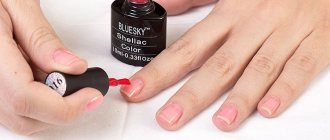
And of course, if you want your manicure to please you for a long time, then it is better to do it with the help of gel polishes.
Choosing a color
The final result and the effect that the design creates will completely depend on the color of the web. Every master should have a viscous gel paint in his arsenal of nail decorations. It is universal and will suit any base. However, the colors of the material may vary. Today there are standard black and white, blue, gray, metallic, delicate and bright shades. Masters are inclined to believe that everyone should have white and black cobweb colors. They create accents, as well as a base from which you can create many looks.
Black
Every master should have a black web, as it sets the base and is combined with all base colors. Dark threads will create a spectacular contrast against a light background.
White
Masters are inclined to believe that everyone should have white and black cobweb colors. They create accents, as well as a base from which you can create many looks.
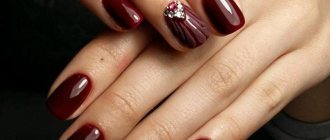
Red and burgundy
The color of passion and love. On nails it can look both gentle and bold, depending on the execution and idea. It occurs quite often in design.
Beige
A delicate color that has become especially fashionable this year. Suitable for everyday style and will create a pleasant mood.
An unusual color for the material, which is why it is often called exclusive. Perfectly accentuates any design.
Nude
The case when the color does not catch the eye: laconic and elegant. Just what a beautiful lady needs. A nude manicure with a spider web in a matte top will emphasize the tenderness of its owner.
Blue
A deep and incredibly attractive color that is especially suitable in winter. However, even in summer this option will look gentle and cute.
Pink
A gentle color for real girls that will add color to even everyday wear. You can safely use it as a background; the color goes with almost everything.
Green
Unusual, bright and bold: green is not often used for design. However, why not dilute this world with bright colors?
The color of nobility, which fits perfectly with delicate colors, sparkles and rhinestones.
Silver and gold
Festive sparkles will complement any design: from New Year's to everyday. Sparkling particles create a magical mood, so these colors will not leave anyone indifferent.
Bright colors are currently in demand: metallic, neon. They can create a bright and original manicure with a minimum amount of material. And delicate shades look especially good on women's hands. Girls are increasingly trying to do a nude manicure with accents, as it fits any dress code: be it the workplace or pleasant gatherings with friends.
Having several multi-colored materials in your arsenal, you can create a design to suit the taste of anyone who wants to get a manicure. And if you decorate the web with rhinestones, foil or sparkles, you can get the perfect New Year's manicure
It is important not to limit your imagination, but to give it the opportunity to run wild. Trends of the last year allow for the introduction of creativity and the author's imagination into nail design
Feather manicure ideas
In order to further diversify the already unusual design, you can add a variety of decorative elements to the manicure, for example: rhinestones, sparkles, bouillons, etc.
It is worth experimenting with shades of varnish. Feathers look different on each new background. If, for example, the feather is black, then it will look great on a white background.
It is necessary to adhere to the basic rule, if the feathers are drawn by hand - you must try as hard as possible to ensure that the feathers are similar to real ones. By the way, painted fluffy feathers look very impressive. They are more beautiful and have a natural appearance.
In general, this type of design opens up many different options for creativity, because coming up with something new is very interesting.
If we talk about the style in which feathers can be used, then it’s definitely a boho manicure. It includes images of various magical elements, such as dream catchers, the sun, ancient signs and feathers themselves.
Manicure feathers
An interesting way to create a nail design with feathers, as in the photo, is to use special manicure decor. It consists of small, about 1 cm in length, synthetic feathers. They are very thin and soft and invisible under varnish or gel. This decor can be used not only for extensions, but also for coating natural nails with shellac. Feathers come in a variety of colors and shapes.
The application of such feathers during extension can be done under a layer of gel or similar to an aquarium design. When applied under a layer of gel, it can be used both on tips and on forms. In this case, before applying the top layer of gel, the feather is placed on the nail (on the layer of sculpting gel after it has dried) and covered with top coat, while straightening it with a brush.
When making an aquarium design, a feather mixed with sparkles or other decorative elements is placed in a gel “pocket”. The fundamental difference from aquarium design in this case is that you cannot inject water into the cavity, as the feather may get wet and stick together. In addition, such feathers look very impressive in stained glass design.
Nails with feathers like those in the photo can be natural. In this case, the feather is applied under a layer of top shellac or gel and on the dried color layer. It can be quite difficult for a non-professional to do this. Sometimes you can apply such feathers under regular polish, but the manicure may not be as durable.
[yandex2] [google2]
Peacock feather
Here’s another idea for a luxurious manicure, but with peacock feathers. As you know, the feathers of this bird are incredibly beautiful and bright. So why not repeat them on your nails?
In this manicure you will need a little more time and skill than in the previous one. After covering your nail with a thick white gel polish, you can start painting. First, draw the outline of the colored “core” of the feather. This can only be done with a very thin brush. Next, fill the peacock eye step by step with colored gel polishes. Dry each layer if you want to avoid mixing shades. Using a thin brush, draw the base of the feather and the lines extending from it. Use firm strokes, but don't press the brush too hard to avoid creating thick stripes. This design is more suitable for a festive event or celebration!
Bright manicure
Now on the nails of fashionistas you can see a wide variety of patterns and designs that immediately show others the girl’s excellent sense of taste. An original design is a great way to grab the attention of others. Therefore, girls carefully think through a new version of their manicure every day.
Peacock Feather manicure is a great choice not to be left out. This design is suitable for confident ladies with creative thinking. Bright ornaments are now popular, and the feathers of this exotic bird cannot be called pale.
The peacock is naturally endowed with a bushy tail, its colors are simply amazing - all the colors of the rainbow are collected here. Rich shades that smoothly flow into each other, fascinate and cause admiration. Therefore, it is not surprising that many girls choose peacock feathers on their nails. And you have a great opportunity to enjoy such a riot of colors. Photos from the Internet will help you get inspired to create such a manicure with a peacock feather. Admire the nail art options, see how such a design is made, or just look at the photo of the birds themselves.
The Peacock Feather nail design has an impeccable harmony of colors. The brilliant plumage shimmers with hundreds of reflections, the majestic tail unfolds like a luxurious fan, as if endowing the beautiful bird with magical qualities. If you are also interested in the richness of shades in the color of this bird of paradise, then try to recreate the feather on your nails. The design will definitely turn out to be original and unique, because with hand painting it is simply impossible to repeat any design exactly the same.
#1 Pastel manicure with quail egg effect
The palette of shades of gel polishes from Illamasqua is aimed specifically at pastel colors. They look natural and are similar to natural texture. The speckled design is quite noticeable, so pastel colors will soften and enhance it.
Specks are most often made in black. For the background, use gray, beige, light green, milky and translucent shades. Both a single-color manicure with a quail effect and a design with strokes with a manicure brush, with foil stripes, and nails painted in a single-color black color look stylish.
“Feather and dream catcher on nails”: 45 exciting and interesting examples
Every woman wants to look not only stylish and beautiful, but also original. That is why nail art masters offer countless different designs for any nail shape. Among the cutest and most delicate ideas are a dream catcher and feathers. In this material we have collected the most current and attractive manicure options with an incredibly exciting dream catcher and a beautiful feather.
zhenya__borisova zazerkalie_nails zazerkalie_nails
unignatova_nails
The dream catcher is one of the most powerful talismans, which scares away not only evil spirits, but also gives good dreams. The talisman itself looks very unusual and beautiful, which is why women often choose it as a design on their nails.
ykorsakova ykorsakova
Indian symbolism allows you to use not only feathers in multi-colored colors, but also the wisest bird. A themed manicure with a dream catcher, feather and bird will be incredibly chic and stylish.
ykorsakova winky.nails5
nails_irinamarten
If desired, feathers can be decorated with sparkles and rhinestones. A manicure in this design is suitable for special occasions or special evenings. You can use absolutely any color in a design with feathers and shiny elements - divine white, chic black and attractive pastel colors.
tasha_ryzh8
tishka_nails
nails_irinamarten
nails_irinamarten
nails_control32
The design with a dream catcher is close to the boho style, but this does not prevent you from creating the most elegant and stylish manicure designs. The drawing allows you to use any colors and shades; you can also make a sketch of the web in black. The overall tone of the manicure is chosen individually; both a single-color coating and a variety of ombre, French, cat-eye, etc. are welcome.
nails_control32 lilitnail_zhuk2
Feathers are the main element of a delicate and mesmerizing manicure. The feather is painted on several nails, combining it with a similar theme. The dream catcher very often includes feathers, which are an additional decoration for the Indian talisman.
puro.nails nailartist_natali ib_nails ib_nails inga__nailart
ismailova_anna_ jahkizz kangannynails68 gushchina____nails15 ewuleek ewuleek
ewuleek
ewuleek ewuleek
a_zolotce7 alenakapriz_studio anna_yudasova_nail_art23 annet_leto arnail_studio 1masternails __albina_nails__
__albina_nails__ __albina_nails__
If you want the most original and stylish manicure, then pay attention to the design with a dream catcher and a feather. Decoration with strong talismans will boost your morale and also complete the fashionable look of any woman.
Which manicure idea did you like best? Tell us about it in the comments!
If you liked the article, save it and share with your friends!
Join us on our channels in Yandex.Zen: Beauty, Makeup and Tattoo , Ideas of stylish people, Manicure★nail art, Geniuses and outsiders