Anyone who has ever had their nails extended knows that tips are special plastic tips for nails that make your nails longer. They are also used to practice painting the nail with complex patterns and interesting prints on it. And famous manicurists use such sets of tips to demonstrate their skills in nail coloring, show their clients the patterns that they can get from them, or simply demonstrate sets of available color palettes of nail coloring products.
Short story
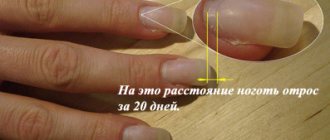
Previously, such nail tips were made from all kinds of materials. People paid attention to plastic as an object for creating tips only in 1970. At the same time, many problems arose with tips, since they were created with their own hands, and the tips themselves were too thick and hard. Mass production of tips began only in 1974, when a new technology for their creation was invented. And at that time their price was very high; their service life reached up to seven months.
Method number 1. Orange stylus and acetone
- Dip an orange stick into pure acetone. Pry the edge of the artificial plate in the cuticle area. Using a pipette, scoop up some nail polish remover and pour the contents under the false nail.
- Wait 5 minutes, then perform the manipulations again. When the substance takes effect, it will become much easier to remove unnatural attributes of beauty.
- You need to pry the edge of the nail with the sharp corner of the stylus, and then try to remove the accessory from its plate. Do this with each nail one at a time.
- When all the tips are removed, soak a cosmetic sponge in nail polish remover and wipe your nails. This way you will clean the plates from any remaining glue.
how to remove nail polish without nail polish remover
Preparing for the process of growing beautiful nails
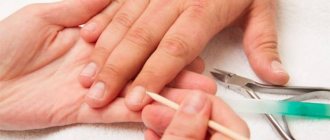
The first step is to treat the hands of the client and the master with an antiseptic, and don’t forget about the tools. They also need to be disinfected. Surely everyone already understands why this is being done, but it is worth clarifying that all this is to avoid any infection of the client’s nails and skin. A person who never neglects this point of action looks in the eyes of his client as a more responsible and professional master of his craft. Never think too highly of the cleanliness of your tools and hands. Remember that this is always fraught with negative reviews about you, and, accordingly, a decrease in the number of your clients and their payment for your work. Nobody wants to harm the health of their nails and hands.
Method number 3. Composition for removing acrylic and gel
- Purchase liquid for removing false nails from a professional nail industry store. As a rule, the composition removes acrylic and gel. The product is more gentle than other similar options.
- Give preference to products that contain natural esters, oils, algae extracts, vitamins A and E. The kit should also include foil, cotton swabs, and a stylus.
- To begin the procedure, cut the free edge of the nail short, but not at the root. Soak cotton pads in the purchased mixture and apply to each plate in turn.
- Tear off large pieces of foil (cling film will do) and wrap around your fingertips. Secure the compress tightly to prevent air penetration.
- Wait for the certain interval specified in the instructions. As a rule, the exposure period is 25-35 minutes. After this, evaluate the result; the artificial nail should come off on its own.
- Help him with the stylus, moving from the cuticle to the free edge. Upon completion of the procedure, remove any remaining glue with the same liquid or acetone, wash your hands, and rub vegetable oil into the plates.
how to remove acrylic nails at home
Creating the required form
Now take a cutter (in other words, a tip cutter) in your hands and shorten the tip to the length that your client desires, create the desired shape of the extended nail.
If you adhere to the acrylic technique of creating a manicure, then at this stage cover your work with acrylic. Once the nail is shaped, sand it down and polish it using buff.
Or are you a fan of “gel” works? In this case, the resulting form should be coated with a bronzer so that the gel adheres even better to the natural nail and does not peel off. Only after this can you apply gel polish in two stages.
Your work is ready!
Method number 6. Cutting down tips
- This option for removing glue-based tips is similar to removing helium and acrylic plates. Processing is carried out by cutting down the artificial turf.
- To do this, you need to purchase files of high, medium and very low abrasiveness. You will also need a buff to make your nails smooth.
- First of all, cut off the edge that is free from the tips. Take a hard (preferably glass) file and erase half the thickness of the tip. Next, using a medium abrasive tool, bring the nail to the thinnest possible state.
You can remove false nails with glue using acetone baths or chamomile infusion. Tips are often removed with a specialized liquid for acrylic and gel, and also with a compress based on a varnish remover. Regardless of the chosen method, you need to be careful and monitor the condition of your native nails.
How to remove tips from nails?
A beautiful manicure is happiness for any girl. But we all know that, unfortunately, you can’t live with this happiness all your life. Either the nail will grow back, or you will simply get tired of the monotonous manicure, and your nails simply need a break from such a “heavy burden” in the form of tips with acrylic or gel. How to remove extended nails on tips? It’s a pity that some ladies don’t ask this question prematurely and don’t consult their master. Well, that’s no problem! After all, in this article you can learn how to properly remove tips from your nails and not damage any of your nails!
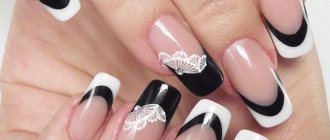
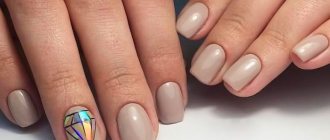
Overview of false nails
Kiss, Hard gel polish “Impress”
False nails with the mysterious name “hard gel polishes” are the same tips, but with an adhesive composition applied to them, activated by the heat of the hands. There are short and long options with different designs - plain, with sparkles, various abstract patterns.
The set includes:
- 24 or 30 records;
- file;
- orange stick;
- degreasing wipe.
Wearing period is up to 10 days.
Miami Tattoos
Miami Tattoos false nails are attached with the included adhesive. The kit also includes a small file and a plastic pusher to prepare the fingers for gluing. Each package includes 24 records of different sizes. If worn carefully, apply several times.
There are different minimalist designs and shapes, as well as lengths. Matte plates are especially popular.
Wearing period is up to 14 days.
Touching Nature
Touching Nature has overlays for both manicures and pedicures. The kit includes glue in a separate bottle, as well as 24 plates of different sizes. Repeated use is acceptable, but as practice shows, during wear the design wears off and using them a second time is simply pointless.
Wear up to 15 days.
Blumery
Blumery false nails for express manicure are tips with an elastic coating that, when exposed to the heat of the fingers, takes the shape of the nail plate. The adhesive base has an unusual format - the adhesive parts come separately from the tips - they need to be inserted inside and then pressed against the nail plate. The glue works on the principle of double-sided tape. There are 24 pieces in the set.
Wearing period is 7 days.
Extensions on top forms with examples and instructions
Getting rid of tips without leaving home
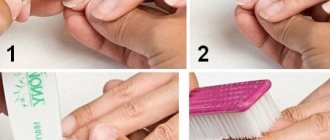
Now is the time to thank the beauty industry! After all, she took care in advance of how to remove the extended tips. It's quite simple. So simple that now you can even learn how to remove tips at home. First you need to purchase a special liquid at a cosmetics store. Don't worry about how to remove tips anymore, just apply this product to your nails and wait a while. But after this, you must rub nutritious oil into the plate.
If such a product is not available in your stores and you still don’t know how to remove tips, then don’t despair! After all, there are other ways... Firstly, you can use regular acetone. And this method will cost you much less. But, in this case, don’t forget about the nourishing oil!
When pseudo-manicurists are asked how to remove tips, they may advise you to simply tear them off. This is because over time your nail grows and the damaged area grows back, but it is still not recommended to resort to this method! It's quite easy and fast, but what harm can it do to you!
Another way. Determine by eye where your natural nail ends and file that area. Trim off any remaining “growth.” After this, cut off the remains from your own plate. Experts recommend leaving half a millimeter of the gel untouched. Under no circumstances should you tear off or chew something off.
Have you settled on the acetone method? Then here are some more tips for you. Instead of immersing your nails in acetone, you can moisten a cotton pad with it and place it on your manicure. To speed up the process of removing nails, wrap your tips with cotton pads soaked in acetone and regular foil.
You can get rid of an artificial nail by taking a hot bath or simply immersing your manicure in a container of warm water for a while. The “growth” just has to fall off on its own. But keep in mind, this process can take quite a long time! In most cases, it all depends on the quality of the glue used.
Now you know how to remove tips!
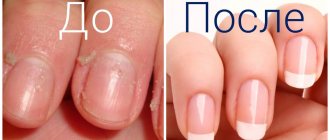
How to care for damaged nails after removing extensions
After you remove your gel nail extensions, you will find that your own nails are in very poor condition. That’s why they need treatment and recovery. The best way to ensure this is to go to a beauty salon, where you will receive professional care. It has an undoubted advantage over home methods, primarily due to the availability of a professional range of care products and tools, as well as the experience and knowledge of a specialist.
Oil baths to restore and strengthen nails
However, if for some reason this is not possible, you can treat damaged nails yourself at home. Once a week or even every other day, make a hand bath with olive or flaxseed oil. Nails are damaged, and the fastest and most effective way to return them to their proper condition is through oil treatments
During the treatment bath, you should gently massage the area around the nail to stimulate its growth. Due to frequent contact with oils, creams and other cosmetics, you should forget about varnishes at first
Eating vitamins and other beneficial substances is an important part of nail care. You can purchase special medicinal preparations for nails, or buy vitamins in ampoules and rub them into the nail plate. Don't forget about your diet. Care should be taken that it includes a sufficient dose of all substances necessary for the body. This will speed up the process of restoring damaged nails after removing the extensions.
The speed at which damaged nails return to their proper condition depends on the intensity of their care and adherence to a proper diet, including all the necessary vitamins and minerals.
It is especially important to pay them as much attention as possible at the initial stage of treatment.
Step-by-step removal of acrylic nails at home
Materials for removing artificial turf
The materials used are the same as for removing the gel.
To facilitate the process of removing acrylic from nails, you can purchase a special device. This is a convenient jar, inside of which there is a foam rubber soaked in acrylic remover.
Just place the edges of your fingers into it and wait for the time specified by the manufacturer (45-40 minutes).
Algorithm for removing extended acrylic nails
Acrylic is removed according to the same principle as gel, but much easier: in this case, the material comes off completely, and nothing needs to be added at the end. The maximum is to apply a buff to give a natural shine.
A special feature of acrylic is that it quickly hardens when exposed to air, so you need to work carefully but quickly.
Nails from the dentist
Photo: Source
Chinese beauties were the first to want to have long nails. The prototypes of artificial nails were Chinese silver tips. A lady wearing such tips seemed to be the standard of beauty, although they lengthened her fingers more than her nails. Later, women began to buy natural cut nails and attach them to their nails. Even after applying varnish to such nails, they were far from beautiful.
After this, a real boom in artificial nails began; they began to be made from pieces of linen fabric, film or papyrus paper, but such nails were short-lived. It was only towards the end of the 20th century that plastic false nails appeared in the United States. They began to be made, which is why manicures with false nails are often called “Broadway”.
Photo: Source
The history of the creation of nail tips began at the same time; they say that this nail extension technology was discovered by an ordinary dentist, Slack. The purpose of artificial nail plates is similar to the purpose of dental crowns - to give the base plates shape and length. The first tips were rough and heavy, but it was a real breakthrough in the art of manicure.
Today, tips (from the English word “tip” - tip) are a synthetic template that is firmly glued to natural nails using modeling material.
In order for the tips to remain on the nails longer, a number of requirements must be met. And you need to start with the right choice.