Posted date: July 26, 2017
Water manicure is a modern nail design technology that is widely and widely used by women. The uniqueness of water manicure is due to the unusual marble effect and elegant patterns. The technique for performing it is quite complicated, but you can do it yourself at home, following the instructions step by step.
Women who decide to decorate their nails this way for the first time often do not know how to do a water manicure and what is needed for it.
What is water manicure
Designers in the nail industry have come up with a new trend for lovers of interesting and unique designs on their nails - water manicure. It is also called marbling or aqua manicure.
Water manicure got its name due to the technique of performing it, during which an ornate pattern is created on the surface of the water with the help of colored varnishes and a toothpick. The resulting ornament is transferred to the surface of the marigolds in several ways.
The drawings created thanks to this technique look very original and intricate, and a wide variety of varnish shades can be used. Aqua manicure is one of the most creative and unique, but learning the art of doing aqua manicure at home is not at all difficult, you just need a little practice and time. Let's take a closer look at what tools and materials are needed to independently create intricate designs on your nails.
There are three most common ways to create a water manicure:
- Standard water manicure , when the nail plate is dipped in a container of water to apply a design to it;
- Dry manicure , when a varnish pattern is formed on the surface of the water and transferred to the nails only after complete drying;
- Marble water manicure , in the process of which hairspray is used. Let's look at how exactly this happens next.
Other options for creating an original manicure
Fashionistas didn't stop at just one method, and figured out how to do a water manicure without even getting your fingers wet. To do this, you should wait until the varnish film has completely hardened, which takes about half an hour on average.
Then take the varnish circle out of the water and cut it into several pieces to fit the size of the nail plates. The film is fixed on the nail with a transparent varnish and covered with another layer of fixative on top. Thus, the skin of the fingers does not need to be protected from paint and remains clean.
Another way to create especially beautiful patterns is a technique that results in a pattern similar to the pattern of the famous marble nail art.
To do this, dissolve two or three drops of the same color in water, which are immediately sprayed with hairspray. This is how the characteristic marble look with many points and veins is achieved. This manicure will look luxurious.
Required tools and materials
The list of necessary equipment for water design is not very long:
- Small bowl with water .
Considering the materials you need to work with and the technology, it is better to take disposable dishes. A plastic cup is quite suitable for these purposes. The water must be clean, always at room temperature. In hot water, the varnishes will become liquid and spread too much, and cold water will cause the varnishes to harden more quickly, which will also negatively affect the final result. - Scotch tape, adhesive tape, special liquid tape , such as Naomi, Fire Star, Masura, Skin Defender, or any adhesive paper to protect the skin around the nails from polish;
- A product for the cuticle area that will protect against color composition. Oil, cream, PVA glue will do;
- Dots , needle, toothpick, or skewer for creating a pattern on the water surface;
- Use a toothpick or cotton swab to remove excess color film in the water around your finger;
- Nail polish remover;
- Cotton sponges;
- Base and top coat;
- Colored varnishes, at least two different shades . You can use more pigmented compounds to create a pattern that is more iridescent and contrasting.
How to create an original water design yourself?
It is advisable to start with the lightest decor option. To do this you will need white and black varnishes. However, the best option is to use four tones of neon color. For water decoration you can use orange, green, yellow and pink. Any clear spray, such as hairspray, is also necessary.
First, the nails are painted with a base coating, then a neon coating should be applied so that the color is initially brighter. In order not to stain the skin, you need to stick tape in the shape of the letter “p” near the nail. Then the nail plate is visually divided into several zones, which will be covered with various varnishes.
Add two drops of a black shade to a container of water; it should spread well. The surface of the water should be sprayed with a spray, then figures of various sizes will form. The future manicure picture will vary depending on the colors used.
Next, you should immerse your finger in water with varnish, and the residues on the water surface are removed with toothpicks. Your design is almost ready. Then the tape is removed, and possible defects should be wiped off with cotton swabs.
Nails need time to dry. After which you can cover the nails with a fixing layer of a special coating. Such an original and easy-to-perform manicure will delight you every day and surprise those around you.
Which color should I choose?
Bright colors are great for water manicure. To make such a design, you will need a container to pour water into, a needle, varnishes of different colors and a napkin. Warm water is poured into a plastic glass, then varnish should be added there. A few drops will be enough. After it has spread in the water, a couple of drops of varnish of a different shade are dripped into the glass.
Next, you can create your own unique pattern using a needle or toothpick. Movements should be from the edge to the middle. And then do everything as indicated above. The main thing is not to be afraid to experiment. Every creative idea needs to be implemented.
This version of water-based manicure looks impressive and interesting. A charming nail design will help you create a charming look that will not go unnoticed.
Selection of varnishes
Let's talk about what coatings are best to use to create a water pattern. There are several simple recommendations, following which you can get a high-quality and beautiful drawing at home.
- Firstly, choose fresh compositions that have not yet begun to thicken. If they already have a viscous structure, they will not be able to spread freely over the water surface;
- Secondly, avoid quick-drying ones, which will harden almost immediately in the water, and you won’t have time to create the necessary ornament and transfer it to your nails;
- And, of course, choose high-quality materials, preferably from the same brand. In this case, they will have the same texture and drying speed, which will make the pattern better and more expressive;
- Do not use coatings that contain glitter, because under their own weight they will most likely settle to the bottom of the container. If you want to add shine, opt for a coating with a pearl sheen;
- For a water pattern you need to use regular varnishes; gel varnishes are not suitable due to their denser structure. The drawing itself can be transferred either to a gel base or to a regular one.
A small list of varnish manufacturers with whom we have never had problems creating patterns on water:
- Golden Rose
- Revlon;
- O.P.I.
- Farmasi;
- China Glaze
How to choose the right gel polish: we analyze all its types and top brands
Water manicure at home
It's no secret that half the success of a manicure depends on the quality of the material. What should you arm yourself with if you want to design your nails in this way yourself?
- Container with water - it is recommended to use disposable containers or cut off the top of a plastic bottle. It’s easy to work with disposable tableware, because after the procedure you can simply throw it away
- There is, of course, a danger that the plastic cup will tip over, but this can be easily avoided if you put a few coins on the bottom or prop it up on the sides with something. The water poured there must be at room temperature. Some people advise dissolving the varnish in ice water, but you are unlikely to achieve anything with this
IMPORTANT: Don’t even touch the bowls and cups, otherwise you’ll think for a long time about how to wipe off any remaining varnish from your favorite dishes.
We stock up on everything we need
- Nail polish is the main component of a manicure. It’s worth saying right away that in this case not just any varnish is suitable. Unfortunately, many girls have to go through more than one type of varnish before finding the right one. But then, believe me, the result will be worth it. In your search, start from the fact that the varnish must certainly have a liquid consistency
- Over time, the varnish in a bottle tends to become more viscous, so it is preferable to use only purchased material. Keep in mind that the structure of the varnish may change if you dilute it with acetone, so this trick is not suitable
- Another secret is good pigmentation. In other words, if one layer covers the natural pigment of the nail, the polish is good. Stop choosing one brand so as not to suffer due to texture mismatch
Thick texture varnish
- It is very important to take care of something that will protect not only the cuticle, but also the fingers. Please note that a water manicure is not a regular application of varnish and is not a gradient, after which there is not much excess left.
- Be prepared for the fact that in this case, about half of your finger may become dirty. Of course, manual cleaning will be quite troublesome, so it’s better to prevent this trouble. This can be done using paper masking tape or a thick cream, preferably for children.
- If you have manicure wax, use it, it also helps a lot. If the choice fell on tape, stock up on scissors
Cream
- Cotton pads and nail polish remover - even if you protect the areas near your nails, there may still be excess left, so place a bottle of special liquid nearby and put some cotton wool
Nail polish remover
- Toothpicks or a needle are also a necessary tool; you will use them to draw varnish patterns on the water surface
IMPORTANT: It all depends on what you are ready to make a choice in favor of - accuracy or saving time. If in favor of the first, then it is better to take a needle, but it will take a long time to wash it after each nail treatment, so to save time it is recommended to choose several toothpicks.
A set of toothpicks must be present
- Base, top and drying agent are all equally important. The base can be either transparent or colored, depending on your personal preferences.
- The top will give the entire manicure a complete look. As for drying, everything is clear here - it is indispensable for saving time, because water manicure itself is already a rather lengthy process
drying and top
Advantages and disadvantages
The advantages of this unusual nail art:
- Huge selection of patterns and shade combinations. There are no restrictions on the number of varnishes used, with the help of which it is possible to make a wide variety of ornaments on water;
- Water manicure looks beautiful on nails of any length and shape;
- The manicure can be complemented with a design such as rhinestones, sparkles, and negative space. It will always look original and attractive;
- A simple technique that can be easily used at home.
Negative points:
- The need to use protective agents for the periungual areas of the skin;
- In the process of creating ornaments, there is a large consumption of pigmented varnishes. Get ready for the fact that after one procedure the bottle may be a third empty. When using this technique, a couple of drops of material is not enough;
- You need to spend a lot of time decorating your nails using this technique, especially if you want to cover all your nails with water patterns.
Secrets of the perfect water manicure
As in any other matter, creating a flawless water manicure has its own subtleties. Watching a video on how to properly do a water manicure at home, you may not always notice the following nuances:
- when developing a water pattern, you should not completely immerse the skewer/knitting needle in water - just dip the tip;
- it is important to carefully ensure that your finger is immersed in water no higher than the level where the tape/plaster is located;
- You should paint your nails one at a time: after dipping and removing one finger, you need to wait until the varnish on it dries, and then move on to painting the second finger;
- when creating water designs on nails at home, it is recommended to paint the nails on one hand first, and after all the nails have dried, start designing on the second hand;
- mixing varnishes in water is enough for one minute - long movements of the paint can mix it too much into a uniform tone, then no pattern will work;
- When performing a water-based manicure with gel polish or a regular coloring compound, after each dipping of a skewer/knitting needle into water with paint, it is recommended to wipe the stick on a cotton pad or cloth - this way you can prevent unwanted mixing of varnish colors;
- the answer to the question of what varnishes are suitable/needed for water manicure is clear: only liquid paints should be used, as they spread better over the surface of the water;
- you should not resort to using thick varnishes, as well as diluting them with various thinning agents - this will only spoil the result;
- varnishes involved in the work should preferably be from the same manufacturer so that their quality characteristics are the same;
- Another secret of how to paint your nails using water and varnish is its thickness: if you have a composition on hand that is too thick and does not want to spread, you can add a couple of drops of nail polish remover to the water. Professionals do not advise doing this, but, as they say, for lack of fish there is cancer;
- if the water temperature exceeds room temperature, the varnish may curl; if, on the contrary, the liquid is too cold, then the paint in it simply will not disperse.
Scarlet tones
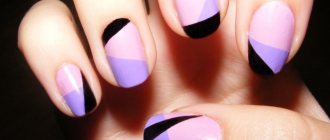
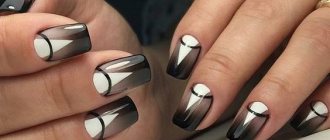
Black and white drawing
Blue colors
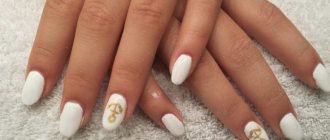
White and pink manicure
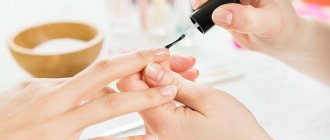
Preparation
Before performing an aqua manicure, you need to make preparations so as not to be distracted during the process.
- Lay out all the necessary tools and materials, pour ordinary water at room temperature into the container.
- Also prepare your nails: remove the old coating, if any, treat the cuticles, give the nails the desired shape and apply a base coat. Painting your nails with white polish will make even a thin layer of color look brighter and richer.
- The next stage of preparation will be to apply cream or oil to the periungual areas of the skin to protect them from varnish. The product must be applied carefully so as not to touch the nail plate, otherwise the pattern will not be fixed on it. If you are afraid that the greasy product will get into the water and interfere with your manicure, then you can carry out this procedure after finishing decorating the nail plates and removing excess thin film in order to moisturize the cuticle and skin after removing the remaining colored film.
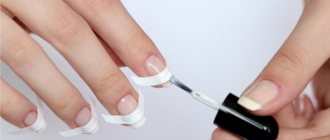
- The last thing to do is to stick tape or adhesive tape on your finger, above the nail and up to the second phalanx. This will also protect the skin from unwanted staining. We recommend immediately sealing all the fingers on which you are planning to apply an aqua manicure, so as not to waste time in the process and not spoil the nails already done.
Shading on nails with gel polish and sand
Shading on nails with gel polish and sand is called a sugar gradient and is done like this:
- A classic ombre is applied to the dried base. It can be a vertical or horizontal gradient, of two or three shades.
- The gel polish is dried in a lamp. Then the same tones are applied in a second layer, shaded and polymerized again.
- Now you need to cover your nails with topcoat and do not dry it. Sprinkle transparent powder or tint powder on top with a spatula, or you can use sand of several colors on different parts of the nail.
- You need to lower your finger down and tap so that the excess product falls off. Drying is needed again.
- Then they go over the nail with a trusty brush to remove the remaining unnecessary sand. The final stage is applying the top and polymerization.
Velvet sand cannot be used on the entire nail. Sometimes it is enough to highlight one or several stripes for them, near the sinus, in the center, along the cuticle, in a word, as your imagination dictates.
Watch the video for step-by-step instructions on how to apply a horizontal gradient with a sponge:
Step-by-step instructions for various techniques
Let's look at common and convenient ways to create an aqua manicure.
Dipping your nails in water
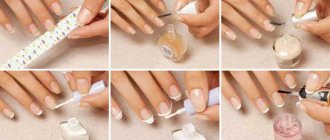
The simplest and most accessible is considered to be a water manicure with immersing nails in a container. It is done in the following sequence:
- Take the first pigmented varnish and drop it into the center of a container of water. The drop will immediately begin to spread over the surface.
- Drop a mixture of a different shade into the center of the resulting color circle.
- Then you can use the first shade or use another color. You can take any number of colors; the richer the palette, the more interesting the ornament. It is necessary to again make a drop in the center of the circle formed by the two previous compositions.
- As a rule, for a complex and graphic design, 10-20 circles are made on the surface of the water. They need to be done quickly so that the varnishes do not have time to dry out.
- Using a toothpick, needle or dots, draw lines on the resulting circles in any direction: across, along, from the center to the edge, diagonally. As a result, interesting patterns are formed. The end of a sharp tool does not need to be deeply immersed in water and it is recommended to wipe it after each line drawn so that the colored layers do not stick and thereby spoil the pattern.
- To transfer the design to the nail, dip your finger, nail side down, parallel to the water surface, into the center of the container. Hold motionless for 10-15 seconds so that the pattern does not smudge and is fixed on the nail. You can dip two fingers into the colored film at once.
- Collect the remaining colored film around your finger in the water with a toothpick or cotton swab.
- Remove the finger with the film attached to it from the water. Remove the protective tape and use a cotton swab soaked in nail polish remover to carefully remove excess polish film from the skin around the nail. Now it’s clear why you need to protect the skin around the nail. Otherwise, removing the color layer is problematic.
- Wait until the pattern dries. This will take a little longer than usual because varnishes with water take longer to dry. Apply a topcoat to protect your manicure from chipping and damage. Aqua manicure is ready!
The video shows the technique of creating patterns in more detail:
Water painting on nails can also be done using a gel base. All stages are performed in the same sequence. The only difference will be the need to dry the base layer, the main color if used for design, and the top coat in a lamp.
Without putting your finger in the water
This technique is also called dry manicure. This is due to the fact that the pattern is transferred to the nails in a frozen form. To do this you need:
- Perform the first five steps of the standard aqua manicure technique from the previous instructions.
- Leave the film on the surface of the water for about half an hour to dry completely.
- Carefully remove the resulting colored circle from the water and cut it into several pieces of the desired size.
- Colored pieces on your nails can be fixed with clear polish.
- When the design is dry, the excess film must be carefully removed with a nail file.
- Apply a layer of fixative varnish on top.
You can clearly see the dry manicure technique in the video:
Marble stains with hairspray
The aqua manicure technique is ideal for creating a marble pattern on your nails. It is also called foam stains.
To achieve this effect you must:
- Dissolve three to five drops of varnish of the same color on the surface of the liquid.
- Immediately, before they set and begin to harden, spray them once with hairspray or other hair spray.
- This way, a completely unusual and unique pattern is obtained, visually reminiscent of foam.
- Then we lower our fingernail into the water parallel to its surface and do everything in the same way as with a regular aqua manicure.
You can take a closer look at the marigold marbling technique in the video:
Manicure with water stickers
Water-based stickers are very popular, which is not surprising, because they do not stick, do not stretch, do not bubble or curl.
These slider stickers are a thin film that can either partially cover the natural pigment of the nail or an existing design, or completely. Using them is not at all difficult. For this we also need water:
- First of all, be sure to treat the nail plate with a degreaser and antiseptic. Light shades are preferred as a base - this will add brightness to the design.
- Take the stickers you like, cut them along the required contour and lower them into water for 5 or 10 seconds. Then gently blot the decorative element and transfer it to the nail
- If you choose regular varnish as a base, then you don’t have to wait for it to dry, but in the case of shellac, you can apply the picture directly to the sticky layer. The secret to the longevity of this design is that the image is located at a distance of approximately 1.5 millimeters from the cuticle and side edges of the nail
IMPORTANT: You should do this all with tweezers - thanks to it, the sticker will not tear.
- Well, the final stage is applying a finishing coat, which will add shine and allow the manicure to last longer. If you cover your nail with regular varnish, then do it in two layers, and if with gel, one thin one is enough. In the latter case, due to treatment in an ultraviolet lamp, the varnish will polymerize, and the manicure will be perfect.
Accent manicure with floral sticker Floral design
Marine theme Bright floral option
Predatory design Oriental theme
Cute owlets
Accent with birds Pandas Favorite cat theme
These are the unusual stickers.
As you can see, in order to become the owner of a beautiful and unique manicure, it is absolutely not necessary to visit a beauty salon. With some skill and knowledge of the nuances, you can become your own master.
Possible mistakes
When creating a decorative pattern, problems may arise, especially if you are using this technique for the first time. Let's look at which of them appear most often and how you can eliminate them:
- The drop is drowning . The reason may be an incorrectly chosen height of the brush from which the color composition falls. Do not raise it more than two centimeters above the surface;
- The drop does not spread. The varnishes chosen for the decoration are old and thick. Take only fresh, liquid formulations;
- Varnishes of different colors are unevenly distributed over the surface of the water . This may occur due to differences in texture and density of the compositions. Try to use polishes from the same brand;
- The patterns get confused and blurred . This happens due to a poorly cleaned toothpick. Wipe it after each time it is placed in the container;
- Colored spots do not form patterns well . This happens when the water selected is too warm or cold. We recommend using water with a temperature of no more than 40 degrees; the ideal solution would be water at room temperature.
Mistakes when creating a water design
- If you touch the wall of the container with your finger, then it is not selected correctly.
- If the varnish droplets do not spread in water, this indicates that the varnish is not liquid.
- If the gel polish immediately becomes crusty in water, change the water to warmer water.
- If the pattern doesn’t work out or is unclear, use a needle instead of a toothpick and don’t forget to clean it.
- The stains must be done lightly; the maximum immersion of the toothpick or needle should be 5 mm.
Water manicure with gel polish: how to do? Execution technology
Once you have prepared for the procedure, you can begin.
- Prepare a container with water, open all the varnishes, take out the lamp (for drying gel polish).
- Do a manicure, apply a base product, dry it in a lamp. Apply base tone.
- Lubricate the skin around the nail with a rich cream or cuticle oil.
- Now you need a container of water. Take a transparent gel with a liquid consistency and drop it into the water. A film should form that gradually spreads through the water. Next, we drip gel polish of a different color; clearer outlines of the color border should appear. Use a toothpick to place a dot in the center and continue dripping colored polishes. There should be a lot of rings. Using a toothpick, we draw lines from the center to the edges with smooth movements, that is, we make a drawing. It can be in the form of a spiral, stripes, teeth, or simply chaotic patterns. Use your imagination and creativity.
- Once the pattern is complete, immerse the treated finger parallel to the pattern in water. The gel polish film should lie flat on the nail and cover the skin around it. Using a cotton swab and disk, remove excess varnish.
- We quickly dry the finger under the lamp. Then you can apply the finishing coat.
- For each finger, make your own spot of circles and repeat the pattern. In this way, you create a unique manicure that will last for more than two weeks and delight not only you, but also those around you.
Choosing a varnish
We offer some tips from professional masters on how to create a beautiful water manicure for beginners. These include:
- To work, you will need fresh gel polish compositions. They quickly spread on the surface of the water surface while creating beautiful circles;
- To create an exclusive design you will need high-quality brands of decorative coatings;
- Experts recommend choosing varnishes from one manufacturer. As a rule, they have a uniform texture and the same drying speed;
- To create a marble effect, it is not recommended to use shiny types of varnish. When immersed in water, the drop will sink to the bottom;
- To create an unusual design, you can use regular nail polishes.