What is a nail airbrush and airbrush?
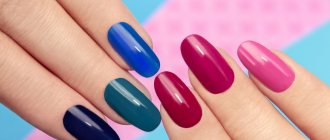
An airbrush is a special device that allows you to apply paint to your nails by spraying under air pressure. Using the device helps to achieve a very clear picture with smooth transitions between dark and light shades.
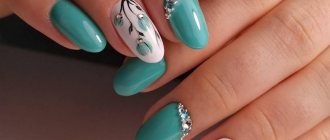
Airbrush nail designs are very popular. Using a paint sprayer, craftsmen create real miniature masterpieces. The device makes it possible to perform gradient and ombre, smoky halos or continuous painting.
Using an airbrush to create a manicure on your nails provides the following advantages:
- You can apply a drawing even without artistic skills, just choose a stencil;
- the procedure for creating a manicure takes little time, usually about half an hour;
- the paint applies evenly to the nails, without smudges or clots;
- The color rendering quality is very high.
Important! Airbrushing can be combined with sparkles, rhinestones and painting, they will make the manicure even more impressive.
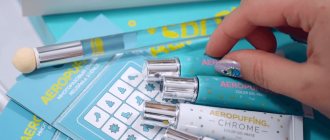
Examples of designs using the aeropuffing technique: photos and videos.
Even the most demanding client cannot resist the beauty of an air puffing manicure.
It will captivate with the play of color and light, smooth transitions, rich, realistic and natural patterns. In the training videos you will be able to see firsthand the quality of drawing details and the effectiveness of gradient transitions. As for the images that can be created with this technique, they are almost limitless. The most popular are, of course:
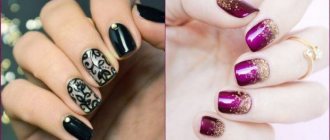
- three-dimensional 3D paintings (stars, planets, volumetric glare effect in precious stones);
- a variety of ombre gradients (both soft pastel and brightly saturated);
- bright and attractive images for the holiday, evening images. For example, painting or spectacular stained glass;
- original and mesmerizingly beautiful abstractions and geometric designs;
- manicure based on the seasons;
- and many many others.
By choosing an air puffing set as your assistant for decorating nails (both natural and extended) of any length and shape, you can be sure:
- the ideas embodied will be deep and voluminous, clear and impeccable;
- smooth halftones and airy transitions will give any design a special appeal and appeal;
- With air puffing, you don't have to worry about common imperfections like too much paint, brush marks in the design, or uneven coloring.
You can buy Aeropuffing using this link and bring your manicure fantasies to life in bright colors!
How does a nail airbrush work?
The photo of the airbrush for nails shows that it consists of a handle with a trigger, which is also called a gun. There is a paint tank on the top or side of the body, and at the end there is a nozzle from which the pigment is sprayed. An important element is also the compressor; it is not always included in the kit, but the device cannot work without it, so it is necessary to purchase it in addition.
The operating principle is as follows:
- paint and air are supplied to the handle under pressure using a compressor;
- when the trigger is pressed, they mix with each other;
- the paint is sprayed in an even thin layer onto the surface of the nail.
The paint tank can be located on top or on the side of the airbrush.
Airbrushes are not only simple, but also double. The former allow you to regulate only the flow of paint; with the help of the latter you can also control the amount of air during mixing. Professionals often use double models; with them, the drawings are brighter, with many small details. Air adjustment makes it possible to change the thickness and level of clarity of the lines.
About airbrush manicure
Nail shapes
Such drawings cannot be made manually; they are created only using airbrush manicure paint, which is sprayed with this very device.
What is this manicure equipment? This is an automatic paint sprayer. Skilled and experienced craftsmen, using this machine, create small masterpieces on their nails - three-dimensional designs that seem “alive”, with a smooth gradient transition from one color to another. A manicure with airbrush nail paint always looks more flattering, sophisticated and expensive.
Which airbrush for nails is better to choose?
There are many models of airbrushes for nails in specialty stores. First of all, when purchasing, you need to pay attention to the manufacturer. Famous brands include:
- Sparmax;
- Iwata;
- Jas;
- Hansa;
- Evolution;
- Fengda;
- Air Nails.
The cost of professional airbrushes starts at an average of 3,000 rubles. Expensive models are the most convenient to use and allow you to achieve better results.
When choosing a device, you should take a closer look at its characteristics. To create a design on your nails, it is recommended to purchase airbrushes:
- with an air flow rate of 10 liters per minute and a pressure of 1.5-3 atm.;
- with a tank for 2 ml of paint or more;
- with a nozzle diameter of about 0.2 mm;
- with a compressor of 12 W and above.
Such devices will ensure the most uniform and smooth distribution of paint over the working surface.
In modern models, the compressor is activated automatically when the trigger lever is pressed. In budget outdated devices, it starts separately, and airbrushes make a lot of noise and vibrate, even if the working part is turned off.
How to choose
You need to choose the device carefully. Please note that it must be tested before purchasing. If you order online, it is important that if the requirements do not meet, you have the opportunity to return the unit to the seller.
What you should pay attention to when purchasing a device:
- Smooth stream of composition distribution . You can also check with plain water. The spot should be of the correct shape.
- Adjustment of the torch and paint supply must be carried out correctly. The intensity of the pattern and the degree of paint supply will depend on this.
- The lever should operate softly and smoothly.
- Upon completion of spraying, there should be no paint remaining on the nozzle and needle in the form of drops.
These are the main factors indicating that the device is more or less of high quality and has no defects. Naturally, you will need to purchase stencils, paints, and cleaning products.
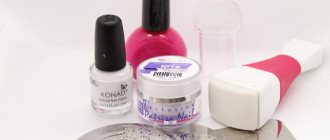
What you need to use an airbrush
To apply a manicure, you will need, first of all, the nail airbrush apparatus itself, consisting of an automatic pen, a compressor and a connecting hose. You will also need to prepare:
- a thin brush to clean the nozzle during operation; the airbrush may become clogged with paint;
- disposable or reusable stencils, as a rule, using spraying, a pattern is created using them;
- tweezers;
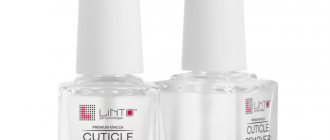
- base varnish;
- special paints;
- thin rubber gloves that will protect the artist’s skin from pigment getting on it;
- plastic tips;
- disposable towels for removing excess pigment and dirt from the workbench.
Tips are especially useful for beginners; they allow you to practice applying manicure.
Paint and tips are usually supplied in a set with an airbrush. But if necessary, they can be purchased separately, like all other elements.
Signs of breakdown and troubleshooting
- If the oil in the tank bubbles during operation , then there is a problem with the nozzle. Unscrew it and inspect it carefully. The problem can be solved by either tightening it or replacing it.
- Drips of paint into the trigger and needle seal . Tighten the seal. If this does not help, the seal will have to be replaced.
- The composition does not spray . Clean the gun. Check the hose for integrity. Check the operation of the air supply valve by unscrewing it from the handle and turning on the compressor. If the problem is in the valve or hose, they will need to be replaced.
- Problems with the needle stroke, displacement of the center of the spot . Clean your pen. Check the tip of the needle for integrity. It may need to be replaced.
How to assemble an airbrush for nails
The paint sprayer is usually stored disassembled in a special case. Before you start creating a manicure, all parts will need to be connected. The algorithm may vary slightly depending on the airbrush model, but in general it looks like this:
- the gun is connected to the compressor;
- fix the hose through which air is supplied;
- Screw on the paint container if it is not integral with the body of the gun.
Pour a little ordinary water into the tank of the assembled airbrush and make several sprays. This is necessary to remove remnants of the previous pigment. Then the water is drained, the tank is wiped with a disposable towel and fresh paint is poured into it.
Advice! Before starting work, you need to test the airbrush on a sheet of paper and adjust the pigment supply and color density through the trigger.
Preparing for work
The airbrush does not require long preparation for use. Just plug in the compressor, connect the hose and paint gun, and you can start applying designs.
- The paint is poured into the tank ready-made or pre-diluted in a small container with water to the state of milk. If the consistency is thicker, the nozzle will clog or throw out lumps.
- Before filling the tank with the finished paint, you need to shake it well so that the liquid becomes homogeneous. After filling the tank, you need to close it with a lid, if it is provided in the design of the model.
There are also nail airbrushes without a top tank. For beginners, they are completely impractical, since the paint can spill or splash out when working, staining clothes and work surfaces.
- After filling the tank, you need to adjust the device by forcing air through it and adjusting the flow of paint. To expel the air, press the trigger only downwards, pointing the nozzle at a sheet of paper or a napkin on the table.
- To adjust the paint supply, we now move the trigger towards ourselves. The more we move the lever towards ourselves, the more intense the paint supply. Having set up a clean and even flow on the paper or napkin, you can proceed to spraying the color onto your nails.
How to use a nail airbrush
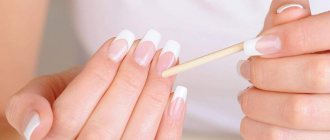
Before using an airbrush, you first need to prepare your nails. To do this, do a hardware or edged manicure, and then apply a base coat and level it. It is advisable to protect the cuticle and side ridges with a special liquid film, so that later you do not have to wash off the remaining paint.
There are several popular airbrush techniques on nails. Which one to choose depends on preference.
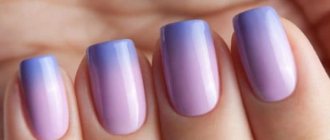
How to make a gradient with an airbrush on your nails
A gradient, or ombre, is created on a colored background of gel polish, for example, nude or camouflage. Step-by-step use of an airbrush for nails looks like this:
- the selected paint is poured into the tank of the device in a volume of about 2 ml;
- the nozzle of the device is purged and an even flow of pigment is adjusted;
- The paint is sprayed from the tips of the nails to the middle from a distance of approximately 1.5-3 cm.
The airbrush allows you to easily adjust the intensity of the applied gradient.
Videos about using an airbrush for nails show that the pigment should lay down in a very thin and even layer, drying almost immediately in the air. After applying the paint, you need to moisten the brush in the primer and remove the residue from the sides of the nails; you can also treat the ends with a buff.
At the last stage, the pigment is coated with a topcoat, dried in a lamp and the dispersion is removed. Then all that remains is to remove the remaining paint from the skin with a cleanser or remove the protective film from the cuticle.
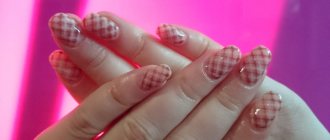
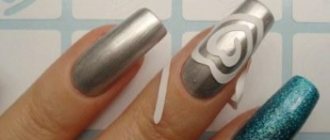
How to make airbrush designs on your nails
The fill pattern using an airbrush is performed through a stencil on a contrasting background. They do it like this:
- the template is pressed tightly to the nail plate;
- use an airbrush to spray paint through the holes;
- the template is removed and a fixing agent is applied over the design;
- the ends are treated with a buff if there is pigment left on them;
- The nails are dried in a lamp and then the dispersion is removed.
A regular fill on nails done with an airbrush has very clear lines.
The colors for the fill pattern are chosen at your own discretion. A manicure that combines 2-3 contrasts looks brighter and more noticeable. But you can also use shades from the same range.
How to apply a halo to your nails using an airbrush
Another interesting technique is creating a halo based on the applied pattern. Manicure is performed according to the following algorithm:
- the selected stencil is glued or pressed tightly to the nail;
- the airbrush is filled with contrasting pigment;
- apply paint in a very thin layer without smudges around the perimeter of the template, creating a slight haze;
- the edges of the pattern are drawn with a brush, accentuating strokes or in one line.
The halo makes the manicure pattern more voluminous and deep.
Next, all that remains is to remove the stencil and, according to the standard procedure, dry the nails in a lamp, clean the skin and remove the dispersion.
How to make a complex painting using an airbrush
The device for spraying paint can be used not only on one, but also on several stencils. This allows you to create a complex graphic design on your nails.
For example, you can perform a floral spring-summer manicure using the following algorithm:
- make a French base using two or three colors of varnish;
- apply a stencil to your nails and use it to create abstract lines;
- fix the result with topcoat and lamp;
- reapply another stencil to your nails and paint the second layer with butterflies with an airbrush.
A graphic design using an airbrush is applied to the nails in 2-3 layers.
If desired, you can combine not only different stencils, but also combine styles, achieving the most original graphic design.
Nail care
A beautiful manicure enhances the overall look. However, in order to make a truly high-quality design of the nail plates, they must be healthy and strong. Otherwise, the artificial coating will not last long, and the applied design will be ruined by chips. Nail health must be maintained by observing the following points:
- Choose a healthy diet, give up alcohol and smoking.
- Drink 1.5 liters of water per day.
- Keep your nails and hands clean. Periodically treat them with antibacterial gels.
- Use nourishing creams daily.
- Don't forget to make masks for your nails and hands. A mask made from warm olive oil with drops of lime, lemon, and iodine has an unsurpassed effect.
Important! In addition to manicure procedures, the beauty salon can offer healing techniques. For example, internal strengthening of the plate with preparations from the IBX system, massage with natural professional products, etc.
How and how to wash your nail airbrush
From time to time, your airbrush needs to be washed, especially if it is used infrequently. The paint has time to harden inside the nozzle and in the tank, which reduces the functionality of the tool. You can tell that the system is dirty by the appearance of drops or characteristic “snow”—sticky pigment particles.
If you do a manicure with an airbrush for yourself occasionally, you need to clean it after each use before storing it. In a salon or home office, washing is carried out at the end of the day; with a dense flow of clients, the internal parts of the device do not have time to clog.
The choice of cleaning agent depends on the type of paint. If your airbrush uses acrylic pigment, you can wash the device with plain water. For silicone paint you need to take a special cleaner, for example, TEMPTU.
To clean the nozzle, simply unscrew its tip, moisten a brush in water or washing liquid and treat the area around the needle. Then the device is dried with a stream of air and the nozzle is fixed back.
Cleaning at the end of the working day is carried out more thoroughly. The procedure looks like this:
- blow the remaining pigment out of the nozzle onto a napkin or cotton pad until the air flow becomes clear;
- wipe the walls of the container with a small napkin;
- a few drops of water or a special liquid are poured inside;
- the nozzle is aimed at the napkin and the trigger is pressed several times in a row;
- pour a little more cleaner or water into the tank and turn on the compressor;
- press the trigger, after closing the nozzle with your finger, so that the liquid inside the tank bubbles.
It is better to clean the airbrush with disposable gloves.
Then you need to drain the water or cleaner, blow the remaining air out of the nozzle and repeat the entire procedure. At the last stage, remove the tip, pull the trigger so that the needle is completely hidden, and use a cotton swab to wipe the walls of the outlet hole.
Regular washing of the device allows you to maintain it in working condition. If the airbrush does not become clogged with paint, then it will not have to be completely disassembled to clean the dried pigment.
Airbrush tools
The airbrush for nails itself is accompanied by the necessary kit for work, which includes:
- special airbrush paints,
- stencils;
- training tips;
- tweezers.
Airbrush tools are sold in specialized stores; it is better to purchase from trusted manufacturers so as not to harm the equipment with low-quality components and paints. The kit includes special paints, stencils, cleaners and a compressor. Tools are sold separately or in sets for nail art. The price of components is almost equal to the price of the tool itself. In online stores, you can select a product in a catalog where there is a description of the characteristics and advantages.
Stencils
Stencils are designed to create a given design using simple-action nail airbrushes. But, even when using templates, each drawing is carefully planned to make a quality painting:
- paints are selected and mixed;
- the flow (quantity) of the supplied dye is adjusted;
- the distance from which the paint will be applied is thought through.
Stencils are created from film, which can be transparent or translucent. They are very elastic, which makes them convenient for use with nails of different shapes. Stencils are made using high-precision cutting of the pattern, so the designs are created clearly and the use of a stencil template is not visible.
- Salmon soup - recipes with photos. How to cook salmon soup at home step by step
- How to get rid of boils at home
- Curd dough - recipes with photos. How to make shortbread, yeast or puff pastry from cottage cheese step by step
Airbrush paints
Special paints are used for painting with this tool. Airbrush nails are created with dyes that have a different consistency. If you use regular varnishes and dilute them with solvents, you can break the equipment. Acrylic airbrush paints are often included with the tool. If you want more colors than the standard set, then it is better to buy paint from a well-known manufacturer, for example, Fluo, Premium. It’s easy to order kits in online stores and specialized salons for nail technicians.
Compressor
For convenient work, it is important to choose the appropriate compressor that is suitable for your instrument. Device requirements:
- maximum quiet operation;
- light weight;
- performance.
Without this important detail, your airbrush will be useless. You need to approach the choice of compressor responsibly. Productivity, which characterizes the volume of air passed through the device per unit of time, is the most important requirement.
How to replace airbrush for nails
An airbrush is a rather expensive device. If you don’t have the money to purchase one, but still want to get a high-quality manicure, you can design a homemade coloring device.
The easiest way is to create an airbrush machine for nails using a ballpoint pen, a wine cork and a container for pigment. The diagram looks like this:
- the pen rod is removed and blown through, removing the writing part;
- make a corner from a wine cork and drill a hole in it;
- insert the plastic body of the handle into the prepared cork stand, and attach the rod to the bottom;
- the excess length is cut off with a knife, and a hole of a suitable diameter is drilled in the lid of the paint container;
- the rod is inserted into the bottle and the cork stand is secured with glue.
The entire structure can be assembled in just a few minutes. When using it, you don’t even need to connect a compressor; you just need to blow hard into the plastic tube.
This DIY alternative to a store-bought airbrush is good for creating a simple manicure.
Attention! Any homemade tool will be noticeably inferior in capabilities to a purchased device.
Features of nail care at home and in a beauty salon
It would seem that every woman should be able to take care of her hands and nails using a standard household manicure set. But for most, competent care is limited only to the ability to cut their nails, somehow file the corners and simply apply one color of polish. And for some, this doesn’t work out quite correctly and beautifully.
It is clear that for more complex things, which are at the peak of fashion, you need skills, skill, and special devices with materials. For example, almost no one can apply gel exactly the first time; this only comes with experience, which is reinforced by everyday work with this material. And only a master with a special airbrush with a compressor for nails can make a gradient design.
Important! To get a high-quality manicure that will last a long time and look decent, it is still better to trust its implementation to professionals working in a salon.