Artistically designed nails are attractive, harmoniously complement the image, and emphasize the style and character of the lady. The nail industry has an impressive collection of tools necessary to perform manicures of any complexity. Dots are one of the essential tools for creating a picturesque composition on your nails. What is dots? How to use the tool, step-by-step actions for beginners, techniques for applying patterns, what can be replaced, photos and videos here.
Why do you need a dot stick in manicure?
This term refers to a small thin stick that can be made of wood. It is also often made of plastic. The tip of this tool looks like a metal ball, and it can have different sizes.
Today, double-sided dots are increasingly being sold - at their ends there are balls of different diameters. Professional craftsmen will need a whole set. If you need a dots for home design, a small to medium size will suffice. Large instruments are used extremely rarely.
Dots is very easy and convenient to use. It allows you to quickly decorate your nails with dots, lace and other designs. It makes it easy to draw snowflakes or flowers. Dots are often used to create a small additional pattern. It can also be used for gluing rhinestones onto paintings.
About bright manicure ideas using dots
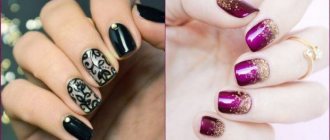
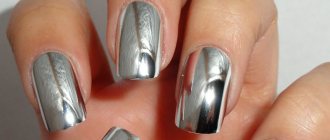
Each person is individual, and that is why all girls try to choose a manicure that will distinguish them from other girls. Unfortunately, many blindly follow fashion trends without knowing at all whether it will suit them. There are many ideas for bright and expressive manicure. You need to choose the right range of colors that will suit you.
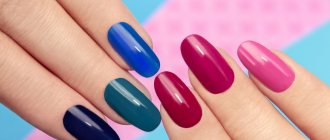
Using dots you can create bright manicures
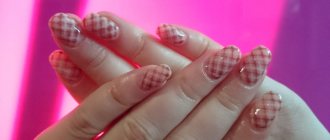
A bright manicure starts with a bright base, and only then a design is added. You can create different compositions using dots. They can be complex and create a picture. You can also simply put a few dots for decoration and variety. One of the brightest designs is a pattern. In this case, the main thing is not to overdo it with the print, and it should not look stupid and tasteless.
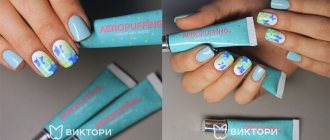
How to use Dots: step-by-step instructions
To use dots correctly, you need to follow a certain sequence of actions:
- First, coat your nails with clear varnish, then wait for the base of the pattern to dry completely. It is also possible to use a colored coating.
- Apply a little varnish to the palette - foil or a plastic container is suitable for this purpose.
- Take a stick and fix it perpendicular to the surface, then dip the end into the varnish. It is important that the entire instrument is treated with a coloring compound.
- Apply a few dots on the nail and complete the design. To get the perfect dots, the dots should be directed perpendicular to the nail.
- The varnish applied to the palette dries quite quickly. To create a neat pattern, you need to periodically add the product.
- After completing the pattern, the dots can be cleaned of any remaining dye.
About dots drawings
Since everyone is already tired of the usual, monochromatic manicure, it is necessary to somehow move forward. Every girl tries to express her individuality and uniqueness even in such seemingly trifles as a manicure, but it turns out that this is far from a trifle. Often, the designs on girls' nails speak for themselves, so it is always necessary to choose a good and thoughtful nail design.
You can make drawings with dots
A wide variety of designs are made with dots and have varying complexity. Sometimes such a pattern consists of several randomly located dots or monograms. For more complex compositions, you need to be good at handling the instrument, as well as have some drawing skills.
What patterns can you draw with a brush?
With this tool you can easily create a huge number of beautiful and interesting patterns. For example, a butterfly or a flower applied with dots looks great.
Lunar manicure
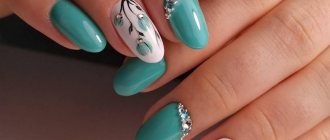
To perform a lunar manicure decorated with a floral pattern, you can use a dots. In order not to make it too pretentious, it is better to perform the pattern on only two nails - most often the middle and ring fingers are chosen for this.
Then you can paint your nails with varnish of the main shade and dry well again. After this, you can cover them with a second layer of varnish and use a dot to create a design. To do this, you need to drop a little varnish onto the foil and use a tool to draw a flower consisting of 4-5 dots. Then use a wooden stick to draw out thin lines to make the composition more voluminous.
Using a thin brush, create a semicircle at the base of the nail plate. First you need to make an arc, and then fill it with color. It is important that the holes are the same.
French
This classic manicure suits all girls. The French technique is considered quite complex, since it is not easy to create a neat white line. However, dots makes this task much easier.
First, you need to prepare the nail, and then cover it with base varnish. The main stage of such nail art is considered to be making a smile. To do this, the dots need to be dipped in white varnish and used like a pen. After applying the main design, the nails can be treated with a fixative.
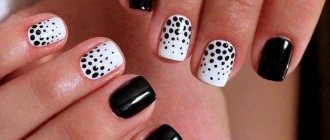
spot flowers
The image of dots on nails is considered one of the most popular designs. With the help of dots you can create such a design quite easily. To do this, you need to dip the device in varnish and cover the dried base with dots. This way you can create designs of different sizes.
It is also quite possible to show your imagination and make various patterns from dots - for example, flowers. Thanks to the use of dots, you can get designs of different sizes and colors, which will make your nail art truly unique. To make a beautiful flower, you need to put a large dot in the center, and use smaller dots to make the petals.
Lace
Lace designs on nails always look very gentle and feminine. To perform them you need to choose a varnish. Then cut out a wavy pattern from the tape, which will then become lace. It should be glued to the nail, and the free area should be covered with a delicate shade of varnish. After this, remove the tape.
Now you should use dots to make the lace, get rid of excess varnish and complete the neat design. To fix the pattern, the nails need to be covered with another layer of varnish.
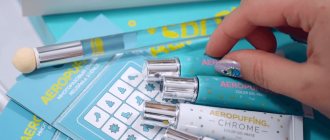
How to use gel web - application and design options
The fastest possible design, perfect fine lines, geometry or abstraction - at its best and all with one super product. Spider gel or spider gel quickly burst into the nail industry and won its niche in gel polish design.
If you are good at drawing on nails, forget about your skills, spider gel has completely different properties than paint and any design with it is impromptu and an active action.
In this article we will look at the intricacies of applying webs and what design possibilities this product opens up.
Methods of applying spider web gel paint to nails
- What tools to use with spider web gel paint.
Using gel web is easy; to make a design you will need to choose from: dots (preferably with a mini ball), a thin brush, an orange stick or gloves (vinyl, nitrile, latex).
- How to apply spider gel and make fine lines.
The thickness of the lines directly depends on the depth of immersion of the dots in the jar; the more composition you capture, the thicker the thread will be. In this case, if you dip the dots very lightly into the gel, the web will grip very weakly and may tear when stretched.
By stretching the gel (pull the dots with paint on the tip away from the can), thinner lines are obtained. Gradually, during the process of creating the design, the thread becomes almost transparent.
- How to use spider web gel paint.
You can apply spider web gel to a finished manicure with gel polish directly on the top without a sticky layer or after removing the stickiness from the finish or color coating.
Spider gel can be left as a convex design, diluted with additional decor, or covered with a top.
Since the web has a modest color palette, you can make it colored yourself. Microglitter, velvet sand, acrylic powder can be sprinkled onto the undried web or with the remainder of the dispersion layer; rub in the mirror rub.
- How long to dry the spider web gel.
The thinner the gel lines, the better they dry - 20-30 seconds of drying is enough, the time increases in relation to the thickness of the threads.
Do not create lines more than 1 mm thick, since the composition is not completely baked in the lamp and a liquid gel remains inside the web.
In general, the drying time of the composition in the lamp is ambiguous; read the instructions on the manufacturer’s jars and practice with tips.
VIDEO INSTRUCTIONS » alt=»»>
- What thickness of spider web gel is best?
Many manufacturers rushed to release the popular design gel, but the density of the compositions varies.
It works better on fairly dense, thick textures; their threads do not break and allow you to draw out the finest lines.
More liquid compositions can cause threads to sag quickly and break.
- How to remove gel cobwebs from skin.
There are several removal methods:
- Before making the design, apply Skin Defender protective tape to the skin of the rollers (you can read about the product in our article). After performing a manicure, simply remove the dried film from the gel paint and everything will be clean.
- Gently wipe away any cobwebs from the skin before drying with a lint-free cloth and cleanser. You can also apply cream to your skin before creating the design to make it easier to remove the gel.
How to create a gel design with spider webs
You can make an interesting design with cobwebs using any of the above tools; for some work a brush is more suitable, for others dots, it’s all a matter of practice.
The described methods of applying web gel are performed on a finished varnish coating or after applying a colored layer with the stickiness removed.
- For making chaotic or sketched rounded lines.
- Grab a little gel directly from the jar (or put a separate drop of paint on the palette).
- Using a brush or dots, draw out the required thickness of the thread, pull it to the level of the nail and, without touching the surface of the gel polish with the tool, place the web in the invented pattern. The thread is in the air all the time, and after pulling it is quickly placed on the nail.
- The dots/brush moves in relation to the nail at an angle of 90 degrees or, if more convenient, completely parallel in the air. The movements should be fast enough, but not too sharp, so that the threads do not break.
- To create rounded lines, the web is draped over the nail, but not tightly wound along the axis (remember that you will need to remove the excess).
- When the lines are completed, send them to the lamp. Once dry, complete the design or cover the lines with topcoat.
Graphic design gel spider web
To create graphic patterns, you can act in two ways: pull a thread from a jar and place fastening points on your glove, or wrap a small drop of gel on your brush and move from point to point.
Web graphics features:
- We draw the lines quickly and clearly; delay causes the thread to sag.
- When working from point to point - do not place clear gel drops, lightly touch the nail - barely noticeable and begin to draw a pattern. They pulled out the desired section in the air and placed it on the nail.
- After drying the lines in the lamp, fill the geometry windows with gel polish or other decor.
How to replace a tool at home
Don't be upset if you don't have dots. Instead of this device, you can use any similar objects. A hairpin with a ball at the end is perfect. An equally effective pattern can be obtained using an ordinary ballpoint pen, a toothpick or an orange stick for manicure. The main thing is to apply the drawing as carefully and patiently as possible.
Possible options for replacing dots also include the following:
- sticks;
- pins with a rounded end;
- ordinary matches;
- hairpins;
- pencils that are not too sharp;
- toothpicks;
- carnations from a comb.
It is important to consider that small objects are not very convenient to hold when drawing. To solve the problem, you should use a regular pencil with an eraser at the end. To do this, just stick a pin into it.
We paint panels using the Dot-art technique without using dots
Dot-art is one of the varieties of dot painting that has recently gained wide popularity. Large, voluminous pea dots, intertwined into openwork mandala patterns, amaze with their beauty, geometrically adjusted pattern, and harmonious color transitions.
As a rule, in such painting, to obtain the effect of relief and convexity of a point, special metal “brushes” are used - dots.
Dots are special tools for applying dots of various diameters. They are a metal rod with a ball at the end. They are widely used in nail design, but are also widely used in other types of decorative art.
However, what should you do if you don’t have dots at hand, and buying expensive special wide rods (for applying especially large dots) requires a lot of money?
My master class is about how to create an original panel using the dot art technique without using dots, but using simple handy tools that almost every craftsman has.
For work we will need:
1. Wooden blank. 2. Acrylic primer (preferably black), putty, sandpaper. 3. Decola black acrylic paint. 4. Decola metallic acrylic paints (gold leaf, Aztec gold, copper, bronze). 6. Decola acrylic contours: gold, copper, bronze. 7. Glossy acrylic varnish Decola. 8. Palette. 9. Wide brush. 10. White universal pencil (for wood, glass, metal). 11. Ruler, protractor, compass. 12. For applying dots: a pencil with a smooth rounded tip, sushi sticks, souvlaki skewers, contour nose, etc. 13. Thin awl or needle.
Photo ideas for nail design using dots
Dots helps to realize the most daring ideas in nail design, which is confirmed by numerous photographs. With the help of this simple tool, you can create a variety of designs on your nails - lace, floral patterns, geometric patterns. In any case, they will look neat and attractive.
Dots are a very convenient device that helps you create various patterns on your nails. With this tool you can get many interesting nail art options. The main thing is to be patient and do everything as carefully as possible. As you complete such drawings, you will acquire the necessary skills and be able to independently perform a beautiful salon manicure.
What is dots
In appearance, the dots are similar to a gel pen. The dye is drawn onto the tip in the form of balls of different sizes, which are located at both ends. Designed for creating openwork patterns using solid, multi-colored dots. The tool is convenient for drawing lines of different thicknesses, filling empty spaces with multi-colored paints, connecting dots, and drawing contours. Metal dot tips allow you to use the item in various fields of applied art:
- sculpting miniature flowers and leaves from plastic polymer clay;
- production and decoration of costume jewelry;
- decoupage, scrapbooking;
- embossing paper, pieces of leather;
- dot painting;
- decoration of glass, porcelain, wood, metal products.
Acrylic or gel is used to apply the design. Using dots, you can create patterns in the form of dotted lines, zigzags, waves, monograms, and curls.
Why do you need a dots stick in manicure?
A dot stick is a small thin object made of wood, plastic or metal. Has one or two metal tips with a rotating ball at the end. The mobility of the ball allows you to collect paint on its surface, apply a dotted pattern, and lay dotted, straight, geometric lines. Dots for nail design are needed to create original, original, exotic ornaments and patterns.
Advantages:
- simple, convenient;
- allows you to quickly decorate your nails and create a special design;
- varnish, gel, acrylic are suitable as paints for painting;
- suitable for independent use at home;
- Suitable for beginners in art design;
- withstands repeated use.
Types of tools
Dots can be single-sided or double-sided and differ from each other in the diameter of the rotating ball. One tool can have different diametrical sizes of the ball to make it possible to apply points of different sizes in the same color. A tool with a micro pea on the end is designed for drawing fine, slightly noticeable details. The shape of the ball is a round pea, cylindrical, elongated, pointed.
There are dots with a silicone brush on one side and a metal ball on the other, which is very convenient when making designs. Dots can be used to attach tiny rhinestones, beads, beads to the surface of the nail. Tools are sold as a set and individually. The set allows you to draw a pattern in several colors and shades. The product differs in design and material from which it is made - wood, metal or plastic. A simple, unassuming look or a glamorous one with sequins and embossed patterns throughout.
Rating of the best
The best dots produce:
- Zinger. The German company produces nail care products and other cosmetics. Metal dots, double-sided, with different ball sizes. The product is high quality, certified.
- Planet Nails. A well-known brand that produces high-quality products for the nail industry. Recognized double-sided dots for drawing, for applying rhinestones and beads.
- Ice Nova. It produces dots for applying small decor, for creating openwork patterns, ornaments of various shapes, three-dimensionality.
Where to buy dots
You can buy the tool in specialized stores selling manicure products, or via the Internet. Sold individually and in packages in several colors, with nozzles of various sizes.