Using stencils you can decorate your nails with patterns and even pictures. You can create entire compositions consisting of flowers, butterflies and other ornate images. A large selection of different templates allows you to bring to life any, even the most original ideas.
Types of stencils for nail design
Water based
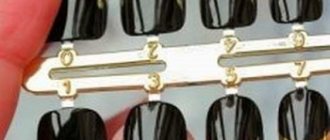
Water stickers
They are a thin and elastic film with an image , which is applied to paper for convenience. They are used after wetting in warm water.
Adhesive based
Thanks to the adhesive layer, the stickers adhere well to the nail plate and help create clear designs.
French stripes
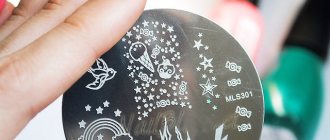
Stamping disc
One of the most popular stencils, because not everyone can boast of the ability to draw a perfectly straight line. And with the help of special strips you can make a French jacket even at home.
Stamping disc
The main tools of this technique are a stamp for transferring the finished drawing and plates with drawings . The stamp has a rubber or silicone tip, which allows you to transfer the finished image through the print.
Airbrush stencils
Airbrush stencil
They are rarely used at home, since this technique requires a special tool - an airbrush , which is quite expensive. The template is firmly fixed with the help of an adhesive base, and after spraying the paint it is removed, leaving a beautiful design.
Vinyl stencils
Vinyl stencil
They are very similar to paper ones, but have a number of advantages. So, they have a more varied design. With their help, you can create absolutely any decor without fear of smearing the design.
And thanks to the specifics of the material from which they are made, such templates fit more tightly to the surface of the nail plate, which allows you to make patterns with clear and even lines and draw the most intricate shapes.
Using forms for extensions: a step-by-step guide
Step-by-step extension to lower forms
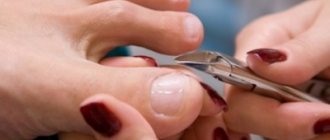
- A manicure is being done .
- The template slightly compressed a natural nail is inserted into a special window . Make sure that the shape perfectly matches the smile line with the free tip of the nail (it can be adjusted if necessary).
- The template is fixed on the finger , and extensions with gel or acrylic begin according to the markings.
- After the nails are dried in the lamp , the templates are removed - to do this, they need to be tilted down towards the palm.
- Grinding and filing is carried out .
Nail extensions for lower forms
Instructions for extensions to upper forms
Nail extension mold
- After performing a manicure, modeling material is applied to the inside of the form - this is how the nail plate is modeled.
- A template with gel or acrylic is applied to the nail pressed firmly . If excess material , it must be removed .
- The forms are removed , the artificial nails are filed and sanded .
If the extended nails bend and the templates cannot be removed from them, it means they were not completely dried.
This procedure is quite simple to perform, and see how it happens in the video tutorial:
DIY nail stencils
Nail tape stencils
Stencil for French
Beautiful and convenient stencils can be obtained from nail tape.
You can use even strips, and you can also cut out various geometric shapes, waves, arcs, etc. from them.
Original pictures can be obtained by combining several strips located on the nail at different angles.
Stencils made of paper, window tape or cash register tape
Plain paper, window tape or cash register tape will help you create large motifs and simple designs. Sketch a sketch on paper, then apply film and cut out the resulting design. When applying the design, make sure that the varnish does not flow under the film. Paper will also make wonderful strips for a French manicure or moon manicure .
Make a stencil design in just a few minutes under the guidance of an expert:
Stencils made from adhesive tape, tape
Geometric fantasies using tape
To make a stencil from tape or adhesive tape, you will need scissors, a utility knife and a glass surface .
- First come up with a suitable design.
- Cut off the required amount of tape or adhesive tape.
- Next, carefully stick it on the glass surface.
- Using a utility knife, shape the tape into the desired shape.
Please note that there are no folds or irregularities anywhere, otherwise the stencil may turn out to be of poor quality.
To get a truly original and unique drawing, it is better to draw it yourself. You can draw directly on paper or in a graphics editor, such as Photoshop. If you can’t draw it yourself, you can download ready-made pictures from the Internet and print them.
Another simple way to make a stencil:
How to make a template for a French manicure
Original French
A stencil for a French manicure can easily be made from tape, adhesive tape or window tape . At the same time, you can not be limited to the standard form, but show your imagination and create your own unique pattern for a jacket, for example in the form of a wave.
How to make a stencil for a moon manicure
Original lunar
Moon manicure is very similar to French manicure, only the hole at the base of the nail is highlighted with varnish, and not its very tip.
A template for such a manicure can also be made from tape or adhesive tape by simply cutting out the desired shape: round, triangular, wavy, or even with a pattern.
How to do a manicure using a stencil
Using adhesive-based stencils
- Securely attach the template to the surface of the nail. If it moves during the drawing process, the picture may turn out blurry.
- Apply varnish or special paint.
- Let the paint dry thoroughly.
- Once the varnish or paint has dried well, you can carefully remove the stencil.
It is more convenient to apply the pattern using a sponge. The varnish layer will be thin, it will dry faster and provide a more accurate drawing.
See how you can use stencils in gel polish manicure:
Using a stamping disc
- Apply varnish or paint to the desired template picture.
- Remove excess varnish with a special scraper spatula.
- Press the stamp onto the design until it is completely imprinted.
- Use a stamp to transfer the design onto your nail.
For clarity, watch the video:
Stencils for manicure: how to use
In order to correctly apply a stencil on your nails, you will have to understand the technology in sufficient detail, otherwise the designs may be blurry, unclear, or ugly and sloppy. Each type of template has its own characteristics and nuances, so it makes sense to read the manual for each one separately.
Important
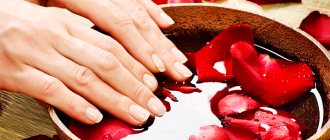
Before figuring out how to use the stencil correctly, it makes sense to initially do all the usual procedures with your nails. It wouldn’t hurt to take baths with essential oils, or get a trim or hardware manicure. Only after this can you proceed to the procedure of creating a unique design using a stencil or template.
Please also note that all instruments, no matter how well closed they are stored, must be disinfected, otherwise you can end up with a whole bunch of various troubles. You need to follow the rules of hygiene and sanitation even if you use it exclusively for your own use, because this does not at all exclude infection through the air or your insufficiently clean hands.
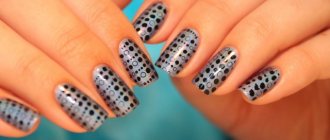
Stamping technique
First, you should learn how to use a stencil for nails with a stamp, which have now spread throughout the world.
Tools and equipment
- A metal disk or plate for stamping, onto which some kind of design or pattern has already been applied.
- Rubber or silicone stamp for transferring the design from the plate to the nails.
- A scraper (ordinary scraper) used to remove excess varnish.
- Varnish for pigmented base.
- Stamping varnish (thicker and more viscous than usual).
Often on sale, for example, on the famous Chinese “Aliexpress”, there are complete sets that include everything you need, with the exception of varnishes. Moreover, stamping can be done not only with ordinary varnish, but also with gel compositions, which we will discuss below.
Regular varnish
- Clean your nails from dirt, make baths, remove cuticles and give the plate the shape you need.
- Degrease your nails with a special compound; you can use regular nail polish remover, either acetone or non-acetone.
- Apply the base and then the pigmented varnish that is chosen as the base. There are absolutely no restrictions on color, the main thing is that the shade of the base matches the shade of the picture.
- On the stencil plate, apply a small amount of varnish to the selected design and carefully, in one sharp and quick movement, remove the excess from the surface, leaving only the recesses in the template filled.
- Pressing firmly and rolling the stamp with a silicone or rubber surface, transfer the design to its surface.
- Using the same rolling motion, stamp the design onto the nail and wait until it dries completely.
To complete the procedure and fix the picture, it makes sense to cover everything with a transparent fixing varnish, which will make the surface beautiful, smooth, even and glossy.
Gel polish
Few people know that using stencils to cover nails with gel polish is no more difficult than using a regular acetone compound, although you will have to tinker a little longer, since they require high-quality drying under ultraviolet rays.
- Make baths, file the shape and remove the cuticle using a method convenient for you.
- Apply primer and bonder if you are used to using them.
- Cover your nails first with a special base, and then with the selected pigmented gel polish, maybe even twice, drying each layer in a lamp.
- Remove the dispersion layer from the varnish.
- Apply thick gel polish to the plate, remove excess with a scraper, and then transfer the design to the stamp.
- Dry the stamp with the resulting ornament under a lamp. To be safe, you can apply a thin layer of transparent top on top and dry again.
- Remove the resulting picture with tweezers and glue it to the nail.
- Cover with a glossy or matte topcoat, and then dry again under the lamp.
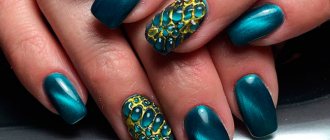
Any girl can make stencils on her nails with gel polish if she learns a little. This can be clearly seen from the video below. In this case, you can get a huge number of new opportunities, for example, making pictures in color.
Sticky stencils
Working with metal templates is quite difficult, especially for a beginner. Therefore, when it comes to ordinary paper or vinyl stencils, many are also scared and completely in vain. Everyone can learn how to do a French manicure, moon manicure and other decorative options without making any special efforts, be it regular acetone coatings or newfangled and long-lasting gel polishes.
Tools and equipment
- Manicure tools, nail files, scissors, tweezers.
- Stencils of the selected shape and material.
- Base for gel polish, pigmented varnish, top coat for fixing the design, or regular acetone-type varnishes.
- ICE, UV or hybrid lamp for drying compositions.
Regular varnish
- Get a manicure, remove cuticles, and give your nails the desired shape.
- Apply a transparent base first, dry, and then apply a pigmented varnish.
- After complete drying, which usually takes 15-30 minutes, stick the stencils on your nails the way you intended.
- Apply varnish of a different color, for example, most often a classic French coat is made with a white edge.
- Remove the templates, removing excess varnish.
- After the polish has dried, cover it with a clear topcoat.
Gel polish
- After manicure and base coating, the nails need to be dried in a lamp.
- Apply pigmented gel polish and dry again. Repeat if necessary.
- Remove the dispersion layer with a cloth moistened with a special liquid.
- Adhere vinyl or paper templates.
- Draw the patterns you were going to make with a different shade of varnish. Dry in a lamp.
After completion, remove the stencil templates and cover the surface with a top coat, which also polymerizes under UV rays.
Original nail design ideas using stencils
Geometric Mess
Take varnishes of different shades and apply them in longitudinal stripes to the nail plate. Cut several narrow strips of tape and stick them randomly onto your nail. Then cover it with a plain, preferably matte, varnish.
Manicure with triangles
Cover the nail with a plain base polish. Cut out several small triangles from tape and stick them on the nail, creating a design. Then apply a contrasting color of polish and let it dry.
Instead of triangles, you can use any other figures for decoration: hearts, diamonds, stars, etc.
Wavy French
The template for such a manicure is most conveniently cut using special serrated scissors for needlework. Cut a strip with wavy edges, glue it to the tip of the nail and cover it with polish.
Instead of waves, you can use paper lace.
To create an original manicure, you simply need nail stencils. You can buy them in a specialized store or make them yourself. These stencils are very easy to use, and the results are incredibly beautiful.
More interesting articles:
Stencil application technology
For an impeccable result of stencil nail art (painting of nail plates), you need to think through its design in advance and have the necessary tools and materials at hand.
Regardless of the type of blanks used, before the procedure you should carefully prepare the nail plates:
- remove remnants of old coating
- give the correct shape using a nail file
- remove cuticles and hangnails
- polish the surface with a soft buff
Then you can start designing. The procedure for using “self-adhesive” and disk stencils has some differences, but in general the execution algorithm is based on one scheme:
- Apply a transparent base varnish (1-2 layers) to the nail and let it dry.
- If necessary, apply varnish in the main color and wait until it dries completely (at least 30 minutes).
- Paste a stencil or apply a design with a stamp (you can use several options at once for a more impressive result).
- Paint the free part of the nail plate with a contrasting color.
- After the top layer has “dried” (it should not be allowed to dry completely), carefully remove the stencil.
- Cover the finished design with a fixative or clear varnish.
To prevent the varnish from smearing during nail art, you need to correctly calculate its dosage and wait for the drying time.
Using stencils significantly reduces manicure time. And thanks to the modern nail industry, which offers various sticker options and convenient stamping plates, even inexperienced beginners will be able to design nails.