It's hard to imagine a modern, fashionable look without a perfect manicure. Every girl should always keep her hands and nails in perfect order, because they are the first thing that catches your eye during communication. If we are talking about solemn, festive and significant events, then you definitely can’t do without shimmering, mystical sparkles in a manicure, especially when it comes to young beauties, although mature ladies do not refuse to decorate themselves with sparkling glitter on occasion. The main thing you need to figure out first is how to properly apply glitter to gel polish so that your manicure really looks stunning.
What is glitter for nails - or a short story about the Northern Lights
As it is not difficult to guess from the name, we will talk about glitter that transforms nail designs, even made in a single-color, pastel shade. At its core, glitter is a variety of shimmering metallic foil particles that differ in shape and size. Its unusual texture instantly “refreshes” even a classic French jacket, provoking a lot of compliments and admiring glances in the direction of your manicured fingers. At the dawn of civilization, reflective materials were used in exceptional cases, but now futuristic fashion trends dictate their own rules to us and women are absolutely unwilling to resist them.
They say that the ancestor of glitter, first mentioned in written sources and on frescoes, is hematite powder - a natural miracle that has the property of repelling and breaking the sun's rays. Already in Paleolithic times, sacred paintings in caves received such elegant decoration. During the prosperity of ancient Egyptian society, fashionistas went further and began to use shimmering powder extracted from crushed beetle wings as a highlighter. In India, fish scales, ground remains of precious stones, mica and even glass played a similar role. Well, beauty requires sacrifice.
During the dark period of the Middle Ages, the desire of lovely ladies to shower themselves with glitter diminished a little, but all this was in preparation for the big turning point in the history of glitter, which happened in 1934. It was then that an unknown farmer, Henry Rushman, noticed the amazing ability of plastic, which, when cut, turned into shining pollen, now called glitter. The enterprising cattle breeder did not yet know that this invention promised him huge profits, but just in case, he patented it, indicating his copyright, and then founded an entire production company, Meadowbrook Inventions. From this moment the popularization of glitter begins.
So, in 1960, several large world-famous cosmetic concerns (namely Revlon, Estée Lauder, Elizabeth Arden, and Helena Rubinstein) released products that contained small and large sparkles. Decorative glitter adorned powders and lipsticks, blushes and eye shadows. Particularly resonant was the event dating back to 1972, when rock singer David Bowie, the idol and idol of the youth of that time, appeared before the public with intricate makeup, which was the work of Hollywood makeup artist Pierre Sarosh. Needless to say, all products containing star powder were swept off store shelves.
It came as no surprise to anyone that in 1990, glitter was recognized as a megatrend. All the stars, celebrities and just girls who follow fashion tried to smear more glitter on their bodies, imitating Britney Spears. Around the same time, glitter began to be used in nail decoration. By the way, simple sparkles even played an important role in political and sociological revolutions. So, they were used by members of LGBT communities at parades, anointing their foreheads with particles. Chic and shine are what modern fashionistas strive for. Our photos are clear proof of this.
What is glitter used for?
Decorative glitter for nails is a universal thing. It is used in different fields and for different purposes. Which ones? Let's take a closer look:
- cosmetic glitter. Perhaps the most popular variety of glitter today. Moreover, it can be divided into two subcategories: glitter in skin care cosmetics and glitter in decorative products. There are no questions with the second type, because all girls, starting from a tender age, smear cream shadows, foundations, powders and highlighters, illuminators and bronzers, mascaras and tints on themselves. The first type is cosmetics aimed at care or styling. These include body oils and lotions, hairspray or facial serum with a glow effect;
- designs with glitter powder are another form where “fairy dust” is actively used. The nail business is growing and developing every second, but the sparkles that are generously sprinkled on the nails of young ladies do not lose their leadership position. Most often, glitter is used for mirror rubbing, which creates the effect of a mirror or chrome manicure;
- fashion industry. Perhaps this is where most of the glitter produced by concerns is involved. Thus, silver glitter proudly flaunts on tops or even frills of jeans, while gold glitter exquisitely complements a pop combination for a pop diva like Beyoncé. Accessories are also not spared this fate, because rhinestones and sparkles are an integral part of evening clutches and even laconic pumps worn “on a special occasion”;
- interior decor. Yes, yes, even in decorating the premises of offices, hotels and ordinary apartments, glitter powder is used. It is added to wall paint, used to decorate picture frames, upholster sofas, and even “mixed” into ceramics, be it tiles or sanitary ware. In measured, small quantities, such things can dilute the dullness and monotony of minimalism, giving the room its own “zest.”
As you can see, glitter is something that is widely used in almost all areas of human life. And arguments about the fact that sparkles are appropriate only on representatives of the stage have long since sunk into oblivion.
Decorative varnish - shine and protection for your plaster!
Decorative plaster does not require additional processing - it is classified as a finishing coating and forms a durable, aesthetic surface. However, if you want to emphasize the texture, add shine and add shades, special glazing compounds are used. In this article we will look at what finishing varnish is used to cover walls, how to prepare it yourself and what to apply it with.
What is a glaze composition
Glaze varnish is a coating designed to improve the decorative properties of a material. It is used on smooth and textured plasters, forms a durable transparent film, gives the desired shade and/or shine. It does not hide the color and texture of the plaster, but only emphasizes its relief.
Glazing varnish is used for:
- Improving the appearance of the coating. Different types of composition and application techniques give different effects: to emphasize the relief structure of the material, to give a pearlescent shine to the coating, to give the wrong color of plaster the desired shade.
- Protection. After drying, the composition forms a vapor-permeable film, which enhances the strength of the main decorative coating. Plaster treated with varnish is more resistant to mechanical stress, is not afraid of dampness, and does not fade under the influence of sunlight. Dust settles less on uneven surfaces, and if necessary, the wall can be washed. Finishing with plaster in wet rooms (bathrooms) must be completed with final varnishing.
The composition is environmentally friendly and can be used for finishing residential premises.
Below in the photo you can see how decorative plaster coated with varnish looks in different colors.
What varnish to cover the walls with?
Glazing varnish is a water-based acrylic solution + targeted additives. Available in 2 options:
- colorless - used unchanged or tinted independently;
- colored - completely ready for use; you cannot add paint or dye to it.
The composition may contain glitter, and the surface covered with it becomes pearlescent.
Glazing varnish, depending on the type, can be matte, semi-gloss or glossy.
Almost every manufacturer of decorative plaster also has a varnish for coating it. But it is not necessary to use materials of the same brand; you can choose any, for example, VGT, San Marco, Perlacheo, Tex, Poliver, Dali, Bayramix, etc.
How to tint varnish
If you can’t choose a color from ready-made compounds, you can purchase a colorless one and get the desired shade yourself. To give the desired color, special solutions are used - tints. Additionally, you will need scales, a mixing container and a drill with a mixer attachment.
- Pour the required amount of varnish into a container and weigh it.
- The maximum allowable amount of color is 10% of the base. It is advisable not to pour out all the paste at once, but add in small portions and then stir.
- Then apply the liquid to a sample of the coating and wait until it dries to evaluate the result.
It is important to remember that acrylic compositions may darken slightly after drying.
How to make it yourself
Glazing compounds are produced by different manufacturers, but most of them are expensive. If you want to save money, you can prepare the solution yourself.
Necessary materials for making glaze with your own hands
- scales;
- wallpaper glue;
- acrylic panel varnish (matte or glossy, depending on what kind of coating is required);
- drill with mixer attachment;
- container for mixing the solution;
- color or water-based paint;
- additives (sparkles - glitter).
Recipe. The glaze solution (glaze) will consist of 2 parts glue, 1 part varnish and ½ part paint.
- First, prepare the glue by diluting the dry powder according to the instructions indicated on the package. Mix thoroughly and leave until the flakes are completely dissolved in the water. It is not advisable to store the prepared liquid for a long time, so you need to calculate the required volume and prepare as much as you need for work.
- Panel varnish is poured into a container with ready-made glue and mixed thoroughly.
- Then paint is added. If you use color, then pour in a smaller amount (not ½ part).
- At the same time, add glitter. Add very little additives - a few grams per 1 kg of solution is enough.
This recipe is not the only one. It is quite possible to do without wallpaper glue, for example, using only acrylic varnish, diluted 1:1 with water and tinted with color. If you do not add water, you will end up with a too thick glossy film on the plaster.
Application (glaze)
The glazing composition is applied to completely dry plaster. If there is dust on the surface (from grouting, for example) or dirt, remove it. Decorative finishes are varnished without preliminary priming; there is no need for it.
When carrying out work, the humidity in the room should not exceed 75%, and the temperature should be from +5 to +35 °C. When the primer layer has dried, begin application.
Application methods: sponge, roller, paint brush or spray gun.
Methods for glazing plaster
Important! The solution containing glitter must be stirred constantly so that the additives do not settle to the bottom of the container.
- Work starts from the corner. The wall is mentally divided into squares with an area of 1 m². First, they process one, then immediately move on to the next, not allowing the first area to dry out. If you take breaks, the liquid will dry out and the transitions will be noticeable. There is no way to fix this.
- If the liquid has thickened, or you need to get a light, almost invisible coating, the liquid is diluted with water. The composition has virtually no odor during application and dries quickly.
- The composition is applied in separate strokes, without trying to completely paint the surface. Movements can be straight or circular, randomly directed. After treatment, even before the liquid dries, you need to shade the surface. Since the solution dries quickly, it is recommended to work together: one applies the composition, the other shades it.
Drying time depends on the specific composition, on average 1-2 hours.
Material consumption: about 100 g per 1 m². When using a spray gun, consumption is reduced.
If the goal is to create a light coating or additional protection for the plaster, then one layer is enough. The second is applied when it is necessary to give the surface greater color saturation. An additional layer can be made either with the same solution or with a different color. Between applications take a break of 1-2 hours.
Types of glitter
There are countless varieties of glitter that transform a manicure, but globally it can be divided into two large categories - liquid and crumbly glitter. We will talk about each of them in more detail below, but you can compare the pros and cons of this or that element without putting things in a deep drawer.
| Advantages | Flaws |
| Dry glitter can be combined with the same particles, but in a different shade, size or color, while creating intricate patterns. By the way, it was thanks to this technique that mirror and metal nails, as well as ombre manicure, became possible | Nail glitter often cannot be applied without the use of special auxiliary accessories: applicators, sponges and even tweezers |
| Nail glitter, like any other glitter, has good adhesive ability, regardless of its texture or consistency. It fits tightly to the nail or base, adhering securely and not chipping over a long period of wear. | Before applying white glitter or glitter of any other shade, prepare the nail plates by first sanding down any uneven areas and removing any rough edges using a buff. Only in this case will the coating look impressive |
| The opinion that glitter on a woman’s hands is appropriate only in exceptional cases has long since become obsolete. Now glitter nails can be seen not only on stage or at high society receptions, but also in the office or at the university | There are certain types of glitter that require the use of additional materials for attachment. The most common option is a glitter base, which can be purchased at wholesale and retail manicure stores. |
| There is no difficulty in combining glitter and colored varnish. It is not necessary to use black glitter under black shellac; experiment and add a drop of rose gold, etc. to it. | If there are no problems with applying glitter, then many people notice difficulties with removal. The fact is that medical-dispersed glitter often literally “eats” into the base, which makes removing them very, very difficult |
| Feel free to combine glitter with different designs and don't be afraid to go overboard. Or add shimmering particles to the classic smile line of a French man, to curls on monograms or minimalist geometric patterns | Always monitor the process and adjust the amount of flickering pollen. Otherwise, you risk overdoing it and getting a too voluminous manicure that clings to clothes and hair, which is very uncomfortable. |
| Having even one type of glitter in the collection, a practicing master can satisfy the most daring ideas of his clients. It’s not at all necessary to buy a million treasured miniature jars in stores before starting work. | Follow the correct application technique exactly without skipping steps. Otherwise, even a long-lasting glitter manicure will chip or peel off in a couple of days. |
Liquid glitter or nail polish with glitter
To begin with, let’s dot the i’s and explain in detail that glitter and shimmer are not identical concepts. Shimmer is those small particles that obscure the light and are practically invisible to the eye. And glitter is large pieces of foil-coated plastic that can be noticeable individually. Gel polish glitter is the same notorious liquid glitter for nails. A simplified version is regular varnish that does not require drying under an LED or UF lamp. There are usually two types of liquid glitter:
- pigmented varnish. Pink glitter, blue or light blue - choose any one from the extensive collection of glass jars and bottles presented on store shelves. This option is practical and convenient, but you can hardly experiment with a colored coating;
- transparent varnish without pigment. A more functional purchase, since by covering any other color with it, you end up with completely different results, always striking in their impeccability.
Dry glitter
This type of glitter is more like powder, which in the hands of a real professional turns into magic dust, changing any design before your eyes. You can cover the entire nail plate with it, literally “dipping” your finger into the jar, or you can highlight individual details of nail art. Glitter powder also looks great against a dark background, creating a chrome-plated surface or creating a cat-eye effect. And light, pastel varnish and crumbly glitter will make your nails look like precious pearls.
Glitter powder
Glitter powder is another popular type of women’s favorite glitter. To be fair, let’s say that this type of loose glitter is especially held in high esteem by nail technicians. Powder consists of many fine particles of foil, but classic nail glitter is larger and more noticeable. This type of decor is especially appropriate in combination with drawings; it elegantly complements a prom manicure or a wedding manicure, but looks no less impressive in everyday nail art.
How to decorate a wall with glitter
Have you seen interesting rooms in which one wall is painted a different color or has a special design applied to it? You can go a little further and make one wall sparkle or shimmer with glitter, small sparkles made from polyester film. Using our instructions, you can make the wall have a subtle shimmer or a high shine, depending on your preference. You can decorate a wall in this way in a children's room, in a bath or in a bedroom.
What you will need: - PVA glue or PVA with acrylic varnish; - 600g regular size rainbow glitter; - 320g very small rainbow glitter; - 120g largest size rainbow glitter; - 150g very small pink glitter; - foam brush with wooden handle;
Step 1: Mix Glitter Once the wall is painted the base color, start finishing. Mix glue with different sizes of glitter. For a wall measuring 2.6 m x 5.2 m you need approximately 1.9 liters of glue and 1200 g of glitter.
Start by pouring a cup of glue into the container. You need to take the glue one cup at a time so that it does not dry out prematurely.
Add glitter to the container.
Using the handle of a brush, stir the mixture.
Add as much glitter as you like. At the end, the mixture should look like cement and flow slowly from the brush.
Tip: Before you start painting the wall, cover the floor to prevent glue from dripping onto it. If a leak does occur, wait until the mixture dries and then use a paint scraper to remove any adhesive. Any remaining stains can be cleaned with a hoe and warm, soapy water.
Step 2: Apply the mixture to the surface Using a foam brush, spread the mixture over your prepared wall.
The big advantage of this project is that it does not require any special skill. You do not have to cover the wall completely evenly, as long as the coating is not too thick and does not contain lumps. Once you've covered the wall with the glitter mixture, let the layer dry for about five hours.
Tip: The mixture will appear white at first, but as it dries, only glitter will be visible.
Step 3: Touch up the wall where necessary
When the first layer is dry, go through and touch up those areas that look pale compared to the rest of the wall. Make the same mixture as for the first layer, but a little thinner. Use the same brush as for the first layer.
Step 4: Decorate the Room After the last layer has dried, arrange the furniture. Now you have such a unique wall in your room that everyone will be jealous!
A great way to add elegance to your apartment design!
How to use nail glitter
So, a miniature jar with promising contents has settled in your arsenal, but the question - how to use glitter - still remains relevant. ProstoNail exists to help its faithful readers in such difficult situations, and our step-by-step photos combined with detailed instructions will definitely dot the i’s. Arm yourself with patience and begin to take active action:
- perform the standard hygienic manicure procedure, adjusting the shape and length of the nail plates, cutting or pushing back the cuticles, but pay special attention to polishing the nails, since this determines how smoothly the glitter will lie;
- treat your nails with an antiseptic degreaser; it will not only remove moisture, but also improve the adhesive ability of the varnish. Apply an acid-free primer and let it soak in;
- cover your fingers with a moderately dense layer of self-leveling base, polymerizing it under an LED or UF lamp;
- Apply your favorite shade of shellac or gel polish in two layers to achieve optimal color intensity;
- in a separate container or on a piece of foil used as an improvised palette, mix dry silver glitter with transparent gel;
- take a small amount of the resulting mixture onto a flat brush and apply it to the nails, then dry it under the lamp;
- in the final, choosing a glossy or matte topcoat, secure the result of your efforts, not forgetting to remove the sticky layer.
How to tint varnish
If you can’t choose a color from ready-made compounds, you can purchase a colorless one and get the desired shade yourself. To give the desired color, special solutions are used - tints. Additionally, you will need scales, a mixing container and a drill with a mixer attachment.
- Pour the required amount of varnish into a container and weigh it.
- The maximum allowable amount of color is 10% of the base. It is advisable not to pour out all the paste at once, but add in small portions and then stir.
- Then apply the liquid to a sample of the coating and wait until it dries to evaluate the result.
It is important to remember that acrylic compositions may darken slightly after drying.
How to apply glitter to gel polish
The previous step-by-step instructions made it clear to us that even a beginner can apply glitter to gel polish and still get a very impressive result of his work. Large nail glitter is a little more problematic on ladies’ fingers, but this does not mean at all that you should deny yourself the pleasure of such decoration. ProstoNail has collected the most effective and proven life hacks from practicing professionals that are worth adopting:
- Many people have a question - what to glue the famous glitter on? The answer is quite simple - just a sticky base layer or colored gel coating is enough;
- If you plan to cover the entire surface of the nail with glitter, then pay special attention to evenly painting it with varnish. Otherwise, in places where the gel is bald, bald spots will form, but they will be shiny;
- carefully polish the nail plates with a buff, smoothing out all the irregularities. Only then can gold glitter or metallic glitter create a trendy chrome effect;
- To apply dry glitter, be sure to use a regular applicator, which you can remove from the eyeshadow palette. Using gentle circular movements, he will polish the glitter, remove excess and improve the adhesion rate;
- Only after waiting for the glitter to dry, brush off the excess from the side rollers and cuticles and only then fix the result with a top coat.
How to rub glitter into gel polish
You can also rub glitter into gel polish if you use finely ground decor:
- The nails are painted over a dried base with a flower bed with a sticky layer.
- It needs to be dried in a lamp.
- The shiny powder is scooped up with a brush and applied to the plate with patting movements.
- The same tool is used to distribute the decor more evenly.
- You need to wait a few seconds for the shining particles to connect more tightly with the sticky layer of varnish.
- Use a soft fan brush to fan your nails to remove excess shiny particles.
- The next layer is the top.
- It needs to be polymerized.
Glitter powder, glitter or kamifubuki, as well as liquid shining compositions, make the design catchy and original. The decor looks good with bright lacquer colors and pastels. Just don’t use it in abundance so that your nails don’t look like Christmas tree decorations. However, if you want just such an effect, a manicure will not cost you much. After all, a jar of glitter costs only 25-60 rubles.
How to make glitter with your own hands
If you do not have the opportunity to visit a specialized manicure store in order to acquire the coveted jar of glitter, then do not rush to despair. It can be replaced by ordinary stationery glitter, which is often bought for schoolchildren to design appliqués and crafts. Don’t forget about cosmetic glitter used in eye makeup or body decoration. It is also suitable for decorating your fresh manicure. If you are a big fan of evening styling, then you can probably get a bottle of hair glitter from your bins, which looks just as appropriate on your nails. In other cases, you need to use patience, ingenuity and manual dexterity in combination with the maneuverability of scissors. The coveted large sparkles can be easily obtained by cutting a sheet of culinary foil or metallized strips for nail art. Is this option not suitable for you? Then it’s time to resort to extreme measures and get a box with Christmas tree tinsel and toys from the mezzanine. Have you guessed what needs to be done with them?
Techniques and methods of manicure with glitter
Adding sparkles in the form of decorative manicure helps to diversify the image and create a gentle and romantic style, as well as a bold and bright one. It all depends on the colors of the base polish and glitter used, as well as on the method of applying them.
French manicure
Glitter on gel polish can be applied in combination with a French manicure, creating a sophisticated look. The classic French coat is diluted with sparkles instead of the usual white coating, or replacing the main coating with it. Successful options are to use glitter on one of the nails, and the rest are decorated with the usual jacket.
Lovers of the original approach mix several techniques, such as French and ombre, smoothly distributing sparkles on one of the nails. They also combine French manicure with glitter, but use a triangular rather than an arc shape.
Lunar manicure
This technique resembles a French style, but arcs are drawn at the holes of the nail, leaving the rest of the nail surface a different color. This type of decor is original in itself, but in combination with glitter or sequins they create even more interesting design solutions.
For example:
- Glitter comes in a variety of colors, but gold, bronze and silver shades are best for filling holes.
- To create a festive or more relaxed manicure design, dry and wet glitters are used. Using the dry method, the holes are filled using the rubbing method, when the glitter is immersed in the varnish, or the glitter is placed on the nail plate using tweezers or a stick. Liquid glitter itself is a varnish mixed with glitter. They find it easier to cover a dry layer of glitter to seal it in place.
- To create an everyday design, a slight shimmer will be enough. If the goal is to create a festive manicure, use glitter to provide a strong coating of the shiny layer.
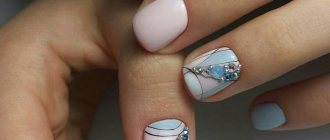
Ombre glitter
The method of stretching glitter along the length of the nail is suitable for both a festive version and a neutral everyday manicure design. To create such decor, manicurists use glitter with different sizes of sparkles. Any color of varnish can be used as a basis, but creamy and delicate colors are most suitable; they also create a gentle effect for a daily option.
The glitter is stretched over the nail, applying a drop of glitter to the hole and gradually spreading it to the middle of the nail. The reverse option is successful, when the stretching occurs from the edge of the nail. To create this decor, use a special brush or sponge. The effect is achieved by any of the selected tools, but when applying glitter with a sponge, you should then clean the skin around the nail.
"Veil"
A special technique for creating nail design involves the use of colored varnish and base. Between them, patterns or shapes are drawn in a separate layer, and a good option would be to use glitter to create this pattern.
This decor option turns out to be spectacular:
- A successful decor option is where one finger is completely covered with sparkles, and the adjacent ones are decorated using the “veil” technique.
- Glitter is used to lay out stripes and lines to draw petals or flowers. The design near the nail hole or at its edge looks especially original.
- Decor using the “veil” technique will be an interesting solution for a wedding manicure.
Where to buy glitter
The answer to this question is quite predictable and obvious - in specialized stores with tools and materials for manicurists. The second option is cosmetic stores that provide a large assortment of glitter for decorating the body and eyes. The third “secret place” is stores with hairdressing paraphernalia and stationery stores. In the first case, such sparkles are bought to decorate curls, in the second - to transform applications.
Don't be afraid to shine and attract attention, collect compliments and use glitter not only for an evening out. And, of course, shine brighter, illuminating the dullness of everyday life!
Master class on applying glitter
Before you start applying gel polish, carry out basic nail care: treat the cuticle and adjust the shape of the nail with a nail file. The nail plate itself is also treated with a special buff file to make it smoother and remove irregularities, then treated with a degreasing agent.
After all the preparatory procedures are done, the nails are covered with a transparent base.
The second layer is colored varnish, or liquid glitter, if you need to completely cover the nail with it. Dry glitter can be applied to gel polish in several ways. Large glitter is applied to the nail using a dot or a damp orange stick. Fine sand glitter can be applied using several techniques.
Normal way
The simplest way to use dry glitter will be perfectly mastered by those who have not yet worked with this material or do not have sufficient experience in applying glitter. The edge of the nail is covered with transparent varnish and dipped into a container with dry glitter. Remains of glitter that did not stick to the varnish are brushed off with a manicure brush. This method is often chosen when creating glitter nail designs.
Rub method
This method is used only on top of gel polish; shiny pollen will not settle on regular polish. Glitter is applied to the sticky layer of gel polish and gradually distributed using an applicator or a thick manicure brush. This way, the glitter will gradually penetrate the surface of the gel polish.
The rubbing method allows you to apply glitter in a very thin layer, so it is advised to choose a color close to the color of the varnish, otherwise the shade of the glitter may be greatly distorted. Manicurists advise that when finished, go over the shiny layer with a degreasing cloth or even dry this layer in a lamp.
Sprinkling with glitter
The nail is covered with base varnish and not dried. A dry manicure brush is dipped into glitter and sprayed over the nail with light movements. Manicurists draw a pattern on the nail with clear polish in advance and then use this method of spraying glitter.
After the glitter is applied in a sufficiently dense layer, they are sent to the lamp to dry. After drying, the remaining glitter can be easily brushed off with a brush. Using glitter in this way does not require applying a finishing layer of varnish, otherwise the effect will be similar to that of liquid glitter.
Glitter stretch method
This method helps replace liquid glitter polish. To apply dry glitter, use a flat manicure brush and pre-wet it in the base polish, and then dip it into the glitter. Using gentle movements, apply the glitter to the desired areas of the nail plate.
To make the manicure look discreet, use the brush lightly, since it covers a large amount of dry glitter at a time. Once complete, the glitter layer is topped off.
Method of mixing glitter with top
This method is most often used by manicurists when filling out nail design elements such as French manicures, holes, etc. Apply glitter to gel polish using a dry thin manicure brush. On a separate surface or prepared palette, mix the finishing varnish with glitter until a viscous mixture is formed.
Dip the brush into the mixture and draw the desired detail. For small fragments, it is enough to apply 1 layer of glitter. After drying this layer, apply the finishing varnish twice and level the surface of the nail, since fragments of glitter add volume.
Manicure with glitter in different shades
Sequins combine well with each other in different colors and below are ways to create a successful color combination.
Glitter rainbow
A stylish and at the same time quite bright version of the manicure can be created using sparkles. Decor made of glitter or sequins in the form of colored stripes reminiscent of a rainbow is especially appreciated by young girls. Such a bright and summer look is unlikely to suit business women as a casual option or for formal events.
But rainbow decor can perfectly complement a girl’s elegant look for festivals, holidays or while on vacation:
- Iridescent sparkles will look especially impressive in a combination of blue, red, yellow and purple shades. But even in the design of short nails, this color combination can be successful.
- Strips of glitter are applied vertically, horizontally or at an angle. The colors may blend a little when applied, but this will only create a more interesting effect.
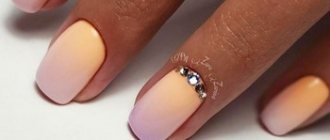
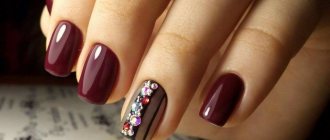
Combining varnish shades
Another stylish option for manicure design can be a combination of several colors using sparkles. A smooth transition of the same color, but in different shades across all fingers of the hand, is considered a good option. Or use 2-3 contrasting colors. For example: black and white, red, white and gold.
Glitter on gel polish looks beautiful and harmonious. Here's how to apply glitter and how it will look.
Such a manicure will be especially interesting if one of the nails is complemented with matching sparkles or completely covered with liquid glitter of the same color. This type of nail decoration is considered calmer than the rainbow one, which means it can be suitable for both holidays and as an everyday option.
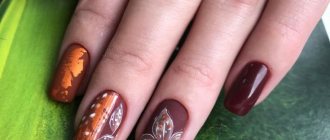
Manicure options with glitter, complemented by patterns and designs
Nail designs using patterns have become increasingly in demand among manicurists. This design will be appropriate both in everyday life and as a festive option, depending on the chosen shades.
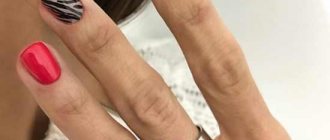
Girls who want to diversify a monochromatic manicure with interesting details and create a romantic or mysterious image, combine monograms and designs with dark or neutral nail polish colors.
Craftsmen complement patterns and designs with sparkles or perform them entirely using glitter:
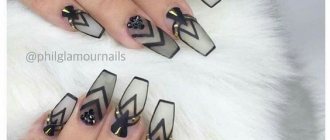
- Lines, stripes and shapes are drawn with glitter. Monograms, filled diamonds or a Latin V look especially beautiful. The zebra-shaped decor is simple and beautiful. Thematic designs also look interesting, for example, a Christmas ball on New Year’s Eve.
- The number of designs is limited only by the length of the nail.
- The patterns look especially impressive on plain varnish.
This option for applying glitter is quite simple to implement. Colored gel polish is applied to the nail in advance and secured with a top coat. On top of these layers, a nail design is made in the form of the desired pattern, monogram or other fragment. This layer is not dried and immediately sprinkled generously with glitter using a thick brush. After application, dry the nail in a lamp and brush off any remaining glitter.