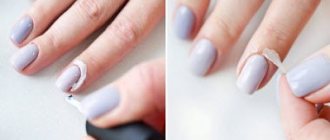
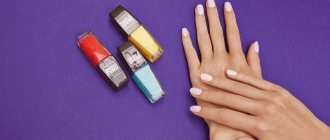
What do you smear around the nail during a manicure?
There are a huge number of design techniques, but now minimalist trends can be traced, a small amount of decor predominates in manicure, and there is a complete absence of stones. Geometry is still in fashion, as are twigs, complemented by colored strokes on top of a camouflage base. Sometimes when applying a gradient it is difficult to blend without touching the skin around the nail. Nowadays, a gradient brush called a comb is used for this purpose. This is a regular brush with thinned bristles and varying hair lengths.
This manicure has been at the peak of popularity for several years now. You can significantly speed up the process of creating such a design by using air puffing or an airbrush. Aeropuffing is a regular tube or rod with a soft sponge attached to the end. It has a small number of pores, is very soft, and absorbs varnish perfectly. Thanks to this, the transition from one color to another is almost imperceptible and very smooth. When using a sponge, the gel polish gets onto the cuticle, side rollers and sinus area. It is not always possible to wash them without touching the nail or removing part of the coating.
What to apply around the nail during manicure:
- For these purposes, use a product that is applied around the nail. It has several names, because the drug is produced by a huge number of manufacturers. The very first of them to appear on the market was skin defender.
- This is a rubber based liquid that comes in a small bottle with a soft brush. The brush itself resembles an applicator that is used to apply lip gloss. The main task of the product is to protect the cuticle from varnish.
- It is applied around the nail after the main tone has been applied, and it is necessary to stretch the color, or make a gradient.
Defender
DIY liquid tape for manicure: materials and methods of application
Every self-respecting girl always takes care of the beauty of her hands, takes care of her nails, and does a beautiful manicure, but in order to save money, you can perform these procedures yourself.
Nowadays, representatives of beauty are faced with a huge selection of nail care products. A unique manicure can be created using a huge list of techniques, methods, and tools.
However, styling your nails with your own hands can be complicated by various kinds of difficulties, including contamination of the cuticle at the nail plate and the side ridges of the finger.
More recently, this problem caused a lot of negative emotions, but today there are special products that can protect the cuticle from pollution. For example, liquid tape for manicure, which is quite easy to make with your own hands.
This is an inexpensive and safe product that can help ensure your nails look beautiful and well-groomed during a manicure. It does not contain harmful substances in its composition, does not cause burns or allergic reactions, so these days liquid tape is very popular among experienced nail artists and fashionistas who are accustomed to caring for their nails on their own.
This product is a viscous liquid that hardens after application to the surface of the skin. To make the manicure truly attractive, sophisticated and durable, the composition is applied using a brush as close as possible to the nail plate. The product is allowed to dry for some time (from 1 to 3 minutes) until a dense film is formed, then you can proceed to performing nail art, regardless of its type.
When the manicure is completed, the remaining liquid tape is simply removed from the surface of the skin around the nail; for this you can use tweezers, an orange stick, etc. This way you can get really neat nails.
Many nail art options will have a more attractive appearance if liquid tape is used in the process of decorating the nails:
- Water manicure using liquid tape takes on a neat, holistic look. In order to complete this design of nail plates, you will need several varnishes of different colors, a bowl of water, cotton pads and, of course, the liquid tape itself. Varnish of different colors is poured into water one by one, and then the nail is promptly lowered into the composition; after the composition dries, the liquid tape is simply lifted and removed from the skin. At the end, a top coat is applied to ensure that the manicure retains its attractiveness for as long as possible.
- A gradient manicure using liquid tape is very easy to create. This is a manicure with a smooth transition from one color to another. To create it you will need to have a sponge and varnishes of different colors. The varnish should be applied to the surface of the sponge and lightly transferred to the nail plate. The sponge must be pressed gently to create the effect of a smooth color transition. Of course, this technique does not allow you to create perfectly painted nails; the sponge transfers the polish not only to the nail, but also to the finger. Accordingly, the hands take on a sloppy appearance. That is why it is so important to use liquid tape or glue in the process of creating a manicure, which allows you to give your nails a neat look. After the polish has dried, you can coat the nail with topcoat to give it a bright shine and provide the surface with better protection from scratches and abrasions.
- The use of liquid tape in stamping design is also very important. First, the nail is covered with a base coat, and the skin around it is covered with liquid tape, then you need to use colored varnish or gel. After covering the nails with a single-color composition, you need to apply a varnish or varnish-gel of a contrasting color to the stamping plate, then the stamping roller is applied to the nail, leaving an imprint on it. After the composition has dried, you should remove the liquid tape from the skin, and cover your nails with top coat, then the manicure will look more neat.
How to apply manicure liquid around the nail?
The essence of this product is that it dries quickly and forms an adhesive, elastic film on the surface of the skin. At the very end, after performing a manicure, you just need to pry off the film with tweezers or an orange stick and remove it.
How to apply manicure liquid around the nail:
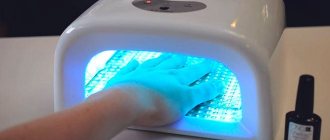
- Apply the base color, after covering the nail with base and additional liquids. After curing in a lamp of the main color, apply defender. Place a drop of white paint on the palette and tap it onto the airpoofing sponge.
- Drive the paint into the surface of the nail, applying a minimum of force in those places where you want to create a smooth transition and almost imperceptible color. The color is more intense at the tips, so dip the airpuffing in the paint again and stamp onto the tip of the nail.
- Cure in a lamp, remove the skin defender using tweezers or an orange stick. Cover the nail with the top coat and cure in a lamp. The nail will remain covered in color, but the skin will be absolutely clean, without streaks or traces of paint.
Liquid tape
Home remedies
If this liquid tape is unavailable or it is impossible to purchase it, experts recommend replacing it with other non-traditional protective agents:
- stationery tape;
- PVA glue;
- hand cream with an oily structure;
- medical Vaseline;
- cosmetic liquid for removing cuticles or special oil;
- felt-tip pens for correcting manicure;
- sunflower or olive oil;
- remover and orange stick.
To create a designer water-based varnish coating, you cannot use stationery and masking tape, which under the influence of water will get wet and come off your fingers, and the adhesive layer will not allow you to give the material the desired shape.
The use of glue and its uniform distribution is possible only if you have experience and practical skills. Professional craftsmen warn about the presence of chemical elements in this composition that can cause redness of the skin and an allergic rash. The liquid consistency of the adhesive composition creates difficulties in its application and in the formation of a reliable and durable protective coating.
When purchasing a fatty cream, you should give preference to cosmetics that moisturize dry skin or are used in winter. Vaseline, vegetable oil, greasy cream and cuticle products are not suitable for water treatment or nail airbrushing. For subsequent decoration of the nail plate, it is necessary not only to remove greasy compounds, but also to carefully treat the entire surface of the manicure with special means.
Protective oily products must be applied very carefully, trying not to spoil the design. Corrective markers have a low percentage of efficiency and do not allow you to completely cover the entire working surface.
Strong pressure with orange sticks and other tools can deform the surface of the skin and cuticle , as well as the applied coating. Long-term use of cotton swabs soaked in chemical solvents can negatively affect the general condition of the body, causing headaches and dizziness.
In cases where it is not possible to use even simple home remedies, you can wash your hands under warm running water with any moisturizing soap two hours after applying the varnish. The softened varnish coating will quickly and easily come off the skin. This procedure is not suitable for all types of varnish and can ruin your new manicure.
Before using any non-traditional means of protecting the skin from varnish, you must definitely consult with professional craftsmen and study all the intricacies of using traditional methods.
Manicure around the nail, film: list
This product is great if you use an airbrush to create a gradient or nail design. This is a gun to which a compressor is connected, and the nozzle contains paint. The paint is sprayed onto the nail under high pressure. Droplets of paint fly in different directions, so the surface of the side rollers and the cuticle are often stained with varnish. To avoid this, use a cuticle protectant.
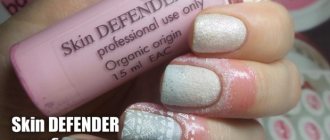
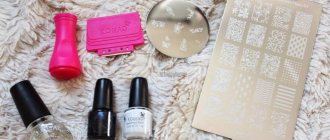
Of course, after skin defender appeared on the market, several more companies produced similar products, improving the formula. The main advantage of the product is its low price and excellent efficiency. Since skin defender was the first to appear on the market, its price is quite high, so there are cheaper analogues that are in no way inferior in quality to the original. Below you can find the most common ones. Almost every company that produces gel polishes and stamping paints produces cuticle protection products. It's called defender, but some manufacturers indicate on the packaging that it is a cuticle protector, a pink thing, a liquid tape.
Manicure product around the nail, film, list:
- El corazon
- Ru nail
- Patrisa nail
- Uno
- Severina
Professionals do not save on such funds, especially if the work is streamlined and a limited amount of time is allocated to each client. Thanks to the large number of clients, manicurists buy such products. The drug is used very sparingly; on average, one bottle is enough for about 50 manicures. This completely justifies the cost of the product, saves time and protects the cuticle. After all, you will have to spend much more time cleaning dirty cuticles than just removing the film. As you know, time is money.
Defender
Description
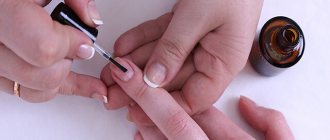
Skin Defender is a natural product that is made of rubber and does not contain chemical components. Long-term laboratory studies have revealed the absolute safety of the product and the possibility of its use on any type of skin. For ease of application, manufacturers have developed a convenient brush, which makes it possible to apply the composition to the side rollers, cuticle, and also to the skin around the finger.
The beautiful glass container and bright design of the liquid tape will appeal to even the most capricious fashionistas and will look harmonious among other bottles with varnishes and decorative products. On the shelves of specialized cosmetic departments you can see a large number of protective products, which differ not only in color and country of production, but also in price range.
To apply a high-quality protective layer, novice craftsmen must know the main stages of performing this type of work.
- Thorough treatment of the cuticle surface before applying the composition. It is strictly forbidden to adjust the nail plate after applying the liquid tape. This procedure can lead to deformation of the protective layer and the need for its reapplication.
- Carefully apply the composition near the nail. The presence of protective drops on the nail plate will create a fuzzy and blurry pattern.
- To apply an aqueous coating, it is necessary to apply the liquid to the entire length of the finger being used.
- Applying a thick layer of film will not only reliably protect the skin, but will also greatly simplify the procedure for removing the coating.
- Application of the varnish coating is possible only after the protective film has completely dried.
- To remove the tape, simply lift the cover and remove it. This procedure will take a few minutes and will not cause difficulties even for inexperienced craftsmen.
What do you apply around the nail during a manicure?
Home users tend to save money, because water manicure, gradient, or air puffing are not done as often as in salons. That is why craftsmen use other means for these purposes.
What to coat around the nail during manicure:
- Vaseline . Almost any greasy product such as cream or Vaseline can be used for such a manicure. As you know, an oily environment prevents the absorption of gel polish and dyes into the skin. The remaining pigment can be washed off very quickly with ordinary water and a sponge. However, the problem is that oily products are difficult to control and can end up on the nail, under the cuticle and in the sinuses. If this happens, the topcoat will peel off in just a few days. This will happen due to the appearance of a greasy film in the sinuses, near the cuticle. The main condition for the durability of a manicure made with gel polish is complete degreasing of the nail.
- Using nail polish remover. For these purposes, craftsmen use an orange stick or a toothpick on which a small amount of cotton wool is wound. It must be moistened with nail polish remover and wiped off the stained areas. The main disadvantage of this method is that dark colors, for example, black varnish, or some neon colors, are very difficult to wipe off the surface of the skin and eat into it. Thus, the manicure turns out untidy and dirty. You will have to wait a few days for the varnish to be completely washed off and for the skin flakes in this area to peel off.
Defender
Mix and apply
A primer for wood for painting is prepared from the following components: glue (sold in any construction stores, average price from 60 rubles for 0.9 liters) and warm water (40-45 degrees). The adhesive composition is suitable for construction or carpentry work. The price is lower for the first option. You will also need an empty plastic container, a small bucket and a spatula for stirring. Below is a table of prices for various glue manufacturers:
| Manufacturer and name | Peculiarities | Price |
| “Super PVA” moment | Quick-drying, viscous. | 145 rub. for 250 g. |
| “Carpenter” moment | Moisture resistant, viscous. Doesn't mix well with water. | 190 rub. for 250 g. |
| White House “PVA universal” | Construction, easy to install. | 60 rub. for 900 g |
| White House “PVA super” | Waterproof, viscous, suitable for all surfaces. | 75 rub. for 900 g |
| Expert “PVA carpentry glue” | Waterproof, viscous, contains antiseptic additives. | 116 rub. for 900 g |
| Expert “Universal PVA Glue” | Easily diluted with water and applied to any surface. | 83 rub. for 900 g |
| Text “Universal joiner! | Moisture resistant, quick drying. | 90 rub. for 900 g |
You should not buy the advertised Moment or Titan. When choosing, you don’t need to pay attention to the manufacturer, since an inexpensive option from White House or Expert is suitable for the primer composition. Essentially the composition of the emulsion is the same. A waterproof composition will be more difficult to dilute with water, so for quick woodworking it is better to use classic PVA glue. But waterproof gives the wood additional waterproofing and protective properties, like an acrylic primer. Diluted in small portions. It is not recommended to prepare a large amount of adhesive primer at once, since the mixture left loses its quality characteristics.
It is more profitable to purchase glue for preparing primers in volumes of 0.9 liters or more, since the price for small packages is higher. If you need to treat a small surface, then 250 g is enough, so there will be no unused residues.
Preparation
You can make a primer with your own hands using the following ratio: 1 part PVA - 2 parts water. But the ratio depends on the viscosity of the glue. After mixing, the DIY wood primer is checked for thickness using a test application. A small amount is applied to the wood, the mark should remain whitish, but not too dense. When drying, the film should not peel off from the wood. If the composition turns out to be thick, add a little more water. An antiseptic or a small amount of lime or crushed chalk is added to the finished mixture. Lime and chalk are sifted so that there are no large inclusions during application.
Water is poured into the glue in small portions, the composition is stirred all the time. If, on the contrary, you pour glue into water, it will be more difficult to mix the primer.
The finished primer will be well absorbed into the wood and applied evenly using a brush or roller. But before application, the wooden surface is sanded and leveled. If there are cracks or chips, the wood is puttied using special compounds.
Application
Instructions for applying PVA glue primer to a wooden surface consist of the following steps:
- The wood is being prepared. To do this, the surface is ground and leveled. The accuracy of further work will depend on the quality of preparation.
- Using a brush, hard-to-reach places are treated: corners, baseboards, places behind radiators and pipes.
- The remaining surface of the wood is covered with a roller or a wider brush. The first layer should dry within 1-2 hours.
- The wood is inspected for the presence of “fringe”. If the surface has lost its evenness, it is sanded again using the finest caliber sandpaper. It is more convenient to carry out sanding by placing a piece of paper on a small block.
- A second coat of primer is applied. Just like the first time, hard-to-reach areas are coated first, then the main surface.
- The treated surface must dry (for 24 hours), after which the paint and varnish coating is applied.
The finishing is considered complete after complete drying.
It is possible to use PVA glue as a base for a primer on wood, but the result is not always positive. If the primer is not diluted correctly, then over time the finish will peel off from the wood and the repair work will have to be done all over again. Under light paints and varnishes, the PVA emulsion turns yellow and the appearance of the wood deteriorates. Therefore, it is recommended to use professional primers for finishing, which are available in every hardware store and the price for them is not off the charts.
PVA glue for manicure around the nail
PVA glue is very similar in structure to defender and is removed from the cuticle with a thin film. However, it has one huge drawback - the consistency of the product.
PVA glue for manicure around the nail:
- The glue is quite liquid, so it can penetrate under the cuticle and onto the surface of the nail. This in turn will contribute to the formation of gaps and bald spots where there is no pattern.
- In addition, very thin application often causes the film to rupture, and it takes quite a long time to remove it. The glue is removed from the cuticle not with a single strip, but with small, sticky pieces.
PVA glue
How to make liquid nail tape at home
There is a varnish that is applied around the nail and removed with a film, called liquid tape. So, in this article we will talk about how to make liquid tape for manicure with your own hands, replacing it with regular PVA glue. A short informative video instruction - you won’t even have time to get bored.
Well, for this you need an empty bottle of nail polish. You can clean an already used bottle with acetone, or you can buy a ready-made empty one in a specialized store.
You will also need PVA glue, consisting of polyvinyl acetate (if this is important to you), that is, this is ordinary PVA glue sold in the stationery store around the corner, which will need to be poured into an empty bottle of varnish, filling about three quarters so that it remains place for a brush.
If desired, you can mark the bottles with a marker so as not to confuse the glue with nail polish. That's all the instructions, and if you are interested in how good this composition is in practice, then read on.
What kind of gel is applied around the nail for a manicure?
At the very beginning, after removing the old gel polish, manicurists apply another product to the cuticle, which has a different purpose.
What gel to apply around the nail for manicure:
- This is a keratolytic - a skin softener. It helps eliminate cuticle adhesions in the nail area, soften the skin, and make it pliable. Most often, this product is used in a combined technique, when the cuticle around the nail is not removed using a cutter, but is cut with scissors or tweeters.
- This product is used if the cuticle is rubbery, oaky, or too wet. This often happens on nails with hyperhidrosis. A few minutes after degreasing and using alcohol, droplets of water appear.
- Due to the presence of a large amount of moisture in the skin, such cuticle is not cut using the device, and the pressure of the cutter on the skin causes a strong burning sensation and small wounds. Therefore, when performing a manicure on difficult hands, the master usually uses a remover. It's much easier to do a manicure with it. This saves time and helps remove roughness without using a cutter, but with the use of nippers or other cutting tools.
Below you can find the most common keratolytics for the cuticle:
- Cody
- CND
- Naomi
- Severina
Removing the coating
How to file off gel polish from tips: manual method
The second method is mechanical and involves simply cutting the composition from the plastic. There are no special nuances here: the main thing is to choose the right working tool.
If you choose a tool with a rougher surface, you can damage the plastic, and then next time you simply won’t be able to remove the shellac from the tips. A softer version of the nail file will not cope with the required task.
How to remove gel polish from a design palette using a nail file?
Very simple:
- The top layers are removed with a rougher surface - first the top coat, then the colored coating.
- Closer to the plastic, the tool is turned over to the side with less abrasiveness.
- Sawing is carried out in one direction, evenly layer by layer.
At the end of the work, dust is shaken off the tips: they are ready for applying new designs.
I washed down the gel polish with a cutter from the palette: hardware solution
This method is not the most popular, but it can be used if you have a device and suitable attachments. Actually, the cutters are the main difficulty when choosing this method
What do you need to pay attention to?
Material. Ceramic and carbide cutters are suitable for removing gel compounds. Ceramics are more expensive, so they are usually used for manicure work. The design is removed from “daisies” using budget attachments.
Notch color
As when choosing a file, it is important to correctly evaluate the abrasive properties of cutters. To help the craftsmen, colored “belts” were made on the nozzles
For ceramics, the edging should be blue, for carbide cutters it should be red.
Form. In this matter, you should focus only on the convenience of the master, but for working with tips, cylinder cutters are considered optimal.
After choosing a nozzle and preparing the device, everything is simple. The design is quickly removed from the tips, spending a minimum of time and effort.
Many manicurists throw away tips and daisies with old designs without even thinking about reusing the palettes. And then they spend money on buying new blanks. Now this can be avoided.
Any of the three methods will help you quickly and easily get rid of the design on the tips and make the plastic again suitable for nail art.
Cuticle remover gel: how to apply?
There are several types of keratolytics, depending on the active substance. To soften them, fruit acids or alkalis are often introduced into their composition. Urea agents are also used. Sometimes urea-based drugs are used. The main purpose is to loosen the surface of the cuticle, skin, and facilitate its easy cleansing. The remover is applied depending on the manicure technique. Most often, this product is used in classic manicure and in combined techniques. Manicurists are trying to simplify the task by speeding up the work.
Cuticle remover gel, how to apply:
- After removing the gel polish and removing dust, apply a thin flame treatment to clean the subcuticular pocket and remove pterygium from the sinuses. Next, a keratolytic agent is applied to the cuticle surface and left for about 2 minutes.
- Remains of the product are removed with a damp cloth. Two to three minutes is enough for the skin in this area to become very soft and supple. It can be easily lifted with an orange stick and removed with a cutting tool.
- In classic manicure, apparatus and cutters are not used. Pull back the cuticle and release the subcuticular pocket using an orange stick or pusher. The remover is applied, and after its exposure, using orange sticks, scrape off the remains of the pterygium, and cut off the cuticle with a cutting instrument. These can be scissors, tweeters or manicure scissors.
- Remover or keratolytic is used not only in manicure, but also in pedicure, when treating fingers before applying gel polish.
Remover
How to remove gel polish without foil using special wipes
For those who have neither the strength nor the desire to bother with cotton pads and foil, special napkins soaked in a solution for removing gel polish are available for sale.
They are simple and easy to use, but they tend to dry out the nail plate, making it more brittle. Preparation for using a cosmetic product looks the same as in the previous method. That is, you must cut off most of the covering and treat the cuticle with cream, after which an envelope with a napkin inside is put on each finger. The exposure time is indicated on the packaging or in the instructions for use. As a rule, it is 15 minutes. Remove the remaining varnish with a stick.
Skin defender for nails: reviews
Below you can read reviews from consumers who have used skin defender.
Skin defender for nails, reviews:
Olga. I’m not a manicurist, but a “me” person. I learned how to do a manicure after watching videos on YouTube. I’m good at it, but I consider stamping the simplest design option for myself. However, after it, traces of paint remain on the skin, which are difficult to remove. I took a risk and purchased skin defender. I was focusing on a low price category, so I purchased a product from corazon. It cost me only 70 rubles, but the bottle is small. It is quite suitable for home use, because the consumption is economical. It sticks well, the consistency is comfortable, does not spread over the surface of the nail, and is easily removed with a film, along with the remaining paint.
Oksana. I only do manicures for myself and my friends, so initially I didn’t want to spend money on useless products. Therefore, I often use PVA glue for such purposes. But it is very liquid and spreads, so the manicure is completely sloppy, with a lot of bald spots. It is difficult to wipe off glue residue from the nail. It was removed with liquid along with the remaining paint, and everything had to be done again. I was generous and bought a pink thing from Neil Ru. I am very pleased because the product works great. Lately, almost all of my girlfriends have been asking me to make a gradient. For these purposes I use air puffing, which leaves a lot of marks on the skin around the nail. This pink thing makes them easy to remove. Dries instantly and has a neutral odor. None of the friends had an allergic reaction.
Marina. I noticed the product immediately after it appeared on the market, but I thought it was some kind of deception. I thought the product was useless. How wrong I was. After water manicure with a lot of streaks came into fashion, as well as baby boomer, gradient and stamping, I purchased adhesive, liquid tape. I am very pleased, there are no marks left on my nails. I chose the product from born pretty. I ordered it in China on the Aliexpress website. I’m happy with the quality, I think it’s no different from expensive products. Works well, applies in a thin film and dries quickly. It is worth remembering that in winter the product freezes, and after defrosting the properties are not restored. The Chinese manufacturer did not warn me about this, so I made my first order in winter. After the product arrived, it was impossible to use it due to the large amount of flakes. The product separated into two parts: liquid and thick. After that, I made another order in the summer. A mass of medium consistency arrived, which resembles jelly. I use it with pleasure, I really like it, after stamping there are no traces left.
Defender
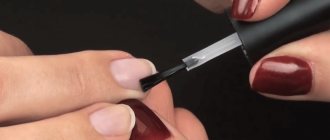
Thanks to its elasticity, the product is easily removed from the skin and does not tear. Together with it, the remaining dye is removed. Thus, the nail remains clean, without streaks or traces of paint.
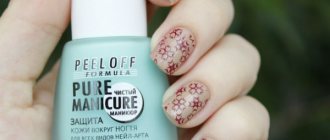
Manicure correction with “RIO Profi”
Thanks to all the specialists who are partial to female beauty and try to please the fairer sex with unusual new products, more and more interesting ideas for manicure are appearing
.
How to use RIO Profi liquid tape.
For example, a unique device is liquid tape. It is necessary for those who love designer unusual patterns on nails and who are not afraid of experiments.
especially indispensable when it is decided to:
- stamping;
- water manicure;
- gradient;
- stencil;
- French;
- drawing holes.
All these types of manicure require not only skill, but also great care, because such original nails always attract the eyes of others.
.
The skin around the nails should remain in excellent condition. And all the excess varnish will remain on a specially prepared tape.
The time usually spent on the lengthy and often labor-intensive task of removing excess will be reduced to a minimum.
The convenient product “RIO Profi” appeared on store shelves not so long ago, but anyone who follows new products in the field of manicure has already managed to understand and appreciate all the benefits of this corrector.
Moreover, it does not matter what means are used:
- colorless varnish;
- colored varnish;
- varnishes for creating various patterns;
- gels.
Now it’s time to calmly start working on your nails with RIO Profi, without worrying that streaks and marks will remain.
What makes this product stand out is:
- natural ingredients, environmentally friendly. The main ingredient here is rubber;
- manufacturers decided not to add any dyes to the product in order to save people from all kinds of allergic reactions;
- due to its composition, the product does not have a special odor;
- the absence of fragrances and essential oils makes the product cheaper, and therefore accessible to many;
- ease of use;
- The tape dries quickly - within a few minutes, so it will be especially useful for specialists in manicure salons.
Using liquid tape is a pleasure, you don’t even have to learn. You just need to:
- Before the general procedure, apply the corrector to the areas of the side rollers along the contour of the cuticle; a thin layer protects just as well;
- wait until the liquid tape dries. In the bottle it is pink in color, but gradually dries out and becomes more transparent;
- Please note that the fingers with the applied liquid should not touch each other, otherwise they will stick together.
Now you can proceed directly to the manicure, and even if the varnish remains outside the nails, the corrector will take care of any mistake.
After the procedure, the tape is very easily removed with tweezers.
You just need to grab the edge, but after the nail polish has dried on your nails.
Removing gel polish from the palette - soaking in hot water
This method is considered the simplest and fastest, so manicurists use it most often.
It requires:
- hot water - but not boiling water;
- pusher - a convenient metal scraper;
- 100 grit nail file or nail polish remover.
How to easily remove gel polish from tips or chamomile? The first step is to get rid of the top coat, and here it is important to know what exactly was applied with the top coat. There are two options:
Option two:
- Regular clear nail polish - removed with nail polish remover and a cotton pad.
- Top coat – removed superficially with a hard file until the shine disappears.
After only the nail design remains on the tips and there is no protective film on top, you can proceed directly to the removal procedure:
- The tips are immersed in hot water for a few seconds.
- Use a pusher to pry up and remove shellac from the plastic.
When performing work, you need to remember a number of points:
- All gel polishes differ in consistency, composition, density, density, so the duration of heating in water will have to be determined empirically. Typically the processing period ranges from 10 to 60 seconds.
- The pusher may not remove the “color” in a single layer, then you should simply scrape off the coating from the tips - carefully and without haste.
- If you press hard on the plastic with a scraper, you can break the tip, and then you definitely won’t be able to reuse it.
VIDEO INSTRUCTION
Which is better
- Cleanser Severina is the most budget-friendly product for removing the sticky layer from the surface of the nail, which is perfect for home or professional use. In addition to alcohol and water, it contains provitamin B5 to moisturize and soften the nail plate and the skin around it. Judging by consumer reviews, this product is worthy of close attention and does its job perfectly.
- Runail is suitable for removing the dispersion layer and cleaning brushes after using gel polish. It is a little more expensive than the first analogue.
- TNL is used to decontaminate the nail and the final stage of gel polish coating - removing the sticky layer.
- CND Nail Fresh is a product for professional use. It cleans the nail well, dries its surface and does an excellent job of removing the unpleasant sticky layer.
- Kodi Professional Nail fresher is an American product for professional use. It removes the sticky layer, dries the nail before applying the base and cleans it.
The choice of degreaser depends on whether it is chosen for home or professional use, brand recognition, price, and functionality.
How to minimize the risk of allergies to gel polish
Keep all jars and bottles clean and do not allow leaks on the lids or bottles. After all, then you suddenly take them with your bare hands.
If you accidentally spill gel polish, immediately wipe it off with a clean napkin.
If you are a manicurist, be sure to wear a medical mask and gloves before working.
Do not use frankly cheap materials
Remove any dispersion only with gloves, because the dispersion layer is nothing more than uncured gel polish. In other words, the remains of an uncured coating.
Also, change wipes more often when removing dispersion from the client’s nails. Be careful not to get it on the client's skin.
After working with a client, wash your hands thoroughly with antibacterial soap and ventilate the office for at least 20-30 minutes.
How to avoid suffering from allergies
Follow simple safety rules and you will be happy. Do not breathe in vapors (in this case, ventilate the room where you work more often, plus good ventilation). Do not eat or drink the remaining components, do not put them in your eyes, work with it until it dries completely (polymerizes) with forced ventilation.
When everything dries in the lamp, it turns into a harmless polymer.
If you are careful and careful when working with materials, you can get rid of 11 of the 12 main causes of allergies from my list. The exception is “personal intolerance to some materials,” but this is a very rare case
If you still have an allergy to gel polish, then go through my list again, maybe you haven’t worked on one of the points.
If everything on the list is ok, try changing the materials you are working with.
Tools for removing gel polish yourself
You can remove gel polish at home with a removing liquid - either regular or specially created for working with the coating. In a familiar liquid, the presence of acetone is inevitable, since the gel cannot be removed without it. And what else can you use? Of course, it is better to use branded products.
To work you will need:
- Cotton pads are cut in half and divided in half.
- Fat cream.
- Food foil, cut into small pieces (you can use chocolate or candy wrappers).
- Orange or plastic sticks.
- Cuticle oil.
- Sanding file.
Step-by-step guide to action:
Preparing the nail plate at home involves treating it with a sanding file to remove shine (shellac is not required for a manicure). When solving the problem of how to remove gel polish from nails, it is very important to wash your fingers in warm soapy water and cover the skin around the nail with a rich cream. This will protect the dermis from the aggression of the coating removal solution. Moistening a cotton pad in nail polish remover and applying it alternately to the plates
The cotton wool is secured around the fingers with foil. A special liquid melts the gel sticky layer after 10 minutes. The usual composition with acetone will extend this phase by another 7 minutes. To speed up the process, lightly massage the plate. And then the coating can be easily removed along with a cotton pad. However, more often than not, an orange stick is required to remove the layer. It happens that the manipulation aimed at how to remove gel polish at home should be repeated (when the coating is applied too generously). The nail plate becomes shiny after working with a sanding file. At the end of the process, the skin is treated with cuticle oil.
It is considered a mistake to remove the gel using the usual acetone, as well as using only the mechanical method - this leads to injury to the surface of the nail.
Manicurists advise removing gel polish first on the fingers of one hand, and then on the other. A hand free from the procedure may be needed, for example, to massage the nail plates.
You can use the new coating at home immediately after removing the old one.
Steps
Removing Wet Varnish
- Prepare your brush.
Use a new, clean eyeshadow brush or an old manicure brush that has been cleaned and disinfected. To clean your brush, dip it in 2-3 drops of nail polish remover in a plastic dish, then wipe it on a piece of cardboard. Repeat until the brush is clean.
- Nail polish remover is different from solvent. It is often used to restore old nail polish bottles to their original appearance.
- Use cardboard as other materials, such as napkins, may leave lint on the brush.
- Pour nail polish remover into a small saucer.
Do not use acetone as it will destroy the fibers of the brush. Instead, choose another nail polish remover of similar strength that will clean your fingers just as well.
Paint your nails.
Choose your favorite color. Apply a base coat and a color coat. Apply as many coats of colored varnish as needed to achieve the desired color.
Soak the brush.
Dip the tip of the brush into nail polish remover. This is important because, over time, nail polish remover can damage the adhesive and metal crimp. Wipe off excess product on the edge of the bottle.
- By not removing excess product from the brush, you risk eventually erasing your manicure along with the polish around your nails.
Gently brush along the edge of your nails. Make sure that the brush does not go into the nail, as this will ruin the entire manicure. Once you've finished cleaning your fingers, touch up your nail polish where necessary. Let the varnish dry and apply the top coat.
Finish applying your manicure.
Once the top layer is dry, soak a napkin in warm water and fold it in half. Use the folded side of the napkin to wipe away any remaining polish around your nails. Don't forget to wash your brushes so they're ready for next time!
Using warm water
- Apply nail polish.
Take your favorite nail polish and apply a base coat, color coat, and top coat. As a general rule, it is best to apply two coats of color. Inspect the bottle to see how many coats are recommended.
Let your nails dry completely.
Allow the polish to dry before removing any nail polish that gets on your fingers. Otherwise, you will only smear the color layer on your nails.
Get your hands wet.
Fill the sink with warm, soapy water. Use moisturizing soap to soften your hands. Once your nails are completely dry, place your fingers in the sink. Soak them in water for about 2-3 minutes. It doesn't matter whether you dangle them in the water or leave them motionless.
- If you applied water-based polish, soak your fingers for 5 minutes or more to allow the color layer to release from your nails.
If you don't have time to soak your nails, you can easily do this in the shower.
Take the cotton wool in your other hand and gently wipe the polish off the skin. If the polish is difficult to remove, try soaking your fingers for another minute and try again. After removing all the polish around your nails, dry your hands. If necessary, add another top coat to give the polish extra shine.
Using Elmer's Glue
Prepare everything you need.
Elmer's glue is best, but white PVA glue will work. In addition to glue, you will also need a brush and nail polish. You also need a small paper saucer or something to pour the glue into.
Even now, not everyone knows what gel nail polish is and how to handle it correctly, although it appeared quite a long time ago. How to use gel polish so as not to harm your body?
Gel polish is used for both manicure and pedicure, for a single-color coating and for gel designs. How to use this miracle product correctly in order to fully experience all the ease of use?
Regardless of the date of manufacture, gel nail polish
Before each use it is necessary to mix with a spatula.
By applying one coat of gel polish, you can get a translucent finish and pastel colors, and by applying two coats, you can get a full, rich, opaque color. To use directly on the nail plate, it is advisable to take the materials in this order - first, a means for degreasing the nail plate and removing all types of moisture, then a primer or base for better contact of the gel polish material with the nail plate, and after all this, the gel polish itself to set the shine and final coat. High-quality materials do not require removal of residual stickiness and additional sawdust. In general, a natural nail and the methods of preparing it for the effects of gel polish are completely no different from preparing for artificial nail extensions. Apply a little primer gel to the prepared surface of the natural nail. The nail plate should become matte. If there is too much primer gel, this will most likely cause the gel polish to peel off later. Too much primer if after drying the nail is still shiny or worse, looks wet. Excess drug should be removed using a foam sponge. But there is no need to remove the dispersion layer after polymerization of the nail in a UV device. When gel polish needs to be applied over existing acrylic nails, a layer of strengthening gel before the procedure will also not be amiss. Using a thin brush to work with gel polish, apply it in a thin layer over the dispersion layer of gel primer. You need to be especially careful when applying the gel polish near the cuticle, and you should also cover the end of the edge of the nail. Gel that gets on the cuticle or loose skin around the nail will inevitably lead to rapid peeling of the artificial coating from the nail plate. You can remove excess gel from the surface of the cuticle or skin near the nail by using a special cuticle pusher. For better performance of the work, you should adhere to the following algorithm of actions - it is better to start work with the little finger of your right hand. While the little finger of the right hand is in the UV apparatus, the little finger on the left hand is processed, and the hands in the UV apparatus are swapped. By continuing to alternate application and polymerization, you can apply gel polish to all fingers much faster. This procedure also prevents the gel polish from flowing onto the cuticle and periungual area. This procedure is recommended by experienced craftsmen for those who are just starting to think about how to use gel polish
most accurately. Then a thin layer of a special ultra-fixing gel is applied to the nail. The thickness of the ultra-fixing gel along the edges of the nail and in the cuticle area should be minimal. Also, do not forget about sealing the nail with ultra-fixing gel by applying it to the sides and end of the free part of the nail. This will give the nail protection from mechanical stress. To fix the ultra-fixing layer, the hand is left in the UV device for one minute. It is best to remove excess gel from the cuticle and skin around the nail using a special cuticle pusher. In order to remove the sticky dispersion layer, it is best to use a foam sponge and special preparations for cleaning gel polish.
One foam sponge should not be used on more than three nails, otherwise the nail may become dull when dry. If all proportions and recommendations are followed correctly, the coating on all nails should be smooth and shiny.
There is an opinion that a graceful gait turns a woman into a queen. Also, a woman’s appearance tells how noble and educated she is.
Well-groomed hands, discreet, pleasant makeup, flawless manicure, as well as well- groomed magnificent nails emphasize the beauty of a woman.
.
The perfect manicure can be done at home; it is only important to follow a few rules that will help keep your hands clean and tidy.
Homemade substitutes
If you wish, you can make liquid nail tape at home from improvised materials. Using tape for this is quite inconvenient, since it does not provide reliable protection, while Vaseline or PVA glue provide it 100%. However, you need to know that the use of glue is allowed only if there are no wounds on the skin, irritation or fungal infections.
When using tape, you need to cut it exactly along the contour of the nail so that this tape, glued to the skin around it, does not cover the edges of the plate, but also does not expose the nail folds. Only a few can do everything with the necessary care with their own hands.
Vaseline oil is a completely safe means of protection during manicure, and it also prevents the appearance of hangnails by softening the skin. Vaseline is applied around the nail in an even, fairly thick layer and left to dry for 10-12 minutes. It is very important to ensure that the product does not get on the nail plate. After the manicure is done, the Vaseline is removed with a cotton swab, and then the hands are washed with soap.
PVA glue creates uniform protection around the nail, similar to that provided by liquid tape. The product is applied with a brush in a layer of medium thickness and left until dry. On average, PVA dries in 15-20 minutes. However, if a manicure is done without using water, then it is enough to wait until the glue surface becomes dense. Next, the manicure is carried out according to all the rules. Once the topcoat has dried, the adhesive is removed. Its layer needs to be picked up with tweezers and carefully peeled off from the skin, as is done with tape.
If there are concerns about using glue in its pure form, it can be slightly diluted with water in the proportion: 1 part water to 6 parts PVA. A well-mixed composition is used similarly to glue in its pure form.
Liquid tape allows you to always have a perfect manicure without wasting time and effort on scrubbing your skin off of polish. It is only important to choose a product that will be completely suitable.
Source
Sawing
Ideally, this should be done in a salon using a manicure filing machine, popularly called a drill. But you can find a way out at home.
For this method you will need the following tools:
- manicure scissors;
- buff;
- peroxide or alcohol, you can even use vodka, which you will need to degrease your nails;
- glass nail file.
Next we start cutting. Start by shortening your nails. The free edge should stick out a maximum of 1-2 mm. Next, using a high-quality glass file, make movements from one edge of the periungual fold to the other without affecting the cuticle.
Continue making these movements until you see that the coating has become thin. To make the process easier, periodically remove dust with a sponge. Soak the sponge in peroxide or alcohol in advance to degrease your nails.
Grinding should not be completed to the end, as this can lead to damage to your own nail plate.
Therefore, when after sawing you are left with a very thin layer of coating, then take a buff instead of a glass file. And with the help of a buff, clean off the entire coating.
Base with a sticky layer: what is it, the best types
A base with a sticky layer is one of the types of this category of products, because there are also No Cleanse or No sticky, which do not need to be wiped with a cleanser after drying. But this is not their main difference. And the fact is that bases with a sticky layer, due to their composition, are thicker, more elastic, smooth out the nails well and last longer. They can be camouflage or transparent, rubber. The products have a liquid texture without residual stickiness. And they are more suitable for strong nails that do not need additional strengthening, and on which manicure wears well.
Among the bases with a sticky layer, the best from manufacturers are:
- Uno,
- Klio,
- Diva,
- One Nail,
- ONIQ
Each company has hard and elastic products, but they all stick well to the nails.
How to use
Using a product with a sticky layer is easy:
- It is applied to the prepared nail in 3 movements - in the center and along the side ridges.
- Take a drop of base and place the brush at a distance of approximately 4 mm from the cuticle.
- Stretch this amount to the free edge without touching the nail with the bristles.
- The finger is turned upside down for a more even distribution of the product, and imperfections are corrected with a brush.
- The hand is returned to its previous position and the base is leveled again with a brush, if necessary.
- The finger is placed under a drying lamp.
- After 1-1.5 minutes, wipe the nail with a napkin moistened with a clinser.
- When the moisture dries after a few seconds, you can apply gel polish with a sticky layer - first with a long stroke in the center, from the cuticle to the end.
- The following actions with a brush with a flower bed are performed on the sides of the nail.
- The area under the cuticle is painted with a thin brush.
- The finger is placed in the lamp for polymerization.
- After cooling for a minute, wipe the nail with a cloth moistened with a cleanser.
- When the liquid has evaporated, apply a second layer of gel polish in the same way as in steps 8-10.
- Once dry, repeat steps 12-13 and the finishing agent can be applied.