What are nail sliders? How to use them with gel polish and regular polish. How to order sliders. Beautiful photo slider design.
Slider nail designs are incredibly popular today. Women and girls are happy to wear elegant flowers, funny cartoon characters, various symbols and even portraits of celebrities on their nails. It would seem that working with bright stickers is very easy. But every art, including nail design, has its own subtleties. They are definitely worth delving into.
What is slider design, nail stickers?
Nail sliders are special stickers that are applied to the nail plate to create an interesting and trendy design. Slider design is considered an innovation in manicure.
Nail sliders.
How can this be, many will ask. After all, nail stickers have been around for a very long time; even little girls use them. But sliders and those same stickers are absolutely not the same thing:
- Sliders with photo printing are applied to an incredibly thin film, which, if handled skillfully, lies perfectly flat on the nail plate, so it looks very elegant and organic
- The film with the pattern is fixed on a special substrate. To separate it, you need to soak the slider for a short time using the technology that will be described below.
- The sticker itself has its own adhesive layer; in addition, it is often applied to a sticky layer of gel polish or uncured ordinary polish. Sliders, glued correctly, do not separate from the nail plate, do not tear and are worn as long as the coating
IMPORTANT: You do not need to have any special abilities or skills to successfully create a slider design. You will be able to glue stickers with pictures evenly after just a few tries.
Elegant manicure with sliders and stickers.
Manicurists and nail designers immediately appreciated the numerous advantages of sticker sliders:
- They are an advantageous alternative to hand painting. Wearing designs on nails has been fashionable for many years. But some masters draw with pleasure, while others cannot draw at all. Often a woman comes to the salon and asks to paint her nails. At an affordable price they offer her monotonous, rather boring patterns. If she orders something unusual, it will cost a pretty penny. In addition, the more complex the drawing, the longer it will take to draw. With sliders, an original, even unique manicure becomes simple, fast and cheap
- The variety of photo stickers is impressive. You can find anything from zodiac signs, symbols, flowers, to drawings in the oriental style and reproductions of paintings by famous artists
- Sliders can be glued to any type of nail coating: regular polish, shellac, gel polish, acrylic
- When building (modeling) with acrylic and gel, stickers can also be used
Sliders are designs for nails of any complexity that do not need to be drawn.
IMPORTANT: Sliders do not damage the nail plate and are easily removed from it
Today there are three main types of slider stickers.
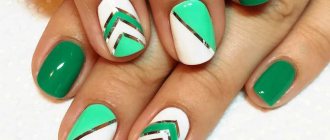
- For the entire nail plate. As a rule, such a sticker is already adjusted to the shape and size of the middle plate. It is applied to the entire nail, from the roller to the free edge. It doesn’t matter what color coating is applied to the nail, because the slider will completely seal it
- On transparent film. Such stickers are glued to nails coated with white or some other light varnish. Then the drawings on them look most clearly and advantageously
- With a dense pattern. As a rule, the design of such stickers is the most complex. The slider design is completed with a dense pattern of glitter, rhinestones, beads and other decorative elements.
Sliders for the entire nail. Sliders on a transparent background. Sliders with a dense pattern.
Kinds
Slider design includes several types of water stickers. All of them require preliminary soaking of the decorative element before separating it from the paper backing. Otherwise, the products are divided into two lines: options for the entire nail and pictures for a small part of it.
Regardless of the type, aqua pictures can have different thicknesses, which determines the difficulty of fixing the decor to the nail coating. There are options with elastic film. It is convenient when you need to tighten the slider a little, covering the light base on the nail plate. Analogues with greater thickness are more difficult to work with; it will take longer to give them the desired shape and concavity.
Based on the type of background, nail sliders are divided into two categories: they come with a pigmented and transparent base, on which a drawing or photo printing is applied. Transparent options are used to cover the main background. Due to this, they create the effect of hand-painting; such varieties are in price today. Analogues with a color base are convenient because, without unnecessary persistence, they allow you to create the effect of a pattern applied to a nail evenly painted with pigmented varnish.
Regarding films with a color or monochrome background, it is worth noting that it is here that the determining factor of the technology is the thickness of the slider. The fact is that a thin film cannot completely cover the original color of the nail plate. In addition, such a slider will look clear and rich only if you first put a white backing underneath it. It is useless to glue such pictures onto bright and dark tones of varnish: this will cause the image to fade and may lose its original attractiveness.
A thick film will be the best solution here, because you don’t need to paint your nail white under it. This can reduce the precious time it takes to apply and dry a single layer, simplifying standard slider design technology. As for the differences between pictures on the entire surface of the nail or part of it, partial images are made on a transparent basis, although some masters, for any special idea, painstakingly cut off the slider motifs in order to glue it only to part of the nail.
The main types of sliders include options with solid fill and applications. However, both options can be made in the spirit of airbrushing. This is achieved through a three-dimensional image or the so-called 3D effect. For example, sliders can convey a gradient effect and the illusion of volume. This type of decor is applied to any background background.
It is also worth considering that sliders are not universal pictures for arms and legs. In fact, companies produce different versions, which is usually indicated by the product labeling, and often by a special picture. In addition, the number of pictures for feet is smaller, because in pedicures, water-type stickers are usually used to decorate mainly the nails of the big toes. These images are larger than the hand images.
Sliders can have a glossy or foil surface. In addition, they come in monochrome, color, holographic and even somewhat voluminous. At the same time, the design itself may differ: in addition to photo printing, manufacturers create designs for real watercolors, made using wet techniques. This type of picture looks very beautiful; it is often used to imitate hand painting.
Slider design for nails: instructions, application technology
Manufacturers of high-quality sliders, as a rule, include with their products at least schematic, and sometimes very detailed and understandable instructions for their use. It immediately becomes clear that there is nothing complicated in using stickers. They make it easy to do a manicure even for yourself.
Instructions included with the nail sliders.
Whatever the coating on which the slider will be glued, the nail plate should be prepared for it.
- Water stickers look very beautiful only if the nails are neat and the hands are well-groomed. Therefore, before creating a slide design, it is necessary to carefully remove the previous coating and perform a hygienic manicure in the most convenient way (edged, hardware, chemical)
- The nail plate is given the desired shape
- The nail plate is degreased
- A base varnish is applied to it (transparent, white, any other color, depending on the type of slider and the woman’s desire)
- Selected stickers are adjusted to the nail plate in shape and size
- The pattern is separated from the backing and carefully applied to the nail plate, leveled on it
- If necessary, the design of nails with stickers is complemented by other decorative elements
- A fixing layer is applied on top
Technology of applying water stickers to nails.
Result.
IMPORTANT: Whether the sliders will decorate all ten nails or just a few depends on the woman’s desire. But the first option is not very fashionable, often “clunky”. The most current solution is to glue water stickers to 2 or 4 nail plates
How to work with translation sliders: instructions
To apply the slider, you need to make a base, which can be varnish, base coat, shellac, artificial coating (gel, acrylic). Owners of natural nails can use the simplest technique, but if they have extensions, it is important to take into account some nuances. You can easily create a fashionable manicure with your own hands using transfer stickers if you follow the steps in these instructions:
- The application technology will depend on the base, so first choose the sticker, and then the shade of the varnish.
- Before the main procedure, get a manicure to get your nails and hands in perfect condition.
- To apply the slider at home, you need to have on hand: tweezers or an orange stick, a pusher, a cotton swab, and a transparent fixative varnish.
- Depending on the type of stickers and the desired design, cut out fragments to create a spectacular manicure.
- Before application, the slider is immersed in water for 40 seconds and then carefully separated from the base.
- Place the design on the nail, leave until completely dry and cover with clear varnish.
Quick raspberry manicure with water stickers. Slider nail design | Water Decals Nail Art
How to apply sliders to regular varnish
Applying a slider to regular varnish is an accessible technique even for beginners; it does not require much experience. The initial stage involves choosing a slider, preparing the nail and applying a base layer, which is the same for both natural nails and those coated with gel or acrylic. If you are taking your first steps into slider design, wait until the second coat of varnish has dried before applying the decal.
- To make the shade expressive, regular varnish, regardless of color, must be applied in stages in two layers.
- Take the sticker and, using a stick or tweezers, apply it to the nail with the adhesive side.
- To fix the sticker, remove irregularities and air bubbles, walk over the surface of the nail with a cotton swab.
- To ensure that the slider holds tightly and does not spoil the manicure, apply a transparent fixative varnish over the sticker.
How to apply a slider design correctly. Slider review.
Under gel polish
You can do a manicure with a decal for gel polish at home. The difference from a salon procedure will be only in the presence of special tools and experience at the master’s disposal, which helps to complete the procedure faster. Otherwise there are no obstacles. To make a fashionable manicure, learn how to make a slider design for nails under gel polish using these instructions:
- Carefully process the cuticle, remove the glossy layer with a file.
- Give the nail plate the desired shape, wipe the nail with a degreaser.
- Apply gel polish, dry it in a lamp, and then place the slider - the whole or a fragment - with the adhesive side. Wait until completely dry.
- At the final stage, it is recommended to apply a transparent layer of varnish on top, which will preserve the sticker and at the same time fix it even more tightly.
Slider design for gel polish. How to do it?
When building up
If extensions are used first, there should be no difficulties with stickers either:
- After the manicure, when the nails are modeled, lightly walk over the surface with a pusher and brush off the dust.
- Complete the extension procedure by applying the finished drawing, but accuracy will be required here, since you cannot move the picture on the acrylic coating.
- When applying gel extensions, be sure to dry your nails in a lamp so that you can then glue the finished picture on top.
- Otherwise, the application technique will be standard, and at the finish you will need to secure the slider with a transparent varnish or top coat if it is a gel extension.
Slider design for extended nails. / Sticker nail art on acrylic nail
How to cut a slider design exactly along the nail?
To ensure that the slider fits perfectly in the shape and size of your nail, you need to:
- have a very accurate eye
- cut out the design with a reserve, and after applying it to the nails, adjust it to their size
Adjusting the sticker to the shape and length of the nail.
- If the slider is glued to the entire nail, you need to leave small edges from the cuticle and side ridges. Then the drawing will last longer
- If your eye fails, it is recommended to cut the stickers a little wider and longer than the nails, and after the topcoat has dried, remove the excess using an orange stick or a router
You can adjust the slider to the desired size and length already on the nail.
IMPORTANT: Figuratively cut stickers, which were originally intended to be glued to the entire nail plate, look very beautiful. The design is truly unique
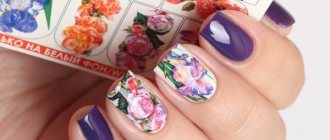
Beautiful slider design.
Kinds
Today the choice of such products is quite wide. There are many varieties of nail design stickers.
Water
Water stickers are a thin film placed on a white paper base. A special feature of decals is that they need to be based on a translucent base, so they require careful selection of the shade of varnish. The background should be in harmony with the color palette of the pattern and not merge with it into a single incomprehensible spot.
The disadvantages of this type of stickers include the likelihood of damage to the workpiece during the process of adjusting it to size and shape.
Self-adhesive
Such drawings are photodesigns (fragments with an adhesive surface located on a special substrate). Their feature is independence. In order to glue them, it is enough to separate the sticky layer and stick the fragment onto the surface of the nail.
The stickers themselves can represent individual objects of a specific design or be a full-fledged object. They come in a variety of sets of 10 plates designed specifically to cover the entire area of the nail. Sets created for French are made in the form of stripes.
3D
Stickers of this type differ in volume. They are slightly convex, unlike regular flat pictures. This type of slider can be a full-fledged decorative element or a nail accent.
These stickers are either water-based or adhesive-based. In general, they are not difficult to work with, although sometimes difficulties may arise (when designing a manicure over the entire area of the nail). The presence of a small relief (bulge) does not interfere with everyday life; it does not scratch or cling to clothes and other objects.
The advantages of 3D stickers include the ability to combine them with other decorative design elements (for example, with regular stickers). They are easy to use and often look more beautiful than their counterparts. The disadvantages include the difficulty of removing the sticker when removing the coating. Special liquids for removing gel polish are not intended for such procedures, so this sticker will have to be scraped off.
How to stick a slider design on the entire nail?
It is clear that the slider is glued to the nail plate. But it’s not entirely clear how to do it correctly so that it doesn’t get soggy, crumpled or come apart on the nail.
- The slider, cut to the shape and size of the nail, is soaked in a bath of plain water at room temperature. The instructions usually indicate a time from 15 to 60 seconds. During this time, the backing gets wet, but often the sticker itself gets wet.
- Another option is to soak the slider on a napkin. Place the sticker on a cloth or paper napkin soaked in water at room temperature for 15 seconds to a minute.
The next steps are always the same:
- the sticker is applied to the nail plate along with the base
- remove the sticker from the base
- straighten the sticker
- lightly press the air out from under it
- apply a coating - a fixative - to the drawing
The sticker is carefully pushed onto the nail directly from the base.
Why sliders can peel or peel quickly
How to use a slider design for nails so that it does not peel off or peel off quickly? There are two main reasons that lead to such unpleasant phenomena: violation of technology or poor quality material. To avoid peeling, when applying the sticker, carefully walk over its surface with a cotton swab, leveling and removing any irregularities. It is better to glue the decal onto the dried second layer of varnish.
Sliders peel off or peel off quickly in cases where they are not covered with topcoat or clear varnish. The durability of the decal is affected by the base film, elasticity, thickness of the sticker and how well the base is dried. Fulfilling the last condition helps to securely fix the slider and eliminate the option when the picture starts to “crawl”.
- First aid for frostbite on hands or feet. Symptoms and signs of frostbite and how to provide first aid
- Coffee calories
- Corn porridge in a slow cooker with milk and water
How to make a slider nail design using regular polish?
If a girl wants to make a skinny design herself, she won’t need gel polishes and a lamp. The stickers stick successfully to regular varnish. For decorative manicure you will need:
- base coat for varnish
- regular varnish of the desired color
- fixer
- bath with water
- lint-free wipes
- orange sticks
- scissors
- sliders
Sliders can also be glued to regular varnish.
- After performing a hygienic manicure, a base is applied to the nail plates
- Cover your nails with regular polish
- Cut the sliders according to the shape and size of the nail plates, apply them according to the instructions
- Fix the varnish and sliders with a special agent (two layers on the sliders)
IMPORTANT: Stickers are applied either to the base or to the colored varnish
note
Most often, a set of nail stickers includes instructions for use, but sometimes they may not. That is why it is necessary to know the recommendations for the use and application of nail sliders.
Before starting a manicure, it is important to prepare all the necessary tools in advance so that nothing interferes with the successful completion of your nail decor:
- When applying water-based stickers, it is best to use warm water to speed up the process of peeling them off from the base.
- If the sticker cannot be fixed in the desired position, do not try to move it. Try to correct the shortcomings by adding other decorative elements, otherwise you will have to apply the slider again.
- It is worth remembering that you are not limited in choosing the location of the sticker on the surface of the nail, and this makes it possible to create a truly unique composition.
- After completing the slider nail design, avoid contact of your hands with water for at least half an hour.
Thanks to the large selection and ease of use of sliders, more and more nail art lovers prefer this method of nail decoration. They do not give the effect of extended nails, so your nails look as if they have only one layer of varnish. Such stickers are perfect for those who do not want to weigh down their nail plates with a large number of decorative elements. Sliders do not have a negative effect on the structure of the nails, which allows you to use them regularly.
The main reasons for peeling nail stickers:
If the quality of the slider leaves much to be desired or the varnish fixation does not adequately protect the design from external influences, the manicure will become unusable in a fairly short time. If you make a mistake when applying the sliders, then the nail decoration will also become unusable very soon.
When applying nail stickers yourself, it is very important to thoroughly dry both the base coat and the slider itself. Don’t forget about the quality of the varnish fixation, which protects the design.
Templates for nail design slider
A variety of nail sliders are available for sale. But sometimes you want something completely unusual, something that no one else has and won’t have. In this case, you can make nail sliders yourself in Photoshop using special templates. Detailed instructions are in the video below.
Template for sliders in Photoshop.
How to use nail transfer stickers
There are two ways to use transfer stickers for nails, the first is as follows:
- The selected shade of gel polish is applied to the base and dried.
- Next, use a special glue, which is applied in a thin layer and evenly.
- Then you need to wait a few seconds for it to become transparent.
- The wrong side of the sticker is pressed against the nail and smoothed.
- Then it is sharply removed from the surface, and the design is imprinted on the gel polish.
- All that remains is to coat the nails with the finish and dry for the required time.
The second method is similar to the first; almost all actions are repeated. But it is not the glue that acts as a fixative, but the sticky layer of the base. It is applied to polymerized gel polish, dried, but the surface is not wiped with a cleaner. Thanks to the sticky layer, the decal is clearly imprinted on the nail. It is secured on top with a finishing agent.
How to buy slider nail designs in Aliexpress? (give link to Aliexpress)
It is very cheap and convenient to buy nail sliders on Aliexpress in bulk. Necessary:
- register on the site
- go to the “Beauty and Health” section, select the “Manicure and Tools” subsection, “Nail Stickers” category
- choose your favorite sticker design
- make an order
Nail sliders on Aliexpress.
You can use the link
How to use it in design?
Nail sliders are unique in their self-sufficiency. However, despite this, they allow further nail decoration. In addition, experienced craftsmen often use such pictures when their clients are late, but ask for a special accent design. And here acrylic-based paints, thin brushes and all sorts of sparkling elements come to the aid of the master.
Due to the small image in the pictures, rhinestones for them should also be selected in a tiny size. It’s even better to combine rhinestones with bouillons (microscopic beads for manicure). This will allow them to fit into the design more organically. Rhinestones can decorate images in spots. For example, these could be:
- eyes on butterfly wings;
- the body of a dragonfly or spider;
- the glare of a cat's eyes;
- middle of flowers;
- grains of a wheat ear;
- peculiar buds or buds on branches;
- crown bases;
- imitation of a highlight on the logo of a Fashion House.
In addition, sliders can be used as a tool for creating seasonal designs, which is one of the fashion trends this season. It is pictures that, better than any decor, can convey the right mood of the season. For example, an autumn manicure can be decorated with prints of orange-fiery leaves and ripe berries, and drawings of a rainy city. It is worth supporting the winter design with patterns with a knitted texture, as well as pictures of snow-covered frosty patterns on the windows.
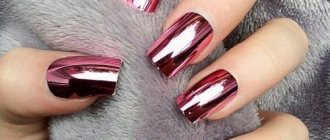
Slider design foil
Foil sliders will give your nails chic and metallic shine:
- gold
- silver
- copper
- bronze
The manicure will turn out very bright. This one is most suitable for special occasions. Although some people wear it every day.
Foil sliders are cats.
Foil lace sliders in silver. New Year's design with foil sliders.
Silver foil with glitter.
Emerald polish and gold foil sliders are a simply luxurious manicure.
Red reverse french and gold foil sliders.
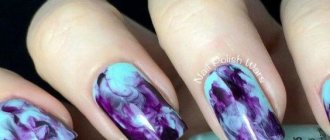
Slider design for long nails
Sliders with national painting. Sliders with sunflowers.
Animal print sliders on long nails.
Stickers with butterflies and flowers on long nails. Fashionable autumn slider design. Stilettos with skull sliders.
Sliders with owls. Roses glued on long nails. Sliders with crows. Lace sliders on long nails.
Features of gluing sliders to extended nails
The sticker is applied to extended nails in the same way as to natural ones, and the procedure in most stages is standard, but there are still some peculiarities and nuances.
You can use the sticker when the nail is completely modeled. The master must carefully brush off the dust from the surface and apply the design. It is important to do everything right the first time, because you cannot shift or move the slider on acrylic. If gel is used for extensions, the nail must be dried under a lamp before gluing the slider.
Finally, the topcoat is applied and the manicure is ready.
Slider design for short nails
Sliders with landmarks of European cities. Minions on short nails. Fashionable summer fruit slider design for short nails.
Sliders with butterflies on short nails.
Current sliders for short nails. Water splash sliders on short nails. Neat sliders with roses on short nails. Teddy bear stickers.
How to glue self-adhesive stickers - features
To apply a photo design to gel polish, you should adhere to a different technology. Unlike working with water sliders, you don’t need water to transfer the self-adhesive onto the nail, which is very convenient and saves time.
Most often, photo design is a solid image that either already follows the shape of the nail or is located on a single sheet. In the second case, the master first cuts out the image and only then begins to apply it.
After the preparatory work and application of two layers of gel polish, you can begin to transfer the slider. You need to carefully, using tweezers, separate the picture from the base and apply it to the nail, starting from the cuticle and moving towards the edge of the nail. It is important to avoid the appearance of an air bubble under the sticker.
You need to step back a little from the cuticle and on the sides, and tuck the edge of the film under the nail. Next, the plate is lightly filed, a finishing coating is applied, and the edge is carefully sealed.
Pedicure with slider design
Sliders are also used to create toenail designs.
Same slider design on arms and legs. Beautiful slider pedicure. Bright stickers for pedicure.
Flaws
You might be interested in:❶ How to paint toenails
We can talk for a long time about the advantages of stickers on gel polish at home or in a nail salon. But what are the disadvantages of this method of nail decoration? And are there any negative factors at all in using such a technique for decorating the nail plate?
Rather, it all depends not on what such a decoration element is in nail aesthetics
Here you need to pay more attention to how to apply stickers to gel polish or any other base surface correctly. Without following the appropriate recommendations on the sequence of correct application of illustrations in the form of such translations, you risk spoiling the overall appearance of the manicure
Take your time, try to transfer the adhesive blanks onto your nails carefully. And then you won’t have to think about whether this attribute of nail aesthetics has any disadvantages at all.