As soon as acrylic and gel technologies appeared at the disposal of the manicure industry, the field of nail design experienced a sharp leap in development, comparable to the Big Bang of the universe at the beginning of time. Since then, progress has not stood still. They constantly invent new materials, adapt techniques from related creative fields - painting, interior decoration - this is how new types of nail design are born. What we have today is simply fantastic compared to the meager arsenal of materials and means of the recent past.
All nail art is divided into 2 classes:
- flat nail design
- volumetric (sculptural, relief)
The article lists all types of planar nail design - this is when the material is drawn, glued or laid out in one plane - along the surface of the nail plate.
Introduction
Every modern and well-groomed girl today will not allow herself to leave the house with unkempt hands. Masters are ready to offer clients a lot of ideas for manicure - from classic options to colorful designs.
The most popular technique is applying gel polish. This coating can last on a girl’s hands for about three to four weeks, but to avoid nail disease, it is better to make corrections once every 15 days.
To be different, you can experiment with shapes, colors and patterns. In this article we will look at nail design options for beginning artists, because this type of income is quite good, and you can independently regulate the degree of your own workload.
European manicure
Speaking about what kind of manicure there is in which the cuticle is not cut, one cannot fail to mention the European one, which provides a supporting effect:
- After disinfection, the old coating is removed from the nails.
- Then, using files of different abrasiveness, the shape of the free edge is corrected.
- A softening agent is applied to the cuticle, as well as formulations with vitamins and other nutrients that nourish and slow down its further growth.
- If a wet European manicure is done, then the nails are placed in a steaming bath. But we must keep in mind that with the dry version, the decorative varnish lasts much longer than with the wet technology.
- Then the remaining cuticle is carefully removed with an orange stick or a special pumice stone, without touching the surface of the nail plate.
- A special oil is applied to the cuticle, and a nourishing cream is applied to the hands.
- Nails are sanded, polished and painted with varnish.
European manicure is only suitable for very well-groomed hands. Its positive aspects are the absence of injuries and the appearance of hangnails. But it is not done on very neglected nails.
What you need for home nail art
If a person is not going to become a professional and do manicure as a core activity, then it is absolutely not necessary to buy everything. It is enough to acquire a basic set of things that will be useful for drawing and developing designs.
To do your own manicure at home, you will need the following things:
- Scotch. It will help you create geometric shapes and do a French manicure;
- Dots. This element is a small plastic or wooden stick with a ball at the end for making dot patterns. Using this device, if necessary, you can also draw;
- A set of brushes of different diameters. The choice should be made in favor of products with natural bristles;
- Gel polishes of different colors;
- Glitters, sequins, rhinestones.
- Toothpicks, cotton swabs for pattern correction;
- Manicure corrector or gel polish remover;
- Fixative. This is a means to extend the life of the coating.
Attention! You can’t start your business with professional and expensive materials. At the first stage, you can try to apply drawings using ordinary watercolor paints, which are easily washed off. The main rule is to avoid overdoing the design.
SPA manicure
For problem nails, experts advise using such types of manicure as spa and hot. SPA is the most gentle and useful method of nail care, which includes various procedures:
- oil and paraffin baths;
- peeling;
- massage;
- masks.
During its implementation, cosmetic preparations containing only natural ingredients are used:
- First, remove the old varnish.
- Using a nail file, the shape of the nail is corrected and a nourishing cream is applied to the cuticle with massaging movements.
- To soften the skin, dip your fingers into a solution made from warm water, sea salt, and essential oils.
- When the cuticle becomes soft, it is pushed back or trimmed.
- A scrub is applied to the skin and peeling is performed, which improves blood circulation and starts the process of cell renewal.
- At the end of the SPA manicure, the nails are covered with decorative varnish or a composition with medicinal components.
The procedure takes quite a long time. You need to know that some of the products used can cause allergies. It should also be taken into account that there are a number of contraindications for paraffin baths.
Nail patterns using tape
It is believed that the easiest design to create is a French one. Also, beginning craftsmen often resort to colored blocks of different shapes and lengths. In this process, ordinary adhesive tape is useful, which, as a rule, is available in every home. In beauty stores you can find special self-adhesive strips.
How to make the simplest lines:
- A transparent base is applied to the nails, and then one layer of varnish of any color;
- After drying, strips are applied to the surface;
- Next, the nail plate is covered with a layer of varnish of a different color or colors, based on the design idea;
- When the coating has dried, you need to remove the strips and fix the resulting pattern using a special topcoat.
Important! The sequence of manipulations must be observed to obtain an effective result.
This technique allows you to create patterns with semicircles, triangles, diamonds and other geometric elements.
Below we will take a closer look at design options for beginners in pictures .
What types of nail designs are there?
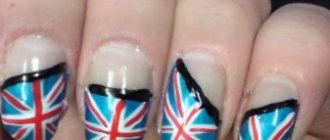
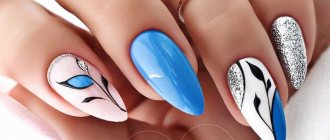
French , also known as French manicure. The most popular type of nail design in the world. Versatile and always on trend. In the classic version, the tip of the nail is decorated in white, imitating an overgrown free edge. The rest of the part is painted with translucent varnish in a natural pink color. Lunar nail design.
With a lunar manicure, the holes (the lunula area of the natural nail plate) are visually accentuated. There are many options - painting the holes with a contrasting color of varnish, placing a small pattern or sparkles on them, or not painting them at all. Ruffian manicure. Another name for the Ruffian design is “reverse French”. A type of design where the main part of the nail is painted with one color, a line is drawn along the cuticle and sides with a different color, and this line is thicker at the base of the nail. It turns out an inverted smile line from a French jacket. Baby boomer . This type of design is also called milky French - it represents a smooth transition from white on the free edge to natural pink at the root of the nail. Gradient , also known as ombre, degrade, stretch . One of the main types of nail design, when one color of varnish smoothly fades into another, or the intense tone of one color flows into a pale shade of the same color. Gradients relative to the nail plate are horizontal, vertical and diagonal, two-color and three-color. Aquarium design - when extending nails, a design or decorative materials are placed inside, under a thick layer of material. The result is an effect of volume and depth, like “under glass.” Water nail design - done with several colors of regular varnish, which is dripped onto the surface of the water and carefully stretched into intricate patterns. Then the fingers are lowered into the water with the varnish film, nails down, after which the entire varnish pattern sticks to the nails and the surrounding skin of the hands. It is peeled off from the skin, leaving a luxurious marble pattern on the nails.
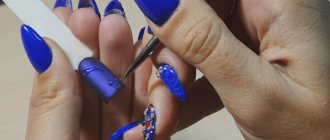
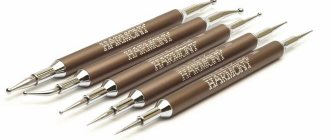
How to draw nail patterns using dots: dot technique
Dots are a popular and most suitable tool for dotting techniques. If a girl decides not to give preference to professional tools, then it is better to replace them with a wooden stick with a pointed tip, a toothpick or a banal hairpin.
Attention! Simple dots will make the manicure noticeable and expressive.
It is recommended to use tools of different diameters to create different patterns. They can be flowers, figures, images of animals. Often, when doing a manicure on your own, a problem arises with your left hand. In this case, it is better to decorate only one finger with the design, so as not to strain the non-functional hand and vision.
The technique here is as follows:
- A few drops of varnish are applied to the palette with a brush. Foil or cardboard can serve as a palette;
- The tip of the working tool is dipped into the coating and carefully applied to the nail plastic using a drip motion;
- To make a straight line or a curl, you need to start drawing with a tool similar to writing with a ballpoint pen;
- A drop of varnish is stretched in a pre-conceived pattern with a smooth movement of the hand.
When choosing a design, pay attention to the fashionable colors of the season. Often, in winter and autumn, preference is given to more classic tones, while in summer and spring, you want brighter shades.
Patterns on nails using a brush step by step
For girls who have just begun to master nail art at home, the technique of painting with a brush will help. At first glance, it may seem the most difficult, but in reality it is not so. It's better to start experimenting by making simple geometric patterns.
To create a spectacular nail coating, you must have a base color, at least two more shades for the design and a fixative. Next, you should follow the basic instructions.
Important! Do not forget that each layer of varnish must dry perfectly. Only after this can the next color be applied. Otherwise, the drawing will be damaged. Initially, you should choose light and classic patterns.
If you look at the work of professionals with a brush, you will notice that they work wonders with this tool. However, at home, without special training, it is difficult to understand all the intricacies of this matter.
Hot manicure
The types of manicure used as a medical procedure include the hot version. The procedure is carried out using baths to which are added:
- gel;
- salt;
- oils
They help soften the skin, having a positive effect on it. After this, the cuticle and its excess lower very thin layer are removed. To remove, you can use a pusher rather than tweezers.
When performing a hot manicure yourself, you need to know that you need to trim your nails before immersing them in the bath. You can apply varnish to your nail plates after they have completely dried.
To carry out the procedure, oil-based formulations are used. They need to be heated in a special apparatus, into which the hands are lowered for several minutes. The skin is nourished with beneficial substances and begins to recover thanks to the elevated temperature and the active ingredients contained in these products. These warm baths help replenish vitamin deficiencies and also solve problems associated with nails.
It is recommended to do a hot manicure in winter, when the dermis suffers most from exposure to cold air. These treatments are recommended for the following people:
- having a very thin nail plate;
- sensitive skin;
- joint problems.
But it is necessary to take into account that the procedure has contraindications:
- presence of diabetes mellitus;
- high blood pressure;
- varicose veins;
- damage to the skin.
Sponge for creating simple patterns on nails for beginners - ombre
Manicure done with a sponge is called gradient or ombre. Even a novice master can handle it. To perform the technique you will need the following elements:
- Sponge or fine-pored sponge;
- Several colors of varnish;
- Base for color coating;
- Fixative;
- Liquid latex.
It is important that the sponge should not absorb the varnish too actively. The material itself cannot be thickened, otherwise the design will not work. Before applying the technique to your own nails, it is better to practice on a plastic tip or a piece of cardboard.
Ombre coating technique
As part of the first method of implementing this technique, the following steps are performed:
- A classic cut manicure is done and a protective base is applied to the nails;
- Use one of the shades to cover the nail;
- The second color is applied to a soft sponge, and one part should be thicker;
- Using quick movements, the sponge is pressed against the plate; it is better to start from the middle to the top edge so that the color gains density.
The second method is considered more complex, but the color transition is smoother. The technique here is as follows:
- The palette is tightly covered with varnishes of three colors, all boundaries are carefully shaded using a regular needle;
- It is customary to apply liquid latex to the finger around the nail;
- A sponge is dipped into the varnish and the nail plate is covered with it;
- When the paint dries, the latex layer is removed;
- The top is applied.
You can emphasize this design by applying special stickers to one of the nails.
Uncut hardware view
Due to greater safety, other types of manicure are gaining popularity, in which the cuticle is softened and pushed back, rather than cut. Hardware manicure is done on dry nails.
A special device is used for the procedure. It has a central rod and several attachments that rotate at high speed and do everything you need.
- Before the procedure, the skin around the nails is softened with special creams.
- The cuticle is carefully ground off with the necessary attachment.
- The master controls:
- filing;
- grinding;
- polishing the nail.
The advantage of this method is that there is no risk of infection and skin damage. But we must keep in mind that not every master can perform such a manicure. If you do not use this technique properly, you can cause serious injury to your nail.
Easy patterns on nails for beginners using stamping
Stamping is a method of transferring a particular design onto the nail plate using a stamp. This technique is considered not very complicated, but at the same time suitable for diluting a boring monochromatic manicure.
To master the technique you will need a little patience and a set of basic tools:
- A flat metal plate with engraved patterns;
- A stamp with a rubber or silicone base to transfer the design from the plate to the nail;
- Scraper for removing excess varnish from a disc.
Reference! A positive feature of the technique is the speed of execution. It can take up to two hours to apply the appropriate pattern by hand. The stamp allows you to complete the full process cycle in 15 minutes.
Step-by-step stamping scheme:
- It is necessary to degrease the surface of the nail and apply a base;
- Cover the plate with the main color and let it dry well;
- The stencil is coated with the second varnish;
- It is worth leaving the varnish exclusively in the recesses, and the excess is removed with a scraper;
- The image is transferred to the rubber surface of the stamp;
- You should first mark the places for the stamp on the nail and press the device firmly against the nail;
- If for some reason the pattern ends up on the skin, the excess is removed with acetone;
- When everything is dry, the design is covered with topcoat.
Art painting of nails
Artistic painting is subject to the same laws of composition and color combinations as real painting. In most cases, painting is done with acrylic paints or gel paints, but regular gel polish is also possible. There are several well-established techniques in painting nails.
“ Thin lines ” technique. The first thing they teach in manicure design courses is to draw with thin lines. Lace, frills, cobwebs, holes, guipure, veil, mesh, tights. Monogram technique . Monograms are twisted lines that create a certain pattern with special symmetry. Each curl has a kind of head, thickening at the beginning of the line and narrowing towards the end of the tail. It is used as an independent type of nail design, or in combination with other techniques and materials - velvet sand, foil, etc. Chinese painting - painting with a flat brush. 2 colors are drawn into the bristles of the brush; as a result of different pressure forces and hand movements, several types of gradient strokes are obtained, within which the shades smoothly transition into each other. The watercolor technique involves working with special translucent paints - real watercolors, diluted acrylics, a special series of gel varnishes, or regular gel varnishes diluted with a top coat or clinser.
Chinese painting
Monograms
Abstraction
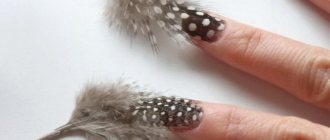
Ideas come from anywhere - flora, fauna, situational subjects, abstraction . Frequent floral motifs are poppies, roses, pansies, fruits. berries. The drawing can be detailed, naturalistic, or it can be schematic. For example, “stencil rose” is a very popular technique for drawing roses. From the animal world - drawings of the skin of reptiles, leopards, images of animals, birds, cartoon characters, insects. Subjects - New Year trees, toys, valentines, vacation, marine theme, travel, etc.
Abstraction . For abstract designs on nails, there are 2 design techniques: clear geometric compositions and the so-called lyrical abstraction - a mixture of wavy lines, spots, blots, fragments of patterns and figures. The decor can be two-color, multi-color, symmetrical or not. When choosing the “Abstraction - Geometry” style, tape tapes and manicure stencils are used to help
Doodling - we unconsciously draw something geometrically ornamental during a long telephone conversation, but it turns out that this is “doodling” and a whole trend in nail painting.
Nail designs for beginners at home with a needle
Today, the corresponding technique is considered outdated, but you can try to master it at home. The most important thing is that the tools for such a manicure can be found in every home.
Practical exercises should begin with drawing the simplest figures and elements possible. First, as in previous cases, you need to start with a manicure. Next, apply a base coat of varnish and wait until it dries completely. Then dots are made using a needle, and a thoughtful pattern is formed using planned movements from one to another. Finally, let the coating dry and apply a sealer to it.
There are thousands of options for beautiful and simple manicures at home. If you happen to have a fan brush in your hands, and there are beautiful varnishes on the table, then completing the design will not be difficult.
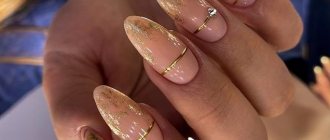
Beautiful delicate manicure in nude tones: photo 2022
All girls love nude manicure, even those who love bright manicures; from time to time they want something calm and minimalistic. Fashionable nude manicure is beautiful at any time of the year, suitable for both short and long nails.
In 2022, the current colors of nude manicure are being polished: caramel
- cream
- Sandy
- Fleshy
- Beige Camel
- Light pink
- Faint yellow
- Gray blue
- The manicure act is combined with sequins, stones, foil, waxing, stickers and other techniques; it is beautiful in both matte and glossy versions. Nude manicure looks especially harmonious with geometry and minimalism, which allows you to create an interesting and stylish design.
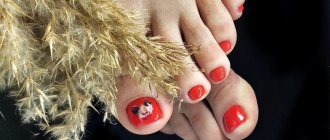
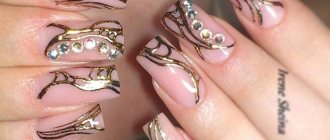
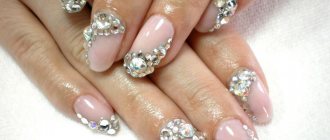
Manicure with stones has become a classic of nail art; today masters create the most unusual and beautiful compositions from miniature rhinestones and stones. Stones can be combined with both pastel shades of varnish and dark, rich ones; they can decorate even an everyday manicure, your favorite French or matte manicure.
Useful tips
Don’t forget that you can also use beads and rhinestones at home. However, when using these elements, it is important not to overdo it with accents. To prevent the manicure from turning out tasteless, decorate one finger with beads or stones.
You can also use foil. Design ideas are presented below.
Simple nail patterns for beginners using gel polish
To ensure that the nail coating lasts a long time, gel polishes are used instead of regular polishes. Their cost is much more expensive, but this manicure can last for at least two weeks. In addition, you will need a special lamp for drying.
If we talk about drawings, then they should be performed in the following sequence:
- The plate is processed with Bafik. It is a special rectangular file;
- The primer degreases the nail;
- After applying the base, it is dried in a lamp;
- The pattern is made using the chosen technique;
- Then everything is dried again in the lamp;
- The pattern is covered with topcoat and dried again;
- Use acetone to remove the top sticky layer.
Application techniques here can be similar: foil, brush, ombre, stencils, sparkles and glitters, others. The main thing is not to overdo it with the design so that the manicure looks stylish.
Permanent manicure
A very popular type of manicure is the permanent method. After classical treatment of the nail plate, biogel or shellac is applied in a thin layer. Manicure lasts 3-4 weeks.
Shellac is a gel polish that contains extension material with varnish. As a result, the manicure is very durable, bright and shiny. The biogel contains trace elements and calcium, which strengthens the nail plates. Before these compounds are applied, the nails are prepared:
- the surface is degreased;
- the cuticle is trimmed;
- give the desired shape.
After that:
- First, apply the base, and after it dries, apply two layers of colored gel, each dried under an ultraviolet lamp.
- To prevent the coating from peeling off, the tip is sealed.
- Nails are painted or decorated with sparkles.
- The final transparent top coat is cured in a lamp.
- At the end, the sticky residue is removed from the nail with a special composition, and the cuticle is softened with oil.
Remove the gel polish with cotton balls, heavily soaked in nail polish remover, which are applied to the nails, wrapped in foil and left for 15-20 minutes. After that, it can be easily removed with a stick.