Hello, dear readers! Do you think there is a manicure that will suit any time of year? Neil specialists say that it exists, its name is drip. On nails it looks unusual, interesting, bold and always attracts attention.
Are you still sure that this is a complex design and only top masters can do it? Today I will dispel all your fears and doubts! You will learn how to make drops on your nails with gel polish and get acquainted with a simple technique for applying such a manicure. I’ll also give you several design options that even a beginner can handle.
"Water splashes" on nails
A manicure with imitation of water droplets is a real trend in modern nail art. It refers to 3D design, because the “irregularities” on the nail look three-dimensional.
Professionals say that it is suitable for all girls in any season. It looks beautiful on both short and long nails. Are you heading out for a romantic evening? Business dinner? To work? On vacation? “Water splashes” on your nails will become your ideal companions for the next 2-4 weeks.
Matte manicure with gel polish
This year, matte manicure is on the list of the most fashionable trends. The secret of popularity lies in the ease of application and the achievement of an incredibly effective combination with other textures. Matte manicure looks very unusual and impressive.
A manicure with a matte finish will suit every girl and will go with any image. The coating can be done in a single color or try to complement it with glossy varnishes. Make various patterns, geometric shapes, decorate with sparkles and rhinestones ─ just use a little imagination. In any case, the tone of the coating should depend on the event for which it is being performed.
Whatever pattern or application method is chosen, it is important to remember that the matte finish is very easily soiled. Due to the rough surface, dirt gets on it, which looks like worn suede leather
Therefore, you need to take into account that on a light manicure, the stained areas will be very noticeable. To avoid this effect, choose dark shades of coating.
If you really want to do a matte French manicure using a pale pink shade, then buy more liquid to remove the matte gel coating; you should always have it on hand. If your nail is dirty, you just need to wipe it a little with the product and everything will be perfect again.
Design Benefits
The advantages of drip manicure are obvious:
- Simplicity and ease of execution. Mastering the technique of applying drops on nails is not difficult at all, even for a beginner.
- Beautiful and original look. Covering with “splashes” is suitable for ladies of any age, with any style of clothing.
- Budget. The materials and tools for creating such a manicure are standard. No need to purchase special equipment.
- Quick application. Making a gel drop is very simple, because there is no need to draw individual elements.
You are definitely guaranteed a positive mood with drops of water on your nails. Otherwise, why do you need to make such a simple and at the same time elegant coating?
Selection of varnishes
Let's talk about what coatings are best to use to create a water pattern. There are several simple recommendations, following which you can get a high-quality and beautiful drawing at home.
- Firstly, choose fresh compositions that have not yet begun to thicken. If they already have a viscous structure, they will not be able to spread freely over the water surface;
- Secondly, avoid quick-drying ones, which will harden almost immediately in the water, and you won’t have time to create the necessary ornament and transfer it to your nails;
- And, of course, choose high-quality materials, preferably from the same brand. In this case, they will have the same texture and drying speed, which will make the pattern better and more expressive;
- Do not use coatings that contain glitter, because under their own weight they will most likely settle to the bottom of the container. If you want to add shine, opt for a coating with a pearl sheen;
- For a water pattern you need to use regular varnishes; gel varnishes are not suitable due to their denser structure. The drawing itself can be transferred either to a gel base or to a regular one.
A small list of varnish manufacturers with whom we have never had problems creating patterns on water:
- Golden Rose
- Revlon;
- O.P.I.
- Farmasi;
- China Glaze
"Raindrops": a modern approach
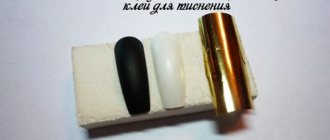
Drip nail art requires virtually no additional costs. You will need the following set of materials and tools:
- any gel polish or regular polish that is used as a base coat;
- "base";
- "finish";
- dehydrator or degreaser;
- brush or dots (from improvised means - a toothpick);
- Ultraviolet lamp;
- liquid for safe removal of coating from nails;
- cotton pads or cotton swabs.
Depending on what you plan to do with your nails, you may need other materials. For example, rhinestones, foil, matte coating, etc.
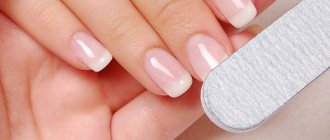
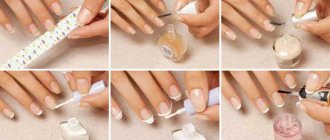
Before applying the “spray”, you must perform a standard manicure. The preparatory stage is as follows:
- Treat your handles with antiseptic.
- Use a nail file to give your nails the desired shape. Trim the cuticle and sand the surface.
- Apply a dehydrator to the nail plate.
- Spread the base layer.
- Dry your nails well.
Not difficult, right? I’m sure any of you can handle this on your own, without the help of a professional.
Required Tools
To create a manicure with a dew drop design on the tips of your nails, you don’t need a lot of complex professional equipment. Most simple tools can be found at home:
- gel or varnish of any color as the main coating;
- transparent base for varnish;
- finishing fixer;
- dots or brush of two sizes;
- varnish remover;
- cosmetic cotton wool or discs.
If you haven’t been able to purchase brushes or dots yet, don’t be upset. It is quite possible to make a neat drawing using available tools. This may require a match, a hairpin with a rounded end, or a regular ballpoint pen without ink.
Making “dewdrops”: four methods
Did you know that there are several ways to apply “rain spray” to your nails? Which one to choose depends on your experience, taste preferences and the time you are willing to spend on a manicure.
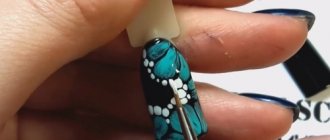
No. 1: Painting with a brush
- Before moving on to artistic painting with a brush, you need to perform a classic manicure. This is the basis. The further process step by step:
- Choose the gel polish you like and cover your nails well with it. Dry in a UV lamp.
- Take a thin brush and paint a few small circles on your nail with dark polish. Blend them to create a hazy effect. Dry well in a lamp.
- Apply droplets of gel or top coat on top of the circles. Dry again.
The application technique is quite simple. Thanks to it, a shadow effect is created. It is this that gives the “splashes” natural volume.
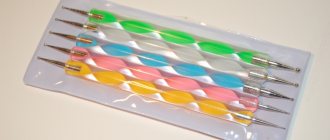
No. 2: Use dots
In nail art there is a special tool with which you can apply perfectly even circles on your nails - dots. It is an elongated plastic cylinder (like a regular fountain pen), with balls of different diameters at both ends.
Tip: It doesn’t matter if you don’t have this tool on hand. It can easily be replaced by a safety pin or a regular toothpick.
The application technique using dots is almost the same as with a brush. It is advisable to correctly select the color of the gel polish and the tone of the polish for the circles so that they match well with each other. And then everything depends on your imagination.
In this video, the master shows what a spectacular design can be created using dots.
No. 3: Volumetric stickers
This is the easiest option for creating a drip manicure. There are many varieties of “splashes”: from transparent to pearlescent.
Before purchasing such stickers, take a look at the photo and choose the option you like best. Drop stickers can be either the main design element or a secondary one.
No. 4: Beautiful rhinestones
In order to create a shining drip manicure, some top nail artists resort to rhinestones. Sparkling beads come in a variety of shades and sizes, and you can easily make various combinations of them, including with droplets.
Nail experts do not advise getting carried away with rhinestones, generously strewing the surface of the nail with sparkling inlay. Everything is good in moderation. For example, like in this video:
Operating technique
Watercolor drops for nails (which can be used in two techniques) allow you to significantly expand the variability of designs. The first technique creates chaotic, blurry patterns on the surface of the nail.
In accordance with the chosen color, visually it can resemble:
- sea;
- sky;
- haze;
- marble.
The second technique is considered more difficult, as it requires artistic skills and training. However, with its help, the master is able to create a work of art at his fingertips. It involves drawing distinct forms of a certain theme. In addition to brush skills, the master must know the basics of color and light and shade.
Before you start making a design using your chosen watercolor technique, you need to consider three key points:
- Proper surface preparation. In addition to the fact that for the paint to be distributed correctly, it must be perfectly even, there are several prerequisites. For a chaotic distribution of droplets, it is preferable to apply them to a material with a sticky layer. At the same time, the execution of the drawing requires clarity, so the surface is matted with a matte top. Watercolor looks brightest on a white background, softer with the use of camouflage nude shades.
- Control of drops on the brush. The liquid consistency of watercolor is quite difficult to control. If a drop forms on the tip of the brush while applying pigment, do not rush to distribute it on the surface. Excess material should be squeezed onto the edge of the bottle or removed with a dry cloth. Otherwise, unable to withstand the tension and its own weight, the drop will spread over the surface, ruining the design.
- Compliance with phasing. Each subsequent layer is drawn after the previous one has completely dried. Multi-layering adds depth and volume to the design, however, if the paint has not dried, there is a chance of getting a blurred effect.
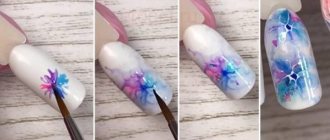
Step-by-step technique for creating a chaotic design with watercolor drops:
- After performing a manicure, the surface must be degreased. After drying, apply a thin layer of base with a sticky layer and carry out a full polymerization cycle in a lamp. The dispersion layer remaining after polymerization is not removed.
- Using a brush from the bottle, apply a few drops in the area of the future design. Using a clean brush dipped in an alcohol solution, you need to chaotically blur the edges of the drops, creating a translucent haze. Using the same or a different shade of drops, the stage is repeated until the design takes on the required outline and shape. Combining colors adds personality to the design.
- After the watercolor drops have completely dried in the open air, the design is covered with a matte or glossy topcoat. If desired, it can be supplemented with shimmering sparkles and veins of gel paint of a suitable shade.
The smooth surface of most materials does not allow the master to control the correct spreading of drops. Gloss does not allow the watercolor pigment to be fixed in sufficient quantities. Stickiness fixes the pigment well, but does not make it possible to create a drawing with clear boundaries.
Step-by-step technique for drawing using watercolor drops:
- To create a rough surface, the nail is covered with a top coat with a matte effect. After completing the full polymerization cycle, remove the resulting dispersion layer using a cloth soaked in a degreaser. The rough surface prevents chaotic paint spreading for more precise distribution.
- Using a thin brush with a sharp end made of natural bristles, apply the first layer of the future design, after which a blur is performed with an alcohol solution. First you need to clean the brush from any remaining pigment. The result should be a clear outline of the design with a translucent center. Excess liquid can be removed with a dry, clean brush.
- Subsequent layers are applied in a similar pattern, but usually brighter. The main condition is to observe the time interval for the paint to dry completely.
- The dried composition is fixed with any type of topcoat, followed by polymerization.
If there is no matte topcoat, the coating can be sanded with a buff. However, it is necessary to understand that the abrasive makes grooves. By settling in them, the pigment emphasizes their presence, which spoils the overall appearance.
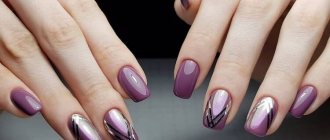
Design options
Top masters say that the droplet effect can be used in a variety of types of manicure. It also looks beautiful and elegant in the following options:
Plain
Perhaps there is nothing simpler than making your nails one color and “placing” splashes of water on top. This glossy decor looks impressive, especially on a matte finish. This design option produces a very impressive play of textures.
Fruit
The image of exotic fruits on her nails will give a girl a special charm in the summer. And if you decorate them with droplets of water, then such an unusual manicure will look even prettier and will certainly lift your spirits.
Nautical
This type of manicure is unthinkable without water droplets. Do you agree?
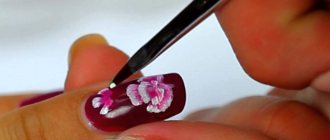
Floral
Drops of dew on beautiful flowers will add femininity and tenderness to your cover.
"Kitty"
Glass drops are the perfect complement to the cat eye technique. Your nails will shine in a special, more festive way.
Autumn
This theme is relevant in rainy weather. Drawings in the form of raindrops on top of painted umbrellas or yellow leaves will be very appropriate.
Professionals quite often apply “dew drops” to painted nails. This way they visually expand the image on the surface and give the picture a 3D effect.
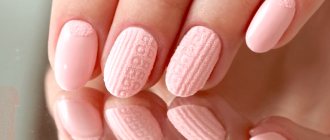
Volumetric manicure ideas
To make your voluminous gel manicure look impressive, you can use different nail design ideas. We will give you several recommendations that will allow your nails with a voluminous design to look beautiful and stylish:
- A voluminous gel manicure in neutral or light pastel colors looks cozy and feminine. You can use white, light pink, beige, mint, light blue or turquoise varnish. A very beautiful manicure will be obtained by using milk, coffee and cream shades of gel polish.
- If you want to make a knitted manicure with a brightly colored gel, then you can choose light tones of orange, red or blue, but be sure to use a matte finish. This is the only way to achieve the sweater effect.
- A voluminous manicure can be decorated with rhinestones, beads or foil. But for this you need to choose the appropriate nail design. This manicure is more suitable for young girls as a holiday option.
Pro recommendations
Nail artists say that it is important to use drip design correctly when performing a manicure. Follow the following tips and then you will definitely be satisfied with your new nails.
- Decorate several nail plates with “rain” decor. A too flashy manicure does not cause much delight, but rather draws too much attention to your person.
- Combine droplets with dark shades of varnish - this way you can make them as deep and rich as possible.
- Use the opportunity to lengthen the “dew drops” with a brush and you will get a more striking effect.
- Don't be afraid to combine drip designs with different manicure techniques. For example, it will add even more tenderness to a French coat, while “chameleon” or “metallic” will make it more peaceful and softening.
Nail design is a matter of taste and style of every girl. Don't neglect ideas, experiment! What if you create a new product for the season?!
What to remember
We can summarize:
- The “dewdrops” on the nails are a real work of art. You can create them yourself without the help of a professional. You can watch step-by-step photos or study video tutorials on the Internet.
- Drip manicure is popular among girls. It is always relevant, suitable for any time of year, any length of nails, it is easy to create an individual design for any look.
- This is a fairly budget-friendly type of nail plate decor. You just need a standard manicure set, a UV lamp, as well as dots, brushes, stickers or rhinestones - your choice.
- There are many drip design options. You can be guided by pictures on the Internet or create the decor yourself. It all depends on your creative abilities.
Have you ever worn drop-shaped decor on your nails? No? Then try it! And you will certainly see how beautiful the volumetric design is. Do you still have any questions? Then feel free to ask them in the comments. See you again in the next article!