Hello, dear readers! Do you dream of beautiful designs on your nails? But don’t want to overpay for artistic painting? Still afraid to do a fashionable manicure with a pattern on your own? Then you should definitely read today's article.
From it you will learn how to do nail stamping and what this design technique is. I will tell you about the features of working with stamps and reveal a few secrets of professionals. You don't need any special skills. Using stamping is not difficult at all. Ready? Then let's go!
“Applying stamps” to nails
Hitherto unknown products and innovative technologies regularly appear in the nail industry - melange, rhinestones, powder, foil... So, a few years ago, another small revolution took place in the field of nail design - stamping appeared. Translated from English, this word (stamping) means “applying stamps”, “stamping”.
This technology is easy to use independently at home. With its help, you can easily create simple, but very cute patterns on your nails. Moreover, the quality of your manicure will not suffer: your nails will look great in any situation.
In this type of manicure technique, you cannot do without a special tool - a metal round or rectangular print, a stencil on which various patterns are embossed (“printed”).
All that remains is to correctly transfer them onto the nail, and you will get an exact copy of the image.
This is interesting. Did you know that stamping originates from South Korea? It was developed by Konad. Asian experts decided to look at nail design from a completely different angle. And it worked!
Lots of advantages and very few disadvantages
This technology has many advantages and almost no disadvantages:
- nail decoration is done quickly and accurately;
- nails are decorated with complex patterns and can be combined in any way according to your taste preferences;
- the application technique is not difficult even for beginners;
- significant savings on trips to nail salons;
- space for imagination;
- spectacular - stamping looks excellent even on a single-color coating.
There are no downsides as such. It’s just that it’s not always possible to make a high-quality print the first time. Still, this matter requires some skill and minimal experience.
Home Arsenal
In order to create a stamp manicure, you need to acquire basic tools and equipment. First of all you will need the following:
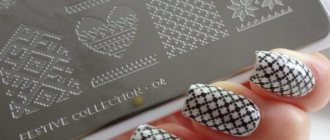
- Metal imprint (disc or hexagon). Several designs are engraved on it, which you will subsequently transfer to the nail surface. When purchasing, pay attention to the depth of the recess (the deeper it is, the better).
- Scraper (in other words – scraper). It removes excess varnish and evens out the design. Some home craftsmen use a regular bank plastic card instead of this device.
- Rubber stamp. It is designed to transfer a design from a metal disc to the nail plate. The clarity of the pattern depends on its quality. When purchasing, you need to pay attention to the handle - it is important that it holds tightly (the length does not matter).
- Special varnish. It has a dense texture and is highly pigmented. This way the drawing will not spread and will be clearer. Regular polish or gel polish is not entirely suitable here. However, if you do not have special equipment, then you can try to do without it.
You can purchase ready-made sets (which is more profitable) or buy all the tools separately. The price of a stamping kit varies from 500 (for example, on Aliexpress) to 2000 rubles.
You will also additionally need:
- cotton pads;
- colored varnishes (of your choice);
- tape (for cleaning the rubber stamp);
- nail polish remover containing acetone (for wiping basic tools);
- substance for protecting the cuticle.
With such a rich arsenal, you can easily create the perfect image on your nails without much effort.
Set of required tools
To get a quality manicure, you will need a stamping kit. You can buy it at one of the cosmetic stores. Includes:
- A plate (disk) of metal with embossed patterns, covered with a protective film of white or blue color, which must be removed;
- A stamp for transferring a design from a disc to nails, which is a plastic body with an insertable pad, rubber or silicone;
- A scraper that removes excess varnish from a print on a plate and aligns images, manufactured in three versions - with a blade, without a blade, in the form of a card;
- A varnish with stronger pigmentation and thickness than regular varnishes, in 3 types: base, pattern varnish and fixing top.
A scraper with a blade is capable of leaving small scratches on the disk that do not affect the appearance of the translated design. If there is no scraper, use an inactive bank card.
In addition to the above products, you will also need:
- A product for protecting cuticles from varnish, applied to the cuticles before applying varnish;
- Nail polish remover (preferably with acetone, as it more effectively removes highly pigmented varnish, and without oil, for better adhesion of the design), wipe the plate, rubber stamp and scraper with it;
- Scotch tape to clean the silicone stamp;
- Cotton pads;
- Several colored varnishes.
To make the application process easier and more convenient, it is advisable to arrange the devices in a sequential order.
Features of stamping: secrets of the masters
“Stamping” has its own nuances that must be taken into account before getting down to business. Nail specialists give the following recommendations for the use of stamping:
- You can make a high-quality drawing only on a well-dried nail plate. The varnish must be hard. This will ensure that the image will not be blurred.
- To brighten the pattern, use thick and pigmented varnish.
- Choose dark varnishes and paints. They are clearly visible on the nail plate.
- At the end of the procedure, be sure to use a fixative. It will help maintain your manicure for a long time.
Tips for performing a manicure with stamping
The main advice for women and girls performing manicures using this method for the first time is the advice to use gel polish as a base. This makes it possible to transfer designs from the stamp to the nail as many times as necessary to obtain good image quality. The wrong picture can be easily removed with nail polish remover applied to a cotton pad. The base layer will remain undamaged, unlike other base varnishes.
Varnishes for work: review
Do you want to have beautiful and clear designs on your nails? Then it won’t hurt you to find out which varnishes you should use during a stamping manicure, and which ones you should avoid.
Ordinary
Experts do not recommend using conventional varnishes for “stamping”. Yes, they attract with their low cost. However, this is where the advantages end. The thing is that you won’t find bright, rich shades and thick consistency varnishes from this category during the day.
But if you are a beginner, then you can try using this variety first. Just don't be upset if the image turns out fuzzy, blurry and unnoticeable.
Acrylic
Quite a common product. It can be purchased at art stores or beauty salons. It is very thick, so it is only suitable for stamping large images. Another disadvantage is that acrylic varnish dries very quickly. It is suitable only for experienced nail artists.
Gel
Some girls manage to do stamping using gel polish. But the pros say this is nonsense. This product is not at all suitable for this type of manicure. After all, it is too liquid and therefore spreads instantly. It is impossible to make a high-quality drawing; everything turns out blurry.
Stamping
You can buy this special product from the Korean company Konad itself (the company that invented the stamping technology). She also developed special varnishes, moderately viscous and pigmented, ideal for working with a metal plate. The price for them is not very high - from 175 rubles. per bottle of 5 ml.
Many companies produce high-quality analogues (it is better to avoid Chinese ones). They can be purchased for about the same cost.
Video tutorial on how to do stamping on gel polish
In addition to everything that has been said above, many manage to additionally decorate patterns applied using stamping with colored sequins, sparkles or rhinestones. More detailed information on how to fix rhinestones on gel polish is already available on our website; it wouldn’t hurt for everyone to familiarize themselves with it. For those who do not fully understand the technique of stamping on shellac, it is recommended to watch the video instructions posted below, everything is clearly shown and laid out there.
Let's create a small masterpiece
Girls, what do you think, is it possible to create the perfect manicure with a pattern in just 30-40 minutes? I think this is real. Perhaps some of you will object. However, do not rush to conclusions. Next, you can read two step-by-step recommendations on how to make good stamping in a short time. The first is for beginners, the second is for more experienced craftswomen.
Simple: when there are no skills
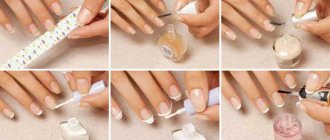
In this case, you do not need much skill. It is enough to acquire the necessary equipment and consistently perform the following algorithm of actions:
- Wash your hands thoroughly, dry them and apply antiseptic.
- Make a classic manicure: give your nails the desired shape, trim the cuticles and polish the surface with buff.
- Cover the nail plate with a protective base and two layers of varnish (you can use regular polish first). Dry your nails slightly in the open air.
- Take the metal print. Remove the protective film from it (if any). Apply a contrasting special to the stencil. varnish so that it completely covers the design.
- Use a scraper to remove excess varnish, remembering that the tool must be held at a slight angle.
- Take a rubber stamp and roll it over the image a couple of times. Make sure the design prints well.
- Transfer the pattern to the nail plate. Press the stamp firmly onto the nail without moving the tool. This way you are guaranteed to get a clear image.
- Treat the stencil and scraper with nail polish remover. During this time, the nail will dry and you can move on to the next one.
- At the end of the procedure, you need to seal the image with a transparent glossy topcoat. Manicure is ready!
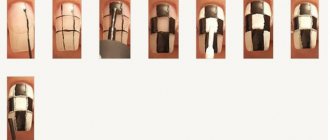
For experienced ones: “reverse stamping”
This technique is popular in European countries and the USA. Here it is just beginning to gain momentum. To begin with, I will briefly tell you about this technology, and then I will describe the process step by step.
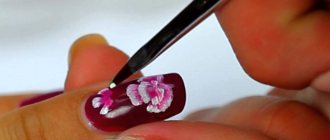
“Reverse stamping”, or “reverse stamping”, got its name due to the fact that the master paints the reverse side of the picture with multi-colored (possibly monochrome) paints. The result is an incredibly beautiful artistic painting, the creation process of which is not always understood even by “experienced” artists.
In order to create such a manicure, you will need a standard stamping kit, manicure tools and a UV lamp (we will make a permanent version).
The procedure is as follows:
- Wash your hands and dry them thoroughly. Treat them with an antiseptic solution.
- Do a standard manicure: file your nails, remove cuticles, polish the nail plate.
- Cover the nail with two layers of gel polish and dry it in a UV lamp.
- Take a stencil for stamping (it’s best if it has an unusual oriental pattern).
- Apply a dark color of varnish to the drawing and carefully distribute it over the surface of the image, without going beyond the edges.
- Remove excess varnish with a scraper. Wait for the product to dry a little.
- Using a small pattern brush, paint the image with bright colors (directly on the stamp).
- Wait for 2-3 minutes (until completely dry).
- Apply clear polish to your nail.
- Carefully remove the resulting film of varnish from the stamp and place it on the nail surface. Press firmly to ensure no air bubbles remain.
- Cover the nail with top coat and dry in a UV lamp.
The technology is not very simple, however, once you master it, you will be able to create gorgeous designs on your nails.
How to use nail stamping?
The technology for creating a stamping design is quite simple and consists of several stages:
Preparatory
A prerequisite for any nail art, including stamping, is beautiful, well-groomed hands. Therefore, before applying the design, you should thoroughly wash your hands and do a hygienic manicure.
Next, you should prepare all the tools for stamping nails. To do this, the surfaces of the scraper, stamp and disk with the pattern are wiped with nail polish remover.
Basic
Consists of the following steps:
- Nails are wiped with a degreaser;
- First the base coat is applied;
- The base varnish should dry for a couple of minutes;
- The selected pattern on the metal disk is covered with another shade of varnish;
- Using a scraper at an angle of 45 degrees, remove excess varnish from the disc;
- Using rolling movements, we move the stamper along the disk;
- After making sure that the entire design is imprinted on the surface, we transfer it to the nail;
- Afterwards, using the same rolling motion, we print the image from the stamper onto the nail;
- We repeat these manipulations in the same way for each nail. A prerequisite is to wipe the stamper and metal disc with nail polish remover after applying the design to each nail;
- If necessary, it is allowed to supplement the stamping image with staraz, dots or any other accessories.
Final
When the stamping design is completely applied, you should use a cosmetic stick dipped in nail polish remover to carefully treat the cuticles, removing the polish from them.
When the design dries a little, you can cover all the nails with a transparent fixative. Experts advise applying the fixative in one layer, since with a more thorough coating there is a high probability that the pattern will be smeared.
Video on how to use nail stamps
Video instruction
I have selected several video lessons for you. They will show you the stamping manicure more clearly.
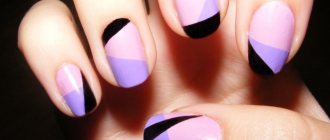
The following video shows how to create painted stamping.
Beautiful design, refined and sophisticated, isn't it?
You can find a lot of useful information in the next video. Here the manicurist shows and tells how to do stamping correctly. She also shares her life hacks and work experience. Don't be lazy to watch the entire video to the end!