Features of working with manicure tapes
Many girls fail to do a manicure using adhesive strips the first time. For some, it doesn’t even work out from the second, third and tenth. It just takes practice in everything, including nail design. Manicurists share their secrets of perfect nail design with tape:
- In order for the adhesive edging to fit well on the nail plate, you first need to go over it with a buff, creating a slightly rough surface. Then the decor will lie flat, perfectly, and will not rise or peel off.
- The tape should be glued in tension, that is, it needs to be stretched a little, placed in the place where it plans to be, attached to the center of the plate, to its most convex part. Then gently press the decor with your fingernail.
- The tape should be cut so that small empty gaps (no more than 0.5 mm) remain on the nail. Using this simple method, you can properly seal the edge of the nail and then the manicure tape will not come off.
- It is best to cut off a piece of strip with wire cutters - they do not lift the strip, unlike scissors.
- The topcoat will help increase the service life of a manicure with braid.
- Bright stripes should only be attached to a dry surface.
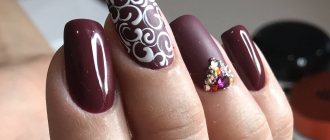
Luxury Bordeaux
This rich shade of red can visually lengthen your nails and make them more graceful. It suits almost any skin, is not subject to age restrictions and goes well with other colors. Therefore, stylists often make a mix, adding new colors to the composition.
Often people choose ombre, combining burgundy with black. Or apply magnetic varnish to a black substrate, forming a diagonal line. Such a dark, rich manicure is often decorated with gold elements.
For short nails, the solution may be as follows: a burgundy manicure with gold stripes arranged vertically (to visually elongate the length) and creating an accent on one finger to enhance the contrast. The classic companion option for burgundy is pink.
Stencil tape in nail design
If you want to add some zest to your ordinary manicure, make, for example, a perfectly even stripe, geometry, but with a poor eye and a trembling hand you cannot draw the lines perfectly, then tapes can come to the rescue. After all, it is not at all necessary to glue them on the nail; they can be used as a stencil.
It is not difficult to make such a design, for this you need: - Apply varnish to prepared nails, wait for it to dry. — Stick tape with a pre-designed design on top, sealing it well to the nail. — Cover the nail with varnish of a different color, being careful not to touch the decor. Then all that remains is to remove the adhesive tape and dry your nails.
This manicure is suitable for those girls who do not like excessive shine, but at the same time want to see the clarity and evenness of lines, diamonds, squares, etc.
Ways to create stripes
To create a striped design, you can use one of these methods.
- After painting your nails with the varnish you like, dry them well and paint stripes with a varnish of a different color using a thin brush.
- Glue a special adhesive tape to the surface of the nail, forming the pattern you like, and then cover it with a layer of varnish. When the varnish is dry, carefully remove the tape. The result will be a pattern of unpainted stripes. You can also paint your nails, glue the stripes on, and then paint them again with a different color polish. This is how colored stripes are obtained.
- Glue the ready-made colored strips onto the painted nail, and apply a fixing agent on top.
Editor's choice: Gel nail extensions step by step: what do I need for this?
It is worth noting that it is not at all necessary to limit yourself to stripes located exclusively vertically or horizontally. Stripes angled at different angles create a unique nail look.
When choosing the direction of the stripes, you need to take into account the shape of the nails. For those with wide and short nails, vertical stripes are suitable; narrow nails can be visually expanded using horizontal stripes.
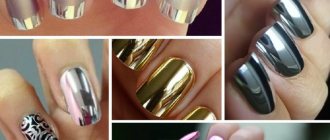
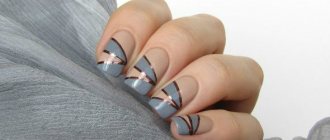
Manicure with metallic stripes and lines
Do you know why many girls love to do manicures with design tape? Because with her you don’t need to think about how to decorate your nails, what design or pattern to come up with. All you need for such a manicure is to choose a tape of a suitable color and thickness, place it on your nails and paint it with a top coat.
A nail design with a silver or golden ribbon looks impressive on nails of any color: both bright and pastel, muted and dark. For an office manicure, it is, of course, better to choose calm shades: coffee, beige, gray, nude varnishes with a minimum number of decorative elements.
And for parties, going to the cinema, a disco, or a concert, you can use gel polishes of the brightest colors and shades. At the same time, you don’t have to skimp on the number of manicure ribbons. Stripes can be placed on all nails, or on one or two; tiers can be made from ribbons or simply parallel stripes.
Tenderness of pink
The pink range is quite extensive. It includes bright colors such as fuchsia, delicate nude shades, and subtle sakura color. Gold goes well with any shade of this range.
For a pink manicure with gold stripes, it will be enough to decorate one accent nail with them, laying out a lattice and placing rhinestones in its weaves. To add brightness, the background for the design is made more saturated. Additional effects will only add to the charm of this option: the accent nail is covered with velor topping, emphasizing the tenderness of the texture, and on the adjacent finger you can create an ombre with a transition to white towards the free edge.
Manicure with ribbons on gel polish
To ensure that a design using adhesive strips lasts a long time, we recommend applying a varnish coating to the gel. If regular polish begins to chip on the third day, then gel polish can stay on your nails for 2-3 weeks.
Step-by-step guide to creating a manicure with ribbons on gel polish:
Step 1
Trim your nails, push back the cuticles, and go over the plate with a buff.
Step 2
Paint your nails with colored gel polish in one or two layers, after each be sure to dry your fingers in a lamp. To give your design more brightness, you can use gel polishes of various colors and combine all kinds of shades. In this case, the manicure tape will subsequently act as a delimiter.
Step 3
Cut off the tape from the roll with a margin so that later it is convenient to remove its remains. Glue a bright strip onto a dry coating, having previously treated the surface of the nail with a buff. Cut off the excess tape tails with pliers.
Step 4
Apply the fixative to the nails, paying special attention to the places where the tape is glued. Remove the sticky layer.
Design option No. 1
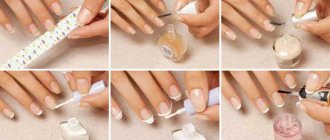
Regardless of whether you plan to do strips with gel polish or a French manicure, the first stage of the technology is preparing the nail plates. This means that first of all, you need to:
- give your nails the desired shape,
- treat the cuticle area,
- remove the top fatty layer.
Stripes on nails
Then apply a base product to the nails, which will ensure reliable adhesion of the gel polish to the natural surface. Having dried the base, we proceed to applying the first layer of gel. Dry it under a UV lamp and evaluate the color. If the coating density is insufficient, re-apply gel polish to the nails. Dry the manicure again until the gel is completely dry.
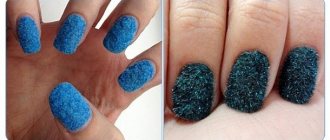
Summer manicure
Let's move on to decorative finishing. This pattern shown in the photo is a web-like design. To make a “web” on your nails, cut out the nail art tape to the required length. Then we proceed as follows:
- We glue the first strip next to the skin roller vertically.
- The second - perpendicular to the cuticle, retreating a few millimeters.
Next, we improvise, creating a beautiful web from pieces of tape.
To make the manicure look even more attractive, the web can be complemented with rhinestones, beads or sparkles. After the drawing is ready, coat each nail with a top coat. After drying the top in a UV lamp, do not forget to remove the sticky top layer.
Nail Design Ideas with Adhesive Strips
If a girl decides to try a manicure with these bright stripes for the first time, then first she needs to try simple, light designs. For example, make horizontal, vertical or diagonal stripes. It doesn’t matter how many of them there are on the nail. Even one ribbon looks beautiful and will create a complete look. In this case, stylists advise diluting one strip with two colors of varnish. That is, a bright ribbon in this case serves as a border between contrasting varnishes.
Many girls like to emphasize the smile line with ribbons, doing a French manicure with an adhesive strip. And in general, adhesive tapes are worth a closer look for those girls who adore French hair, but are unable to make their smile line clear and beautiful. Metallized strips, as usual, will help in this matter. At the same time, it is not necessary that the smile line be of a standard shape; it can be beveled a little, made rectangular or triangular.
If you've already gotten the hang of working with adhesive strips, then you can start making geometric, complex nail designs with tape. Here the flight of imagination is already unlimited. Adhesive strips can be placed in different ways: to make parallels, corners, triangles, X's, squares, strokes, in general, whatever you want. Please note that the tape can be selected to match the varnishes or in a completely different color. And you can glue the strips on both long and short nails of any plate shape: square, pointed, almond-shaped.
Decorative ribbons on nails fit into any look; they create enormous scope for imagination and the realization of your creative abilities. Metallic, colored stripes in manicure are a universal solution for girls who follow fashion trends in the nail industry.
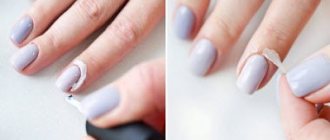
Liquid tape
Liquid tape for manicure
Used as the most effective means of protecting against varnish getting on the skin when creating nail designs. It is a quick-drying product that, when dried, forms a protective film on the skin .
You no longer have to worry about staining the side rollers with nail polish and having to scrub them off with cotton swabs and nail polish remover. Using liquid tape, you are guaranteed to ensure clean skin while working. As a rule, craftsmen use this method of protection when performing a complex design, which is guaranteed to stain the cuticles or side ridges.
Learn to use liquid tape with a manicurist:
How to use liquid tape
- Get your nails done. Give your nails the desired shape, then degrease them.
- Apply the product to the areas of skin that need to be protected, wait until it dries completely and a protective film forms.
- Apply a base coat and wait until completely dry.
- Take a cotton pad, moisten it with remover, then take a different color of nail polish and apply several strips on the pad, close to each other. Stamp onto your nails to achieve the desired pattern and depth of color.
- Use tweezers to remove the film with any varnish on it.
See how you can use liquid tape when performing water, gradient and stamping manicures:
Modern nail coatings
It is worth noting that a simple manicure treated with regular varnish will only please you for a few days. However, you can use new long-term products such as gel polish, which do not wear off from your nails for up to 20 days or more.
Such coatings, due to their unique properties, do not cause any harm to your nails. Today gel polishes are very popular among fashionistas. Recently, you can purchase them in stores and create your own individual manicure at home.
If you have problems with imagination, then a lot of ideas for nail design can be found on the Internet. You can watch some of them in the video. In addition, here you can learn how to properly perform gel nail design. Moreover, in order to create a beautiful manicure, it is not at all necessary to stock up on a large number of necessary elements.
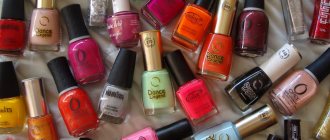
You can only have 2-3 colors of polish to create an amazing nail design. The main thing when choosing nail polish is to ensure that these colors are combined with each other. Before you start creating with gel polish, you also need to worry about the availability of tools.