Stamping is a new technique for applying patterns to the nail plate. The designs themselves are created on a disk/plate with a stencil, after which they are transferred to the nails using a stamp. The resulting result is identical on all nails, as if the design was made by a professional master. This nail art looks very impressive and interesting.
If you want to learn how to do a manicure using stamping yourself, it’s not difficult, the main thing is to practice a little, get a suitable varnish and a stamp. Below we will tell you in detail how to correctly apply stamping patterns on varnish, and also consider the TOP 5 good varnish coatings.
Special varnish for stamping - what is it?
The technology itself for creating a pattern is correctly called stamping nail art; it is a new product in the field of nail design, which has already gained enormous popularity.
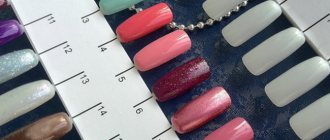
The essence of the procedure is that the pattern is applied with a special stamp tool, which can be silicone, rubber or with a sticky imprint pad. One of the main conditions for obtaining a high-quality result when stamping is the use of a special coating for nails. Many manufacturers already produce entire series for stamping, so finding the desired color will not be a problem. The peculiarity of this varnish is that it is thicker than usual, and, most importantly, it is highly pigmented.
- Such qualities help create clear and precise lines of the design; they do not spread and are easily visible on the nails. Today, it’s very easy to get acquainted with this technology - they even sell ready-made kits that include everything you need to create a design, including several nail polishes of different shades.
Which polish is best for nail stamping: review
With the growing popularity of stamping, the range is also growing; more and more well-known companies are producing high-quality coatings for creating ideal designs on nails. Let's look at the characteristics of the most popular stamping kits today.
Konad Special Nail Polish
The manufacturer Konad produces several versions of acrylic varnishes for creating stamping patterns on nails: in volumes of 5, 11 and 12 ml. The range includes a variety of coating options: pearlescent, matte, transparent, glossy in different shades. It is possible to purchase the rest of the necessary tools for nail design from this manufacturer; only under this condition does he guarantee the perfect design.
The consistency of the varnishes is viscous , the color is rich, which fully satisfies all the requirements for use in stamping.
El Corazon Kaleidoscope
Stamping paints from El Corazon and Kaleidoscope are offered in an economical and convenient volume of 15 ml; a separate collection of 8 ml format has been released, which is gradually being replenished with new colors.
The easiest way to verify this is with the example of white and black varnish - the colors used in a duet completely overlap the substrate, even despite such intense contrast. In the line you can find cream shades, neon colors, and iridescent duochromes, not to mention simple plain glossy and matte options.
The manufacturer notes the high concentration of pigment, which ensures the clearest pattern and 100% color rendition.
Golden Rose Rich color
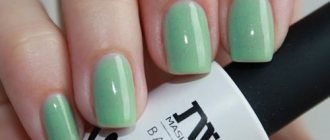
Many fans of stamping use Golden Rose varnishes, and not only a special collection for nail art, but also certain options from among the usual ones, which are sufficiently rich. A huge advantage of the product is its low cost and prevalence, but before creating a manicure, it is better to conduct several experiments and check exactly how the colors will look on dark and light substrates. Golden Rose varnishes are available in different volumes depending on the series; the product for nail art comes in long 7.5 ml bottles.
The varnish has good durability and lasts about 5 days. For best durability, it is recommended to apply a base and top coat.
Kand Special nail polish
Available in standard glass bottles (10 ml), the price category is average. Produced in South Korea. Products can be easily found in online stores and choose the color you like from the offered range. This brand also produces convenient stamping kits that will allow you to immediately begin creating a beautiful design.
Kand brand varnish has the necessary consistency and saturation to obtain clear and expressive patterns. Not intended for use alone as a single-color nail coating.
Born Pretty Nail Art Stamping Polish
Born Pretty stamping paint is famous for its excellent quality. The varnish is dense and spreads well over the plate; prints when transferred with a stamp turn out clear and bright. It does not dry quickly, which allows for high-quality drawing. During the year of storage of the bottle, the consistency of the paint does not thicken and does not require dilution.
The only drawback of the paint is the difficulty in removing it from the nail plate. You need to rub it well with nail polish remover to get rid of the pigment. But this is most likely a disadvantage of all stamping paints.
Comparison of stamping dies. Photo design and video tutorials
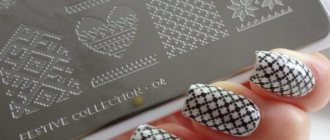
Using stamping, you can quickly and easily create nail designs with designs, patterns or ornaments at home . For this popular type of nail art, you can buy a special set that includes all the necessary accessories: a plate in the form of a disk with printed prints, a stamp, a scraper, highly pigmented varnish or nail paint. The technique for performing a manicure with fashionable decor is very simple: a thematic design is transferred onto a prepared coated nail using a stamp. The stamp is pre-imprinted with the selected print from the plate. Since the popularity of stamping is rapidly growing, the range of products for this type of nail art is regularly updated with more convenient tools, high-quality varnishes and thematic sets of discs with different designs. Now you can make your own nail designs with drawings and entire compositions, the creation of which a master from a beauty salon with professional artistic skills would spend a lot of time working with thin brushes.
One of the most important accessories in a stamping kit is a stamp, the quality of which determines the accuracy of the transfer of the design from the plate and the clarity of the imprint of each element of the print. As a rule, beginners immediately buy a complete set, which already contains a stamp and does not always have the best characteristics for nail design. But you can always purchase suitable stamps for stamping, which are usually sold complete with scraper.
— in the photo: a professional stamping kit and a starter kit for beginners By the way, these tools from famous brands (Konad, Lesly, Born Pretty) are not always the most convenient to use and have 100% the best characteristics. Therefore, it is not at all necessary to purchase so-called original stamps in addition to the already purchased stamping kit. Among the non-original (no name) stamps from Chinese manufacturers, you can choose quite high-quality options, and even much cheaper. The working part of these tools is made of rubber or silicone. Rubber stamps are quite hard and inelastic. They are convenient for transferring small fragments of decor or small designs onto the nail coating, after which you can add individual elements of the composition using a dot and a thin needle. But silicone analogues are great for transferring a solid pattern or large image onto the entire nail. The decor lies evenly, clearly follows the shape of the nail plate, and the smallest elements of the pattern are clearly visible. In addition to one-sided stamps, two-sided tools can now be found on sale, and the working surface on each side may differ in size or elasticity. You can also buy Chinese stamping stamps with a set of removable print heads. The kit may include elastic silicone heads, as well as denser and harder rubber heads of different colors. If the color of the varnish or gel polish matches the color of the working surface of the stamp, then it is better to change the removable head in order to clearly see the pattern transferred to the nail coating. ♦ TRANSPARENT STAMPS Popular new products that are now most often ordered from online stores include transparent stamping stamps. Through the hollow transparent body of the instrument, a soft silicone pad, transparent as glass, is clearly visible. On the transparent pillow, each line of the design transferred to the nail is clearly visible. In addition, the transparent silicone of the stamp allows you to more accurately 'aim' at the moment of transferring the image to the nail and even slightly enlarges the image visually.
— in the photo: transparent stamps The working surface of a transparent stamping stamp does not need to be treated with a buff before transferring the design from the plate, since the silicone pad is absolutely non-sticky and easily lays on the nail coating. Using a transparent stamp, it is easy to make a geometric design with clear edges of each element of the composition, as well as an ornament with identical elements of different colors, imprinting them alternately on the surface of the nail. This tool is ideal for performing French manicure with gel polish. Now on sale there are stamping plates with prints in the form of separate fragments of a French jacket, which can be used to decorate both the free edge and the base of the nail plate. ♦ REVIEW OF ORIGINAL AND NON-ORIGINAL STAMPS ► Click on the photo and expand the options for popular stamps that are most often ordered:
► Click on the photo and expand examples of the quality of prints from different stamps:
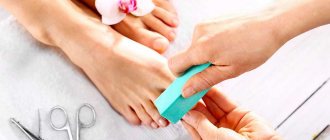
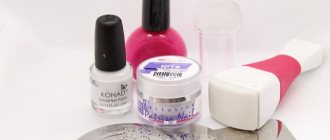
♦ HOW TO DO STAMPING AT HOME ► What tools and materials for nail design should be laid out on the manicure table : • Manicure tools for preparing nails for design (glass or laser files, buff, pusher, scissors), as well as base coat and background varnish . The background coating can also be made with gel polish, but in this case you will need a UV lamp to polymerize the shellac; • Silicone or rubber stamp; • Scraper (scraper for removing excess varnish from the plate); • Rectangular or disk-shaped plate with engraved designs; • Highly pigmented varnish or special paint; • Skin Defender (a bottle with a pink product) or a cream with a thick consistency to protect the cuticle from stamping varnish; • Nail polish remover, which we will use to clean the scraper, plate, stamp. If you use a silicone stamp, you can clean it with the sticky side of the tape. ► How to use a stamping stamp: ❶ If your silicone stamp is still new, then for better adhesion of the working surface to the coating, treat it with a fine file or buff;
❷ Wipe the stamp and print plate with nail polish remover to remove dirt and small lint;
❸ Give your nails the desired shape (long oval or almond-shaped nails are more suitable for a large design or pattern; if you have short nails, then make a square shape of the free edge with rounded corners). Then we apply the base coat, dry it and apply varnish of the desired color for the background decor. If you use shellac or other gel polish, do not forget to do the polymerization in a UV lamp;
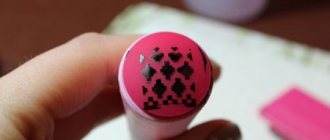
❹ Now take a plate or disk with patterns and, with a brush, apply a thin layer of special stamping varnish (its density is 5-6 times higher than the consistency of regular varnish) onto the selected option, trying not to go too far beyond the boundaries of the pattern;
❺ With confident movements, remove excess varnish from the plate with a scraper, moving the tool first in one direction, then in the other. Try not to press the scraper too hard against the surface of the plate to avoid scratching it. It is advisable to apply skin defender to the cuticle and periungual ridges; ❻ Now we take the stamp and press it tightly against our drawing on the plate. Try not to move the tool for 3-4 seconds, as the print on the pad will be blurry;
❼ Now we apply the stamp to the background coating of the nail and carefully “roll” it over the surface so that the entire design is beautifully placed on the nail. You can add the same design to the same nail, but in a different color. The procedure should be repeated, but before doing this you need to wipe the stamp and plate with nail polish remover. Then we move on to the rest of the nails, working according to the same pattern;
❽ In order for the nail design to be preserved for a long time, you need to apply a finishing coat or topcoat to the already dried design. When the top coat has dried, treat the skin around the nails with nail polish remover (or remove the skin defender if it was previously applied to the cuticle and periungual ridges).
A beautiful nail design with a pattern is ready! ♦ HOW TO DO STAINED GLASS AND REVERSE STAMPING AT HOME
Click on the photo and expand the step-by-step master classes: ♦ FASHIONABLE NAIL DESIGN WITH DRAWINGS MADE BY STAMPING METHOD
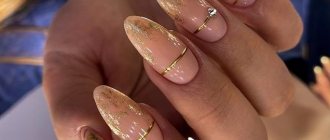
— in the photo: interesting ideas for design for your manicure ♦ VIDEO LESSONS FOR BEGINNERS
Dear girls! Please share with beginners your secrets, experience, tips for performing decorative manicure at home using stamping. If you want to post your photos and video materials on the topic on the site, please write a message to us by email: This e-mail address is being protected from spambots. You need JavaScript enabled to view it. To the main page
ALSO FIND OUT...
| Comments | Add new | Search |
Children's Portal: Home Page
3.26 Copyright (C) 2008 Compojoom.com / Copyright (C) 2007 Alain Georgette / Copyright (C) 2006 Frantisek Hliva. All rights reserved."
Related materials:
- A tiny newborn baby looks very fragile and mothers take their firstborn in their arms with understandable trepidation and are afraid of accidentally harming him...
“>Learning to hold a baby in your arms in different ways
- Too slow weight gain in a baby in the first months of life is a common phenomenon and many mothers mistakenly assume that it is increased...
">Foremilk and hindmilk for babies
- Before birth, the baby is constantly in the mother's placenta and his movements are very constrained by the tight space. When a child is born, there is hyper...
“>How to sew a cocoon diaper with your own hands (pattern, master class)
- I recently added peach oil to my home “beauty” collection to care for my brittle hair damaged by ironing during styling...
">How to properly use peach oil for hair care
- The unique restorative and rejuvenating properties of golden olive oil have been well known since ancient Greek times. If you will…
">Homemade masks based on olive oil, 5 best recipes
The following materials:
- A beautiful, carefully executed manicure harmoniously complements a woman’s sophisticated image and visually lengthens well-groomed fingers. And in order to design...
“>Learning to make simple designs on nails at home
- Many women prefer to wear a single-color or two-color manicure (for example, now an extravagant colored French manicure is in fashion) on short nails, so...
“>Beautiful manicure with patterns on the nails. Photo and video materials
- Stamping (translated from English: embossing or stamping) is a unique nail art technique for quickly applying designs and...
“>How to do stamping nail design. Photos and videos for beginners
- The popular technology of transferring any thematic design or pattern onto nails using a special stamp is ideal for active, business women…
“>How to use stamping varnish. Gel polish coating
- Stamping allows you to quickly apply absolutely identical designs to all nails, which are no different in appearance from those made with a thin brush by a nail artist...
“>Which stamping plates are better. Tips for choosing
Previous materials:
- Openwork nail design is rightfully one of the most sophisticated and sophisticated ways to decorate a manicure. They look especially elegant...
“>Manicure with lace. Nail designs, fabric and sticker designs
- If you are looking for an easy and inexpensive way to create trendy nail designs at home, be sure to pay attention to the videos below...
“>We draw patterns and designs on nails with a needle at home
- Looking at the latest in modern nail design in photos in fashion magazines, you inevitably wonder how much time and labor the artist spent creating...
">Fashionable manicure. Drawings and dots monograms on nails
- It's no secret that French-style manicure on short nails continues to be popular this year. But on the eve of some sign...
“>Chinese painting on nails, photo. Video lessons for beginners
- Today, manicure with a pattern is back in trend and graphic patterns, which were at the peak of popularity quite recently, are gradually replacing the elegant, subtle...
">Manicure with butterflies. How to draw on nails, step by step with photos
- It probably won’t be easy to find a girl who hasn’t at least once thought about doing nail art on her own, without leaving home and...
“>Beautiful designs on nails at home. Photo, video MK
Is it possible to do stamping with regular varnish?
The basic requirements for stamping varnish are thickness, bright, rich color. In addition, many prefer the coating to be matte - this way the greatest clarity of the design is achieved. This is where a popular question arises: is it possible to use regular varnish if it meets these requirements?
Theoretically, this is possible, the main advice is to first try to manipulate the transfer of the pattern with a regular coating, and only if the experiment is successful, create a full-fledged manicure.
In order to avoid buying a special varnish and replace it with a regular one, you will have to work hard to find a more or less suitable one. But even here, not everything may turn out so smoothly. Ordinary varnishes may behave “badly” in the process:
- when transferring the design, it may turn out that the varnish is not pigmented enough, the picture will turn out pale and translucent and will lose all attractiveness;
- some slightly thickened varnishes may pull behind the stamp when removing the stamp, leaving small “hairs” on the edges of the design, which will make the appearance of the nails sloppy;
- Often, ordinary varnish simply dries on the stamp sheet itself and simply does not transfer to the nail.
If you managed to choose a good regular nail polish that allows you to create neat and beautiful designs when stamping, you can safely use it.
Step-by-step instructions for use
To use stamping varnish correctly, step-by-step instructions will come in handy:
- A top coat and a colorless base are applied to the nail.
- Prepare the tools for applying the design: the stamp is thoroughly degreased (especially if we are talking about a device made of metal). For degreasing, you can use alcohol tinctures.
- A layer of pigmented shellac is applied onto which the design will be subsequently transferred. First, the nail plates should be degreased in a similar way.
- A layer of varnish in one or two strokes is applied to the selected design on the engraved plate.
- Transfer the design from the plate directly to the nail using a stamp in one of three ways:
- with varnish removal from the stamp (similar to a sticker);
- rolling motion;
- pressing (impressing) movement.
Nail stamping: how to use with gel polish
It is difficult to say which of the listed methods can be called classical, since in practice all three are equally widely used. It all depends on the habits and personal preferences of the manicurist.
To avoid damaging the drawing, apply a layer of transparent protective varnish to it as quickly as possible. This is best done with one movement of the brush.
Advice. When working with plates on which varnish is applied, they should be placed on a napkin. Otherwise, you may stain your manicure tools or work surface.
How to properly use varnish and stamping
The stamping procedure requires the presence of the following required items: varnish (the main color and for creating the design itself), a sheet with a pattern, a scraper for removing excess coating, a stamp for transferring the image.
The technology involves the following step-by-step actions:
- cover the nail with the base color;
- apply a varnish of a contrasting color to the disc with the pattern, trying not to go too far beyond the image;
- remove excess varnish with a scraper so that the paint fills only the contours of the design itself;
- attach and press the silicone stamp tightly to the plate, trying not to smudge the picture, then transfer it to the nail, also applying the stamp tightly;
- If nail polish gets on your skin, carefully remove it with nail polish remover;
- If you are completely satisfied with the result, it is recommended to coat the finished nail with a colorless fixative varnish.
Advice from experienced cosmetologists
Those who are just starting to master the technique of stamping a design on the nail plate will find it interesting to familiarize themselves with some advice from experienced cosmetologists:
- Despite the fact that you can find a variety of stamps on sale, not only in shape, but also in material, it is recommended to choose gel stamps. Practice shows that they are the most convenient to use in practice.
- If stamping paint is not used for a long period of time, it begins to fade. In order to solve this problem, in most cases it is enough to shake the composition thoroughly before using it. This action will improve the consistency of a special varnish or paint, making the product much more uniform, simply by lifting the coloring pigment from the bottom of the bottle.
- In order for the design to be applied as evenly and clearly as possible, it is strongly recommended to use silicone stamps, which are made from a transparent material, rather than rubber stamps. This type of device, among other things, has a tube-shaped handle, which simplifies the process of using the tool.
- In the absence of special paint for stamping, some semblance of it can be made from the most ordinary varnish. In order for it to match the thickness of the specialized one, it is recommended to leave the bottle open for a while. As a rule, 30-60 minutes are enough for the density to increase.
- If there is an urgent need to transfer the design to the surface of the nails as quickly as possible, it is recommended to think through and select the application area in advance. This will make it possible to avoid forced downtime and will not allow the varnish to dry before the moment when it is transferred to the nails.
- After applying the decoration to each nail, both the stamp itself and the plate should be cleaned with nail polish remover. It is allowed to contain acetone. But oil-based formulations should be avoided. This is due to the fact that after wiping, an invisible film will remain in the engraving, due to which the quality of the transferred design will significantly deteriorate.
- If the room is too hot, low humidity or drafty, the varnish on the metal disc will dry much faster. In this regard, it is recommended to carry out the procedure in a cool room with tightly closed windows.
- If the stencil becomes clogged, you should never try to pick out the remaining varnish using needles. The engraving will be damaged and the disc will become unusable. It is much more effective to soak the disc in nail polish remover containing acetone for just a few minutes and wipe it with a napkin.
- Before stamping, you should not apply cream or other oily substances to your hands - the designs will not be printed properly.
Beautiful stamping does not always work out the first time
If you put all the above tips into practice and fully follow the stamping technology, the drawing will turn out exactly as it should be: bright, clear and beautiful, and your nails will look amazing.
Reviews
Anya: I had a lot of Golden Rose polishes at home, I love them so much. And as it turned out, many of them are ideal for stamping. The biggest difficulties arose with white varnish - it gives a pale design, but for some delicate designs this is just right!
Katya: I was given a set from Konad and I am delighted with it! All the elements are of very high quality, I got it right the first time and it’s very beautiful.
Alina: In the absence of special varnishes, I used my old ones, which had thickened a little. It worked, of course, but I can’t say that it was possible to achieve beautiful thin lines. Now I ordered a professional series, and everything has become much neater and simpler.
Stamping - a list of my tools for it and other bells and whistles down to the smallest detail (part 1)
I was inspired to write this article by this phrase from my search -
Thanks to this phrase from the search, I realized that this is an excellent reason to photograph everything I use in stamping, from basic tools to additional, not entirely necessary little things.