Take a varnish with a thin black brush and draw a couple of horizontal stripes and the same number of vertical ones. When the stripes intersect, you will get a chessboard. We make sure that the resulting cells are the same size. If you can’t draw even stripes with a brush, use a black nail pencil.
We begin to paint over our chessboard. How to do a manicure? From black cells. Let's paint the middle square in the first row from the cuticle. We move on to the second row, where we paint over the first and third squares. In the third row, paint the middle square. That is, we paint over the squares one at a time to get a chessboard pattern. In the next row we will replace the colors with others. Now we wait for the varnish to dry completely.
Take white varnish and carefully paint over the remaining squares. We select rich and matte varnish. It should not be transparent: such a manicure will not look good. To mask the transitions, we use silver varnish with a thin brush.
Apply it carefully to the borders and let it dry. How to make a manicure more impressive? To paint over the joint lines, we can use a shiny cosmetic silver nail pencil. To extend the life of our design, we cover the manicure with colorless varnish. You can coat our creation with clear varnish twice. Be sure to dry the varnish layer thoroughly to always look attractive.
What do you need for a chess manicure?
Traditional chess manicure - black and white checkered. They alternate one after another on the nail plate, attracting the attention of others with the contrasting brightness of the created pattern. The size of the cells determines the complexity of the planned work and varies solely at the request of the fashionista.
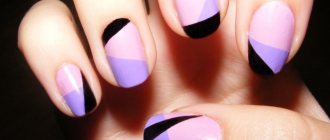
The simplest manicure involves dividing the nail into four zones, which are painted either with black and white varnishes, or in an arbitrary combination of shades. It’s a little more difficult to do a chessboard manicure with medium squares, and the height of professionalism, style and grace is a small “chessboard” painted on the nails.
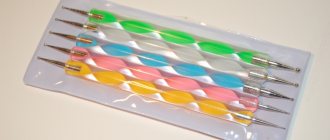
To create a chess manicure you will need:
- varnishes of contrasting colors;
- clear varnish;
- silver coating;
- base for manicure.
Important! For a chess manicure, you need to choose varnishes that have a thin “native” brush, or purchase the accessories necessary for beautiful drawing.
Space manicure with ornament
What you will need:
- Base and fixative
- Blue varnish in three shades: light blue, blue and dark blue
- White creamy varnish
- Makeup sponge
- Black doter (a toothpick will do)
- Brush for small details
Photo, video and manicure: Blog “Coewlesspolish”
- Apply foundation.
- Apply blue polish to your nails and let it dry.
- Apply stripes of three shades of blue (including cyan) to the sponge. They should not overlap each other.
- Blot your nail with the sponge several times, moving it up and down so that the boundaries of the colors are blurred. The dark blue should be near the cuticle.
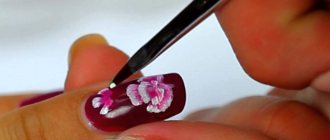
- Using a brush, paint drifts of snow on the tips of your nails. Do not try to draw straight lines - this is “just fallen snow.”
- To draw a tree, place one small vertical stripe. You need to check the box at the top to make an arrow. Now, going down the trunk, draw the branches, while they should lengthen towards the bottom. If you want, you can bend them a little towards the top, like mine. But if they are simply horizontal, the view will not be affected.
- Using a dotter or a toothpick, place several white dots around the trees - these are falling snowflakes.
- After the design has dried, apply a layer of your favorite sealer to make the manicure last longer. The fixative will also smooth out the surface of the nail if any unevenness has formed on it and add shine.
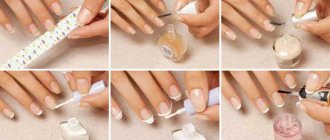
How to do a chess manicure?
The first step in any manicure is preparing the nail plate. This includes gentle removal of the cuticle using a special product and an orange stick. As well as degreasing the nail.
The next stage will be the actual creation of chess cells - for example, in traditional black and white. To make a beautiful chess manicure, you need:
- coat the nail with white varnish twice and let both layers dry;
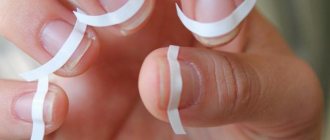
- Use black varnish to make a “chessboard” marking - use thin vertical and horizontal lines to line the nail plate into squares of the required size;
- slowly and carefully paint the squares in the selected colors, alternating the arrangement of shades;
- wait for the varnishes to dry;
- cover your nails with clear varnish to fix the manicure.
To prevent joints and manicure errors from being noticeable, it is recommended to paint the joints with a gray or silver tone before applying the final colorless coating.
The best nail art ideas with a checkerboard base
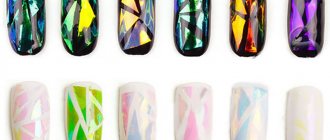
It's time to consider ready-made ideas for the main trend of 2021-2022 - chess manicure. Now we will show you six examples that differ from each other and meet the latest trends:
- Firstly, you can decorate absolutely all nails with a checkerboard pattern. You can see how it will look in the photo. The big advantage of this design is that it will look equally good on nails of any length.
- The second option is suitable for brave ladies who are not afraid to use so much black in their manicure. All nails here are coated with matte black varnish and have glossy areas at the tips. And only on one finger is a fashionable checkerboard pattern, which significantly improves the holistic perception of the picture.
- The following example shows how well bright colors go with checkerboard. Some of the marigolds here are covered with black varnish, some with bright yellow. And to complete the look, one nail on each hand was decorated with a classic checkerboard pattern. This manicure will be perfect for summer.
- We have already mentioned that manicure wonderfully combines chess and fire. To confirm our words, we attach a photo with a real design. It combines restraint in the form of black and checkerboard, as well as the image of fire against the backdrop of a red-orange gradient. It turned out very hot!
- Checkerboard can also be used to dilute a French manicure. Here it is presented in black, and not in the white we are used to, but that doesn’t make it look any worse. Black and white checkered patterns adorn only one nail on the middle finger, adding a touch of flair. The result meets all fashion trends of 2022.
- Next, we will show an example of a bright chess manicure for the summer. Here we decided to move away from the classics and use many colorful shades. The master had to work hard to achieve this result. But his work was not in vain - it turned out very bright and original!
The photo shows only the most stylish and trendy checkerboard manicure options. We hope that you have found at least a few good ideas for your future nail art here and will use them in the near future.
Interesting chess manicure ideas
A traditional checkerboard pattern on nails always looks great. But, unfortunately, its brevity may seem boring and untrendy. To avoid this, nail design masters recommend combining chess manicure with other techniques, creating original original ideas.
Among the most interesting and stylish chess manicure designs are:
- lunar French – a “smile” painted in complementary shades to both checkerboard shades will give the manicure a fabulous and unusual look;
- rhinestones or bouillons - the use of small elements to create cell boundaries guarantees the nail design brightness and festivity;
- slider - “crowns”, “rooks”, “knights” and other figures glued to the nails will allow you to experiment with chess manicure and create something new every time;
- matte variations – monochrome “chess” when using two types of coatings.
Checkerboard manicure gives enormous scope for creativity. Replacing traditional colors with gold or silver shades, using emerging new nail techniques and other possibilities will allow you to create an unusually beautiful and bright manicure to suit any look, image and even mood.
Elegant manicure: fashion trends, photos 2021-2022
Classics have long been valued for their undeniable advantages over other styles and genres. This applies to almost any field of activity, including manicure art. Neat, sophisticated, sophisticated and elegant classic manicure has remained at the peak of popularity for many years, maintaining its position in the current 2021-2022 season.
Fashion trends and photo news of the modern nail industry include several main directions that will be relevant for use in the near future.
Classic, elegant nail design: new photos 2021-2022
The game of opposites in the right design can create an amazing nail design on your hands, captivating with its grace and aesthetic appeal:
• frame manicure is a fresh trend of modern trends, which consists of framing the nail along the lunula line, side borders and cut line with stripes that enclose the main space in the so-called frame. In the case of black and white classics, it is appropriate to use snow-white gel polish or shellac as a base coat, and recreate the frame using a thin brush and black paint;
• geometric nail art – can also be classified as a series of elegant designs, since the clarity of the lines of vertically laid out piano keys on long nails or horizontally outlined parallel straight lines, as well as an imitation of a black and white chessboard mounted on the nail plate advantageously outlines the classic black and white aristocracy;
Black and white manicure on short nails
Short nails are considered the most comfortable length for many women. After all, they are comfortable and you can do any work. The black and white manicure is ideal for short nails.
Black and white ombre
Black and white colors look especially mysterious and elegant in the ombre technique. There are many options for gradient manicure. The option with diamonds is especially popular, where each element is painted with a separate color. The result is a laconic, smooth transition from black to white.
Let's assume the classic version of the ombre technique, where the transition is made from the base of the nail to the tip and vice versa. A gradient manicure looks unusual and stylish, where the transition occurs on all fingers, that is, the black varnish on the thumb gradually lightens to white on the little finger.
Manicure with dots
Even a beginner can do dots design. It is enough to apply a basic polish, for example, white, to your nails, dip the dots in a black coating and draw dots of various diameters on your nails. This design may not be suitable for a special occasion, but it will be the best option for fun everyday nail art.
Lunar manicure
The traditional lunar manicure has also undergone transformations this season. Simple coloring of the root hole looks too simple; it has been replaced by options with negative space, holes of unusual shape - triangular, double, inverted.
Lace manicure
Cute and delicate openwork patterns are popular with many fashionistas. They look amazing, and you can make a similar pattern yourself. You can paint lace on your nails with a brush or dots. Ready-made stamping plates will help you get an openwork pattern on your nails.
Snowflake on a blue background
Description of the snowflake in the photo:
- Place a dot in the center of the nail.
- Draw two vertical lines from the center that will determine the length of the snowflake.
- Add more lines around the circumference, like spokes in a bicycle wheel. The result should be 8 lines.
- Place "v" symbols at the ends of the lines.
- Ready!
- Repeat the procedure with the icons, but only away from the ends.
- This snowflake is made in a similar way, only it has 5 lines, and 6.
Photo and manicure: Blog “Nevertoomuchglitter”
And again snowflakes
“I always start with a base and then apply the background color. I have China Glaze Sea Spray, its gray-blue shade reminds me of the color of the winter sky. But you can also take blue or red. As an addition, I have a clear varnish with a glitter pigment (Orly Shine On Crazy Diamond), which will give the appearance of frosty frost. When the base color is dry, paint a “+” sign using white polish with a long thin brush (or another fine detail brush, varnish or acrylic paint) off the center of the nail. Place a small “x” in the middle of the plus sign. Using a dotter (or a pin head), place 4 dots along the edges of the plus. Add a few additional points in random places. When the polish is dry, coat your nails with a sealer.”