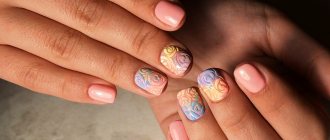
Beautiful, well-groomed hands add attractiveness to a woman's appearance. And in this case, you can’t do without a manicure, which can literally transform your nails and make the skin of your hands soft and silky. Currently, there are many types of manicure. Quite common are edged, hardware and spa manicures. The nails are covered with varnish, gel or acrylic powder. All this undoubtedly gives a beautiful appearance and for a long time saves a woman from the need to touch up chipped nails every day. The coatings used are distinguished not only by their pleasant aesthetic appearance, but also by their durability. However, recently a new product has appeared in the nail industry, which is called sugar manicure. We will show photos of marigolds with this coating below in the article.
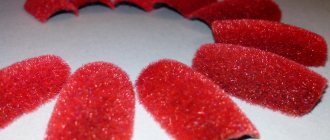
Initially, masters did this manicure using grains of sugar, but it was short-lived, since the particles dissolved under the influence of water, and considering how many times a day the hands are exposed to water, such a coating is unlikely to last until the end of the day. Subsequently, they came up with an alternative to this material and created melange powder.
Melange is tiny grains of sand. Outwardly, it is very similar to transparent powder. Its color changes easily depending on the coating on which it is applied. Suitable for use on extended and natural nails. Using this material you can make the surface of your nails smooth or rough. This product is equally suitable for gel polish and regular polish. The variety of colors of this material allows the most fastidious people to perform a manicure.
Ease of use allows you to perform a manicure with its help not only in the salon, but also at home. The following tools should be at hand: varnish and gel, base coat, gloss, spatula and fan brush.
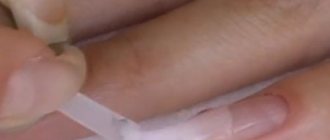
The first step is to apply a base coat to your nails. After which gel polish or just regular polish is applied. Next, using a spatula, sprinkle the nails with shiny melange particles. You can simply dip your nail into a jar of this sand and then simply brush off the excess.
Of course, in terms of durability of the coating and wear time, the gel coating wins. True, for such a manicure you will have to use a llama for drying with ultraviolet radiation. You can initially mix sand particles with gel and apply them to your nails, and then simply dry them in a lamp.
To perform a manicure in a salon, the master will need a set consisting of flock (colored sand), a device for gluing the smallest particles of sand to the nails, a brush with voluminous and long bristles and a metal stand. There are usually seven varieties of sand in a set. A small amount of sand is placed into the apparatus. The nail is pre-coated with gel or varnish, and then it is placed on a stand and the apparatus with sand is turned on. Then the nail is processed under the influence of the rays of the lamp. Each nail is covered in this way. After the procedure, it is advisable not to contact water for several hours to better fix the material on the nail.
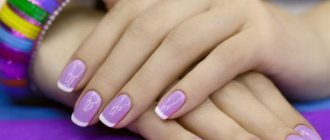
There are many advantages to this type of manicure. First of all, it looks unusual and attracts the attention of others. This coating can be used to treat the entire nail plate or apply it in the form of a pattern. This material is very light, so it can be used at home. This manicure takes no more than thirty minutes. Due to the strength of the sand particles, the coating adheres very firmly to the nails, providing long-lasting coverage, which is very important for women who spend a lot of time doing household chores and exposing their hands to water.
This procedure also has disadvantages. First of all, this is a fairly high price, and this is explained by the fact that this type of manicure is a new product. Doing it yourself, of course, will not give the coverage that a salon procedure will provide.
If all this does not scare the girl and she still decides to do such a manicure at home, then she must adhere to the following recommendations.
Manicure with regular polish. First, you should do a regular manicure, remove the cuticles and give your nails the desired shape with a nail file. After this, you need to apply nail polish. The sand must be the same color as the varnish, so you need to take care of this in advance.
Next, you should apply a second layer of varnish to your nails and until it dries, cover your nails with melange sand. First, you should sprinkle the entire nail with the material, without touching the surface of the nail, and only when the entire nail is covered with sand, you can rub it a little into the surface. Now you can use a brush and brush off the excess. This should be done after the nails are dry.
You can additionally coat your nails with clear varnish to remove roughness. For those to whom this detail does not cause discomfort, you can leave everything as is.
Manicure with gel. The initial stage is the same: perform a manicure and shape your nails. Next, you should apply the gel to your nails with a special brush and dry each nail in succession in a lamp. If several layers of gel are applied, each of them should be dried. After the first layer of gel, you can mix some of it with melange sand and apply it like that to the nail. This is necessary to remove roughness from the nails, since under the influence of the lamp the layer will dry out and sand particles will be inside the gel coating.
If a girl wants to get a natural sugar coating, then after applying the second layer of gel, she should not dry it in a lamp, but first apply sand particles to it with a brush. It is best to do this over a jar of product so that you do not end up wasting a lot of material.
Then you should carefully remove the excess with a fan brush and fix the result in the lamp. After the nails have dried, you can use a hard brush to smooth out the edges of the nail.
This manicure looks especially beautiful in the summer, made in bright colors. Reviews of girls who use this type of coating indicate its high durability.
Every girl should have well-groomed nails, so designers create original prints, designs and images to decorate nails all the time. But who would have thought that a sugar manicure would appear. A nail treated with this technology becomes velvety - to the touch and visually reminiscent of velor fabric.
Of course, nail art masters do not cut out pieces of their velvet, much less attach it to the nail. Everything is much simpler - there is special velvet sand.
We suggest making a velvet design with your own hands, at home, but first you need to understand who will suit this method of decorating their nails, and who would prefer something else.
Features of the material
Velvet sand gradient
Velvet sand is a medium to coarse powder.
Compared to acrylic powder, sand consists of larger fractions. It looks like dense powder, semolina or very fine sugar.
Where can a novice craftsman get sand powder? The technology is very popular, and the material can be purchased at any professional store online and offline. If the material is not at hand, it can be replaced with acrylic powder or scrapbooking powder.
Which velvet sand is better? Experienced craftsmen recommend using medium-grain material and light shades for decoration. Transparent white is best. This is a universal solution, since velvet sand, when covered, takes on the shade of the colored base on which it is poured.
There are several varieties of velvet sand:
- White translucent . Takes on the shade of the coating it is applied to.
- Colored . Can replace gel polish and is applied immediately to the base.
- With sparkles . Used for both fine decoration and full nail coverage.
The velvety texture does not need to be covered with a top or finishing layer. Sand dusting can be used to strengthen nail plates, just like acrylic powder. It reinforces and creates a durable layer.
The coating lasts 10-21 days, just like gel polish. The texture does not crumble and does not form bald spots during wear.
Hands with this design can be actively washed with soap and do any housework as usual. The coating does not react to alcohol solvents.
To remove a design with a velor texture, you will need 15 minutes, foil and a gel polish remover on which the material is attached.
Sand manicure ideas
Stylists use numerous ideas when creating a spectacular manicure with sand. Among the most common and popular of them are the following:
- Nail art with a matte finish looks extremely stylish. The velvet pattern can be applied over it or on individual fingers;
- You can add depth and richness to the image using a black tone;
- freshness, tenderness and romance will be given by a white tint;
- to complement evening outfits, a shiny effect will be indispensable, this can be a manicure “golden sand” or having a metallic sheen;
- The addition of rhinestones looks extremely organic;
- When creating nail art, a variety of original design techniques are used. For example, the image of footprints is popular;
- the marine theme becomes especially relevant with the onset of the summer season;
- The image of roses will add additional femininity;
- the velvet effect can be created using one shade or several multi-colored tones;
- This version of nail art will fit very organically into the wedding look.
Sand manicure ideas
Matte manicure with sand
One of the most elegant options is a matte manicure with velvet sand. Among the common variations of its design are the following:
- the nail plates can alternate between a matte finish and a velvet effect;
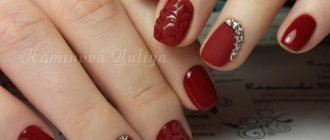
- As for the color scheme, it can be black, pastel, red manicure with sand;
- nails can be covered with matte varnish, and a variety of patterns can be applied on top of it. These can be openwork curls, stripes, images of geometric shapes.
Manicure with black sand
A “sand effect” manicure done in black tones can make your look extremely sophisticated. It can be formatted in the following ways:
- the velvet pattern can be applied to a glossy or matte finish;
- a similar effect can be present on absolutely all nail plates, and they can be evenly covered;
- Decorating with rhinestones looks organic; they can be transparent or brightly colored.
White manicure with sand
Nail art done in white is invariably associated with freshness, tenderness and romance. It is often used to create a bridal look, but it will also be a harmonious addition to an everyday outfit. Among the design techniques that are used in its creation are the following:
- it can be a single-color snow-white design that is evenly applied to all nail plates;
- A manicure with monograms and curls with velvet sand looks incredibly elegant;
- a combination with a French or lunar nail art can be used.
Manicure with shiny sand
Lovers of bright and memorable looks can use a manicure with shiny sand when creating them. It has the following distinctive characteristics:
- One of the most luxurious design variations is the use of golden or silver shades. They will be a harmonious addition to any evening outfit;
- A variety of color combinations can be used, for example, it can be a pink manicure with sand, blue, yellow and other tones;
- An organic solution would be a combination with a glossy finish or one that contains a mirror rub.
Manicure with sand and rhinestones
Nail art with rhinestones is invariably considered one of the most catchy, luxurious and memorable. Its design depends on the length of the nail plates and the individual preferences of the fair sex. Among the most common and popular design techniques are the following:
- nail art can be simple and concise, for example, a beige manicure with sand, decorated with several rhinestones;
- with the help of rhinestones, all kinds of patterns can be laid out, for example, openwork curls or stripes that are located horizontally, vertically or diagonally;
- rhinestones can completely cover any of the fingers, for example, the ring finger.
Manicure with sand and rhinestones
Manicure “footprints in the sand”
In the summer season, “sea and sand” manicure becomes extremely popular. It may consist of several elements, among which are the following:
- there may be an image of feet on a beige surface, this is considered a real trend of this season;
- a marine theme may include images of shells, sea waves, the sun, and anchors. These details are used to create an original composition.
Marine manicure with sand
Among fashionistas, a manicure with shells and velvet sand has become extremely popular. It is often performed on a blue or light blue background, and can be complemented by drawing seagulls, the sun, and sea waves. Shells can be flat or voluminous; they act as the main accent of a stylish nail design and its unique highlight. They are applied to one or more fingers.
Manicure “roses from velvet sand”
One of the most feminine and romantic design options is a manicure with glitter sand containing images of roses. It can be made in the traditional range characteristic of these floral motifs, which is represented by pink, red, burgundy, and cream. It is also possible to use any other shades, such as black, white, green, purple.
Manicure with colored sand
To create a bright and eye-catching look, a summer manicure with sand, made using a variety of shades, is intended. The following variations of its design are found:
- colors can alternate with each other on different fingers;
- alternation of shades can be done using stripes, which can be drawn vertically, horizontally, diagonally, they can run parallel to each other or intersect each other;
- It is allowed to apply all kinds of motifs, it can be floral, plant, geometric, abstract themes;
- Openwork patterns imitating lace look feminine.
How to apply on gel polish
Sand can be poured onto regular varnish, gel paint, gel polish or topcoat as a base. Also, for the base under it, you can take the UV gel of the finishing layer from the three-component gel system for extensions.
Let's look at the procedure for applying velvet sand to gel polish. It consists of the following stages:
- A manicure is performed using the desired technique, the nails are shaped, and the cuticles are processed.
- Nails need to be buffed to remove their natural shine and improve adhesion to the decorative coating.
- Degrease nails and remove dust.
- Cover with gel polish base.
- We paint our nails in two layers of gel polish or gel paint, dry each layer in a lamp for the recommended time.
- Apply topcoat or topcoat to the nail.
- We don’t dry it in a lamp, but immediately pour sand onto the sticky layer. It is necessary to pour from 5 to 10 layers so that it is well saturated.
- You need to wait a minute for the material to “settle” on the nail in an even, dense layer.
- Dry the layer in a lamp. It is recommended to double the drying time from the usual so that the material lasts well from 10 to 21 days.
- Brush off any remaining sprinkles with a soft bristle brush or broom.
Some craftsmen apply sand powder immediately to the second layer of gel polish, without topcoat, and dry it in a lamp for double the time. This method also provides reliable coverage, but only if the nail plate is completely covered with sandy decor.
It is convenient to pour the sprinkles onto the nail over a jar with a wide edge or over a sheet of foil or paper. Scattered residues can be returned to the container with the material and used next time.
Sand can be applied with a fan brush, a pusher, or even an inverted training tip on a holder.
You can mix sand with glitter of different shades yourself, creating a new color of the desired intensity.
Rubbing: what it is, how to use it and all application methods with step-by-step instructions
Velvet sand - how to use the material
Manicure 2022 with sand
Many stylists use manicures with sand on their nails when creating original looks. It is characterized by the following distinctive features:
- nail art gives nails a velvety effect;
- This design is characterized by versatility, it can be combined with both everyday and evening outfits;
- manicure with sand can be done using both glossy and matte finishes, and their combination is also allowed;
- the velvet effect can be present on the entire nail plate or laid out in the form of certain patterns, which can be made in floral, plant, geometric, abstract themes;
- when designing, various effects may be present, such as ombre, lunar design, French;
- As for the color scheme, it is characterized by variety; it can be classic black and white, delicate pastel or bright saturated.
Manicure for short nails with sand
Such a stylish and original type of design as a “velvet sand” manicure looks great on shortened nail plates. Some of the features of its design can be identified as follows:
- at this length almost any shade will look harmonious;
- It is recommended to give preference to solid colors. The use of prints is also allowed, but it is better if they are discreet, made in a minimalist style;
- It is better to refrain from abundant decoration with rhinestones so that the image does not come out overloaded; if a combination of different tones is used, then their combination will be very organic, made in the form of a smooth transition from one shade to another. This can be done using a design technique such as ombre, which can be horizontal, vertical or diagonal.
Manicure for long nails with sand
On elongated nail plates you will get an unrivaled manicure with granulated sugar. It has the following characteristic features:
- When creating it, stylists will be able to fully express their imagination and apply a variety of patterns to the surface of the nail. It can be a marine theme, imitation lace, all kinds of geometric shapes;
- a manicure with sand can be generously decorated with rhinestones, which are applied in small quantities or completely cover any of the nail plates;
- Almost any design will look organic on elongated nail plates. It can be ombre, French, lunar nail art. At the same time, when creating them, all kinds of shades can be used, both discreet, muted, and extremely bright and saturated.
Velvet varnish application technology
Sand varnish
An alternative to velvet sand is a new product, velvet nail polish.
This is a type of regular varnish with the addition of tiny acrylic powder, creating the effect of suede or light grain.
With its help, even beginners can quickly create a uniform velor coating.
The varnish dries in air in 2-3 minutes. It must be applied in two layers and covered with the second only after the first has completely dried, so that there are no grooves or screeds. You can use a fixative, but then the suede texture will disappear, leaving only a matte effect. Velvet varnish can be found from the following manufacturers: Dance Legend, OPI, ZOYA, NUBAR. The coating lasts 2-4 days, and then chips and comes off like regular varnish.
How is the sugar coating removed?
The melange powder applied to the gel polish is removed like a regular gel polish coating. But it is better not to remove sugar varnish or regular varnish with a melange rub by simply wiping it off the nail, because grains of sand can scratch the nail plate.
Editor's choice: Fashionable nail polishes 2022: photo selection
To more carefully remove sugar polish from nails, remember how to remove gel polish. Soak pieces of cotton pads in nail polish remover and apply to your nails, wrapping them in foil. Keep the solvent for about 5 minutes, the varnish will soften well, and you can wipe it off with a light movement without causing injury to the nail plate.
Sugar manicure design is loved not only by fashionistas for its beauty and originality, but also by craftsmen for its ease of implementation. And many nail artists collect a portfolio of their own work, and it is this design that always looks great and is very clearly visible in the photo, without creating bright shimmers.
Powder top, cashmere-effect finish for gel polish
The effect of a velor, velvety surface can also be achieved using a matte top with the declared texture. It does not contain a sticky layer; it is applied, like a regular top coat, on top of two layers of gel polish, and dried in a lamp according to the recommended time.
The top with a cashmere effect has a dense texture and remains flexible after polymerization, making the nails even more durable and resistant to chipping and damage.
Second method: if you have gel polish and a UV lamp
If you have gel polish and a special UV lamp, you can make a velvet design easier and faster, even at home:
- Paint your nails with the desired shade.
- Draw a diagram of the ornament, pattern with which you want to decorate your nails.
- Cover the diagram with sand so that it is not visible. If the grains do not stick well to the base, lightly press them with a bamboo stick; you should not do this with much pressure - there is a possibility of losing some of the volume.
- Next, place your fingers in a UV lamp, just a couple of minutes and the design is already dry.
- Be sure to shake off loose particles and apply a few strokes of clear gel polish, or better yet, a professional sealer.
Velvet Sand Nail Design Ideas
The most popular design directions with this texture are:
- Full Coverage
- Velvet sand painting
- Small drawings
- Ombre, gradient
- Wedding manicure
- Sweater design
- French
When applying any designs under the topping, the nail is first sealed with topcoat and the dispersion layer is removed.
Technique for applying and removing sugar effect varnish
Sugar gloss is much thicker in texture, so before performing a manicure, the bottle must be shaken thoroughly for a minute. If this is not done, then it will lie ugly and uneven. As a result, you will not achieve the desired effect.
So, after shaking the bottle, you can start applying. As a base, you need to take a special varnish. This is done so that the sand coating lies evenly and beautifully. Once the base gloss is dry, take a small amount of sugar polish on your brush and apply it to your nail. Remember that applying too thick a layer may crack or crack later. We paint all the nails. Take your time when applying. After completing the manicure, you must wait until the coating crystallizes, so it is not recommended to touch your nails for 20 minutes.
When removing polish, do not rush and rub the nail, as this can damage it.
Start by soaking a cotton pad or swab in nail polish remover. Then wrap it around your nail. This procedure is done on each finger. You need to sit with your nails wrapped for about 5 minutes. Then you can start removing the old gloss. You need to wipe the nail gently and without strong pressure. If the gloss does not come off the first time, then the procedure must be repeated. After the coating is removed, a protective nourishing cream or balm should be applied to the nail plate. After an hour, you can start a new manicure.
Return to contents
It’s spring outside, and episodes of the upcoming summer holiday are replaying in my head for the hundredth time. The warm sea, the hot sun and the burning sand under your feet are moments that remain only in your memory or in a photo saved on your phone. To ensure that the summer mood never leaves you, despite the weather outside, try doing this. Using sand nail polish, you can easily create beautiful nail art that will remind you of your upcoming vacation. Our photo gallery will help you choose a suitable design that will not leave anyone indifferent.
Texture manicure is a relief coating with small grains reminiscent of sand. Depending on the manufacturer, the varnish may lie on the nails with a smoother or, on the contrary, a bumpy layer. A manicure with a very voluminous coating is often referred to as a sugar manicure. If the sand varnish is liquid enough and the grains are very small, the result is a velvety design that looks like velor. The final result largely depends on the ability to carefully apply the coating. The nail polish itself is very unusual and has an amazing structure.
Full Coverage
Can be performed on one nail or on all fingers. Allows you to strengthen the nail plates, which is important for square shapes with increased load on the corners. Sand is poured onto regular varnish, gel polish or gel paint after coating with topcoat. The transparent material takes on the same shade as the colored background underneath. Please note that the bright colors of a manicure with a velvety surface do fade over time. By the end of the first week, the color may lose a little brightness, but the coating will remain durable.
Advantages of sugar manicure
Granulated sugar perfectly laid out on your nails has several advantages:
- The manicure is unlike any other - bright, stylish, unusual and extremely original, a real exclusive.
- Sand particles can be used as a solid coating of the nail plate; they are also used to form images, impressions and other ornaments and patterns.
- The designer nail decoration has no analogues, and it is absolutely harmless and safe.
- If a sugar manicure is done according to all the rules, it will last for 20 days.
Velvet sand painting
The technique allows you to combine several decoration options in one composition. Painting is done with gel paint, top coat or gel polish. The technology is as follows:
- After applying the main color of the gel polish, seal it with a top coat.
- Remove the dispersion layer.
- Using gel paint, gel polish of the selected shade, or just a transparent top coat, we draw monograms using a thin brush.
- Sprinkle the drawing with velvet sand.
- Dry it in the lamp for double the time.
- Brush off any remaining sprinkles with a brush.
The monograms of the painting must contain a sufficient amount of liquid and be “fat” in order to “take” the sprinkles. Otherwise, the drawing will have bald spots and will be uneven.
Pattern application technique
We should also consider the process of applying patterns with a velvet effect. This is also done in stages, but the technology is slightly different.
The first stage is preparing your nails. They need to be given a suitable shape, covered with a base and a main layer of varnish. Next you need to apply the finish and dry your nails. And only after that you can move on to creating patterns.
The outline of the pattern should be drawn with a simple gel polish. It is recommended to lay out the paint of the desired color in a convex edging. This way you will get a beautiful three-dimensional effect of your drawing. After you have drawn the outline of the future pattern, you need to cover it with sand. This is not difficult to do. Just sprinkle a thin layer of sand over the entire nail plate - it will fix itself only where it is needed. Make sure that the layer of sand is the same thickness everywhere.
After the entire future pattern is covered with sand, the nails need to be dried in a lamp.
After this, the remaining sand that is on the nails must be carefully removed with a brush. You need to move in the direction from the cuticle to the edge of the nail. This way you won’t damage your manicure, but will only bring it to perfection.
If you plan to fix the design on your nails, then you will need a simple topcoat, which is used when creating a manicure with gel polish. You can fix the top layer on your nails using a semi-dry brush. Apply it with light touches to the nail plate, as if driving into the surface. It will hold the grains of sand together.
Regardless of whether you completely covered your nails with sand or just created velvet patterns on their surface, after completing the procedures and completely drying your nails, wash your hands with warm water and moisturize them with cream.
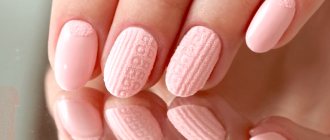
Sweater design
The trendy design of the autumn-winter season would not be so impressive without its voluminous velor texture. It can also be done with acrylic powder or flock. The design is applied with paint or gel polish onto the top without a dispersion layer, sprinkled with powder material, and then dried in a lamp. With sprinkles, the design becomes durable and expressive. You can choose different braid patterns for sweater designs. Read more about knitted design technology.
Original design
Using high-quality colored “sand” for manicure, you can create several interesting design options at once. Let's look at the most popular of them.
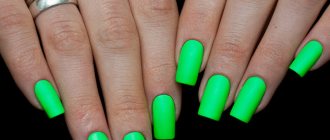
Plain
The simplest option is simple plain nails covered with velvet sand. For this purpose, you can use “liquid sand” of different shades. If you want to cheer yourself up and create a bright look, then you can combine several different tones. For example, turquoise glossy tones are complemented with inserts of a catchy and rich color called “orange cupcake”.
Knitted
You've probably seen the original version of the manicure, in which the coating resembles the “braids” of a warm knitted sweater. Such patterns are relevant not only in winter. They look unusual, but at the same time very attractive.
A similar approach is needed when combining the “liquid stone” technique with the process of using sand.
As a result of this combination, the nail looks like a tiny pillow for decoration.
Floral
A time-tested option is nails with floral patterns. They are suitable for almost all girls and women. “Velvet” flowers on nails look charming and delicate. You can paint irises, roses, peonies and any other flowers that attract you on the surface of the nail plate.
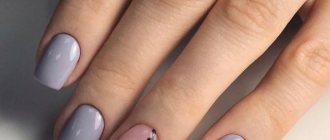
Lunar
You can’t ignore the trendy “moon” manicure. When performing it, you can use sand to highlight either the base of the nail or the hole. In both cases, the nails look very beautiful and unusual. You can also go the other way and highlight the free edge of the nail with a different texture. This way you will get an unusual version of French manicure.
Ombre
An effective gradient with sand sprinkles is applied to a ready-made gradient with gel polish. The varnish transfers its color, and a smooth, beautiful transition is obtained. In detail about the technique of performing a gradient.
The second option is to use two or three shades of sprinkles in a horizontal or vertical transition. Due to the fine-grained texture of the material, the gradient is smooth and delicate.
How to do a sugar manicure at home
To make sugar nails with gel, you need to purchase transparent acrylic powder, which fits perfectly on any colored varnish. In the future, it can be used with a gradient, when you want to make a colored stretch strewn with sand. But before we get into complex designs, let's try a simple coat of colored varnish.
Transparent acrylic powder must be mixed with any sand. When dry, it will help absorb excess moisture and create a very durable coating on your nails. Thus, the manicure will last longer without crumbling, abrasion or chipping.
- Prepare the plate for painting with gel polish.
- Apply primer, base and send to dry in the lamp.
- Apply the selected color in two layers and dry.
- We apply the top coat and begin to generously sprinkle sugar onto the wet, undried finish.
- After drying, use a brush to remove excess acrylic powder and granulated sugar mixture.
You can perform a manicure in several ways - apply sugar material to colored varnish, base or top. In all three cases, the design is the same, but with different color saturation.
You can add different components to the loose composition: shimmer glitter, acrylic powder for strength, mix several sands to obtain the desired shade. Sand of very bright colors is diluted to obtain delicate pastel shades.
Sugar manicure
Wedding manicure
Sand with mirror or rainbow sand sparkles is indispensable in a wedding manicure. It adds a subtle shine to the base design. The classic white color acquires volume and a fascinating texture. This manicure is worthy of being included in a wedding album photo.
Wedding manicure ideas - from classic to avant-garde
Advantages of sand nail polish
- Quite easy to do
.
Painting a house is quite easy. If you resorted to combining sand with varnish, without buying a ready-made mixture in advance, then to cover the nail you will only need a napkin on which you place a small handful of sand and then carefully place each finger in it.
- Suitable for any age.
This is actually true! As we said earlier, sand gives the varnish a matte finish. Any color looks calm and expensive. Who doesn't love velvet? From one glance at it you get a feeling of softness, luxury and tenderness. It is these qualities that are adopted by those who use sand for manicure, or purchase sand varnishes right away.
- Durable.
Some will argue here. But in truth, if you sanded your nail well before polishing, your base was applied in 2-3 layers, which completely evened out your nail, then the sand will not want to fall off on its own. It all depends on you and on the remedies available at home.
- Enjoys versatility
.
This is undoubtedly true. With this manicure you can go out into the world, as well as go to work, take a walk with your child on the street, go shopping, or go on a date. Your fingers will look equally suitable in any situation. All you have to do is choose the right color!
- Available
.
On Aliexpress you can purchase 18 colors of 10 grams for only 2-3 dollars. In Moscow, the cost of one box of 10 grams will cost from 50 to 100 rubles. I don't want to take it.
French
The powder texture is applied only to the tips of the nails, painted with a French line. This allows you to further strengthen the nails in this area. When using colored or shiny sand, the design becomes even more original.
Design options for a French jacket - a selection of ideas
Velvet sand for nails does not require special skills in mastering the technology and provides a wide field for experimentation both for masters and when performed at home. At the start, purchase a translucent material to strengthen your skills in working with texture.
The first method of applying granulated sugar to nails
There are several techniques for applying manicure, it is better to familiarize yourself with each and then choose the most suitable option. The first way is as follows:
- Do a regular trimmed manicure, be sure to steam your hands in a warm herbal bath, push back and trim the cuticles, use a nail file to give them a better shape, and dry each nail plate well with a towel.
- Apply a protective base to your nails.
- Now scoop up a small amount of colored dye and make a couple of strokes on each nail. Most often, calm pastel colors are chosen - sand, beige, milky, soft plum, soft pink. Sometimes, on the contrary, strongly contrasting shades are selected.
- While the composition has not yet dried, quickly but carefully sprinkle granulated sugar on the nail and wait until it sticks completely. According to nail art masters, 10-15 minutes is enough for this.
- Next, use a hard miniature brush designed for working with nails to sweep away any loose grains of sand; if you need to make a pattern, form it.
- To make a sugar manicure last longer, it is advisable to seal the result with shellac, but this technique will not work if you want a 100% velvet feeling.
Creative design ideas
Modern nail art is replete with innovative ideas. Each master strives to perform an incredible sugar manicure and put on public display a photo that will be remembered for its creativity. The Eiffel Tower made with granulated sugar looks stylish on nails. Especially if there is an inscription “Paris” next to it with uneven, broken letters. This trend can be seen among many masters. Experts also write “love” and “fashion” on the plate, and then decorate it with sand.
Marmalade design
We will not deny that a marmalade manicure done with a gradient looks great. Many girls like juicy, bright combinations, especially if lemon-orange tones are used.
Painted sugar
Skilled craftswomen have been using sand in painting for a long time. Just look at the flower arrangements with the textured design of one of the parts of the plant. In most cases, it is the bud or blossoming flower that is sprinkled with sugar.
The stem and leaves are painted with regular paint. The most important thing is that in such a manicure one nail is completely covered with sugar material for a harmonious combination.
Sweet casting
It’s not easy to combine the two techniques, but there’s nothing complicated about it. The result is a very unusual nail art, with gold veins in the middle of sugar hills.
The main thing is to choose the right color scheme, use similar shades of varnish and sand, where there will be partial coverage. Sand casting looks impressive on French manicures, moon manicures, and as a decoration for accent nails. First, casting is performed, and then the empty areas are generously sprinkled with material.
Sugar candies
Marmalade manicure has several branches. The design is made in three versions: with imitation jelly marmalade, meringue candies and chewing marshmallow marshmallows. In this direction, it is very important to convey a sweet mood, choose a pink and white color scheme and depict marmalade.
At home, it’s easy to create a manicure that resembles multi-colored confectionery sprinkles. To do this, just mix three colors of velvet sand and then apply it to the plate. The result is an original melange of sugar manicure.
Sugar manicure with gel polish
Sugar polish with a textured surface appeared earlier than manicure with gel polish sprinkled with acrylic powder.
Initially, abrasive particles mixed with glitter were added to ordinary varnish, which created the desired effect. However, ordinary nail polish, even with a brilliant shine, does not last more than four days, and the improved formula of gel polish gives long-lasting wear and a lasting effect.
Sand effect varnish
Sugar nail polish is sold in many brand stores that produce nail material.
The Jerden brand and its series called Color Sugar are popular. Colored sugar is applied easily, without the formation of lumps or unevenness. Using this product, you can hide the unevenness of the plate and continue with a manicure for about four days.
Golden Rose has already presented a new product with a 3D effect. According to the manufacturer, the improved formula, containing a base and a fixative, provides durability for up to five days.
The Dance Legend brand has distinguished itself somewhat with linear products. He released a new product called Sugar Crystals, but in fact, the coating resembles the sands of the Sahara desert without the shimmering effect. Girls complain that the color when drying is very different from the declared shade.