The calling card of any girl is the beauty of her hands. Looking at their neatness, you can say a lot: how clean you are, take care of yourself, etc. Nails should be neatly filed, hands should be clean and moisturized, and a beautiful manicure will add even more self-confidence.
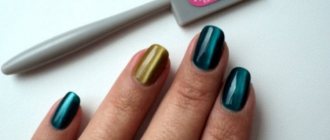
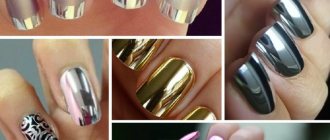
Every girl tries to give her design a spectacular look, using brighter and more eye-catching shades. Recently, manicures with a mirror effect have become very popular, which will undoubtedly add a special zest and fit perfectly into any look.
What does a mirror manicure look like?
The name speaks for itself, the nail surface is like a real mirror, the manicure looks smooth and shiny, high-quality workmanship attracts the eyes of others.
This design is perfect for a festive look or visiting a nightclub. Mirror design will add zest to your style, add irresistibility and additional shine to your nails.
Ways to create a metallic effect
How to make a mirror manicure with gel polish at home is a question that worries many girls.
Today, there are several techniques that can be used to express a mirror effect on your nails.
- Using reflective foil.
- Application of special varnish.
- Using glitter.
All options are quite simple and do not require special skills, the main thing is to have a sense of taste and the necessary materials, then mirror nail design can be done at home without the help of a specialist.
It is worth noting
This manicure is more suitable for going out or going to a nightclub or party, but stylish, bright and independent girls can use it to add zest to their look.
A similar manicure is done with a metallic effect of nail polish using foil or stickers on the nail plate. Each method has its own subtleties and deserves special attention.
Applying nail polish with a metallic sheen to your nails is the most common and versatile method.
Working with foil is more difficult and requires the purchase of special materials, but nail stickers are a quick way to get the desired result and can withstand a lot of mechanical stress.
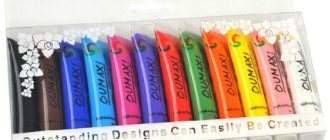
What varnishes for mirror manicure can be found:
- ZOYA . This is a high-quality cosmetic product that allows you to make your nails beautiful in a matter of minutes. The best option in the line for metallic manicure is the silver color, this polish is difficult to find, but can be bought online. Using a convenient brush, it is enough to apply it in one layer to get the result. The manicure lasts about five days. The average price is 650-750 rubles.
- EL CORAZON . The product is quite liquid, but despite this, it hardly spreads, often lays down unevenly, forming stripes, the effect is visible already from the first layer. Visually similar to foil coating, lasts three days. The cost is about 200 rubles.
- OPI . This is the most popular and widespread option today. Easy to apply, but the downside is the uneven coverage. The cost is about 1300 rubles per bottle of varnish.
- AVON is a fairly inexpensive product with a convenient brush and ease of application, but its effect is short-lived, the varnish begins to wear off after a day of use. Its price is about 200 rubles.
- CHANEL . The cost of the varnish is not cheap and will be at least 500 rubles per bottle. It is inconvenient to apply, but is endowed with coating protection, has a pleasant visual effect and lasts a long time.
We recommend: Rainbow manicure: water design
The price of foil for Hollywood manicure varies from forty to one hundred rubles, depending on the color and manufacturer. You can also make mirror nails using stickers, the cost of which varies from 150 to 200 rubles. You can buy them in specialized stores with tools and materials for manicure.
Reflective film on nails
The simplest option for creating a mirror manicure is gluing special foil with a reflection effect.
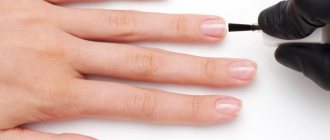
- First, let's get your hands in order.
- We move back or remove the cuticle, give the nails the same shape, align the nail plate, get rid of delamination and roughness.
- Apply degreaser, primer, base for gel polish and dry in a lamp.
- Cover each nail with colored varnish and dry. It is important to choose a color that will match the tone of the foil, as this is a good safety net in case some areas do not print well.
- Next you should apply special glue.
- We apply the prepared pieces of foil.
- Press firmly and smooth out the unevenness using an orange stick, paying special attention to the areas near the cuticle.
- Carefully, without sudden movements, remove the film.
The final coat is not applied, as the manicure may lose its shine and mirror effect. The manicure done is attached to the nail quite well, since the glue layer is highly durable.
Fashionable colors for short nails
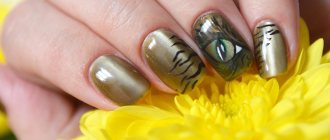
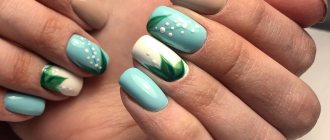
For mirror manicure, gold and silver are considered fashionable colors, but other colors will also look impressive. The colors pink, white, blue and purple look very beautiful, as in the photo.
The mirror and holographic version is ideal for shortened nails. It is important not to choose bright, flashy colors, as pastel colors will look best.
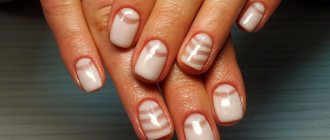
Application of special varnishes
If you decide to purchase a polish with a mirror effect, you should know how to choose the right quality product. First of all, pay attention to the bottle - the tone of the varnish must completely match the color of the bottle. The varnish should be rich, dense and in no case transparent.
- After choosing a color, let's move on to the main process - how to apply mirror gel polish so that the tone is rich and uniform.
- We prepare the nail plate for coating with gel polish.
- Apply degreaser, primer, base coat and dry in a UV lamp.
- Next, using a special brush, apply an even layer of the selected varnish and dry (the brush should be chosen wide to cover the width of the nail as much as possible). The application of layers of gel polish can vary, sometimes two are enough to get the desired effect, but occasionally the polish requires a third layer to achieve the desired thickness of your manicure.
- Be sure to fix it with a top coat and dry it in a lamp.
- Most often, shades of silver and golden varnishes are used, because these are the tones that can maximize the effectiveness of the mirror style.
Remember that when thickening these varnishes are not recommended to be diluted, as the desired color density is lost.
What is needed for rubbing
With the help of rubbing, the nails become glossy and have a mirror shine. There are no restrictions on shades in this technique and therefore you can safely show your imagination.
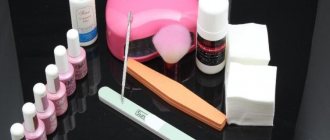
To use the rub you need the following materials:
- manicure set;
- primer;
- degreasing agent;
- cuticle remover;
- base, color, top coat;
- clinser;
- tassels;
- UV lamp;
- special oil;
- glitter, powder.
Applying glitter
Glitter is a microscopic dust made of polyester, which when rubbed into gel polish gives a mirror effect. The uniqueness of this type of manicure lies in the fact that if the base color is pink and the metallic polish is yellow, then as a result you will get a beautiful pastel beige color.
- You should approach the choice of colors quite carefully, as there are tones that are not compatible with each other.
- Let's start with the technique of applying mirror sand to your nails.
- Apply a base layer of varnish to the prepared surface and dry it in a UV lamp.
Without removing the sticky layer, generously sprinkle each nail one by one so that not a single gap remains. Rubbing can be done using a pusher or fan brush. We carry out this procedure over a jar or sheet of paper so that excess sand can be collected.
The next stage is to begin to gently rub the dust into the nail plate with your fingertips (act slowly, without pressing hard). The glitter should be evenly distributed over the entire surface of the nail in one layer.
- Using an orange stick, remove excess glitter from the cuticle.
- We fix the obtained result with a coating.
The most common choice is a mirror manicure, adding shine to the entire surface, but you can experiment and display glitter on only half of the nail or in the style of a French design.
note
If the work is done with ordinary varnish, then a mirror shine is applied to a damp, undried coating.
How is mirror rubbing with glitter carried out? We process the nail plate, correct overgrown cuticles, and file the edges of the nails. To decorate with a mirror shine, it is necessary to create a smooth surface without sagging or unevenness. Rubbing for the nail plate is a fine sand of various shades, packaged in containers with brushes.
The application procedure is as follows: the nail is covered with a basic base (gel or varnish), make sure that the distribution is even, the layer should not be thick. You need to catch the moment when the base becomes sticky, stops being liquid and has not yet had time to dry. Gradually pour mirror nail polish from the jar onto the nail plate so that the glitter does not crumble, place a paper sheet under your hand.
If there is any excess, you can simply collect it and pour it into a container. You can, on the contrary, pour the powder onto a sheet and apply from it. Nails in places where mirror shine is applied are massaged with quick, gentle movements. It is important not to scratch the manicure and make sure that the coating is even and without bald spots. In order for the surface to stop being rough, it is necessary to cover the top with another layer of varnish with high transparency.
How is the mirror file processed? So that after processing the nail it acquires a mirror shine, we take a polishing file with 4 working surfaces. Each of them is marked with a serial number corresponding to the filing algorithm. The nail plates are processed starting with the little finger and finishing with the thumb. The tool is held at an angle, carefully rounding the nail plates. After 3-4 filings, smooth the upper edge of the nail.
We recommend: How to draw a butterfly on your nails: tips for creating decor
Useful tips
By following some recommendations, you can easily create a beautiful mirror effect, no different from professional application.
The smaller the grains of sand, the better the design will be. The winning option is sand, whose structure is more reminiscent of dust. In this case, the glitter completely covers the nail and gives it a unique metallic shine.
To apply glitter, it is better to use brushes with soft bristles, since when they come into contact with the nail, they do not remove the unstable shiny surface.
Gel polish should be chosen with a more pronounced sticky layer, since in this case the glitter adheres much more tightly to the surface.
Having studied each of the methods in detail, choose the one that is most suitable for you and practice mirror manicure with benefit.
Manicure made with pigment
Pigment is a coloring agent that is very similar to grains and has different tones. For the “mirror” design, chrome pigment of various tones is used.
A step-by-step instruction will show you the rules for implementing a fashionable manicure:
- treat nails to give them a neat appearance;
- remove greasy surface;
- apply a coloring gel base;
- dried;
- rub the pigment onto a slightly light sticky layer of gel with a brush or hand;
- shake off excess pigment;
- painted with finish.
Photo of nail polish coating with mirror gel polish
Even more photos at the link: Mirror gel polish photo.