Fashionable designs using the ombre or gradient technique have become even easier and more fun, thanks to the advent of a tool - the airbrush for nails. If earlier ombre took from 30 to 40 minutes in the salon, now the same color transition effect can be done in 10-15 minutes on the nails of both hands.
An airbrush makes it possible to achieve not only smooth transitions of shades on your nails, but also volume, imitation of a rough texture, graphic and artistic painting using additional design materials.
What is airbrush, how to work with the tool and what ideas and designs can be obtained using this technique? Let's look into the details.
What is airbrush nails
Airbrushing is the process of coating and painting nails with paints using an airbrush tool that delivers pigment under air pressure.
The process is also called aerial writing. In general, airbrushing on nails consists of designs and backgrounds made with paints using the fine spraying technique.
An airbrush consists of a compressor and a handle connected by a hose. The compressor pumps air under pressure into the handle. The handle contains a nozzle and a paint reservoir. The nozzle consists of two parts - material, for the material, and air.
The material nozzle comes in different sizes and varies from 0.15 to 0.2 mm to work with nail designs. Paint is supplied to the nozzle only when the handle is pressed. In the inactive position, the nozzle is closed from the inside by the needle, and paint cannot flow out of it.
There are two types of airbrushes for nails - simple and double action.:
- Simple - Allows you to control the flow of paint, but not the air flow. The tool is more suitable for working with stencils and creating three-dimensional drawings and graphic designs.
- Double-acting - They differ from simple ones by the presence of a valve that regulates the air flow. Thanks to this, the master has the opportunity to accurately draw the smallest details by hand. It can change the thickness or clarity of a drawing's edges, lines, and strokes.
Typically, an airbrush comes complete with cleaning brushes and a pipette for collecting paint. You can purchase more extended sets, with solvents and liquids for cleaning the device.
Airbrush in nail design: how to choose and use
Airbrushing can also be done with liquid coloring aerosols, where the pigment is in disposable or reusable containers.
Airbrushing differs from other types of design in the speed and ease of creating multi-color backgrounds and neat gradient transitions.
It significantly reduces the time spent by the craftsman on such manual processes and makes it possible to experiment with combinations of shades and quick stencil designs even at home.
https://youtu.be/https://youtu.be/fKm0YiQuv0w
_
Airbrush on nails with gel polish 2022 photo
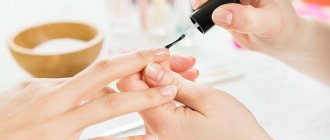
To perform airbrushing you will need the following materials and equipment: airbrush and compressor; paints of different shades; tips for training; sharp tweezers and gloves; stencils; mat for cutting stencils. The first step is to spray the background color paint onto the surface of the nail (do not forget to treat your nails with a classic trim or European manicure before applying any varnish or paint).
Then, using special stencils with drawings, one of them is applied. If necessary, the drawing is adjusted or completed with nail paint or varnish. Further, if desired, the nails are decorated with sparkles, decorative stones and other elements.
The final step is to coat the nails with a fixative. With the help of nail airbrushing, you can draw the most incredible designs and even entire stories on your nails; it gives you unlimited possibilities for flights of fancy.
Take the choice of tools seriously: airbrush and paints, since the final result of the work largely depends on this. When purchasing, if possible, ask to test the device with water. Pay attention to the quality of the sprayer (uniform stream and correctly shaped spot); torch adjustment (special device for changing the pressure in the apparatus); adjusting the supply of the paint itself (that is, the needle stroke to increase or, conversely, decrease the supply of paint); operation of the control lever (it is soft and smooth); needles and nozzle (after applying paint there should be no drops left on them).
Materials for airbrush nails
You can use an airbrush to create a whole range of nail designs: ombre or gradient, graphic designs, artistic painting with stickers and stencils, which are sold separately for working with the airbrush.
Airbrushing is performed on a completely finished varnish coating.
To design using this technique you will need the following set:
- Airbrush
- Airbrush paint set
- Pipette for collecting paint
- Stickers, stencils for drawing pictures
- Protective stickers for the skin around the nail (optional)
- Training tips
- Tweezers
- Acid-free primer
- Glossy and matte top
- Buff for natural nails
- Cleaner for removing sticky layer
- Airbrush cleaner, with brush
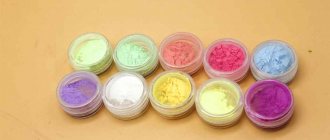
Airbrush paint is sold ready to use; 2-3 drops of color are needed to cover one hand.
Acrylic based paints are recommended. Popular manufacturers of acrylic paints for airbrush are Premium or Fluo. They can be purchased in specialized stores online or offline.
What is an airbrush manicure?
This manicure is performed using a special airbrush device. This device allows you to spray paint under high pressure. Human hands cannot apply paint the way an airbrush can, so the results are always fantastic.
Together with an airbrush, you can use stencils that will make it possible to create beautiful and unusual designs on your nails. The most interesting thing is that such a device is widely used in creating ombre and gradient manicures.
Airbrush design using stencils
A simple airbrush is designed for working with stencils.
Before applying the drawing, it is recommended to immediately think through the entire composition. This will reduce work time and you won’t have to redo it if you don’t like something during the process. You can make one nail on training tips to further focus on it. This is especially true when practicing first designs or mastering a new composition by masters.
When planning a design, one or more stencils are selected, the necessary paints are mixed or selected, the airbrush is adjusted and the paint supply distance of the tool is tested. It is convenient to do this on a napkin, a sheet of paper, or even a glove on your second hand if you are a salon master. The paint can then be washed off with water or a cleaner.
Airbrush stencils are made of flexible, elastic film. It sticks securely to the surface of the nail, gripping the side parts well. To ensure maximum adhesion, additionally go over the sides with an orange stick. This will prevent paint from bleeding into the cuticle area.
Stencils have clear and even edges thanks to high-precision cutting in production. The drawings are obtained without streaks or smudges, and are often indistinguishable from artistic painting.
The second type of stencils is applied. With their help, abstract drawings are created that do not require clear lines in execution. Such stencils are applied to the nails from above and then the pigment is sprayed with an airbrush.
How to create a drawing with an airbrush and what materials will be useful
With the help of airbrush you can implement any bold manicure ideas. In order to make a drawing using an airbrush, you must have the following items:
- the airbrush itself;
- compressor;
- paints;
- tips;
- medical gloves;
- tweezers;
- various stencils;
- paper towels;
- mat for cutting stencils.
The method of applying paint this way is quite simple, but you will have to practice first. The result will depend on skill and practice. You can't master a technique all at once. It’s worth starting with simple drawings and gradually improving. This way you can save money. Simple art nail design (photos, new items 2017) for your inspiration:
The process of creating an airbrush design:
- Cover your nails with base varnish to ensure the color adheres well.
- Apply the base background using an airbrush. You can choose any number of shades. For a light design, choose a dark base and vice versa.
- Each layer needs to dry for 2 minutes.
- After the base has dried, you need to apply the stencil and process the nail again.
- To enhance the effect, you can use brushes and other additional tools.
- The design can be decorated with rhinestones, ribbons, colored sand and other decorative elements.
- The last layer should be a fixing agent.
The procedure takes little time, but you will have to spend many hours on practice. The process is delayed if the design is complex or a special color transition is required. The presence of miniature parts also slows down the procedure.
Advice! The best option is to buy a set of stencils. There will be different patterns presented there. You can’t create a chic airbrush design without a few stencils.
You need to choose a high-quality stencil. They differ in shape, size and degree of transparency. Most often they are created on a film with an adhesive base. Thanks to it, it is convenient to separate the stencil from the paper and attach it to the surface of the nail. After applying the paint it is also easy to remove. The glue does not spoil the design and leaves no marks.
Preparing nails and cuticles for airbrushing
This stage is short but important. It consists of pre-treating the cuticle with a protective agent or cream, especially if the client has dry, sensitive skin. After airbrushing, the pigment is easily washed off with water or a cleanser containing alcohol or acetone, but with dry skin this can further dry out the cuticle area.
You can purchase protective cuticle stickers. They are attached around the nail to the skin, and after airbrushing they are disposed of. The stickers can be used on the second hand after processing the first; the sticky layer is enough for re-fixation.
Airbrushing is performed on a completely finished varnish coating. If it is gel polish, then the nails are painted in two layers. Then there are two possible surface treatment options, depending on whether you are using a topcoat with a matte or glossy surface.
When covering the gel polish with a matte top coat, the sticky layer is removed from it and then the design is made with an airbrush.
If you are using a glossy topcoat, then after removing the sticky layer you need to use a buff to slightly remove the shine in the area of further airbrush treatment. This way the paint will adhere much more firmly and the manicure will last longer.
It is important to buff the tips and sides of the nails so that the paint adheres well to these areas. After applying the design, the tips and surface are sealed with topcoat.
Materials and tools
Using an airbrush for nails is impossible without some additional accessories. The necessary materials and tools are not only paints and stencils, but also solvents and gun cleaning fluids.
Among the wide range of materials and tools, there are often not only fakes, but also simply low-quality products. You should approach your choice responsibly, because the quality of the result depends on it.
Paints and varnishes for artistic painting
Naturally, it is not possible to paint with just air, so a paint kit is simply necessary. They are often purchased as a set of a basic palette. These colors are good for the main background. Shades are often created by mixing several colors, but you can choose from tint palettes if you wish.
Airbrush paint set
Paints are mainly produced on a water basis. This makes them well diluted and washed out of the airbrush. But there are also special varnishes that contain special compounds for better adhesion.
High-quality paint will not clump, flow like water, or, on the contrary, be excessively thick. If the pigment has such characteristics, it cannot be used to avoid damage to the airbrush device.
They are simply necessary for creating various effects on nails if there is no time for manual design or lack of drawing skills. Although stencils are often used by craftsmen who deliberately want to give the nail some special design option. Among the stencils you can find disposable paper stickers (or from film) and reusable ones.
Commonly used stencil options:
- “leopard” spots and other animalistic patterns;
- geometric shapes (often used as a basis for subsequent design);
- for French, moon manicure;
- contours of animals, plants, objects, monograms;
- inscriptions, letters, symbols;
- specific drawings (religious themes, subculture, etc.)
In almost all cases of using stencils, the effect of contrast is used. This can manifest itself in shades (light-dark), color scheme.
Ready-made sets
The airbrush apparatus itself is a pistol-like object on which there is a reservoir for liquid pigment, a spray nozzle, and switches. In order for it to start “blowing” paint under pressure, you will have to purchase a special compressor separately. The operation of the airbrush directly depends on its power. Some manufacturers provide an airbrush and a compressor at the same time, so you can find devices that are produced in sets. The “gun” is connected to the compressor using a hose through which air flows.
Standard airbrush kit
In addition to the complete equipment for the device, the all-inclusive set may include:
- paints or varnishes;
- stencils;
- solvents and cleaning fluids;
- set of nozzles, needles, etc.
Depending on the configuration of the kit and the quality of the device itself, the cost of the kit can easily fluctuate several dozen times.
Step-by-step instructions for working with an airbrush using the example of a two-color ombre
Using the example of the classic and most popular ombre design, we will consider step by step the features of working with the device. To prepare the airbrush, just plug it in, adjust the nozzle diameter and air flow intensity, and then fill in the desired paint. You will need a pipette and 2-3 drops of gray pigment. The intensity of the shade can be changed by diluting the pigment with a solvent for acrylic paints.
- Apply two layers of pink or beige gel polish, dry each in a lamp.
- We cover the nails with a matte top coat and dry them in a lamp.
- Remove the sticky layer from the top.
- Refilling the airbrush
- Testing the paint flow intensity and measuring the spray distance
- Using a pendulum swinging motion, spray the paint onto each nail in a very thin layer, increasing the intensity of the color through layering.
- Let the paint dry completely for another minute and apply top coat to your nails.
- Remove the sticky layer and the design is ready.
Experienced masters recommend applying the paint so that it lays on the nails in an almost dry layer, or “dries while still in the air.” When applying paint, it should not be visible in the air; only the intensity of the color on the sprayed background should change. It is better to work in more thin layers than to apply a lot of paint at once and end up with streaks and smudges.
Gradient manicure ideas
Step-by-step creation of airbrush drawings
Like any other coating, airbrush paint can be applied to natural nails, extended nails, or coated with gel polish. If the design is applied directly to a natural nail, then its surface is prepared in the same way as for coating with gel polish: a hardware or other manicure is done, and the nail is polished. There is no need to prepare artificial coatings in advance; the main thing is to remove the dispersion layer.
Nail ready for airbrush painting
In order to easily remove the remaining paint from the skin around the nail after artistic painting, it is worth applying hand oil in advance to those areas where you need to protect the skin from paint. A rich cream will also work. It is important not to touch the nail plate.
Preparing the skin around the nail for airbrushing
Don’t be afraid of this miracle airbrush machine, but practice more. If you have completed a training course in airbrush techniques, then working with the device will not be difficult. If the theory is mastered independently, numerous training sessions cannot be avoided. It is better to do this on training tips.
Set of tips for training sessions with an airbrush
But in any case, the process of decorating nails with an airbrush is the same:
- Apply the background by spraying the paint at the optimal distance above the nail. The design will be original if you use several shades as a background (although it all depends on the intended nail design); Painting a nail to create a background
- Allow the paint layer to dry under the lamp;
Lamp drying
Place the stencil firmly on the surface of the nail. If it is not used, then the main drawing is applied step by step.
Using a stencil
When using a large number of colors, it is worth using each one on all intended nails in turn, and only then changing the paint in the airbrush for subsequent painting. If necessary, especially small details can be applied with a thin brush;
Creating a drawing
- After each stage of applying the image to the nail, it is better to dry the new layer in a lamp;
- After the necessary drawing and detailing, you can begin to complement the design: decorate your nails with rhinestones or other decorations (using sparkles, for example);
Marigold decoration - After completing the design, the nail is covered with a finishing layer - top and dried.
With a sufficient level of skill, both simple patterns and more sophisticated complex compositions or thematic designs can be created on nails.
Simple airbrush patterns:
Photo examples of complex compositions for painting:
The advantage of airbrushing is the realism of the created picture, as well as a thin layer on the nail.
Design ideas using airbrush technique
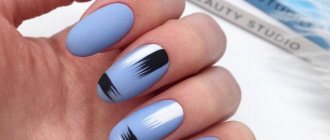
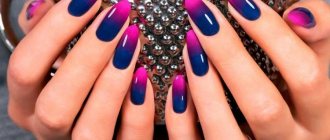
Airbrush ombre
The device is capable of creating miracles of artistic painting on nails. To master the instrument, craftsmen usually need 2-3 days of work. They can make drawings in various techniques. The most popular and in demand:
- Ombre
- French
- Lunar
- Graphic transitions
- Flowers
- Small thematic images from templates
Master class on airbrush at home
In order to properly learn how to do your own nail design with airbrush, you don’t have to attend special courses. A novice master can quickly master the technology at home.
You should have the following tools in your arsenal:
- Airbrush;
- Special acrylic paints or gel varnishes;
- Base and top coats;
- Ultraviolet lamp;
- Reusable brushes;
- Latex gloves;
- Stencils for creating drawings;
- Tweezers;
- Buff and degreaser;
- Disposable towels;
- Cotton pads and buds;
- Manicure set.
French
French airbrush
The same clear lines of French, only made with the help of sticky flats and gradient spraying, give new life to classic French design. It is better to perform on long nails in order to cross the strips several times. A half-tone of gray has been added to the white color, which creates an unusual play of shades at the junction of lines.
Another popular version of the French style, when a gradient is used for the background, and the tips themselves are painted over the fixed ombre effect. Use rich contrasting shades instead of black to experiment with this design with different outfits. Add rhinestones to your ring fingers to create a festive mood.
Design options for a French jacket - a selection of ideas
Graphic arts
The combination of different graphic stickers in one design gives an original three-dimensional effect. Combine two or three colors to highlight the play of lines. Before performing, try to make a design on tips to get symmetrical designs on all nails.
Geometry on nails - the best ideas for improvisation
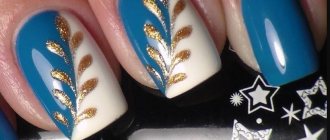
Flowers
Flowers and artistic paintings receive special attention from fashionistas in the spring-summer season. You can make this design with an airbrush in half an hour. Abstract lines are made using one stencil, secured, and then a second layer is created with butterflies. The base is a colored French coat using green, pink and orange varnish.
Painting on nails: materials, step-by-step instructions, design ideas
How to do a manicure with an airbrush? Airbrushing technique
An airbrush is a kind of small spray gun that sprays miniature drops of paint onto the nail. How can a novice master make a beautiful manicure using this device? It’s difficult to do a nail design on your own, although in the video everything looks easy.
Airbrush nail design is performed in several stages:
- Preparation. The master does an edged or unedged manicure.
- Applying the base. It is important to understand here that a manicure done with an airbrush should be contrasting. That is, if the base is dark in color, then the pattern should be in a light color scheme. If the main varnish is light, then it is better to do the drawing in a rich, dark palette, otherwise everything will merge and look ugly.
- Drawing using stencils. They can be of various designs, shapes, and sizes. The client chooses stencils depending on his preferences. Having chosen the design you like, the master carefully applies the stencil to the nail plate. Then he takes a special device - an airbrush filled with paint and uses it to spray the product, painting the nail according to a stencil.
- The master adjusts shades and colors with an airbrush if necessary.
- The specialist dries the applied paint layer. If necessary (and this is often the case), he decorates the nails with additional patterns and designs by hand using a fine brush. But this is beyond professionalism; to do such a manicure, you need skill. But the result is marvelous; real works of art are created.
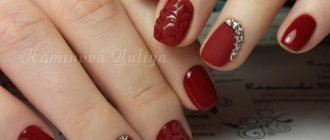
- The master can also decorate the nails with rhinestones and sparkles if the nail design requires it or the girl is going to a special event where she needs to stand out from the general background with an amazing manicure.
- At the end of decoration, the master applies a top coat (fixing composition) and dries each nail
What paints should I use for my airbrush? This device requires special water-based acrylic dyes. Only they will make the tone on your nails as bright as it should be. Regular acrylic paints will not be as rich.
Painting on the nails: birds of happiness waiting to fly south
Airbrushing your nails is not easy. Only an experienced craftsman can create a complex and exquisite design. In addition, a specialist must not only have sufficient skills, but also have excellent imagination in order to create individual drawings that are unlike others.
Combination of stencil designs
In one composition you can combine several stencil options: mesh, butterflies, flowers and ornate lines. When you have the time and desire to create, experiment with existing templates. Combining designs involves working on long nails to accommodate several different elements.
Wedding design
Using an airbrush, you can create delicate romantic nail designs in white and pink tones. All that remains is to complement them with festive decor - sand, rhinestones, sparkles, stucco. A big plus is the ability to evenly spray pigment on large, rough surfaces, where a sponge does not allow for such gradient transitions.
Wedding manicure ideas - from classic to avant-garde
Best Design Ideas
Using airbrush you can create an original and unique manicure on your nails. The photos below will introduce you to the most popular design options today that can be made using an airbrush.
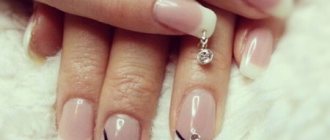
French ombre
Where would we be without one of the most famous and popular manicure techniques – the good old French manicure. No matter how boring it may seem to some fashionistas, with the use of airbrushing this design has received a new life. The peculiarity of the updated jacket is the absence of a clear boundary between the smile and the main color; the transition is as smooth as possible and almost imperceptible. A careful transition from white to beige will create a delicate and sophisticated manicure that is perfect for any occasion. Brighter shades, for example, a gradient in a red, black or blue palette, are suitable for an evening look and special occasions.
To get the most uniform transition using an airbrush, you need to follow simple instructions:
- First, do all the standard manipulations: polish your nails well, apply a base coat, then a base color, for example blue. Dry each layer well.
- After this, drop a small amount of blue paint into the airbrush and spray it at a distance of five centimeters from the nail plate. Try to make sure that there is more paint on the edge of the nail, this way you will get a beautiful and even gradient.
- When the dye in the airbrush runs out, blow a little air onto your nails, this will dry your manicure faster.
- Cover your nails with the topcoat, dry well and enjoy the result.
Unusual holiday design
For a bright party or going to a club, you can get a contrasting manicure using unusual combinations. Try creating abstractions or paintings in the style of surrealism on your nails using airbrushing.
For a more conservative event, a classic nail design is suitable. Create a monochromatic manicure using deep color and complement it with neat designs done with an airbrush.
For a festive manicure, you can decorate your nails with lace. The sequence of the procedure is similar to that given above, but in this case you do not have to draw a gradient. All you need is to use a piece of lace as a stencil. The result exceeds all expectations!
Airbrush manicure with lace
Interesting : Manicure with color transition
Original color combination
When doing a manicure using airbrush, you can allow yourself to experiment with colors. However, remember that in 2022, not too bright colors and unpretentious designs are in fashion. Give preference to discreet and pastel colors. A gentle gradient, for example, a transition from blue to pink, looks great. You can complement your nails with rhinestones and sparkles.
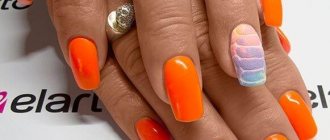
Scaly manicure
Using stencils and an airbrush allows you to create an animal print that is fashionable today on your nails. For example, a design in the form of fish scales, snake or crocodile skin looks very original.
Fashionable geometry
Airbrush masters have not forgotten about the fashion for geometric manicure. Girls who want to be trendy can try to combine two trendy techniques together. Look at the photo how cool the stripes made with an airbrush look on your nails!
Infinite space
Surely you have already realized that with the help of an airbrush you can make a huge number of different patterns. Nowadays, drawings on space themes are quite popular among fashionistas - these can be stars, planets, comets and other paintings on this topic. Typically, in this case, deep blue and purple colors are used, complementing the design with a lot of sparkles.
Matte airbrush
It would be a mistake to believe that airbrushing on nails can be done exclusively in gloss. The matte surface looks no less attractive. However, there is one “but”: such nails are susceptible to rapid contamination, which gives the hands an unkempt appearance. To prevent this from happening, you need to give preference to a dark matte manicure.
Interesting : Beautiful manicure for March 8
https://youtu.be/https://www.youtube.com/watch?v=nND9dKfgolY
_
Play of textures: velvet sand design
For short nails, an original solution would be not only a combination of shades, but also working with different textures. It can be acrylic powder, velvet sand, sprinkle beads, melange, flock. Spraying a second color additionally emphasizes the volume of the texture used, attracts attention and allows you to create bright, original designs. Take the idea and try it in the next image.
For a practicing craftsman, having an airbrush becomes simply a necessity among demanding and creative clients.
If you need to save time and get new, enthusiastic recommendations, add it to your arsenal of tools. It will take several days to master the technique, and then working with it will turn into a complete pleasure. Which ideas will you try first? Share with us in the comments. Comment