Hello, dear readers! Surely you have seen unusual patterns on your nails, as if dusted with snow? This nail art looks impressively voluminous, and at the same time delicate and soft. If you also dream of having such a manicure, velvet sand is exactly what you need. This material helps create real magic on our nails.
In this article we will tell you in detail about this miracle powder, how to work with it correctly and how to use it to make your nails delightfully beautiful. We’ll also look at other ways to create a velvet manicure.
Velvet sand for nails - what is it?
Velvet sand for nails is a powder consisting of acrylic grains. These particles are slightly larger in size than in the same acrylic powder. Visually, transparent velvet sand most closely resembles baking soda or semolina, only white rather than yellowish.
When applied to gel polish or any other raw coating, the acrylic powder penetrates it and, after polymerization, hardens, creating a durable, wearable structure. And the soft velvet effect it creates makes the manicure voluminous, textured, very delicate and a little mysterious.
The velvet coating is highly durable and can be worn for a long time without crumbling or changing texture. If you accidentally stain your nails with something difficult to remove (for example, paint), to return them to their previous appearance, it will be enough to wipe them with nail polish remover or any other alcohol-containing solution.
Velvet sand is easy to work with, so any girl can create a sand effect on her nails. In addition, it is very inexpensive, and the results from its use are simply magical and are unlikely to disappoint you.
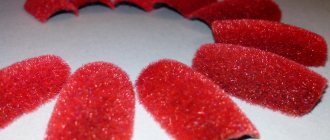
Note: Velvet sand and flock are not the same thing. Flock is not acrylic particles, but small fibers made of viscose or cotton. In salons, craftsmen usually work with such material using a special tool - a flocider.
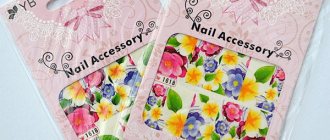
Velvet Design Set
When faced with flock for the first time, many girls have a lot of questions about working with it. Which material is better, how to apply it, how long will the manicure last? Before answering these questions, we suggest you find out what accessories are needed to achieve the velvet effect at home.
- Flock - in the initial stages, give preference to small pile. It is easier to apply to nails and looks much neater than large ones. You can get a velor effect using scrapbooking powder, which can be found in specialized hand-made stores. It is even finer than flock and looks no less attractive and neat on nails.
- Decorative varnish is the basis of your manicure, to which the fibers will be attached. As for the shade, you can choose a transparent base or choose a color similar to flock.
- Brush – the size and hairiness of this tool are not important. You can choose a regular flat brush or use a manicure fan.
In beauty salons, a flocider is used to create a velor design. This portable device creates an electric field that affects the polarity of particles. Under the influence of such a device, the villi adhere more tightly to the surface of the nail and last much longer than “homemade” designs.
How to choose the right one?
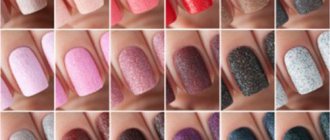
Acrylic sand comes in a variety of shades, from subtle pastels to eye-catching brights, including rainbow color combinations, neon and fluorescent colors. In general, sand for marigolds can be found for every taste and color.
But the most practical choice would be white velvet sand - it is universal because it accepts and “absorbs” the color of any coating.
Therefore, it can be successfully used in most cases. It probably works best with pastel light shades, but looks great with bright colors too.
Lovers of sparkling manicure can choose velvet sand with sparkles in the composition. Sparkles can be in harmony with the main color of the powder or contrast with it. For example, red sand with gold sparkles or blue sand with silver sparkles looks very impressive.
You can also mix your own glitter with the acrylic composition, choosing different sizes and colors for the intended effect. In general, the variety of compositions is huge and you can create as much as your heart desires. But do not forget about the proportions of the mixture and the contrast - the amount of sparkles and velvet sand should be in harmony.
Note: Velvet sand can be replaced with acrylic powder, which is used for nail extensions. It has an even finer structure and enhances the velvety effect. In addition, it is convenient to use it to decorate small details of a manicure, since it adheres well to even the thinnest lines.
Color palette and shape of nails in velvet manicure
Velvet manicure color palette
It is pleasantly surprising that velvet manicure is not limited by any limits in the choice of color.
It can be made in any color scheme or rainbow tints.
Everything will depend on the occasion and your mood.
In stores you can find any colors, even quite unusual and bright ones.
Black velvet on long square nails
Velvet manicure looks great on both short and long nails.
Ideal, of course, is the average length of the nail.
This manicure will last a little longer on extended nails, but it also looks amazing on natural nails.
The shape of the nail is also not of fundamental importance, because it is just an original coating, and it does not correct the shape in any way.
Recommendations for use
Of course, when working with velvet sand, it is necessary to take into account some of the features of this material. This will help you avoid possible mistakes and make your velvet nails perfectly beautiful and long-lasting.
- Many masters recommend using a matte top coat as a coating for powder. The sand sticks to it better, and it will be easier to draw patterns. However, with a complete coating of the nail plate, you can also use gloss - in this case there is practically no difference.
- If you want to make patterns with velvet sand, it is best to use gel paint for these purposes. Unlike gel polish, it has a denser consistency and therefore will not spread when applying the powder. If the gel paint for your drawing is too thick, you can dilute it on the palette with the required amount of top coat or gel polish of a suitable color.
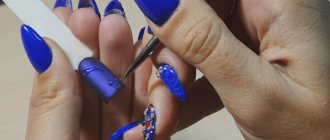
- If you are making a combined design with patterns of velvet sand and rhinestones, it is better to glue the stones before creating the patterns. Why? Yes, simply because it’s more convenient - since the fragments of the pattern are placed close to the rhinestone, there will be no need to glue them with excessive care.
- When creating patterns with velvet sand, it is important to dry them completely, otherwise the sparkles will fall off very quickly. First, find out the permissible layer thickness of the material you are working with. Secondly, add about half a minute to the usual drying time in the lamp - with powder it is always better to dry longer. When drying without a UV lamp, you will have to wait at least forty minutes.
How to properly prepare your nails for applying a velvet manicure?
Preparing nails for velvet manicure
- No matter how fashionable the manicure design is, it will look beautiful only on well-groomed nails. In the case of a velvet manicure, the nail plate should be perfect, almost like an artist’s canvas
- If you try to apply a velvet coating on an old layer of varnish, you will end up with not very neat nails. Therefore, it will be better if you spend a little of your time and prepare the nail plate for the new design as thoroughly as possible.
So:
- At the initial stage, you need to completely remove the old polish and give your nails a strengthening bath. To do this, make a restorative remedy from water, sea salt and iodine and soak your hands in it for at least 10-15 minutes.
- After the nails have soaked a little, check how well the cuticle has softened. If it starts to move with light pressure, then take a trimmer and tweezers and completely remove the entire cuticle. After all the fingers have been treated, dip them in the saline solution for another 5 minutes.
- Then let your nails dry a little, be sure to apply shea butter to the cuticles and let it absorb well. Be sure to treat the skin around the nail plate with oil, as this will help remove germs and promote faster regeneration of the skin.
- At the next stage, we proceed to leveling the nail plate. To give the desired shape, we use nail files coated with diamond or mineral coating, and to remove small growths and irregularities, we use wooden or silicone tools.
- At the very end, be sure to degrease the nail plate and all the skin around it. This will completely remove any remaining oil that may interfere with the correct application of the varnish.
How to apply velvet sand
How to do a manicure with velvet sand? Very simple - no special training or any special skills are required. As a coating for application, you can use gel polish, top or base.
The choice of coating depends mainly on whether you are going to cover the entire nail with sand or just part of it, for example, patterns painted with paint.
Let's take a step-by-step look at the standard technique of applying velvet sand over the entire nail plate with a top coat.
- First, we will carry out all the necessary preliminary procedures: give the nails the desired shape with a file, remove the cuticle, polish the surface with a buff and wipe with a degreaser.
- Apply the base in a thin layer, not forgetting to seal the ends, and dry it in a lamp.
- Then apply the first layer of colored gel polish and dry.
- We cover the nails with a second layer of gel polish and dry again.
- We fix the manicure with a top coat.
- Sprinkle acrylic sand until we cover the entire surface of the nail. Do not skimp on the material - it should be distributed evenly and abundantly. You can sprinkle it with anything, for example, with a fan brush, a pusher, or a regular credit card. Many craftsmen use tips for this. It is convenient to remove excess during application by simply tapping on your finger. Before the procedure, do not forget to place a sheet of paper on the work table - this will make it more convenient to return the excess sand to the jar.
- Wait about half a minute for the powder to absorb into the coating, and then dry it in a lamp.
- Brush off any remaining sand with a brush and you're done! Velvety marigolds will delight you for at least 2 - 3 weeks.
You can also glue rhinestones or other decorative elements in the process.
Note: You can apply velvet sand directly to the gel polish (without a top coat). In this case, it is advisable to dry the manicure twice as long as usual. It is advisable to use this method only when covering an entire nail with sand.
What do we need?
Before you begin the procedure of applying velvet manicure at home, you should purchase the necessary materials that will greatly simplify the process.
We need:
- Files of various abrasiveness, cuticle nippers, pusher.
- Standard set for applying gel polish. Includes degreaser, primer, base gel polish, top coat and colored gel polishes.
- Liquid for removing the sticky layer and sponges.
- A thin brush for applying patterns and a medium brush for removing excess velvet from the skin.
- UV or LED lamp.
- If you have everything you need, move on to the next step.
How else can you make velvet on your nails?
The method described above is the most popular. Perhaps you could even call it a classic. But, of course, there are other methods that also deserve attention.
Velvet sand for the base
To obtain a velvety effect on nails, you can successfully use other materials. As an example, here is one very simple way to create a plain velvet manicure. Using this method, you can completely do without a top. We will need:
- white gel polish;
- rubber base;
- “marmalade” for nails (melange) of the desired color;
- transparent acrylic powder.
First, we carry out all the preliminary steps and apply gel polish. Then:
- Cover the nail surface with a rubber base (not top!). Of course, there is no need to dry it.
- Sprinkle the nail generously with melange, making sure that no bald spots remain. It is convenient to shake off excess material by simply tapping your finger.
- Without drying (!), sprinkle transparent acrylic powder on top. We do not skimp on the material - what is needed will be absorbed into the coating and will not allow the melange to crumble. We also remove excess powder by simply shaking it off.
- Dry it in a lamp, take a brush and remove the excess - done!
This coating is also distinguished by its durability, which is given to it by acrylic powder. It is thanks to her that the melange will stay on your nails as long as you want - until you remove it.
Varnish and top coat with velvet effect
Manicure with sand is so popular that many cosmetic product manufacturers have begun to produce special series of nail polishes with a velvet effect. Such varnishes contain particles of acrylic powder and immediately give the desired result.
The so-called velvet varnish dries in a few minutes without any lamp. It is applied in two layers - apply the first, wait 2-3 minutes, then apply the second.
Unfortunately, this coating is not durable (since it is essentially an ordinary varnish) and comes off the nails quite quickly - in just a few days. And if you fix it with a top coat, the velvety almost disappears. In addition, the sand effect itself is not so beautiful and voluminous.
Professional craftsmen practically do not use such varnishes, but if you like minimalistic design that is easy to carry out, then velvet varnish should definitely be on your shelf. In general, it is ideal for girls who like quick results without additional procedures.
Velvety nails can also be achieved using special matte finishes with the effect of velor, velvet or cashmere. But as with a special varnish, they will not be able to achieve the impressive volume that is achieved with the classic method - acrylic velvet sand.
A portion of bright “velvet” ideas
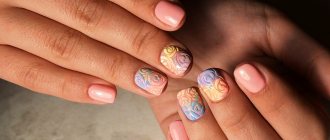
- The most interesting option would be to create a “knitted” manicure. It creates an imitation on the nail of various patterns taken from knitted products. Typically a braid is used, but any type of loop can be applied.
- Various “frosty” patterns . They immediately create a Christmas mood. fantastic flowers are suitable for summer manicure . These can be vines, incredible roses, and delicate lilies.
- Fans of polka dots and stripes will also be pleased. Such patterns can be monochromatic or multi-colored. This is limited only by personal imagination.
Velvet “sweater” on nails
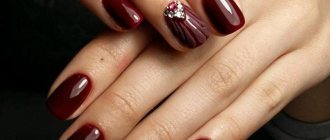
Red manicure with velvet patterns in the form of roses and hearts
Velvet peas on nails
Features of black velvet
Many nail artists note that this is a very capricious material. Therefore, working with black sand requires a special approach, which is radically different from the standard one. There are two points to consider here:
- Firstly, ordinary white acrylic sand takes on the color of the gel polish, and black “eats” the color of the coating.
- Secondly, black acrylic grains dry out poorly, so they need to be applied in a very thin layer.
It is better to work with this material as follows:
- First, apply two layers of black gel polish, allowing each layer to dry.
- Apply another very thin layer of gel polish.
- Use a thin fan brush to scoop up some sand and apply it to the nail using gentle movements. Unlike white, black powder must be poured in a thin layer, otherwise it may simply not dry out.
- Dry in a UV lamp twice as long as usual.
Decorating patterns with black velvet sand must be done as carefully as decorating a full nail.
Instructions for creating a velvet manicure with your own hands step by step
- Be sure to remove any remaining manicure and adjust the shape of the nail if necessary.
- Cover the nail with a layer of base polish . If desired, it can be transparent, match the tone of the sand, or even contrast with it. But it is better to use colorless.
- After the first layer has completely dried, you can apply the next layer. It is best if it matches the tone of the velvet sand, but the contrast looks interesting. Especially if a pattern will be created on the coating.
- As soon as the second layer is applied, it is necessary to immediately sprinkle the surface with sand.
The varnish should not have time to dry, otherwise the design simply will not stick. Don't paint all your nails at once. It is better to work with each finger separately.When applying the coating, hold your finger over the sand box to retain any loose material.
- Afterwards, you need to wait until the surface of the sand-coated nail dries. This is the most important and difficult stage, since it is quite difficult to understand it exactly.
The manicure will take at least 15 minutes , and it is advisable for the hands to be at rest so that the integrity of the coating is not compromised. - Once the nails are dry, you need to sweep away the excess sand . To do this, use a special hard manicure brush.
- At the end, the finished manicure can be coated with a fixative , but the texture of the coating may be damaged due to this. Therefore, this is not recommended .
The video instructions will tell you more about how to make velvet nails at home.
Nuances of color combinations
A harmonious combination of gel polish color and sand itself is very important to create a beautiful, elegant manicure with a velvet effect. When selecting shades for your future design, you must consider the following:
- When working with colored velvet sand, carefully monitor the harmonious combination of shades - otherwise the manicure may turn out to be dirty. The safest thing to do is to choose gel polish and sand of the same or almost the same color: in this case, the manicure will certainly look neat and elegant.
- White sand is universal because it always takes on the color of the coating. However, it looks most impressive in soft pastel shades, creating a snowy effect. You can do any light manicure and boldly decorate it with white velvet, completely or fragmentarily - it certainly won’t make it any worse.
New Year's manicure trends 2022
New Year's manicure design 2022: trends
Fashion trends for winter 2022 are as follows:
- classic winter scenes;
- velvet design;
- imitation knitting;
- design with gold;
- plain coatings with gloss;
- different textures of the same color.
As for the shape of nails, nails that look natural are in fashion, so the preferred shape for a New Year's manicure is oval or almond-shaped.
New Year's manicure 2022: choosing a color
In the winter of 2018-2019, rich muted shades are popular: manicures of wine color, Marsala color, purple, dark blue, dark emerald are still in trend. Black shades are also popular in glossy and matte versions with shimmer and glitter.
2019 will be the year of the Yellow Pig, so all shades of yellow are in fashion. If you don’t want to do a manicure completely in this color, then individual decorative details are quite enough.
Following yellow are pink and brown. Chocolate, burgundy, and purple shades will look great on nails.
Don't forget about the traditional New Year's colors: red, green, blue.
White New Year's manicure
White manicure is also becoming more relevant than ever. When choosing this color, consider the following:
- white manicure must be done very carefully, since all flaws when applying white shades are very noticeable;
- white has many shades, and the color of the varnish must be matched to the skin tone;
- colors that go well with white - shades of silver, as well as glitter;
- white varnish looks great in various designs, including French and moon manicure;
- white color is an ideal background for small drawings.
New Year's manicure 2022: unusual design
Here are a few examples of manicures with unusual designs that will be in fashion in winter 2022.
Broken glass
The “broken glass” nail design is perfect for the New Year’s holiday. This design resembles shards of glass glued to a nail. To achieve this effect, pieces of foil are used. They can be glued in a chaotic order or made into some kind of pattern - for example, a snowflake or a cut stone.
Contrasting combinations are in fashion in 2022, so it is recommended to choose foil that contrasts in color with the varnish. At the same time, you can design your nails using light and dark shades of the same tone.
For New Year's Eve, logs and foil in cool shades are best suited. The finished manicure will then be associated with ice and cold. If foil is initially warm in color, then it is recommended to choose a material with a cold tint - for example, green or blue.
“Broken glass” looks original on both long and short nails.
Shine of metal
Metallized coatings are relevant, which are created using gel polish with the appropriate effect, sand, foil, rubbing.
cat's eye
This design looks self-sufficient in itself, but it can be supplemented with small rhinestones or sparkles.
Knitted design
The design, which imitates a sweater knit, looks very wintery. Many people are familiar with designs made with sand, however, this is not the only option.
Rhinestones
A manicure with rhinestones is especially appropriate for the New Year. If in everyday use it is not recommended to use a large number of rhinestones, then this time you can decorate your nails generously, using rhinestones of various sizes. For example, you can place a large colored stone in the center, and place several colorless rhinestones along the contour. Nail art masters advise drawing ideas from jewelry. For the base in this case, it is recommended to use a varnish of a neutral color - for example, milky, gray, black. Pastel shades and varnishes to match rhinestones with a slight play of shades are appropriate.
With monograms
This is a fairly easy to implement design, which, depending on the number and size of curls, can look simple or chic. The monograms are complemented with other designs, various elements are glued, such as rhinestones, kamifubuki, and decorated with sand, making the curls voluminous and iridescent.
Examples of designs with velvet sand
There are a huge variety of nail art options using this unusual coating. Velvet sand looks great on nails of any length and shape - you just need to choose what is most suitable for you.
Examples of the most popular manicure options with velvet sand - photos and brief descriptions.
Regular Full Coverage
The simplest but stylish option. Of course, it is not at all necessary to make every nail “sandy”.
It is also worth noting that such a coating is not only beautiful, but also practical - it strengthens the nail plate, so breaking such a nail will not be so easy. This velvet design enhances the beauty of any color and makes soft pastel tones even more subtle.
Sugar Gradient
Velvet sand looks great in combination with a gradient. Of course, such an effect can only be created with the help of universal white sand, which can take on any color.
"Sweater"
Nail art with sweaters is very popular, especially in winter.
Sand harmonizes perfectly with rich colors and goes well with almost any design and a wide variety of decorative elements. For example, look how unusual and colorful a sand knitted manicure looks in combination with a French manicure and decorated with rhinestones.
Read more about the knitted manicure technique in the next article.
Black on red
The exquisite contrast of black and red colors will make velvet sand with glitter even more elegant.
For a wedding
Light manicures with sweaters, monograms, roses and other patterns are very popular among brides. Velvet sand will help make this nail art even more amazing.
for the new year
White velvet sand resembles snow, so it is not surprising that it is often used to create New Year's designs on nails.
Wedding manicure with sand
A light manicure with sand will be an organic addition to a wedding outfit. When creating it, the following design techniques are used:
- nail art can be completely plain snow-white;
- Matte or shiny elements can be selected for decoration, and their combination is allowed;
- All kinds of patterns can be laid out, among them those that imitate openwork lace are especially popular;
- Decoration with rhinestones is encouraged; they can be placed on the nail plates in a single copy or completely cover one of the fingers;
- there may be an ombre effect, when a snow-white shade smoothly turns into some other shade, for example, light pink, blue, cream, peach;
- It can be combined with French or lunar nail art.