Methods of applying gel polish to extended nails
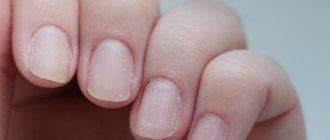
Extended nails undoubtedly have advantages, including the ability to create any length and shape, as well as the durability of the manicure. Properly extended nails retain their ideal appearance for so long that a manicure update is not required for 3-4 weeks. But what to do if the design has become boring before, and your hands are itching to change it?
There is no need to immediately make an appointment with a specialist and pay for a design update. Applying gel polish will solve the problem and maintain the durability of the manicure.
Features and recommendations for applying gel polish on extended nails
The procedure and technique for applying gel coating to artificial nails is not much different from the standard procedure, but there are some nuances that need to be taken into account.
Just like when covering natural nails with gel polish, you need to first shake the bottle with the product so that the pigment is mixed.
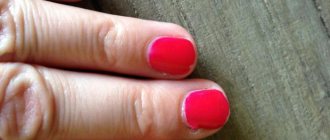
To make the manicure aesthetically pleasing, gel polish should be applied to extended nails in as thin a layer as possible. The fact is that a gel nail is much thicker than a natural one, and 2-3 dense layers of gel polish are unlikely to add grace and aesthetics.
How to care for extended nails (gel, acrylic)
It should be remembered that housework - washing, cleaning, washing dishes and floors - this is the reason why nails can be damaged. Of course, a modern woman is unlikely to be able to avoid such work. It is also impossible to avoid contact with chemicals contained in detergents.
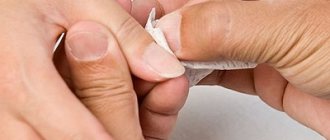
Before starting work, you must wear gloves to avoid damaging the extension plate. They are able to protect not only nails from destruction, but also the skin of the hands from drying and cracking and even allergies.
We recommend:
Marine manicure
Also, upon completion of work, hands and nails should be thoroughly washed with running water and soap and apply moisturizer.
Return to contents
Technology of applying gel polish to extended nails
It is not advisable to steam your nails; it is better to apply a special cuticle remover and push back or trim the cuticles.
- Use a special file for extended nails to file the free edge.
- Artificial nails do not need to be coated with primer, but degreasing the nail plate is essential.
- Some people recommend using a base. It is needed so that the gel polish adheres to the surface of the extended nails. When applied to natural nails, a base coat is necessary: it protects against negative effects and ensures adhesion of the layers. Covering artificial nails with a base is not critical.
Note! Extended nail plates must be impeccably smooth - only then will the gel polish look presentable. It is recommended to polish the surface of the nails before applying base.
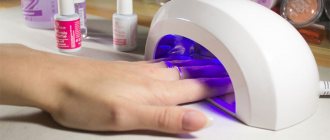
- The base must be dried under a UV lamp for two minutes.
- Apply the first layer of gel polish without streaking to the side ridges and cuticle, sealing the free edge, and then polymerize. If a streak has formed, it can be removed with an orange stick (before drying in the lamp). Sealing is necessary to make nails aesthetically pleasing by hiding their thickness.
- If necessary, apply the thinnest possible second layer of gel polish and also dry.
Cover your nails with the finishing topcoat and place under the lamp for two minutes. Which top is better to use? There are two options:
- finishing top with a sticky layer for gel polish - will provide a high-quality coating without chips;
- finishing top with a sticky layer for hard gels (for extended nails) - perfect for such a coating and will last until correction.
A finish without a sticky layer will not work, as it will not preserve the integrity of the gel polish on artificial nails.
- Dry the top under the lamp.
- If desired, make the design with rhinestones. Without removing the sticky layer, apply a single-phase transparent gel to the coating in the places where the rhinestones will be located. Place the rhinestones and outline with a thin brush with gel. If the rhinestones are small, you can apply them directly to the top before drying.
- Dry in a UV lamp.
- Remove the dispersion layer.
- Care for extended nails with gel polish
Girls, chasing fashion and practicality, sometimes forget that under layers of gel, real nails suffer from a lack of useful components and oxygen. On damaged nail plates, no extended nails or gel polishes will stick firmly and look aesthetically pleasing, which means that care is necessary.
Firstly, it is necessary to exclude any mechanical impact on the artificial nail plate. Simply put, stop mercilessly using your nails as a household tool. Gel is a very fragile material, which in case of unexpected destruction can ruin the natural nail.
For at least a couple of days after applying gel polish, it is recommended to do housework with gloves.
Secondly, making nail baths is not advisable, but rubbing valuable oils and vitamins into the cuticle is what you need. The nutrition of nails comes from the cuticle, which means that all useful components must get there.
Adding acrylic to gel
The addition of acrylic to the gel is used in nail extensions to give the gel greater strength. When working with this technique, it is necessary to add dry acrylic powder , mostly transparent and transparent pink, to the gel. You can also experiment with colored powders - if you mix them with a transparent gel, you can get a very interesting color.
The main thing you need to know is the ratio of gel and acrylic when mixing. When mixing gel and acrylic, you need to maintain the proportion: 100:30. That is, for 100 units of gel you can add 30 units of acrylic. If this formula is followed, the material will polymerize perfectly in a UV lamp and will not crack or break during wear.
With a higher percentage of acrylic in the gel, UV radiation will not be able to fully penetrate inside the gel layer, as it will be reflected from the acrylic powder. As a result, the gel will polymerize on top, but remain liquid inside, which will immediately sharply shorten the life of your nails.
Removing gel polish from extended nails
Gel polish is similar in composition to the material of extended nails, so you can remove the coating along with artificial nails, which will dissolve with acetone.
The question may arise: why are ordinary varnishes washed off with acetone without damaging the artificial nail plate, but gel polish is not? The thing is that one minute is enough to remove nail polish, but to remove gel polish with acetone you need to keep the lotions on your nails for at least five minutes. In one minute, the artificial nail material does not have time to dissolve, but five minutes of acetone will be enough to ruin the surface of the artificial nail.
There is one solution for removing the gel coating from extended nails - oils and products that do not contain acetone.
Covering extended nails with gel polish is a new trend in the nail industry. This is not to say that this is a perfect solution, but there is something about it: it is practical and durable.
A boring design on thin artificial nails can be easily changed using gel polishes at home. In this case, it is better to leave thick artificial nails alone or paint them with regular varnishes that do not contain acetone.
What is the nail extension procedure?
Extensions are a painless cosmetic procedure that allows you to apply beautiful artificial nails to brittle nails.
The construction process is carried out in two ways: gel and acrylic.
Acrylic nails are more durable and resistant to external mechanical influences. They are able to break less and retain their original appearance longer. However, their base - acrylic - can cause allergies and has a specific odor. In addition, without paint applied to them, they look less natural because they do not have the shine inherent in real nails.
But gel nail extensions bring the appearance as close as possible to the natural nail plate. Sometimes it can even be difficult to distinguish which of them is natural and which is artificial - gel. This accumulation has its drawbacks. These nails are less durable than acrylic nails, so they need to be touched up and replaced more often.
Return to contents
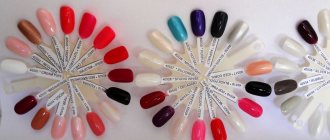
Photo of nail polish coating
Even more photos at the link: Gel polish photo.
Is it possible to mix shellac and regular varnish?
Not everyone knows what will happen if you apply a simple varnish between the top and base. If you do this, the top will not set. The base will only adhere to the nail plastic; the rest may peel off in 2-3 days.
If a regular varnish is applied to a sticky layer, problems may arise. When trying to distribute the material with a brush, difficulties may arise - shellac and regular varnish begin to mix. To prevent this from happening, you need to wet the brush well. After applying the layer, it is dried. Then cover with topcoat and place under a lamp.
The disadvantages of this method are its fragility. As in the first option, the top peels off, the colored gel remains in place.
Important! Do not apply the product close to the edge of the nail plate. This will speed up the peeling process.
Shellac can be combined with any type of manicure. For French you need:
- Cover your nails with gel, leaving the edges free.
- Draw a smile.
- Dry.
Advice! To prevent the products from mixing, you can use ready-made stencils for French manicure.
When going to a special event, you can give your nails a little shine. Apply shellac on top and sprinkle glitter. After covering with topcoat, dry under an ultraviolet lamp.
On the gel layer you can create a real designer design (twigs, curls, geometric lines). First, you should finish applying the gel (base, color layer, finish, remove the sticky layer). You can paint any design with a regular coloring agent. Wait until it dries. Cover with top.
There is a “stamping” technique, where the use of simple varnish is mandatory. In a matter of minutes you can create complex design drawings. The main condition is a rich palette of colors; regular varnish will do. Stamping is a type of nail art using special plates and stamps to create designs.
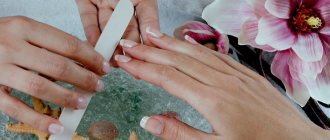
Preparing nails for lengthening
Before applying gel polish to the tips, you should properly glue the artificial nail. Although this process takes a little time, it is also the most responsible.
- First of all, we put the handles in order.
We perform nourishing or softening baths (depending on the needs of your skin).
- We process the nails.
We remove or push back the cuticles, clean the nail ridges from excess skin.
- File your nails to the desired length.
It is better to make the nail plate shorter, leaving a free edge of 3 - 5 mm. This length is well suited for working with tips.
- We polish each nail.
Here it is enough to remove the glossy layer.
- Apply degreaser, followed by primer and let dry completely.
- Now you can safely apply glue to the feet - the line marked on the tips.
We wait 10 – 15 seconds, gently pressing it onto the nail.
After making sure that the material holds tightly, you can safely move on to the next stage.