Flock nail design - covering nails with velvet sand
In order to make a velor design, a special powder is used - flock. These are particles of a certain soft texture. They can be both large and small. A similar product is sold in manicure stores and in shops with fabrics and accessories. The substance is called scrapbooking sand. Matte sand is sold in small jars and can be of different colors.
Salons often combine gel polish coating and flocking. This is not the best idea as the small particles of velvet dust do not fully adhere to the nail. Accordingly, the part rises slightly above the surface. In case of mechanical damage, the powder peels off from the nail very quickly.
Velvet coating technique:
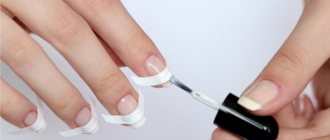
- When applying gel polish, the nail is covered with a base coat, and then colored gel polish is applied. After this it is dried in UV
- Next, apply a top coat with a sticky layer and dry it again in the UV.
- After this, pour sand into a small container and dip the nail. It's like it's being pressed into powder.
- After this, the nail is not covered with anything. Accordingly, the sticky layer remains sticky and simply adheres to the sand.
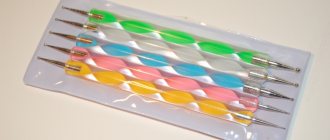
Small particles of sand become electrified and stick to the tools. This is extremely inconvenient. Therefore, a flocator is often used for design - a special device that creates a weak electric field. This allows the powder particles to be evenly distributed on the nails.
general information
Velvet manicure is obtained by using a special suede powder called flock. This powder consists of tiny particles and when a layer of it is fixed on the plate, a soft velvety coating appears.
Flock is sold almost everywhere where manicure products are presented. It can be of different colors, plain or mixed. Sometimes glitter is also added to it. The particles themselves can be of different sizes. Too small ones are bad because they can cover the nail unevenly and not give a full velvet effect. Large particles can fall off under small mechanical loads.
Flock is supplied to the market in small jars. They can be of different sizes. Depending on the volume of packaging, the type of flock and its manufacturer, the price of powder can vary significantly. On average, such “velvet” for nails costs from 40 to 120 rubles per 5 grams.
https://www.youtube.com/watch?v=cJN6VsXVoFg
How to make a velvet manicure at home?
Designing at home is quite easy. You will need flock, that is, the powder itself, a base for varnish and a color coating.
Instructions for creating a manicure:
- Cover your nails with base and dry it. This will save your nail plate
- After this, cover your nails with colored varnish that is as close in color as possible to the flock.
- Let the varnish dry completely. Apply a second coat of varnish and while it is wet, take the velor with tweezers and rub the nail with it.
- You need to sprinkle the flock very thickly. After this, let the coating dry completely and sweep away any remaining powder from the nail with a fluffy brush.
- This manicure lasts only 1-2 days.
Manicure with velvet powder Flock (cashmere, velor)
As an idea for a spectacular fluffy shaggy nail design, you can use velvet flock powder - tiny viscose fibers with a consistency reminiscent of powder or powder.
Video on how to use flock
After applying flock to the surface of the nails, they acquire a fluffy, velvety surface reminiscent of cashmere and velor.
How to design with flock step by step
- Since flock is essentially the smallest fibers, it tends to “caking” during transportation and storage. Before use, the powder must be mixed directly in the jar itself or ground by pouring the required amount of flock into a wider container.
- To match the color of the selected flock powder, select the corresponding color of varnish. Apply polish to prepared nail. Each nail must be coated with varnish immediately before applying the powder, since it is important that the varnish does not have time to dry out. Otherwise, the flock will lie unevenly and “bald spots” may form.
- There are several ways to apply flock to the nail plate: dipping the nail into a jar of powder, sprinkling the nail, picking up the flock with tweezers, but the most convenient way, with the best result, is to apply the powder using a hard artificial brush. Therefore, choose a comfortable brush and use it to apply powder over the entire surface of the nail, actively pressing the fibers into the varnish layer.
- After completing the procedure, let the coating dry, then use a soft brush to remove excess flock from the manicure.
- If, after removing the remaining flock, there are still unfilled areas, apply a small amount of varnish to them and cover them again with powder.
Velvet manicure is not designed for long-term wear, so it is advisable to apply it immediately before a special event or party, for which a flock powder design is chosen. With careful handling, the design will delight you for several days. You can wet your hands with a velvet manicure, but after exposure to water, your nails should be lightly blotted with a soft cloth, being careful not to rub. Remove velvet manicure easily with a cotton swab dipped in nail polish remover.
Flock in jars, any color and taste.
Close-up photo of a fluffy manicure with fluff on the tips.
Manicure with a cat's paw, a great idea for using flock on your nails.
A similar white manicure with arched modeling.
A funny manicure with a slightly “drug addict” pattern on fuzzy red nails.
Dark green cashmere on semi-oval nails.
Fluffy nail design ideas.
The photo is as close up as possible to give an idea of what flock powder coating is like.
White and blue design with stars.
Yellow chicken, original design.
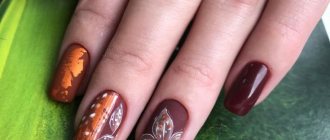
Warm winter manicure with brush painting of mittens and hats on short nails. Brown matte gel polish. The final trick is to use flock.
Cashmere effect coating.
A slightly extravagant shaggy manicure.
Beautiful fluffy manicure with rhinestones.
Fluffy velvet coating on nails.
Blue fluffy manicure on short nails.
info-design-nail.ru
Types of velvet nail coating
There are several options for creating a velvet manicure:
- At home with regular varnishes
- Flocan and gel coatings
The first option is ideal if you don’t have extra money and want to prepare for a party or holiday. The creation technique is outrageously simple. Just pour sand on top of the wet colored varnish and wait for it to dry. The remains are swept away with a brush.
The second option is more durable and can last on nails for up to 20 days, although in reality sand lasts much less. It is necessary to prepare the plate. To do this, the nail is sanded with a file, removing the natural shine. After this, it is covered with a base, which is dried in a UV lamp. Next, a color coating is applied and dried again. After this, the nail is covered with a second layer of gel polish and dried again. Then take a top coat without a sticky layer and cover the nail with it and sprinkle velvet floccan particles directly onto the wet mass. Without sweeping away anything, the fingers are placed in a UV lamp. The top hardens and using a brush, remove excess velvety sand from the surface.
Options for creating a suede effect
As you understand, covering your nails with small fibers is just one of the options for creating a velor effect. Unfortunately, such a design does not last long: one, maximum two days. To get a manicure using colored flock, you don’t have to have super abilities. Wearing voluminous nail art does not require you to be overly careful. Contrary to popular belief, velvet nails can be wet. The pile will, of course, darken, but after drying it will return to its previous state. We invite you to look at a collection of photos with plush nail art that will add delicate and soft notes to your look.
Decorative sand is usually used to create patterns, as it is quite coarse and voluminous. Today, nail industry designers offer a more practical option. Relatively recently, a varnish has appeared in fashion, which, after drying, imitates sand. All you have to do is apply it to your nails in one or two layers. The durable textured coating creates a beautiful velor effect; this manicure lasts for about a week. The velvet design will easily make you stand out from the crowd and emphasize the extraordinary character of its owner. You can see how luxurious sand looks on your nails by looking at the photo.
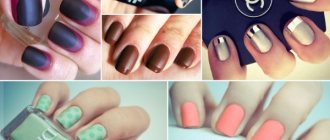
Some girls mean by suede design a light, barely noticeable velvet effect, which can be easily created using regular matte varnish. At the same time, the surface of the nails remains completely smooth. The coating, devoid of glossy shine, looks very chic and rich. You can achieve the desired effect not only with the help of matte varnish. You will find various ways to create velvet nails on the pages of our website. Enjoy viewing colorful photos with spectacular and luxurious manicure.
By tradition, we bring to your attention an interesting video lesson. Famous beauty blogger MissBeautyrella will share her personal experience and tell you how she managed to get velvet nails at home. We wish you pleasant viewing, dear girls! Allow yourself to be different, experiment with different designs. After all, this is the only way you will find out what kind of nail art can warm your soul and heart.
Fashionable beautiful velvet manicure nail design
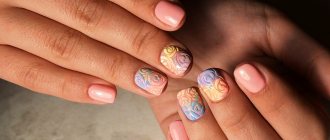
Velvet sand can be combined with glossy and matte finishes. Using gel paints you can create an ornate pattern. They often do a moon manicure with velvet sand.
Lunar nail design with velvet sand:
- The nail is prepared as usual. After this it is covered with a base
- Next, a pollen base is applied and dried in a UV lamp.
- After this, using a thin brush dipped in colored gel polish, a lunula is drawn. It is dried in a UV lamp
- After this, the entire nail is covered with a top coat without a sticky layer and dried.
- A top without a sticky layer is applied to the lunula area and a flock is applied with tweezers. Dry in a lamp, and the remaining lint is removed with a brush.
Below in the photo there are many options for fashionable nail designs with flock.
Materials and tools for velvet manicure
To create a wool covering you need a small set of materials. The kit should contain such products as varnish, it can be of completely different shades and flock. Flock is a material that is similar to small fibers of viscose wool or cotton. There is no velvet in the flock itself. Only after the suede manicure is done will that velvety effect become noticeable. Flock can be made from fibers of different lengths and thicknesses. This property helps to experiment with application, and the wide color palette of the varnish allows girls to choose even the craziest shades of coating. In addition, the set for velor manicure includes a brush. With it you can easily clean your fingers from excess particles of materials.
If you choose the professional version of this coating, then a velvet manicure is created in a beauty salon using a special flocider device. The flocker helps tightly attach the flock particles to the nail plate. A cashmere manicure with a flocider will last you longer than a homemade manicure. The flocider also helps to work on gel polish (shellac) coatings.
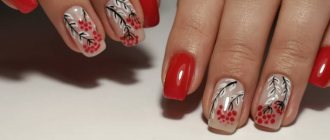
Nails with velvet flowers
There are many techniques for making such a design. Many beginners and masters who did not have time to purchase special devices simply paint flowers with gel paints or a topcoat without a sticky layer and sprinkle the nails with sand. Then dry as usual. But this technique requires a lot of time and effort, so the task can be simplified.
Instructions for creating velvet flowers:
- Prepare your nail. Simply remove the natural shine from it and remove the pterygium
- Prime the nail with subprimer and acid primer. Let dry
- Apply base and dry in a lamp. Apply gel polish and dry
- Take a metal stamping plate and apply gel paint on it without a sticky layer
- Take the stamp and apply it to the plate
- Carefully transfer the design onto your nail. Sprinkle flowers with flock and dry in a lamp
- Brush away any remaining sand
In this case, the flowers turn out just perfect and even, and most importantly, a minimum of time and effort is spent on manicure.
Flock nail design: step-by-step instructions, materials, ideas for styling
You can endlessly look at fire, water and fluffy flocked nail designs. This new trend in nail art won hearts and topped the hit parade of new products for 2022.
On the eve of the New Year holidays, a velvet manicure will create a good mood and bring comfort and tranquility to a woman’s look. How to use flock for nails, what materials are needed to make designs at home, as well as ideas for inspiration - you will find all this further in the article.
What is flock for nails
Flock is small fibers made of wool, cotton or viscose, 0.5-1 mm long, which are sorted into jars from 2 to 20 g. The shorter the flock, the neater it looks in manicure design, and the better it attaches and lasts longer in the design. .
You can also find the names powder pollen, velvet powder or lint powder - this is all the same flock, lint in fine cuts. In addition to manicure design, it is used in scrapbooking, making postcards, pictures, crafts, and artificial flowers.
For manicure design, you can buy flock of any colors. A distinctive feature is that it needs to be matched to the same color of the varnish, so that the bald spots that appear after some time on the surface of the fluffy manicure are not visible.
Judging by the reviews, a design with flock lasts from 3 to 10 days, and then it will have to be adjusted or replaced with a new one.
A set of materials and tools for cashmere flock manicure
The key to high-quality execution of any design in nail art is the availability of all the necessary tools. They provide the desired result with minimal time and effort.
To make fluffy nails you will need:
- Gel polish base and top, cuticle remover, degreaser/dehydrator
- Pusher or orange stick
- Gel polish
- Flock matching the shade of gel polish
- Top without sticky layer
- Fan brush for removing excess lint
- Stamp (yes, you can make stamps on top of the flock in a different or even contrasting shade)
- Tongs, syringe, fine strainer for applying flock powder (one to choose from)
- paper sheet
- UV/LED or combined lamp for drying gel polish.
Salon employees and experienced craftsmen working at home use a special tool for applying lint - a flocider. You can purchase it to perform a manicure at home, or make do with one of the above-mentioned improvised means.
How to do a velvet manicure at home: step-by-step master class
You can do flock nail design yourself, and it will take no more than half an hour. Stock up on all the necessary materials and tools and start creating. Velvet manicure with gel polish is performed in several stages:
- Apply cuticle softening liquid and then push it away with a pusher or an orange stick.
- Treat your nails with a degreaser/dehydrator.
- Apply gel polish base and cure in a UV lamp
- Paint your nails with gel polish in two layers, dry each thoroughly in a UV lamp
- Cover the varnish with a topcoat with a sticky layer, dry in a lamp
- Now apply the top without a sticky layer and do not let it dry, immediately start flocking. Apply the top layer of medium thickness, not thickly, but not very thinly, so that the fleecy material “grabs” well.
If you apply flock to a top coat with a sticky layer right away, it may lie unevenly, with bald spots. Bloggers talk about this feature in their videos. If you skip the step of applying a top coat with a sticky layer, and immediately cover the gel polish with a top coat without a sticky layer as a base for the flock, then the manicure can crack and peel off very quickly. Instead of a topcoat without a sticky layer, you can use gel paint without a sticky layer.
Flock can be applied to the top using a curling iron, simply pouring it on top, and then brushing it off with a fan brush after 10-15 seconds.
The second way is to blow the flock out of the syringe so that it is sprayed with air and lies more evenly. This life hack was also invented by one of the bloggers, and can be taken into account for home use. The disadvantage of this method is that the flock will cover a large area of the working space and almost the entire hand. If this method causes the flock to become loose in the syringe, you need to shake it periodically.
The third way is to pour cashmere powder onto the nail through a fine strainer. This method is easy, practical and at the same time provides a beautiful, uniform coating, almost the same as when using a professional tool - a flocider. We will look at this method in the master class with step-by-step photos.
- Place a sheet of white A4 paper on the table
- Place a small amount of flock on the strainer to match the gel polish
- Sift it evenly over the finger that has already been processed in accordance with the above steps.
- Leave the flock for 10-15 seconds so that it is saturated with the top, and then with your finger, using light pressing movements, secure the layer
- Dry it in a lamp. Treat each finger separately
- Brush off the remaining flock with a fan brush
- You can additionally decorate the velor layer with decor from rhinestones, sparkles, stucco molding, placing them on glue or on a sticky top
- Collect the remaining flock collected on the paper again into a jar.
Velvet nail designs ideas for styling
Velvet manicure is suitable for every day with careful wear, and for special occasions. This is the perfect design for the 2018-2019 winter season when you want to create a cozy, cute look.
Using flock, you can stylize original furry details on an even layer of varnish, imitate knitted elements of hats, mittens, scarves and sweaters, draw fluffy animals on one or several nails using the component technique (thematic composition for several nails), convey the New Year's mood with the help of fluffy Christmas trees and Santa Claus hats.
Hearts in a terry design will decorate your nails for Valentine's Day. March 8 will also allow you to experiment with elements of flowers, pink patterns, and feminine compositions. A new idea for many will be the opportunity to try stamps on flock. This design cannot be called durable, but for a special occasion it will be the most effective solution.
Pros and cons of flock manicure
When deciding to style a cashmere manicure, you should take into account all the pros and cons that you will encounter during its further use. After analyzing the reviews, you can reduce them to the following points:
Pros:
- Spectacular, original design
- Ease of application
- A variety of ideas, especially for the winter season.
Minuses:
- Fragility. In ideal condition, a cashmere manicure will last 2-3 days, and then bald spots will begin to appear.
- Impracticality. You will have to wear gloves for any housework
- A shaggy manicure will cling to clothes and hair. This can be annoying at times, especially in a hurry.
Plush manicure is definitely worth trying in several shades and application techniques to draw your own conclusions.
Which styling options have you already tried and what can you say about velor nails? Share with us in the comments!
nails-mag.ru
Velvet sand designs on nails
In fact, nothing is drawn with sand. Use regular gel polishes and paints without a sticky layer. Most often, for design and drawing small details, a kolinsky brush is used, which is equal in thickness to the tip of a needle. But the easiest way to design is using stamps, that is, stamping. It turns out a mixed and very simple technique. To create a manicure, a base layer of colored varnish is applied, and after it dries, an imprint is applied to the nail with the paint that is as close in color as possible to the color of sand. And sand is poured onto the wet drawing and dried in a lamp.
Wedding design can be done using a thin kolinsky brush. It is distinguished by its small thickness and elasticity of the pile. After applying the design, powder is sprinkled and dried again in the lamp. The design looks very neat and beautiful. In wedding design, ornate patterns and flowers are usually drawn.
As you can see, even a beginner can create a flock design. But coatings using gel polishes and flocking are more durable.
What is flock for nails and why is it needed?
What is flock for nails and why is it needed?
5 (100%) 1 votes
These are very light soft fibers that help create a “fluffy” (also known as velvet and suede) manicure. Flock is sold in small jars, is quite inexpensive and adheres perfectly even to the most ordinary nail polish.
The only difficulty with it, and even then it is insignificant, is the almost complete weightlessness of the material. A breath of wind, an unexpected sneeze, or a cat running at the wrong time can send particles of decorating material flying throughout the apartment, so approach the matter thoughtfully and do not sit down to work with flock in a draft.
The finished flock nail design is simply adorable. This type of coating is especially important in the cold season. It creates additional comfort, harmonizes perfectly with warm sweaters and lifts your spirits.
Nail flock is sold in small jars
Nail flocking techniques
Flocking your nails is a simple matter. In fact, for the perfect spraying of particles on the nail, it is recommended to purchase a special device (flocider), but many masters do it manually, simply picking up the material with tweezers and sprinkling it with fresh, not yet dry varnish.
If you are going to cover the entire nail with bristles, it is better that they match the varnish that serves as the basis for them. But with the help of this original material you can create other manicure options. For example, depict furry animal faces on your nails.
As an example, we will use the technique of working with a flocider, since no one usually has problems with manual application of pile. And here you need to explain, at a minimum, the principle of operation of the device.
This device connects to the network and creates an electric field that polarizes particles of the material. Due to this, they are perfectly evenly distributed over the nail and create a very stable coating that is not afraid of washing dishes or a hot shower. Flockider fans claim that manual application is complete nonsense and the velvet layer lays unevenly. But Manikyr.ru recommends that you still do not purchase the device right away, but first try flocking without it. You never know, what if you don’t like the effect? Then overpaying (more than 5,000 rubles per device!) makes no sense at all.
If you are an experienced nail artist and you have a lot of clients who like flocked nail designs, the device will make your life a lot easier.
Nail flock can be applied without a flocker
Stages of work:
- Nail preparation, design, cuticle removal, degreasing.
- Applying base varnish. You can also use gel polish, but then it will need to be polymerized.
- Covering the nails with varnish or gel polish and drying it.
- Refueling the flocader, connecting it to the network.
- Applying top coat to nails.
- Spraying coating particles onto the undried varnish/gel polish.
- Drying varnish (or polymerizing gel polish).
- Removing excess flock with a fluffy brush.
Flocking your nails gives a great effect.
At least once in your life, this design is definitely worth trying, but whether to purchase an expensive device for flocking nails is up to you to decide. Although for individual use this, in principle, does not make much sense.
This is useful to know
manikyr.ru
Velvet patterns
The process of creating velvet patterns is slightly different from completely covering the nail plate. Of course, before this manicure you should prepare your nails, as before any other, and cover them with a base. And only after these procedures can you begin to create the desired drawing.
- Using transparent gel, draw fancy curls or your chosen design.
- Using colored varnish, draw the outline of the design again, but it is best to apply a thicker layer. This way the drawing will look more voluminous and with clear contours.
- Cover the design with sand or flock of your choice. Try to apply it evenly.
- Dry well with a lamp.
- Carefully remove excess granulated sugar with a brush. It’s better to move from the cuticle to the edge of the nail - this way you won’t harm your manicure.
- If desired, you can secure the pattern with a top coat. Now dry your nails in the lamp again.
Manufacturers of nail art materials invent so many tricks to please lovely ladies! Various rhinestones, shiny ribbons, slider stickers, stamping devices... Among these wonderful inventions there is also a little thing that is a fine powder that is applied to the nails over the varnish. This product is called “flock”. The invention is not new at all, but it is so beloved by girls that designs using it have not gone out of fashion for several seasons in a row. How to make a velvet manicure and what you will need for this is described below.
Features of velvet designs
Sand, powder, plush, velor, shaggy, velvet - all this is the name of the same type of design in nail art. A material called flock was developed by a British company, which first produced the product in a set: powder, varnish of the same color, and a brush. Quite quickly, velvet manicure became so popular that more and more cosmetic companies began to produce it.
Today, such designs are presented in various colors and textures: the sand can be finer, larger, and the fibers can be of different shapes. A manicure done with flock is beautiful, effective, and not too flashy or intrusive. You can take it to a party, to lectures or work; it will be appropriate almost anywhere. Photos of some interesting designs are presented below.
Option number 1: manicure with regular polish
The algorithm for creating a velvet manicure is as follows.
- Apply a clear base coat to your nails. It will protect the plate from aggressive substances and from the pigment in the varnish. Wait until the base dries well.
- Cover the nail with the base polish and, without waiting for it to dry, apply a second coat.
- While the varnish coating is still sticky, gently and evenly flock the nail, straight from the bottle.
- Use your finger to press the fibers onto the nail for better fixation.
- Use a fluffy brush to remove excess sand.
- Repeat the manipulations for each finger in turn.
Under no circumstances should such a manicure be coated with clear varnish or anything else, as it will simply ruin it.
Option number 2: gel polish
If you have a special ultraviolet lamp at home and have the skills to work with it, you can create a velvet design on gel polish. This manicure will last much longer than a regular one. To complete it you will need:
- file or buff;
- UV lamp;
- degreaser, ultrabond;
- base;
- finish without a sticky layer;
- gel polish of primary color;
- velvet powder;
- brush.
As with the first option, you first need to tidy up the nail plate and nearby skin. The instructions for executing the design are as follows.
- File your nails with a file or buff.
- Apply degreaser and ultrabond.
- Apply the base coat and cure in a lamp for two minutes.
- Cover the nail with the main color, one or two layers.
- Apply finish without sticky layer.
- Sprinkle the nail with flock.
- Shake off excess powder.
- Dry for one to two minutes in a lamp.
Design
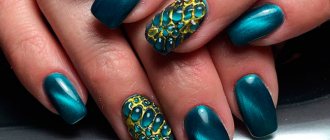
A design done with flocking is called flocking. Suede powder coating can be used in a wide variety of types and variations. The combination of different types and shades of flock on nails looks very impressive. The difference in textures always attracts attention. If you have powder without glitter, then you can pour dry glitter into it and mix them thoroughly. Now your velvet manicure will shine.
Combining flocking in nail design with a gloss finish can also be a good solution. In this case, velvet and gloss can coexist both on one nail and on neighboring ones. Simple varnish or flock may predominate, depending on your idea.
Velvet manicure becomes especially popular with the onset of the cold season. With its help you can create a variety of “knitted” designs. For example, this is when a pattern resembling knitting is applied to a nail covered with a glossy varnish with a transparent varnish. After this, flock is attached to this area and an interesting knitted design is obtained.
Due to the fact that it is impossible to use a fixative when applying flock, this manicure is not very durable. It does not deteriorate if it gets into water, but if you wash your hands too often, it can begin to break down. In addition, the powder is easy to scrape off and ruin the design even with light pressure. We will tell you below how to flock natural plates.