Today there are many ways to decorate nail plates beautifully and interestingly. Often, young ladies and older women get a “velvet sand” manicure, which looks very stylish and attractive and, moreover, has a number of other advantages.
Characteristic features of velvet manicure
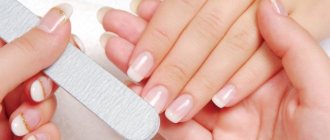
Delicate velvet manicure on extended nails of medium length
Velvet sand is an original and unusual material in manicure.
This technique is not limited by the length of the nail, nor its shape, nor its origin (the nail can be extended or natural).
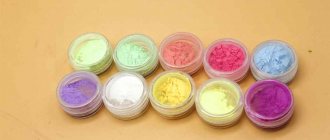
To design a velvet manicure, different materials are used. The use of sand-effect varnishes and flocking of nails will be discussed separately.
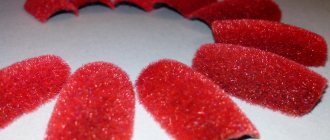
Red velvet sand on natural short nails
Velvet sand has a texture that resembles very fine powder.
In fact, these are the glitter we are used to, only much smaller.
The material is applied to a sticky base, colored or transparent varnish, slightly dried gel or gel polish.
The grains of sand are evenly distributed over the surface, which creates an incredible velvet effect.
The accuracy of the final result directly depends on the “grinding” of the sand: the finer it is, the better.
Velvet sand can be easily found in any store that specializes in selling nail care products, but in extreme cases it can be replaced with acrylic powder or powder that is used in scrapbooking.
Subtleties of application
Stylish and durable coating is ensured by observing the subtleties of its application. The main secrets are:
- using a base coat, treating and degreasing the nail plate;
- selection of quality gels and varnishes;
- applying a thick layer of sprinkles and pressing them down to improve the effect;
- waiting for the varnish to dry completely before using a fixative, or drying all applied layers in a lamp when working with shellac.
It is also possible to experiment when creating a unique pattern.
Advantages and disadvantages of velvet sand
Pros of velvet manicure
- The technique is accessible even to beginners.
- Registration is fast .
- Suitable as a manicure for any age .
- It is not limited to stylistic directions.
- The color palette can be any: if the combination is chosen with taste, it will always look elegant.
- Looks equally good on any nails : short, long, natural, extended.
- Economical consumption of materials.
Disadvantages of velvet manicure
- Doing it at home does not guarantee long-lasting results .
The manicure will last for several days at most, since the smallest particles of sand are very difficult to attach. However, if done professionally in a salon, it can last up to a month and can easily survive any household chores such as cleaning or washing dishes. - Professional implementation of the “velvet sand” technique is a rather expensive procedure.
Benefits of sugar manicure
Girls and women around the world increasingly prefer this type of manicure because:
in this design, nails look stylish and attract the attention of others; Using this technique, you can cover all your nails, or you can only cover individual parts of them, which will make the design even more original; the procedure does not take long and can be easily performed at home; the material used in the work is quite durable: it will stick to the nails when doing household chores and frequent contact with water; If you don’t do a sugar manicure yourself, but go to a professional, it can last about three weeks.
Color palette and shape of nails in velvet manicure
Velvet manicure color palette
It is pleasantly surprising that velvet manicure is not limited by any limits in the choice of color.
It can be made in any color scheme or rainbow tints.
Everything will depend on the occasion and your mood.
In stores you can find any colors, even quite unusual and bright ones.
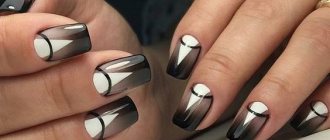
Black velvet on long square nails
Velvet manicure looks great on both short and long nails.
Ideal, of course, is the average length of the nail.
This manicure will last a little longer on extended nails, but it also looks amazing on natural nails.
The shape of the nail is also not of fundamental importance, because it is just an original coating, and it does not correct the shape in any way.
Nails with lunar manicure 2022 fashion ideas for the season photo
Almond-shaped long nails will look even more graceful if the main part of them is painted with one shade, and the lower arch along the nail bed is painted with a contrasting shade. The fashion for lunar manicure, popular in the middle of the last century, was introduced at one time by Dita von Teese, a famous lover of retro. In 2022, variants of this design should be made in pastel colors with a predominance of white, peach, mint, turquoise, soft pink and blue shades. You can also use special strips for nail art instead of contrasting varnish.
Creating drawings with velvet sand
Gradient velvet manicure
An unusual thing about creating a velvet manicure is that it is not necessary to cover the entire nail with this material.
You can decorate part of a nail or one or two nails on your hand with velvet.
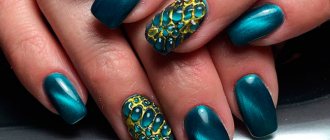
designs made from this sand look very bright
Depending on the level of professionalism and technical base of the master, the drawing can be monotonous, colored, or gradient.
There are several ways to create a velvet manicure.
- In the first option, the required pattern is applied to the sticky base of the manicure using sand itself . It is dried, and the remains are brushed off with a special brush.
- The second option uses the effect of translucent sand, and the design is applied with varnishes , shellac, gel polishes and other sticky bases. After which it is also dried.
Option for decorating manicure with velvet
It is not recommended to cover sand with fixing materials. As a result, the “velvet” structure of the design may be lost or even darkened.
How to do a manicure
Before you make velvet sand on your nails, you need to decide which technique is closer to you. You can make a continuous pattern for the entire (or all) fingers, or decorate only some parts of the nail plate (say, draw abstract lines on them).
1 method
Step-by-step instructions for velvet manicure:
- Clean your nails from old polish and, if necessary, give them the desired shape;
- After this, apply the first coat of varnish. The base can be any color, but it is advisable to use transparent. A contrasting color in relation to the sand also looks good;
- Next, apply a layer of varnish again, and before it dries, sprinkle it generously with sand. Now we have to wait. The main disadvantage of this manicure at home is that it is difficult to understand whether the nail is dry or not. We recommend waiting at least 10 minutes in a warm room and about 15 in a cool room;
- After this, use a stiff manicure brush to sweep away individual grains from your finger and shape the pattern;
- If necessary, the sand can be coated with Shellac on top, so it will last longer, but will become less structural.
Of course, the manicure will be more durable if you use gel polish, but in this case you simply need an ultraviolet lamp. With its use, the technology changes a little.
Photo - How to make velvet sand on your hands
Method 2
Clean the nail and paint it with the base color. After that, draw any pattern, such as a flower. Sprinkle this pattern thoroughly with sand; if necessary, you can lightly press the grains with a bamboo stick, but then you may lose the volume of the pattern.
After applying velvet sand to your nail, you need to place your finger under the warm rays for a couple of minutes to let the polish dry. After this, shake off the remnants of the textured decoration from the surface of the plate; apply a couple of drops of fixative gel on top of the sand. If you cannot do a manicure with liquid stones, then this is the best option to replace this style.
Many reviews claim that when worn carefully, velvet sand hardly suffers, only if you buy a white product, as in the photo, it becomes a slightly darker shade on the nails.
Tips for creating a stylish manicure:
- To create a classic look with a little twist, make a traditional French manicure on your nails and decorate the tips of the plates with white sand. With this design, silver rhinestones would also come in handy;
- When working with sand, do not skimp on it. Sprinkle a large amount of product onto your fingers;
- When applying, you need to lightly press the powder, this way it will fix better;
- Experiment. Draw uneven lines, combine two or more shades.
The average cost of sand on the Internet is from 50 rubles per 5 grams. The Amy brand, which is a professional nail art product, is very popular.
Creation techniques in salons and at home
- In salons, flocider - to speed up the process of creating a velvet manicure . It creates a special electric field. The material lays down quickly and evenly, but the sand consumption increases slightly.
- This device is also available in a special professional set. It also includes several (up to seven) types of sand or flock; a special brush to remove excess material; metal stand for neat application.
- At home, the technology is somewhat different.
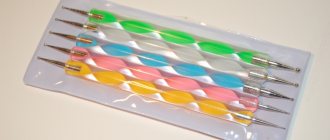
The sand is applied using a regular iron manicure spatula. It is advisable to pour sand onto the nail directly above the container with the material so that it does not spill over the surface. If you plan to work with gel or gel polish, then they need to be dried a little in a lamp, and after applying sand, dry them for a few more minutes.
To learn how to properly apply velvet to gel polish, watch the video tutorial.
Execution technology
How to do a Velvet Sand manicure?
- Sand the surface of the nail plate and apply a degreaser.
- Cover your nails with a base coat.
- Then apply several layers of gel polish of the desired shade. Each layer must be dried separately in a UV lamp.
- Apply top coat, dry it and remove the sticky layer.
- Using a thin brush and gel paint, draw the desired patterns.
- Before the gel paint has dried, apply a thick layer of sand. The grains should completely cover the pattern.
- Dry your nails in a UV lamp.
- Use a fan brush to remove excess powder.
If you want to completely cover the nail plate with such sand without any patterns, then you need to apply powder to the not-dried layer of gel polish and then dry it in a UV lamp. It is easy to create such a beautiful and elegant manicure, the main thing is that it is done carefully.
Instructions for creating a velvet manicure with your own hands step by step
- Be sure to remove any remaining manicure and adjust the shape of the nail if necessary.
- Cover the nail with a layer of base polish . If desired, it can be transparent, match the tone of the sand, or even contrast with it. But it is better to use colorless.
- After the first layer has completely dried, you can apply the next layer. It is best if it matches the tone of the velvet sand, but the contrast looks interesting. Especially if a pattern will be created on the coating.
- As soon as the second layer is applied, it is necessary to immediately sprinkle the surface with sand.
The varnish should not have time to dry, otherwise the design simply will not stick. Don't paint all your nails at once. It is better to work with each finger separately.When applying the coating, hold your finger over the sand box to retain any loose material.
- Afterwards, you need to wait until the surface of the sand-coated nail dries. This is the most important and difficult stage, since it is quite difficult to understand it exactly.
The manicure will take at least 15 minutes , and it is advisable for the hands to be at rest so that the integrity of the coating is not compromised. - Once the nails are dry, you need to sweep away the excess sand . To do this, use a special hard manicure brush.
- At the end, the finished manicure can be coated with a fixative , but the texture of the coating may be damaged due to this. Therefore, this is not recommended .
The video instructions will tell you more about how to make velvet nails at home.
Stylish sand nail art ideas
After the long-awaited purchase, you can move on to the creative part and bring your ideas to life. A colorful collection of photos will inspire you to new experiments and unleash your imagination. Try to start with a solid color, because sandy nail designs look perfect with light and delicate shades of white, pink and peach. Sugar nail art also looks very impressive in black. If you want to choose bright, variegated tones like blue, green or red, you should keep in mind that such contrast is not always beneficial for a textured manicure. To make the sand nail design look new, you can apply a top coat, and the nail art will look very mysterious and alluring. The photo shows several variations of the original manicure.
Sugar nail design is not limited to just a monotonous finish. To create patterns, you can use sand varnishes of various shades
Try, for example, coloring each finger in a different tone or focusing on two nails by making. You can very successfully combine a sand coating of the same shade with or without glitter
In addition, sugar polish can complement the patterns and pictures of regular nail designs. Look at the photo and choose the right nail art for yourself.
Ease of use makes sand nail polishes accessible to girls with different skill levels. Thanks to its original and attractive appearance, sugar manicure is becoming increasingly popular, and manufacturers are expanding their product range every year. In the final video, beauty blogger VashaNedasha will show you 2 luxurious shades of sandy Sahara Crystal nail polishes from. Experiment and always remain beautiful!
Well-groomed hands are the main calling card of every woman. To make an original manicure, special decorative jewelry can be used, but recently material such as velvet sand has become in demand.
A portion of bright “velvet” ideas
- The most interesting option would be to create a “knitted” manicure. It creates an imitation on the nail of various patterns taken from knitted products. Typically a braid is used, but any type of loop can be applied.
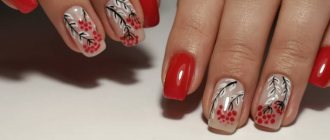
- Various “frosty” patterns . They immediately create a Christmas mood. fantastic flowers are suitable for summer manicure . These can be vines, incredible roses, and delicate lilies.
- Fans of polka dots and stripes will also be pleased. Such patterns can be monochromatic or multi-colored. This is limited only by personal imagination.
Velvet “sweater” on nails
Red manicure with velvet patterns in the form of roses and hearts
Velvet peas on nails
Nails with kamifubuki 2022 fashion ideas for the season photo
Kamifubuki on nails is the hot trend of the season! One of the fashion trends that will gain popularity in 2022 is a manicure with kamifubuki. Coming to us from distant Japan, this design is particularly impressive and simple at the same time. The exotic name hides ordinary confetti, albeit of small diameter. For manicure, confetti of several colors and different sizes is usually used at the same time. Kamifubuki are placed on a plain surface using tweezers and secured with a top layer. As a result of such simple actions, a real masterpiece is obtained. Kamifubuki is good because it gives you the opportunity to show creativity and create a truly original manicure. Confetti fits perfectly on both light and dark surfaces, and on a transparent coating you get a great example of a manicure in the “negative space” style. You can use them on each nail, or highlight accent ones – it’s up to you. There are also many options for arrangement: ordered, chaotic, at a distance, close to each other, or even overlapping each other.
Some useful tips
- If the material is clumped , then it must be crushed. Just shake the box or crush the sand with tweezers.
- When applying sand, do not blow on it. It is very light and spreads quickly.
- At home , the flocider can be replaced with a strainer . It will also allow the sand to be applied evenly.
As you can see, creating a manicure with a velvet effect is easy at home. Experiment with colors and patterns, and the velvet on your nails will always attract admiring glances!
More interesting articles:
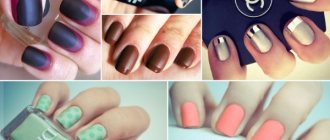
Fashionable manicure colors 2022 photos
In 2022, perhaps more than ever, all pastel shades are in fashion: white, caramel, eggshell, milky coffee, melon cream, beige, nude, lilac, pink, blue. After all, a manicure in soft colors has a lot of advantages. It is indispensable in a formal setting. Light-colored nail polish, matched to match your dress and handbag, will emphasize your femininity and make your image gentle. Jewelry lovers will be able to show them off to their advantage without the fear of overshadowing them with bright shades of nails. You can easily do a simple manicure yourself. Pastel with a bright geometric pattern looks very good! For example, a soft pink coating with a bright red oblique line. In general, there may be variations here, so rely on your own taste. You can do it this way: apply a base, then two layers of varnish (light shade) and finally paint the ends with varnish of a contrasting color.