Posted date: July 12, 2017
For many seasons now, craquelure manicure has not lost its position. This unusual nail design will appeal to both lovers of bright images and adherents of discreet classics. It has another name - “cracked manicure”.
In nail art, the concept of “craquelure” comes from painting: if you look closely at an old painting, you can see that the entire canvas or part of it is riddled with a network of small cracks - this is craquelure.
Over time, artists and designers realized that this is an interesting technique for design, and now artificial craquelure is widely used not only in art, but also in nail art.
Types of coating
First, a few words about what craquelure is and why nail polish got its name. Craquelure is the name for cracking of the coating on various works of art, for example, paintings, as well as antique furniture, jewelry boxes, etc. This is usually how varnish or paint coatings crack. Thus, the craquelure varnish cracks on the nails as it dries, thereby creating a unique and inimitable design.
There are two types of craquelure varnishes. The first of them creates tiny cracks, between which the base on which it is applied cannot be seen. The second creates large cracks and gaps between areas of varnish, into which the background coating, usually a color contrasting with the craquelure, is visible. These types are called as follows:
- Thread spider - craquelure;
- Cracks or fence craquelures.
Adviсe
- The effect is affected not only by the sticky layer, but also by the thickness of the application. The thicker the layer is applied, the larger the cracks will be. If the layer is thin, the coating will crack with a fine mesh.
- Craquelure varnishes are very liquid and practically odorless.
- If you apply topcoat to a varnish that has not dried completely, it will definitely peel off.
- Craquelure must be applied quickly and as evenly as possible. If you hesitate, the coating will streak.
- You need to seal it carefully, otherwise the polish will crumple on the nail.
- On varnishes with a very sticky layer, the craquelure will spread faster than crack. It is worth choosing gel polishes with medium stickiness.
- The design can be applied in a gradient with a single color or incorporated into a jacket.
Rules for creating a craquelure manicure
To create a craquelure manicure, we need two varnishes - the main one, for the first color layer, which is visible through the cracks, and, in fact, a special varnish - crack.
In order for a craquelure manicure to be successful, you must follow the main rule: use colors that go well with each other.
For your first experience, you can purchase craquelure varnish in black or white - this option will be a win-win, because these colors are quite universal.
You won't go wrong if you choose two colors with a difference of a couple of tones - blue and light blue, scarlet and dark red, lilac and purple, and so on. This manicure looks very elegant, especially if it is matched to the image.
If the base polish is a pearlescent shade, then choose gold or silver crack polish - this manicure looks festive and elegant, and is great for parties.
A white or light beige base in combination with white craquelure varnish looks very stylish, and if you apply a thin layer of any crack varnish on top of the light base, you can get an elegant porcelain effect.
Another result of using craquelure varnish can be a “python manicure” that imitates snake skin - for this effect you need to apply a black base varnish and cover it with any colored crack varnish on top.
Even if you are a fan of experimenting with your appearance, think twice about whether red and green colors will look so beautiful on your nails?
Craquelure manicure with foil
The design is made using special foil, which is printed on the nails. An unusual coating is made very quickly and always has a unique pattern.
Technique:
- Prepare your nails for work and cover them with a base coat. It is advisable to use black or dark colors. The cracks will look more luxurious on them.
- The foil design is done only on the sticky layer.
- It is necessary to press the foil firmly against the nail for residual stickiness. Hold it for a few seconds and sharply tear it off.
- Unusual patterns will appear on your nails.
- Don't forget to cover the cracks with topcoat.
Experiment with the colors of the substrate and foil; you can safely mix shades. Every time you will get something new. Craquelure manicure looks good with both a glossy and matte top coat. You can print foil of different colors in any place.
Craquelure at home
The process of using (applying) this varnish is very simple and is almost no different from simply painting a nail in one tone. Prepare your nail plates before applying. File the free edge, remove the cuticle, polish and degrease them. After this, you can proceed directly to the design creation process.
- Apply a protective base and dry thoroughly. It is better to make the layer as thin as possible;
- Apply a background layer, that is, the color that you want to show through the cracks. It is important that it be bright and rich, and most importantly, contrasting with the tone of the craquelure, otherwise the effect will not be achieved and the manicure will simply look sloppy. Some craquelure varnishes reveal their effect on any background, and some only on the one that comes with them. It is better to find out this aspect before starting a manicure;
- Dry this layer thoroughly. If necessary, apply a second one and dry thoroughly. After that, start applying craquelure nail polish. It is important to know that it needs to be applied thinly, so that the background layer is slightly visible. Otherwise, the varnish will not crack, and all the work will go down the drain;
- Dry this layer. If you watch it during the drying process, you will notice how cracks appear and increase literally before your eyes;
- After the varnish has dried, apply a protective topcoat and dry it thoroughly too.
After this, we can assume that the craquelure manicure, as in the photo, is ready. If desired, before applying the final layer of fixative, you can decorate or supplement the pattern. This can be done using drawings with a thin brush or applying rhinestones. Some masters manage to combine craquelure with stamping, but this is quite difficult in the absence of sufficient practice.
How to make a craquelure design correctly?
First, prepare your nails for applying polish. It is recommended to get a manicure so that your hands look well-groomed and the design looks more neat. Nails should be trimmed so that the length is the same on all fingers. You can visit a salon and get a manicure there, or you can do the procedure yourself. A French unedged manicure will be the best way to tidy up your hands at home.
A non-edged manicure is done like this:
- Prepare a small container for water, an orange stick, nail oil or cream, cuticle remover, a napkin;
- Apply cuticle remover to all fingers and soak your hands in a warm bath for 10 minutes;
- Then wipe your hands and remove the softened cuticle with an orange stick;
- Apply oil or cream to your nails and surrounding skin. The unedged manicure is ready.
Video on how to do unedged manicure at home:
https://www.youtube.com/watch?v=lD9J_sVZk7M
When the manicure is finished, you can start applying craquelure varnish.
Instructions on how to paint craquelure:
- Prepare crackling nail polish in two colors;
- Degrease the nail plate with alcohol or polish remover:
- Apply the base, main color in two layers;
- Wait until the varnish dries a little;
- With the second color, very quickly apply the top coat and blow on each finger (at this point you will see how the top varnish cracks, forming interesting patterns). There is no need to apply a second layer here;
- Let the manicure dry a little, apply a top colorless varnish or drying agent. The craquelure design is ready.
Watch a video on how to properly paint craquelure:
Note: The denser you apply the top, cracking layer of craquelure, the larger the cracks will be. A thin, light layer of varnish makes the craquelure smaller and the cracks thinner.
The photo shows thin and larger cracks:
small and large craquelure
Subtleties of manicure
As you can see from reviews on the Internet, cracking nail polish does not always give the same decorative effect as in the photo. This can happen for several reasons. First of all, this is, of course, low-quality varnish. But if the materials are selected correctly, then the problem is most likely a violation of the application technology. Below are some tips for getting a flawless result.
- Craquelure will never work when applying such varnish to natural nails without a background coating;
- Application to extended nails, again, will not give the expected result;
- In order to get a full-fledged craquelure manicure, you need to apply the varnish quite quickly, as it dries quite quickly. Any delay in this case may cause the formation of lumps, smearing of the already dried layer along with the background coating and other difficulties;
- Craquelure varnish should be applied in a thin layer and strictly in one layer. Where you go over with a brush a second time, cracking probably won’t occur;
- Quite complex in execution, but an interesting design is obtained if the varnish is applied horizontally or diagonally. True, this will be visible only on those craquelures that produce many small “pieces”, and not several large ones;
- The thicker the layer of varnish you apply, the more gently and unnoticeably it will crack. The roughest and most striking effect is achieved if the craquelure is applied with an almost dry brush. Although much in this case depends on the initial properties of the varnish. So Pupa varnishes usually crack smaller and more delicately, while Avon varnishes crack larger and more noticeable
- A manicure with a craquelure effect should definitely be secured with a top coat. Matte varnish - the effect is usually not very durable, this is due to the peculiarities of its composition, which ensure cracking. Therefore, for maximum durability of such a manicure, it is better to apply a fixative.
Choose combinations with caution to avoid common mistakes (two bright, “arguing” colors may look too tacky, and a white-yellow manicure gives off a sickly look; it is also not recommended to combine black and brown, as well as brown with beige and green).
Secrets of craquelure
One of the main secrets of craquelure is the combination of the base and top layers. The effect of cracks will depend on the correctly chosen shades. The design is more beautiful if the base layer is dark and the top cracking layer is light. The white craquelure color will go with almost any base coat. You also get a beautiful effect if the base layer is pearlescent and the craquelure is matte.
Different types of craquelure can be obtained using different methods of applying varnish. For example, if you paint craquelure across the nail rather than along it, the cracks will look different. A more intricate design can be achieved if you apply the top layer of craquelure with a brush in a chaotic manner. These little secrets will help you make your manicure original and beautiful. We hope that our tips, photos and videos will help you learn how to properly paint craquelure at home.
The photo shows the most successful combination of craquelure shades:
Nail design ideas with craquelure
Since craquelure manicure quickly burst into nail art and became a fashion trend, more and more manufacturers began to produce varnishes with a craquelure effect, and the characteristics of varnishes from each manufacturer vary.
You have the opportunity to choose separate varnishes to create spider craquelure - a network of thin cracks, and fence craquelure - larger cracks.
Craquelure from BarryM and China Glaze is distributed evenly over the nail, and the ratio of the area of the two colors is approximately fifty to fifty.
Crackle varnish from the manufacturer OPI takes up more space on the nail and the cracks become wide. Spider-craquelure will be provided by varnish from the manufacturer Cover Girl - the colored cracks are very, very thin.
Crack polishes are available in any large shopping center, cosmetics store or beauty salon, and prices are affordable and depend only on the brand.
With additional design
More often than not, craquelure is not complemented with other decor, since turning a stylish manicure into a hodgepodge in this case is easy. However, some manage to combine craquelure with other design elements.
Everything is included in one manicure - craquelure, sparkles, drawings and a yellow background, but at the same time the design looks fresh and harmonious.
Here the situation was practically repeated - sparkles, patterns and bright colors. This manicure would be appropriate for a celebration or theme party.
Not everyday, but an interesting option. Craquelure is used only within clearly defined boundaries, different for each nail.
A noteworthy manicure idea with smooth cracking of the polish. By the way, look closely - there is also a gold accent on the ring finger.
Bright and juicy manicure with polish from Look Nail and nail sliders with an orange print.
You can even go to your own wedding with this decor. This design cannot be called everyday, but for a holiday or corporate event this design is appropriate.
One of the advantages of craquelure is its completeness even without additional decorations, but if your soul still requires variety, be inspired by our selection of ideas. Which design did you take note of? Tell us in the comments!
All manicure design ideas.
How to make a craquelure effect with your own hands using two-component varnish
Here's how to create a craquelure effect with two-component varnishes. Craqueling with a two-component varnish has a more complex technology, but the result is impressive.
The surface is painted with background paint and dried. Then a two-component crackle varnish is applied in as thin and uniform a layer as possible. The brush, preferably a foam one, should move only in one direction, since the stripes of varnish should be as even as possible.
After the first coat of varnish has dried and becomes transparent, apply the second coat. It can be made thick, and the thicker this layer is, the brighter and deeper the cracks will be. When applying varnish, the brush should move crosswise in relation to the first layer.
Then the surface is covered with a finishing layer of paint and dried. It is better to use a fan to dry it or be patient and wait a few days. If you use a hairdryer to dry, the depth and width of the cracks will be even greater. The entire decorated wall must be treated with acrylic varnish and dried.
To enhance the brightness of the cracks, dark dye, gold or silver powder is collected on a sponge and gently rubbed into the recesses. Excess paint can be wiped off using a cloth and vegetable oil.
Craquelure must be properly cared for, otherwise the decorative layer will be damaged. Do not knock on the surface. The finish may crumble if it is strongly touched by something hard (for example, when installing furniture). The coating must not be cleaned, rubbed or wetted excessively. Cleaning is allowed with a soft cloth dampened in clean water. You should not get carried away with wet cleaning; it is enough to do it once a week. It is almost impossible to restore a damaged layer of craquelure unnoticed, and only an experienced craftsman can do this.
In the video “Do-It-Yourself Craquelure” you can learn more fully about all the intricacies of the process of aging surfaces:
Step-by-step instruction
What materials are needed:
- Gel polish with cracking effect . The cracks can be small and thin or wide and large. Think in advance about what design you want to get and prepare the appropriate varnish. If you haven’t decided on a brand yet, look at the selection of products at the end of the article;
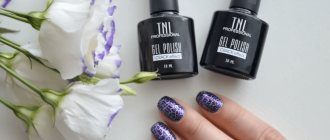
- Base. Any one you are familiar with – Kodi, TNL, Irisk;
- Plain gel polish . This color will serve as the basis for the craquelure, which will be visible through the resulting cracks. It looks more impressive when the background is a contrasting color with craquelure;
- Top.
It is desirable that the three phases of the coating be of the same brand, so that there is maximum adhesion between the layers.
Stages of applying craquelure:
- Apply the base coat in a thin layer and cure in a lamp. Drying time is standard - in a UV lamp - 120 seconds, LED - 30-60 seconds;
- Prepare the background. Apply a single-color colored gel polish as thinly as possible. Even if the color of the coating does not seem dense, it is not recommended to apply a second layer - after applying the craquelure, the heterogeneity will not be visible;
- After thoroughly drying the gel polish, apply craquelure. In order for cracks to form, it is necessary to apply it as thinly as possible so that the background color shows through;
- Dry the layer, cover your nails with topcoat and send the polymerization lamp again.
Before applying the finishing layer, you can add accents to the design - rhinestones, sparkles. However, the craquelure looks complete even without decorative elements.
Types of topcoats: how to choose a topcoat, review of the 10 best brands
What is craquelure effect?
Craquelure
- from the French craquelure.
crackle
is also found (from English
crackle
- crackling, crackling, crunching). Therefore, the craquelure effect implies the effect of cracks on the surface.
Craquelure appeared when paint dried out and cracked over time, for example on paintings. Or the product itself, for example, vases, jugs, aged, forming the finest cracks on the surface.
Manufacturers have created a paint recipe with a cracked effect, thus artificially aging the product or giving it a decorative effect.
Modern craquelure paints are applied to wood, glass, concrete, metal, and plastic.
