Hello, dear readers! Have you noticed that vintage nail art is back in fashion? Many girls use craquelure nail polish to highlight their individuality. Want “snake skin marigolds”? Or maybe you are attracted to spider manicure? Then you should definitely get acquainted with the amazing craquelure coating.
Today I will tell you what this design is and how to do it correctly. You will also learn the techniques used by professionals when applying such varnish and the rating of its best brands.
"Cracked" technology
Do you agree that a regular manicure has long ceased to be the harsh reality of a well-groomed woman? Now it can rightfully be considered a part of fine art. There are so many techniques that can be used to make real masterpieces out of tiny ladies’ nails!
So the nail industry, several years ago, borrowed the technique of artistic aging in painting - craquelure (in other words - crackle, crack). Translated from French, “craquelure” means “crack.” Which led to the creation of vintage nails in manicure.
In other cases
In the first case, we painted our nails along a vertical guide.
And this is what the diagonal method of application will look like.
A similar result will be obtained if the nail is coated with python varnish in different directions.
This is how your nails will look if you use the stamping method - that is, apply craquelure using any of the previously described methods, and then carefully walk the brush over the surface of the nail, as if leaving stamps with it.
And this is how the results of these methods look in comparison with each other.
Varieties
Ten years ago, “antique” designs on nails were created using a brush, then they got the hang of using foil. However, the nail industry does not stand still. Experts have created a varnish with a craquelure effect.
This is interesting. What do you think causes cracking? It turns out it's all down to one tricky component. The varnish contains a special solvent, the particles of which repel each other at the molecular level. As a result, small cracks and veins appear, which expose the first layer of coating.
These days, four types of craquelure on nails are most often used:
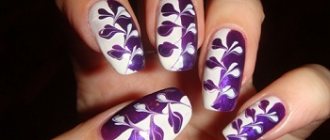
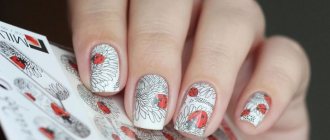
- python - imitation snake skin;
- crocodile - your nails will look like the skin of this reptile;
- cobweb - the nail is strewn with small cracks that look like a cobweb;
- fence crack - creates an imitation of large cracks, like on an old, shabby fence.
Craquelure coating can be hard or soft. The first is the most popular in nail art. This is what allows you to create pronounced cracks.
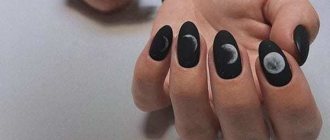
Unusual color solutions
The most universal base colors are considered to be white and black. Nail polish with a craquelure effect of any shade, both matte and pearlescent, will look great on this polish.
In summer, experts advise giving preference to rich and bright colors, and in cold weather to prefer pastel colors. Gold on black or pearlescent turquoise and green colors look luxurious - the resulting craquelure effect will resemble snakeskin.
Colors that are located opposite each other on the color wheel will also go well together. For example, try combining blue and red, orange and lilac, light green and purple. The use of two and three shades of craquelure looks very unusual. For example, try this scheme: apply pink and blue craquelure varnish or yellow and light green varnish on a black base.
Another secret to a beautiful manicure is applying the product in various ways. So, you can apply craquelure horizontally, vertically, with a stroke, and you will get completely different results, since the cracks will have different directions.
Create openwork cracks
Making a craquelure manicure is quite simple. Any of us can easily cope with this task, even at home. However, before moving on to step-by-step recommendations, I would like to tell you a little about some of the nuances in working with such a coating.
This is interesting. Did you know that craquelure has one very unusual and interesting property? As the varnish coating dries, cracks of various lengths and shapes appear - they never repeat! As a result, each of your nails will have a completely unique design.
Design secrets
Creating a spectacular craquelure coating depends primarily on the correct combination of colors and the right combination of two primary colors. There are several subtleties to achieve the perfect manicure with imitation cracks. The nail experts' recommendations are as follows:
- Choose complementary shades of varnish. This way you will get the most natural nail surface with small cracks.
- For a more pronounced openwork pattern, use contrasting or bright colors (classic - black and white).
- For pronounced deep cracks, spread the varnish in a thick layer.
- In order not to spoil the appearance of your nails, do not use a transparent varnish or hardener as a base. Otherwise, the decor will look like unerased old remnants from a previous manicure.
- Not quite sure how to apply once the polish is completely dry? Here you can deviate from the rules (paint from the base to the edge of the nail) and distribute the substance randomly. This will give you a more interesting finish.
Experts advise not to be afraid to fantasize while working. There are a ton of ideas! For example, it is not forbidden to use a hairdryer to speed up drying. Due to the strong air flow, it can slightly change the craquelure surface.
What errors can occur during application?
Apply the varnish using a wide brush in even strokes. You cannot brush the brush twice over the same area. Under normal temperature conditions, the size of cracks depends on the thickness of the varnish layer. The varnish dries in about 30 minutes. You can't overdry it. A poorly applied layer must be washed off and reapplied. This is easy to do if the varnish is water-based. To get small cracks on the surface, it is better to use a sponge. You need to dry the varnish until your finger sticks to it, but does not get dirty. Cracks do not always appear on a completely dry layer.
When using a hairdryer, it is not recommended to direct a strong stream of hot air onto the product. With a thin layer the cracks are smaller, with a thick layer they are larger.
Acrylic paint is selected with a matte surface. A one-component varnish should be placed between its two layers. After work, brushes are washed with turpentine, then with water and laundry soap.
Execution technique
In order to do a crack manicure, you need to acquire the following tools and materials:
- manicure set;
- "base";
- regular colored polish or you can use gel polish;
- craquelure varnish;
- finishing coating.
First of all, you need to do a classic manicure: remove the old coating (if any), file your nails and give them the desired shape, polish the surface with buff.
Then you will need to perform the following series of actions:
- Paint your nails with the “base” and let it dry thoroughly.
- Apply regular varnish. Choose the color depending on the craquelure. Don't forget that the tones must match.
- Cover your nails with several layers of crackling nail polish. Do this carefully and quickly, since the substance tends to harden at lightning speed.
- Spread the top coat and let it dry for 3-5 minutes. Manicure is ready!
Advice. Before opening a bottle of craquelure, you need to roll it out well between your palms. This is due to the fact that small particles that are responsible for cracking usually settle at the bottom.
I suggest you watch a video in which the master shows how to apply gel polish with a craquelure effect. There is nothing complicated about it. You can see for yourself!
Features of cracking manicure
To make the craquelure look beautiful and last as long as possible, you need to prepare your nails. The plate needs to be polished, removing grooves and other irregularities. Then the nail is covered with a protective base, and a base varnish is applied on top of it. It is not necessary to use the same brand of varnish as the craquelure; any dense and opaque enamel will do. Metallic varnishes are very good, they add elegance to the manicure, and the slightly rough texture allows craquelure to create large cracks.
After drying the substrate, apply a layer of craquelure to it. The thicker it is, the larger the cracks will be. A very thin layer will give a patina effect, which can also look beautiful. To speed up the cracking process, expose your nails to a stream of cold air from a hair dryer. Keep your fingers not too close to the device, otherwise bubbles may appear on your nails.
To make your polish last longer, seal it with a top coat with a glitter effect. Apply it only after the craquelure has completely dried. A shiny top will prevent the polish from chipping and will give your manicure a glossy finish. The top with small sparkles looks very elegant; it is ideal for a festive manicure.
Craquelure can be easily removed. It can be easily removed with regular nail polish remover without requiring pre-soaking. At the same time, craquelure is quite durable. A properly done manicure lasts a week or even more. Crack varnish is also suitable for pedicures. But in this case, it is better to apply it only to the nails of the thumbs, covering the rest with regular enamel of a suitable shade.
Craquelure varnish: review of the best brands
Many companies produce cracked varnish coatings. They are available for both professional and home use. Below I have given a rating of the most popular manufacturers.
O.P.I.
American brand, leader in the nail industry. Sells craquelure varnishes in natural shades: olive, coral, pearl, gray, gray-brown. After drying, the effect of small cracks is created. All products have a liquid texture, so you need to apply the varnish in several (4-5) layers. Lasts a long time. There is only one drawback - the palette is not very rich, the colors are dim. The price for 15 ml is at the level of 600-700 rubles.
D.L.
Dance Legend is a Russian company that has been on the nail industry market for 15 years. Craquelure varnish is presented in a wide range of colors, so you can come up with a variety of combinations. Dries quickly, lasts a long time, cracks well. The cost of a 12 ml bottle is about 300 rubles.
El Corazon Crackle
Russian manufacturer of cosmetics. This is a budget brand. However, the quality of the products remains at a high level. The line of craquelure varnishes is presented in a large assortment. You can find any color: from dark to very bright. The company claims that all craquelure coatings begin to crack within 10 seconds of application. They dry quickly and do not require many layers (two are enough). The price for a small bottle is from 150 rubles.
China Glaze
This is not Chinese at all, as one might assume, but the most American brand. The company appeared in California and gained fame in the mid-1990s. Produces products for professionals in the nail industry. The craquelure coating is durable, there is a rich palette of shades. Does not require the application of a colorless “top”, since the varnish does not fade. You can buy the product in specialized stores. Cost – from 300 rubles.
Sally Hanson
Also an American company, it has occupied one of the leading positions in the nail industry market for 50 years. Varnishes with a craquelure effect have a wide range of shades and last a long time. The brush is easy to use. The consistency of the substance is thick. It cracks well, spreads evenly, and produces interesting patterns. The price is around 400 rubles.
Reviews
I decided to find out how girls feel about cracked manicure technology. I suggest you read the opinions of consumers. They are taken from popular Internet resources.
- Anya, 22 years old - “I love experiments in manicure, so I was happy to purchase an inexpensive craquelure varnish from the Russian brand El Corazon. I liked the effect with cracks, I chose universal colors. The appearance of the marigolds changed immediately. Many didn’t even believe that it was such a varnish - they thought that I had painted the nail plate like that.”
- Zhenya, 31 years old - “For 15 years now, I can’t imagine my nails without coating. I bought a new product from OPI - craquelure varnish. But at first I didn’t know how to use it. It turns out there is nothing complicated about this. The craquelure fits well on the nail, the cracking effect appears after 2-3 minutes. It’s a pity that this design didn’t last long – only 5 days.”
- Marina, 28 years old - “Once I tried to give myself a cracked manicure using varnish from Dance Legend. To be honest, I didn’t understand this design at all. Yes, it looks unusual, but after applying the black craquelure it felt like I was digging in the garden and forgot to wash my hands. The effect is for an amateur."
LiveInternetLiveInternet
The term “craquelure,” which comes from the French word “craquelure,” refers to cracks on the surface, the presence of which gives it a touch of antiquity. The technique for creating such an effect is called “crackle”. Crackle is often used in cases where the surface of an object needs to be artificially aged. This method is often used in the decoupage technique, as well as for the restoration of furniture and various household items.
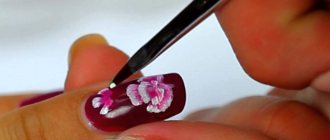
You can achieve an antique effect on the surface using special craquelure varnishes. One-component craquelure varnish is one of the types of varnish that is used for one-step craquelure. In order to age the surface using this product, you will need the following materials: acrylic paint, a foam sponge or brush, as well as the varnish itself, which is available from different manufacturers. Before you start working with craquelure varnishes, be sure to read the instructions. For illustrations, I use the Hobby-Line craquelure tool, manufactured by Kreul, Germany.
The process of working in the craquelure technique using a one-component varnish begins with applying a layer of acrylic paint to the cleaned surface. It should be borne in mind that it is its color that, after all stages of work are completed, will be visible through the resulting cracks. If the goal of the work is to show the unpainted appearance of the surface being treated, then you can immediately begin to coat it with varnish. A one-component carquelure varnish is applied in a fairly thick layer, but only after the paint has dried well. If you're new to this process, it's best to use a foam sponge for this process, as a brush tends to be more comfortable for professionals.
After the varnish dries (the varnish does not stick to the finger, but remains a little sticky), another layer of paint is applied to it, on which cracks appear after a few minutes. The shape and size of the cracks depends on the thickness of the applied varnish. The direction in which the paint is applied also matters. In the photo below, the paint was applied with a brush in one direction.
If you apply paint with a narrow brush in different directions, you will get the following surface:
Paint is applied to the surface using a foam sponge. On the left in the photo - the craquelure varnish is not very dry and sticks to the fingers, and on the right - it has dried out more and the picture on the surface has changed after applying the paint.
The final stage of work is an additional coating of the surface with ordinary acrylic varnish, which will protect it and give the object being processed a finished look. But not every craquelure can be coated with acrylic varnish.
So, let's summarize.
1. The procedure for obtaining craquelure on a surface is as follows: applying paint to the surface - allowing the paint to dry completely - applying craquelure varnish - allowing the varnish to dry to a tack - applying paint.
2.The first and second layers of paint should be contrasting in color so that the cracks clearly appear.
3. We use only matte paint that is applied to the craquelure varnish. Glossy paint and metallic will not give the desired cracking effect.
4. When applying the second coat of paint, do not brush twice over the same area.
5.The size of the cracks on the surface will depend on the thickness of the applied craquelure varnish. The wetter the varnish, the larger the cracks.
If you plan to use one-component craquelure in decoupage, then first apply dark paint, then one-component craquelure, then light paint and a napkin.
When doing reverse decoupage, glue the napkin face down onto the glass surface from the back side.
When the glue has dried well, apply a one-component craquelure varnish, which we also dry until tack-free (it should be sticky, but not stick to your fingers).
Apply light acrylic to the craquelure varnish. The light color will show the design on the napkin. Dry well.
Now we apply acrylic of the color that we want to see through the cracks on the front side of the product.
In this example, brown acrylic shows through the cracks.
One-step craquelure is a convenient and fairly quick way to achieve visual aging; it is perfect for those who are working in this technique for the first time.
Examples of using one-component craquelure varnish.
https://henddecor.com/?p=1241
Let's sum it up
- Craquelure nail polish once made a real splash in the nail industry. With its help you can achieve an amazing “aged” or “animal” image on the nail plate.
- In order for it all to look appropriate, it is important to correctly combine shades. But don't be afraid to experiment! This is welcome.
- The coating process is quite simple and does not require much time. Even a beginner can handle the technique.
- For a long-lasting craquelure manicure, choose proven products. Focus on consumer reviews and don’t be afraid to imagine.
Have you done craquelure on your nails? What do you think of this technology? Share your opinion in the comments!
See you in the next articles!