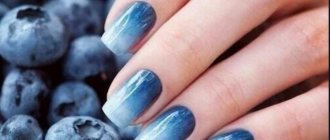
A gradient on nails with gel polish is the use of several colors on a plate and blurred boundaries between them, which looks very natural even with contrasting tones. It can be vertical, horizontal (classic), chaotic, there are “baby boomer” techniques, French, with sparkles, mirror rubbing, velvet sand, geometry.
The design is made with a comb brush, which blurs the boundaries of shades, or with a sponge, air puffing, or sponge. You can do it with an airbrush, but it requires special paint.
What does gradient mean on nails with gel polish?
A gradient on gel polish nails, also called ombre or stretch, is a smooth flow of one tone into another - from light to dark or vice versa. This technique has something in common with French manicure, but the most significant difference is the absence of a clear boundary between shades.
Transitions should be blurry, that's the beauty of design. And the shades of varnish are very different. But they look better when they belong to the same color scheme, for example, burgundy, red, pink.
We recommend reading the article on how to do a French manicure with gel polish. From it you will learn what you need to do a French manicure with gel polish, which gel polish is better and the types of French manicure with gel polish. And here is more information about how gel polish differs from shellac.
How to make a gradient on nails with gel polish, what is needed for this
To make a gradient on your nails with gel polish, you need to:
- perform a hygienic manicure
- use a base, preferably transparent, and if camouflage, then choose the most neutral shade;
- have 2 or more tones of varnish, topcoat, cleanser, lint-free napkins, orange sticks;
- prepare a comb brush or foam sponge, air puffing, sponge, airbrush, paint for the latter;
- the presence of a UV or LED lamp for drying the coating.
Depending on the type of ombre, you may need glitter, stencils, foil, film, and velvet sand.
There are several types of this manicure, but the main ones are:
| Type of manicure | Description | Photo example |
| Vertical | With it, the shades change from the area near the cuticle to the free edge and vice versa. | |
| Horizontal | The shades transform into each other from the right to the left sinus. | |
| Original | The flow of tones is carried out from one nail to another, that is, each of them is painted in its own color. | |
| French | Here, the free edge of the nail must be lighter or darker than the rest of the nail, usually it is white. |
What helps to achieve a smooth transition
A smooth transition of shades is achieved by shading one varnish over another. Both products should not be allowed to dry.
The flow of colors is ensured by using:
- Sponge or sponge made of foam rubber . You can take a dishwasher one, but only a new, unused one, be sure to cut it to reduce its size.
- Special brush - comb . It is quite wide, almost flat, and the hairs at the end are spread out, like the teeth of a comb.
- Aeropuffing . This is something like a brush, but its working part is not lint, but a foam ball.
- Airbrush . This is a compressor manicure device that sprays gel polish using air pressure.
Foam sponge to create a gradient Special brush - comb Aeropuffing Airbrush
After completing the gradient, before drying, you need to let the gel polish “sit” a little on the nail, the bubbles disappear. That is, you should wait a few seconds before sending it to the lamp.
What kind of brush should it be?
The brush called “comb” should be:
- with a fairly long pile;
- soft;
- with equally diverging hairs at the tip.
Similar ones are produced by TNL, Pole, RuNail, Rubloff, Patrisa Nail and others.
In addition to the “comb”, you will need a brush to apply the base shade; you can use the one in the bottle with the product itself. A “hair” is also needed for painting areas near the cuticle and sinuses. Skilled craftsmen use a fan brush instead of a comb. But not everyone will be able to work with it; the fleecy part of this tool is too wide.
Watch the video on how to prepare a gradient brush:
How to choose a sponge
The width and length of the sponge should be larger than the nail plate, quite thick so that it can be comfortably fixed with your fingers. The one designed for washing dishes is suitable. But you should use its soft side, and the hard side can be cut off, at the same time reducing the overall size. The sponge must be porous to hold the gel polish inside. Therefore, sponges that are too smooth are not suitable for applying cosmetics. They will make an even impression, as if with a brush, but shading is needed.
Gradient on nails with gel polish step by step with a comb brush
A gradient on nails with gel polish using a “comb” is done step by step as follows:
- After degreasing the nail plate, a rubber base is applied and must be dried.
- At the base, the nail should be painted with a dark color, in the center with a neon shade, and the free edge should be made completely light.
- Using a comb brush, pull the dark shade through the middle to the tip of the plate.
- The “hair” is painted at the cuticle and dried.
- Next, steps 2-4 are repeated in the same order so that the varnish layer is denser and the stretching is smoother.
- Where there is a clear border of colors, you need to go over the comb brush again to better shade it.
- After drying the second layer of gradient coating, apply topcoat and place your finger in the lamp.
For a more uniform shading of colors, the brush can be dipped into the clinser and slightly squeezed, and then worked along the boundaries of the transition of shades. You should move the instrument with short strokes in the direction of the stretch and at the same time make movements from the right sinus to the left and vice versa. You need to walk along the sides of the nails with a “hair”.
Gradient using a fan brush
A fan brush is used here. The result is not entirely soft, but most people like this simple and instant method:
- The basis for design should be a non-dark gradient color.
- After application , dry using a lamp.
- Mix 2 colors on thermal paper until mixed, paint the center of the nail. Get a neutral zone.
- Cover the edge with dark.
- Take a brush slightly soaked in the cleanser and apply it in different directions, without moving, until you acquire the required option.
- Dry under a lamp.
- Apply the 2nd coat using the same sequence. The main color should be applied directly to the top part so that the gradient does not overlap.
- Dry using a lamp.
Manicure with color transition using baby boomer gel polish
A gel polish manicure with a color transition called “baby boomer” is done like this:
- After drying, a light beige flower garden is applied to oil-free nails coated with primer and base, covering each plate entirely. You will need 2 layers, both need to be dried.
- Apply white varnish to the tip of the foam sponge and blot this layer on the foil. You just need to touch the glossy surface with the product several times.
- Then tap the sponge along the free edges of the nails, almost to the center of the plates. The first layer must be dried and the second must be applied in the same way, and after the next drying, the third. The finger is again sent into the lamp, and the fourth layer is applied with a sponge. After drying, cover the nails with a non-sticky top, leveling them out. This is followed by final polymerization.
How to transition nails with airpuffing
The transition on nails with a gradient manicure using air puffing should be done as follows:
- A darker shade of varnish is applied to the prepared and base coated plate, covering it completely.
- This layer must be dried.
- Place a little dense gel polish or gel paint of a lighter tone on a clean palette.
- It must be collected by air puffing, tapping the product with the soft tip of the tool.
- Then the same is done at the base of the nail so that the border with the darker color is blurred.
- The finger should be placed in the lamp.
- Then a new, smaller portion of light gel polish is placed on the palette, collected by air puffing and applied with a tapping motion as a second layer to the same area of the plate.
- Border shading is done with the clean side of the device.
- The finished design is dried.
- All that remains is to coat the nail with topcoat and place it under the lamp again.
After use, wipe the instrument with a cloth moistened with a cleaner.
Gradient pigments
For the base, use white gel polish or just a base. If pigments are used to create the entire gradient in two shades, and not half of the nail, then a silver layer of varnish or just a base will be enough. The sticky layer does not come off.
- We cover the nail with two layers of colored blue or turquoise varnish.
- Using a flat or round brush, select the pigment and place it on the sticky layer using small strokes and lightly patting movements.
- We move from the zone of maximum color intensity to the transition zone, depending on how you arrange the shades.
- We make the layer of pigment thin but dense.
- If you combine two pigments, then start applying it in the same way from the edge to the middle of the nail. In the middle, where two pigments meet, carefully mix them with a brush, drawing one into the other. We get the pigment and put it where the bald spots form.
- We seal the result with topcoat.
- We process the cuticle.
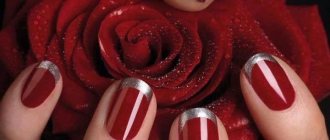
French gradient gel polish
French gradient gel polish is done so that the tips of the nails are highlighted in a lighter or darker tone or several:
- The prepared plates are treated with a dehydrator.
- Then an acid-free primer and a thin layer of base are applied to the nail and dried.
- From the base to a third it is painted over with dark varnish.
- The remaining clean part up to the free edge is covered with a lighter tone.
- Using a comb brush, making small movements across the nail, pull the dark color towards the end, periodically wiping the pile on a napkin.
- This layer needs to be polymerized.
- Then steps 3-5 are repeated, only the border should be shaded more carefully, and the nail should be painted with a thin brush near the cuticle.
- After drying, a top coat is applied and polymerized again.
Watch the video on how to make a French gradient:
What is a gradient in manicure, features in preparing the design and choosing colors
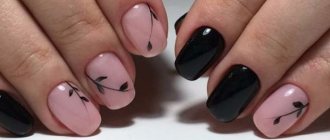
So, when creating a manicure, a gradient of red and pink colors - darker red must be introduced with a brush into pink, smoothly painting over the intermediate zone and creating a third, coral color at the junction.
The most complex combination of shades is the black-red gradient. Masters say that once you master black and red ombre, all other combinations will seem easy to perform. This is due to the fact that black is the dirtiest color in the palette. Even the smallest uneven strokes or an extra drop of black can ruin the entire transition. Especially if you work with a brush.
Nude ombre with mirror rub
The easiest way for beginners is to work with neon gel polishes when drawing a gradient in a manicure. Neon colors blend perfectly on the blending line, and ombre always results in an almost imperceptible transition.
- For the base it is recommended to use white varnish. This is more true if you use loose, soft shades for the gradient. White makes light and pastel colors brighter and more expressive.
- The second option is to use the lightest shade of varnish from those selected for the composition for the base. If the colors are well pigmented, you can work without a base coat, applying the shades directly to the varnish base.
It is recommended to apply two or more layers of gradient, be it varnish or paint. Beginners can use self-leveling gel polish to get a perfectly even coating even at the stage of mastering the technique.
Gradient brush with glitter
A gradient with a brush can be made not only with different colors of gel polish, but also by highlighting areas of the nails with decor, for example, sparkles:
- A flower bed is applied to the dried base, covering the entire nail.
- After polymerization, a portion of glitter with a transparent base is placed on the tip.
- Using a brush, they are stretched towards the center of the nail so that the transition is smooth.
- The coating must be dried again.
- Finally, a top coat is applied, which is also polymerized in a lamp.
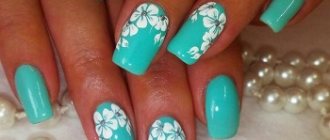
Nail design options with glitter
A manicure with glitter can be very different, because human imagination is limitless! Bright festive, stylish minimalist, black, red, white, pink manicure with sparkles - any options that you like will become a brilliant addition to your look.
Glitter on one nail
Glitter can be used to create a bright accent on one or two nails, while the rest of the nails will only be covered in a single color. Highlighting the ring finger is an undeniable timeless trend; combine it with popular decor and you will become the owner of a fashionable and stunning nail design!
Glitter Gradient
Another popular technique in nail design is ombre or gradient. Apply different amounts of glitter to the top and bottom of the nail, you will see how your manicure will transform and add a festive touch to your look.
Glitter on short nails
This glitter nail decoration looks equally good on both long and short nails. You can cover one or several nails with glitter, partially or completely, use a base of different colors, endlessly experiment with the size of the decor and patterns... Here are some examples of designs with glitter on short nails.
Gradient on nails with gel polish sponge and rubbing
A gradient on nails with gel polish using a sponge using rubbing is no more difficult than just using different colors:
- The nails are covered with a base and placed in a lamp.
- The next step is the flower bed, it is applied to the entire plate with a regular brush, in one layer.
- After drying, cover with a top coat without a sticky layer and polymerize.
- Using a sponge, scoop up a rub of one color and drive it in at the base of the nails to about a quarter of the length.
- Take turns using the same product in two more shades, apply to the middle of the plates and in the penultimate quarter.
- Excess rubbing is brushed off with a flat brush.
- All nails are decorated in the same way, and part of the free edge is covered with the brightest gold powder.
- All that remains is to shake off the excess, cover your nails with 2 layers of topcoat, and dry both.
You can use one color rub or a transparent silver one. But then the gradient is made with several shades of gel polishes, dried, covered with topcoat, polymerized, and mirror powder is rubbed onto all nails. The final layer is applied with a finish, which is also dried in a lamp.
You should always use a very small amount of rub, as the excess will come off the nails. If the product gets on the skin, remove it with a cloth moistened with a degreaser.
Watch the video on how to make a gradient using a sponge and rubbing:
Types of gradient manicure
A gradient is a nail design that uses several shades of polish that smoothly flow from one to another. It looks impressive on paper, but even more impressive on nails.
Types of coating using gradient technique
There are several types of gradient manicure.
Their choice largely depends on the shape of the nails and their length:
- Vertical is a traditional gradient option. It can be called universal, as it suits all nails. With a vertical manicure, the transition of shades occurs from the root part of the nail to the tip. A video tutorial on gradient gel polish on short nails can be seen below.
- Horizontal. The color changes from the left side of the nail to the right. More suitable for medium-length nails. This manicure can visually lengthen your nails.
- French. White is applied to the edges of the nails and made more transparent closer to the roots. This type of manicure is suitable exclusively for girls with graceful fingers and long and thin nails.
- Gradient with transition. Fingernails are painted with different gel polishes, close to each other in tone. This creates an overall picture of the transition from dark colors to lighter ones. This option is the simplest and is suitable for short nails.
- Linear. Thin lines, straight or curved, are drawn on the nails. Each new line is made a tone darker than the previous one.
Vertical gradient
For a gradient, both tones of the same color and completely different colors are used. Usually they take from 2 to 4 colors.
A manicure with a color transition can be done with regular varnishes, but everything will have to be done very quickly, before the varnish has time to dry. It is much more convenient to create a gradient on your nails with gel polish. This material does not dry in the air, and besides, such a manicure will last much longer than a traditional one.
Horizontal Gradient
Gradient on short nails with gel polish: which one should not be done
Gradient gel polish on short nails will look natural if:
- use no more than 2 colors;
- give preference to shades of the same range (white with pink, beige, latte or blue-blue, red-burgundy);
- make the base of the nail darker and lighten it towards the free edge;
- abandon the abundance of geometric lines and large ornaments.
All other ombre options, except the last one, are not only acceptable, but also ideal, helping to visually stretch out the plates and make them more graceful.
Application technique
There are interesting methods with which you can make a smooth color transition. You can choose some of them for yourself and use them successfully.
The Ombre effect can be achieved as follows:
- Using a sponge.
- Using a flat brush.
- With a fan brush.
- Using pigment.
It should be remembered that before applying a gradient with gel polish, you need to lubricate the skin of your hands with a moisturizer to make it easier to remove any droplets that accidentally fall on the skin. But do not overdo it, as oily cream that gets on the nail can cause the polish to chip.
Shading on nails with gel polish and sand
Shading on nails with gel polish and sand is called a sugar gradient and is done like this:
- A classic ombre is applied to the dried base. It can be a vertical or horizontal gradient, of two or three shades.
- The gel polish is dried in a lamp. Then the same tones are applied in a second layer, shaded and polymerized again.
- Now you need to cover your nails with topcoat and do not dry it. Sprinkle transparent powder or tint powder on top with a spatula, or you can use sand of several colors on different parts of the nail.
- You need to lower your finger down and tap so that the excess product falls off. Drying is needed again.
- Then they go over the nail with a trusty brush to remove the remaining unnecessary sand. The final stage is applying the top and polymerization.
Velvet sand cannot be used on the entire nail. Sometimes it is enough to highlight one or several stripes for them, near the sinus, in the center, along the cuticle, in a word, as your imagination dictates.
Watch the video for step-by-step instructions on how to apply a horizontal gradient with a sponge:
Using a sponge for smooth flow
Great option for a gradient. This method is often used at home, since it does not require the purchase of additional materials, and a small piece of sponge can be found in any home.
Let's look at how to make a manicure with a smooth gradient at home step by step.
Method 1
Apply the base color of gel polish to the prepared nail plate, dry it in a UV lamp and achieve the required coating density.- Take a small piece of sponge and blot the desired shade.
- Using light patting movements, apply a contrasting color to the nail.
- We wipe off any varnish that gets on the skin and dry it in a lamp.
- We repeat the procedure to obtain a smooth transition.
- We consolidate the resulting result.
Method 2
- Apply a base coat to the treated nail.
- We place drops of the selected colors on a special surface, without completely mixing them.
- Lightly blot the sponge.
- Apply a colored layer of varnish with light movements, make sure that no air bubbles form on the surface of the nail, and dry it in a lamp.
- We repeat the procedure until the desired effect is obtained.
- We fix it with a top coat.
A smooth transition can be depicted in horizontal, vertical and even diagonal projection. These methods can combine 3 to 4 colors, it all depends on your desires and, of course, the length of the nail plate.
Gradient on nails with gel polish with white geometry
Gradient gel polish on nails with white geometric lines requires more effort than traditional ombre, although many of the steps are repeated:
- First, apply the base and dry it in a lamp.
- Then paint the nails with the main shade in 2 layers and polymerize.
- You need to go over the surface of the plates with a buff to remove the glossiness.
- Protective strips are applied to the nails where the base color needs to be left.
- White paint is sprayed onto the remaining open areas using an airbrush, maybe not evenly, but more on the free edge, less at the base.
- The protective strips need to be removed, and the ends of the nails should be lightly processed with a file to remove excess light pigment.
- Then, with a thin brush, white lines are drawn with gel paint along or across the plate, possibly diagonally, and polymerized.
- All that remains is to apply the finishing coat and dry it too.
To complete this design, you can do without an airbrush and make transitions with a thin brush using white over a darker base tone.
Gradient flat or comb brush with gel polish
- Cover the nails with a base layer of gel polish. It can be a white or pink shade, as it is lighter in the chosen combination of pink and blue.
- On the base layer we apply the shades selected for the gradient - pink in the upper part and blue in the lower part. Varnishes can be applied at the joint or left a small gap if they are dark, contrasting tones, so as not to smear the brush.
- Wet the brush in a cleanser to achieve the effect of light moisture. Then it is convenient to wipe it on a cotton pad, also soaked in cleanser. Some craftsmen use wet baby wipes for their work. The brush is initially blotted with a napkin, and then all remaining varnish is also removed from the brush with a damp napkin while working.
- Holding the brush almost parallel to the nail, we begin to “pull” the pink color down from the cuticle with light touches, moving from side to side. It is important to immediately outline to what area you will “pull” the top color, and more intensively remove the color from the brush in the final transition zone.
- We do a light ombre in two or three layers. We dry each one in a lamp.
- We start the new layer by applying shades along the old transition lines, then tighten it again with a brush.
- It is important to constantly remove excess varnish from the brush. In the area of the free edge, the layer should be thin and neat.
- We seal the resulting layers with an ombre top coat and dry them in a lamp.
- Remove the sticky layer, remove the protection from the cuticle and treat it with oil.
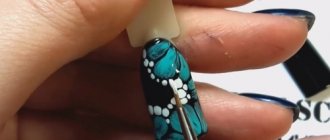
Gradient gel polish using a sponge and stencil
A gradient of gel polish using a sponge and a stencil turns out to be very catchy, so you can design one or two nails on each hand like this:
- The plate is covered with base and dried. The surfaces of the nails on which the stencil needs to be glued are treated with a buff.
- Use a napkin to remove sawdust. The stencil is separated from the base with tweezers and attached to the nail. You need to smooth it out, fix it well and use scissors to cut off the parts that are outside the plate.
- Strips of gel polish are applied to the palette in the order in which they want to be seen on the nail, layering one color on top of another and blending the transitions. There can be 2-3 shades.
- A sponge is applied to this multi-colored print. And then it is leaned against the surface of the nail with a stencil so that the open areas are painted.
- Now you can peel off the protective film by carefully picking up the edges with tweezers and pulling in the direction of the design. The finger must be placed in the lamp.
- A top coat is applied over the dried gel polish. It is also polymerized.
A striped gradient is also made using stencils:
- The strips are glued onto a dried camouflage base across the plate.
- The remaining open space is painted with white gel paint on a third of the nail.
- Each mini-strip is shaded with a sponge closer to the middle of the plate.
- Dry and repeat steps 2 and 3 a couple more times.
- After the next polymerization, the strips are removed, the nail is covered with a top coat without a sticky layer, and dried.
- New stencil devices are glued again across the plate, but this time covering the gradient.
- Gel paint in 3 layers is applied to the open stripes, only on the other side of the nail and almost up to half of it.
- Each time it is shaded with a sponge and polymerized without removing the stencil.
- After drying the 3rd layer of white gel paint, the strips are peeled off.
- The last step is to apply topcoat and dry.
Watch the video on how to make a gradient with gel polish using a sponge and stencil:
Gradient manicure using pigments
Execution algorithm:
- Cover with a base layer and dry under a lamp.
- Using a petal brush, cover the pigment from the cuticle, stretching it towards the color mixing area. Do not press too hard with the brush so as not to pull off the sticky part. At the same time, achieve a thick range at the base and matte in the center.
- Clean the brush and do the same with the next layer, choosing the 2nd pigment color. You need to start from the tip, moving towards the center. The layer should be thin, but thick.
- Apply top coat and dry.
Geometric gradient gel polish at home
The following geometric gradient using gel polish at home is quite simple to do, despite the apparent complexity of the design:
- A little white varnish and colored varnish are laid out on the palette.
- A drop of the latter is mixed into the light gel using a “hair” brush.
- Using this mixture, draw 3 triangles in a row, the vertices of which should be at the beginning of the free edge of the nail.
- The coating is dried, and a little more color is added to the gel polish mixture.
- Use it to draw the next row of triangles, placing them lower and in a checkerboard pattern.
- After drying, steps 4 and 5 are repeated until the entire nail to the base is painted.
- The bottom row of triangles is made with dark varnish without adding white.
- After its polymerization, everything is covered with a matte topcoat and dried.
This design is done on 1-2 plates or on all fingers.
Geometry in combination with ombre can be in the form of waves, straight or irregular lines, and shapes. The main thing you need to do when creating a design this way:
- mix gel polishes with white on a palette or foil;
- work with a thin brush;
- dry each drawn detail.
Acrylic powder for ombre nail design
Another win-win option on how to make a gradient on your nails at home. To do this, you can use special acrylic powder. The technique is as follows:
- Cover the plate with the selected colored varnish and dry it in a lamp.
- Apply a top coat; no need to put it in a lamp.
- Pick up acrylic powder with a brush and begin to slowly apply it to the base of the nail.
- Having reached the middle, lift the brush up to reduce the area of paint scattering. Periodically, you need to shake off excess powder from the nail into a jar so that the applied layer is even.
- Do the same with the selected second color for the rest of the nail.
- Send it to the lamp. Lightly sand the coating with a soft buff.
- Wipe off the dust from your nails again and apply top coat.
This is how you can quickly and easily create a manicure with a color transition using acrylic powder.
And this is what a matte nail gradient in gray and white looks like:
Knowing all the nuances of how to make a gradient gel polish at home using a fan brush, dish sponge, pigments, acrylic powder, you will be able to create interesting, stylish and unique nail looks. Feel free to use our photo ideas to create your own unique style.
Source of the article: https://www.5nail.ru/dizain/gradient-na-nogtyah.html
"Ink" gradient
The shading does not have to be symmetrical; chaotic also looks interesting, and it can be done in any tones:
- A drop of gel polish in two colors (for example, black and blue), as well as a top coat, is applied to the palette.
- The nails are prepared and the base applied to them is dried.
- At the base of the plate a top coat is applied in a stripe, the middle part is coated with blue varnish, and the free edge is coated with black.
- On the undried top coat, make streaks with both colors using a flat brush.
- It is used to smear the border between shades, after which the nail is dried.
- Then additional black and blue stains are applied with a hair on the transparent part.
- The free edge is drawn more clearly in the darkest tone.
- All that remains is to dry it, cover it with top coat, and polymerize it again.
Liquid varnishes are perfect for this manicure. But they need to work quickly. And the areas near the cuticle and sinuses should be painted with a thin brush after the first drying.
Watch the video on how to make an ink gradient:
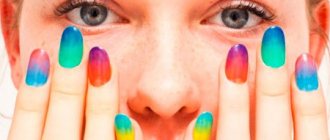
Original gradient
The original ombre design involves painting each nail a different color, but all shades must belong to the same range. For example, tones from soft pink to muted red or from light green to sea green are used. This design looks more organic on young girls. And it is better to use pastel shades.
We recommend reading the article on how to do a manicure with red gel polish. From it you will learn about manicure design options for short and long nails and application techniques. And here is more information about how to remove shellac at home.
Gradient is the richest design option, and many of them are easy to implement. And at the end you can get a unique manicure, calm or flashy - whatever you want. After all, the technique of applying varnishes gives you the chance to use colors that differ by a couple of tones, and contrasting ones.